Note
Access to this page requires authorization. You can try signing in or changing directories.
Access to this page requires authorization. You can try changing directories.
Note
Community interest groups have now moved from Yammer to Microsoft Viva Engage. To join a Viva Engage community and take part in the latest discussions, fill out the Request access to Finance and Operations Viva Engage Community form and choose the community you want to join.
This article describes how to set up and use inventory journal approval workflows for various types of physical inventory transactions, such as issues and receipts, inventory movements, bills of materials (BOMs), and the reconciliation of physical inventory. Inventory journal workflows help ensure that only approved inventory journals can be posted to transactions.
Note
Inventory journal approval workflows apply only to transactions recorded using the Inventory Management module. They don't work with inventory journals triggered from the Warehouse Management module.
Create your inventory journal approval workflows
To set up this feature, create a workflow for each inventory journal type you want to control. Because different inventory journal types can have different approval hierarchies and workflow steps, you can configure individual workflows for each inventory journal type.
Workflows support version control, and each has a workflow ID and an active version. You can choose to activate each new workflow version immediately upon creation or keep it inactive. If you need different workflows for the same journal type, create multiple workflows for that journal type, and then assign each of these workflows to a different journal name that uses that type.
To create your inventory journal approval workflows:
Go to Inventory Management > Setup > Inventory management workflows.
Select New on the Action Pane.
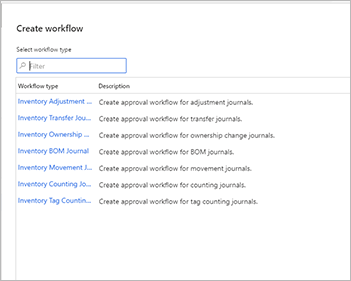
Choose the inventory journal type for which you want to set up a workflow:
- Inventory tag counting journal
- Inventory ownership change journal
- Inventory movement journal
- Inventory transfer journal
- Inventory counting journal
- Inventory BOM journal
- Inventory adjustment journal
The workflow editor app launches on your machine. (You might be asked to approve this action.) Use it to design your workflow as needed. For details about how to use the workflow editor, see Workflow system overview.
After saving and closing the workflow editor app, choose whether to activate this workflow version or keep it inactive.
Note
Workflows provide version control, which means that you can view a list of versions you created and choose which one is active. To view the list of available versions and choose which to activate, select a workflow listed on the Inventory management workflows page. On the Action Pane, open the Workflow tab, and select Versions. Only one version can be active at a time for each workflow ID.
Assign approval workflows to inventory journal names
Next, assign an inventory journal workflow to each inventory journal name. For each inventory journal type, you can set up multiple inventory journal names.
To associate an inventory journal workflow with an inventory journal name:
Go to Inventory management > Setup > Journal names > Inventory.
Select a journal name from the list column to open its settings page.
On the General FastTab, set Approval workflow to Yes. If you're prompted to approve the action, select Yes.
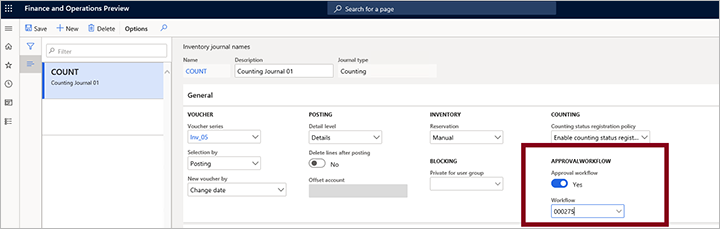
Open the Workflow drop-down list and select the appropriate workflow. The list shows each active workflow that you created by using the workflow editor app.
Create an inventory journal and send it for approval
After you associate an inventory journal name with its matching inventory journal approval workflow, you can create new inventory journals that use that name and then send these journals for approval by using that workflow. You can't post the inventory journal until the approvers configured in the workflow approve it.
On the navigation pane, expand Inventory management > Journal entries > Items and then select an inventory journal type.
Select New to create a new journal of your selected type.
The Create inventory journal dialog box opens. Fill out the form as needed and then select OK to save the journal.
Complete the journal as required.
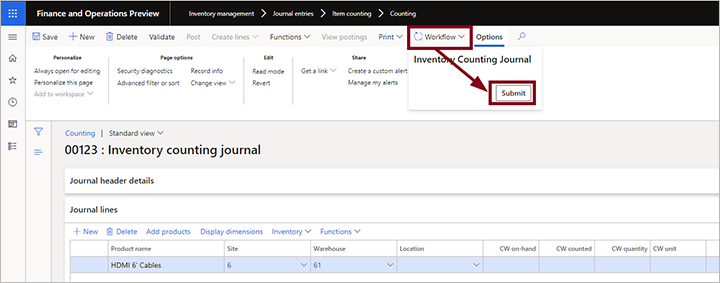
When you create or open an inventory journal with an approval workflow associated with it, the Workflow button is active in the Action Pane. When you're ready to submit the journal for approval, select the Workflow button to open a drop-down dialog box and then select Submit. The approval request routes to the relevant approver, who is alerted by using the notification method configured for the workflow.
To recall an approval request, open the relevant journal, select the Workflow button, and then select Recall. This action resets the workflow.
When your journal is approved, you can post it. To post the journal, select Post from the Action Pane. If the Post button isn't active, the journal isn't approved yet.
Respond to an inventory journal approval request
If you're an approver, you receive a message each time your approval is needed (as configured in the relevant workflow). Then, you can approve or reject a journal approval request by following these steps:
- On the navigation pane, expand Inventory management > Journal entries > Items and then select an inventory journal type.
- Open the relevant journal and review it.
- Select the Workflow button on the Action Pane to open a drop-down dialog box. Select one of the following options:
- Approve - To approve the request.
- Reject - To reject the request.
- More > Request change - To send a message to the requester asking them to change something specific and then resubmit.
- More > Delegate - To delegate the approval to another user.
- More > Recall - To recall the approval request (resets the workflow).
- More > Workflow history - To view the history of this approval workflow so far.
Review the approval history
As with other types of workflows, you can use the Workflow history page to view the approval workflow history for any journal.
To review the workflow history for a journal:
- On the navigation pane, expand Inventory management > Journal entries > Items and then select an inventory journal type.
- Open the relevant journal.
- Select the Workflow button on the Action Pane to open a drop-down dialog box. Select Workflow history. For more information, see View workflow history.