Quickstart: Sign in users and call the Microsoft Graph API from a Node.js web app
This quickstart uses a sample Node.js web app to show you how to sign in users by using the authorization code flow and call the Microsoft Graph API. The sample uses MSAL Node to handle authentication.
Prerequisites
- An Azure subscription. Create an Azure subscription for free.
- Node.js
- Visual Studio Code or another code editor
Register the application and record identifiers
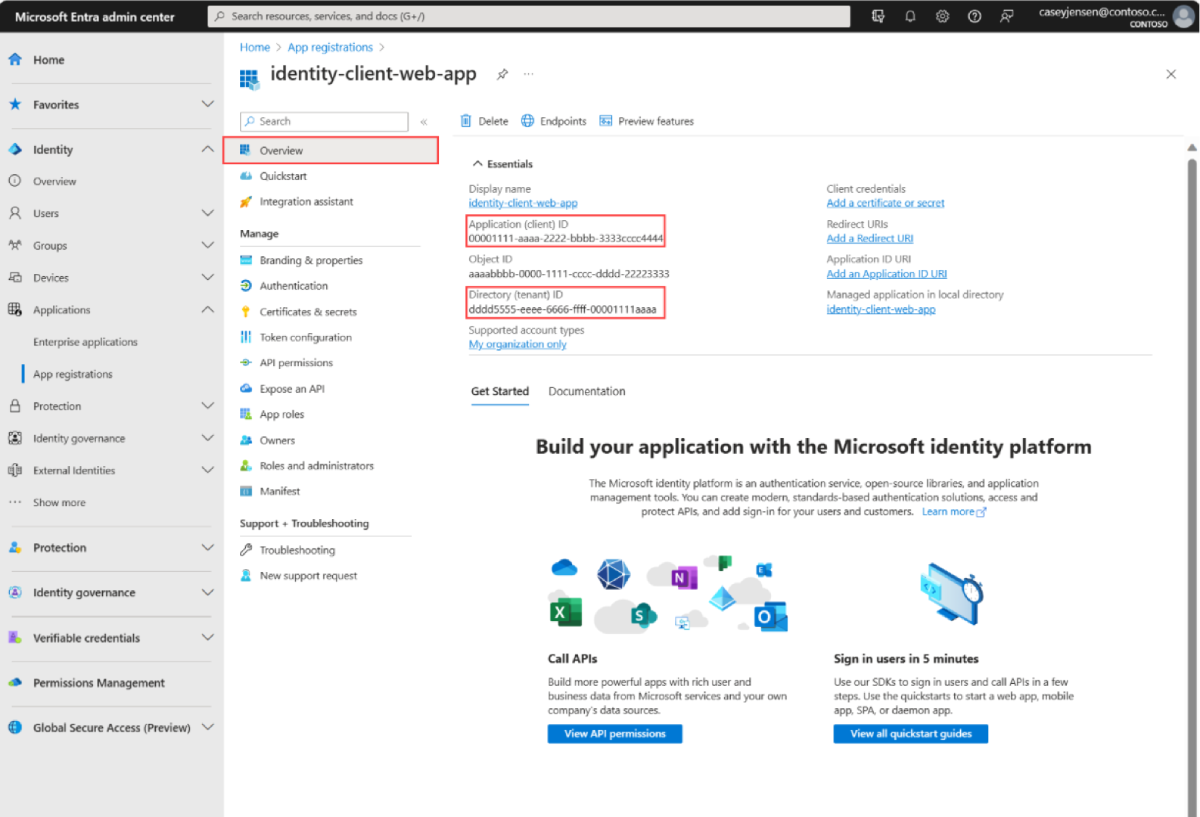
To complete registration, provide the application a name and specify the supported account types. Once registered, the application Overview pane displays the identifiers needed in the application source code.
Sign in to the Microsoft Entra admin center.
If you have access to multiple tenants, use the Settings icon
 in the top menu to switch to the tenant in which you want to register the application from the Directories + subscriptions menu.
Browse to Identity > Applications > App registrations, select New registration.
Enter a Name for the application, such as identity-client-web-app.
For Supported account types, select Accounts in this organizational directory only. For information on different account types, select the Help me choose option.
Select Register.

The application's Overview pane is displayed when registration is complete. Record the Directory (tenant) ID and the Application (client) ID to be used in your application source code.
Note
The Supported account types can be changed by referring to Modify the accounts supported by an application.


Add a platform redirect URI and create a client secret
To specify your app type to your app registration, follow these steps:
- Under Manage, select Authentication.
- On the Platform configurations page, select Add a platform, and then select Web option.
- For the Redirect URIs enter
http://localhost:3000/auth/redirect. - Under Front-channel logout URL, enter
https://localhost:5001/signout-callback-oidcfor signing out. - Select Configure to save your changes.
- Under Manage, select Certificates & secrets > Client secrets > New client secret. Choose a description, and then select Add.
- Note the value of Client secret for later use. This value is only displayed once.
Clone or download the sample application
To obtain the sample application, you can either clone it from GitHub or download it as a .zip file.
To clone the sample, open a command prompt and navigate to where you wish to create the project, and enter the following command:
git clone https://github.com/Azure-Samples/ms-identity-node.gitDownload the .zip file. Extract it to a file path where the length of the name is fewer than 260 characters.
Configure the project
Extract the project, open the ms-identity-node-main folder, and then open the .env file under the App folder. Replace the values above as follows:
| Variable | Description | Example(s) |
|---|---|---|
Enter_the_Cloud_Instance_Id_Here |
The Azure cloud instance in which your application is registered | https://login.microsoftonline.com/ (include the trailing forward-slash) |
Enter_the_Tenant_Info_here |
Tenant ID or Primary domain | contoso.microsoft.com or aaaabbbb-0000-cccc-1111-dddd2222eeee |
Enter_the_Application_Id_Here |
Client ID of the application you registered | 00001111-aaaa-2222-bbbb-3333cccc4444 |
Enter_the_Client_Secret_Here |
Client secret of the application you registered | A1b-C2d_E3f.H4i,J5k?L6m!N7o-P8q_R9s.T0u |
Enter_the_Graph_Endpoint_Here |
The Microsoft Graph API cloud instance that your app will call | https://graph.microsoft.com/ (include the trailing forward-slash) |
Enter_the_Express_Session_Secret_Here |
A random string of characters used to sign the Express session cookie | A1b-C2d_E3f.H4... |
Your file should look similar to below:
CLOUD_INSTANCE=https://login.microsoftonline.com/
TENANT_ID=aaaabbbb-0000-cccc-1111-dddd2222eeee
CLIENT_ID=00001111-aaaa-2222-bbbb-3333cccc4444
CLIENT_SECRET=A1b-C2d_E3f.H4...

REDIRECT_URI=http://localhost:3000/auth/redirect
POST_LOGOUT_REDIRECT_URI=http://localhost:3000

GRAPH_API_ENDPOINT=https://graph.microsoft.com/

EXPRESS_SESSION_SECRET=6DP6v09eLiW7f1E65B8k
Run the application and sign in
Run the project by using Node.js.
To start the server, run the following commands from within the project directory:
cd App
npm install
npm start
Go to
http://localhost:3000/.Select Sign in to start the sign-in process.
The first time you sign in, you're prompted to provide your consent to allow the application to sign you in and access your profile. After you're signed in successfully, you'll be redirected back to the application home page.
More information
How the sample works
The sample hosts a web server on localhost, port 3000. When a web browser accesses this address, the app renders the home page. Once the user selects Sign in, the app redirects the browser to Microsoft Entra sign-in screen, via the URL generated by the MSAL Node library. After user consents, the browser redirects the user back to the application home page, along with an ID and access token.
MSAL Node
The MSAL Node library signs in users and requests the tokens that are used to access an API that's protected by Microsoft identity platform. You can download the latest version by using the Node.js Package Manager (npm):
npm install @azure/msal-node
Next step
Learn more by building an ASP.NET Core web app that signs in users in the following multi-part tutorial series: