Note
Access to this page requires authorization. You can try signing in or changing directories.
Access to this page requires authorization. You can try changing directories.
Entities, items, and blocks in Minecraft are all defined with models that have textures and animations applied to them. When a player picks up an item, though, how can you make both the item and the player models change so the game can correctly render something being held or worn? By using attachables.
Basically, an attachable is a new model, with the features you'd expect from entity models—a unique identifier, materials, textures, geometries, and animations—with instructions on how to render a new combined model that shows the player equipped with the item. There are two approaches:
- Binding the attachable model to an item slot of the holder's model. This is the method Minecraft uses for Vanilla attachable items, and is usually the preferred way.
- Copying the bones from the holder's model to the attachable model's geometry and attaching it directly to a target bone. This approach lacks flexibility—the attachable item can only fit with one entity as a holder, and only in one way—but it may be simpler.
Prerequisites
Before working on attachables, you should be familiar with these concepts:
Defining attachables
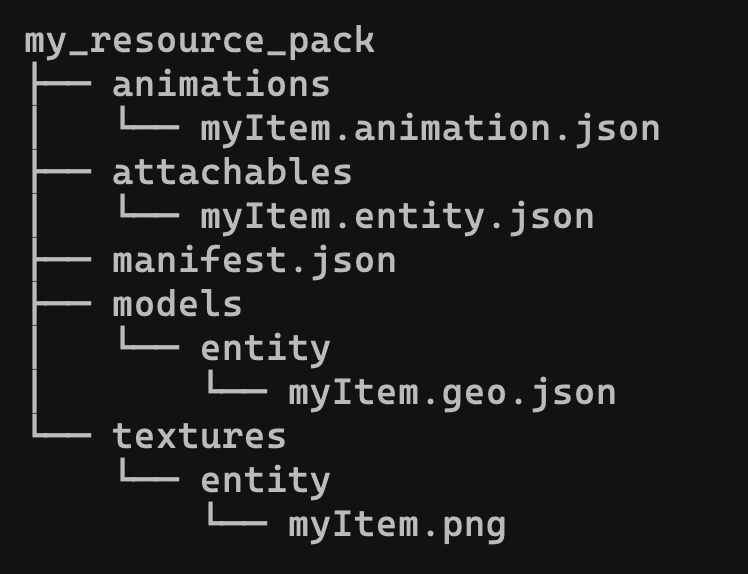
Attachables are defined in a manner you're likely familiar with by now: JSON files in your resource pack, specifically in the attachables/ folder, which goes at the same level as the animations, textures, and models folders.
For the examples throughout this tutorial, we're going to use the Custom Items folder in the Minecraft Samples repo, which is used in the Add Custom Items tutorial. Here's the attachment JSON file for the wrench from that tutorial:
{
  "format_version": "1.20.30",
  "minecraft:attachable": {
    "description": {
      "identifier": "demo:wrench",
      "item": { "demo:wrench": "query.is_owner_identifier_any('minecraft:player')" },
      "materials": {
        "default": "entity",
        "enchanted": "entity_alphatest_glint"
      },
      "textures": {
        "default": "textures/items/wrench",
        "enchanted": "textures/misc/enchanted_item_glint"
      },
      "geometry": {
        "default": "geometry.wrench"
      },
      "animations": {
        "hold_first_person": "animation.steve_head.hold_first_person",
        "hold_third_person": "animation.steve_head.hold_third_person"
      },
      "scripts": {
        "animate": [
          {
            "hold_first_person": "context.is_first_person == 1.0"
          },
          {
            "hold_third_person": "context.is_first_person == 0.0"
          }
        ]
      },
      "render_controllers": ["controller.render.item_default"]
    }
  }
}
- The
identifiertoward the file's beginning specifies the item that's going to be attached, in this case, thedemo:wrench. It must match an identifier for an existing item in the game or your resource pack. - The
materials,textures, andgeometrysections are used in the same way they are for entity visuals. The keys specify names (almost always including adefault) of materials, textures, or geometries, and either specify the paths to the texture and geometry files or a material to map to the name. - Similarly, the
animationsandscripts/animatekeys work like they do for entity animations. - Note that in addition to
default,enchantedis specified for materials and textures to use when the item has been enchanted.
Now, let's see how to use an attachable!
Attaching by model binding
Let's look at the geometry file for the wrench model above (wrench.geo.json).
{
  "format_version": "1.16.0",
  "minecraft:geometry": [
    {
      "description": {
        "identifier": "geometry.wrench",
        "texture_width": 32,
        "texture_height": 32,
        "visible_bounds_width": 3,
        "visible_bounds_height": 4,
        "visible_bounds_offset": [0, 1, 0]
      },
      "bones": [
        {
          "name": "bb_main",
          "pivot": [0.1, 19, -6],
          "rotation": [125, 0, 0],
          "binding": "q.item_slot_to_bone_name(context.item_slot)",
          "cubes": [
            {"origin": [-0.9, 9, -8], "size": [2, 16, 3], "uv": [0, 13]},
            {"origin": [-0.9, 25, -11], "size": [2, 4, 9], "uv": [0, 0]},
            {"origin": [-0.9, 29, -5], "size": [2, 2, 3], "uv": [13, 0]},
            {"origin": [-0.9, 29, -11], "size": [2, 1, 3], "uv": [10, 13]},
            {"origin": [-0.9, 30, -10], "size": [2, 1, 2], "uv": [10, 17]},
            {"origin": [-0.9, 31, -5], "size": [2, 1, 3], "uv": [13, 5]},
            {"origin": [-0.9, 32, -5], "size": [2, 1, 2], "uv": [0, 6]},
            {"origin": [-0.9, 31, -9], "size": [2, 1, 1], "uv": [17, 19]},
            {"origin": [-0.9, 33, -5], "size": [2, 1, 1], "uv": [16, 17]},
            {"origin": [-0.9, 24, -5], "size": [2, 1, 2], "uv": [0, 3]},
            {"origin": [-0.9, 24, -10], "size": [2, 1, 2], "uv": [0, 0]},
            {"origin": [-0.9, 23, -5], "size": [2, 1, 1], "uv": [17, 13]},
            {"origin": [-0.9, 23, -9], "size": [2, 1, 1], "uv": [7, 13]}
          ]
        }
      ]
    }
  ]
}
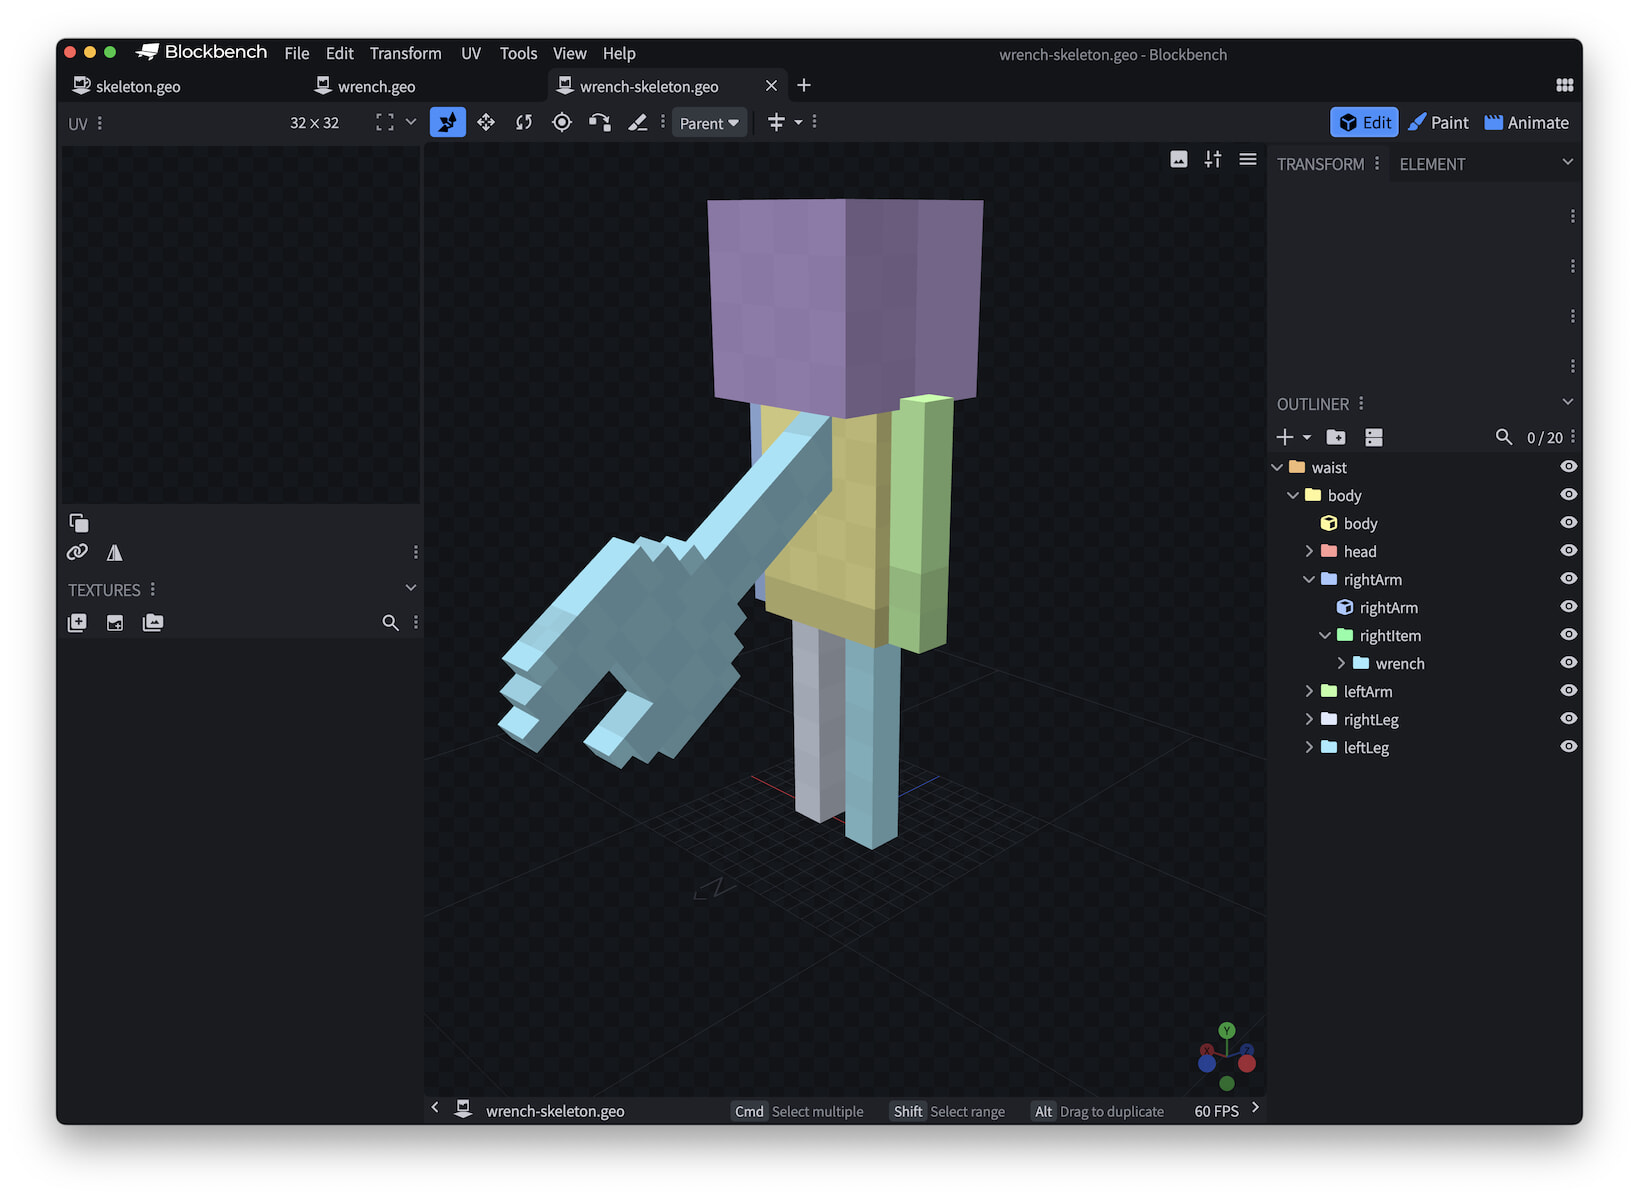
The most interesting key for attachable purposes is binding: its value specifies where the wrench will be attached when it's picked up. Here's a section of the geometry definition for the skeleton:
"geometry.skeleton": {
  "bones": [
    {
      "cubes": [
        // other body parts ...
        {
          "name": "rightArm",
          "pivot": [ -5.0, 22.0, 0.0 ],
          "cubes": [
            {
              "origin": [ -6.0, 12.0, -1.0 ],
              "size": [ 2, 12, 2 ],
              "uv": [ 40, 16 ]
            }
          ],
          "parent": "body"
        },
        {
          "name": "rightItem",
          "pivot": [ -6, 15, 1 ],
          "neverRender": true,
          "parent": "rightArm"
        },
      ]
    }
  ]
}
The parent key defines where bones attach and pivot: the rightArm connects to the body, and the rightItem connects to the rightArm. The rightItem is a place for an attachable to attach to.
The binding for the wrench would work with the value "rightItem", but that would limit it to only being wielded in the right hand. Instead, we use the Molang query item_slot_to_bone_name, which returns the name of the bone an item slot is mapped to. In this case (assuming our skeleton is right-handed), the item slot main_hand would map to rightItem, and the item slot off_hand would map to leftItem.
Using Blockbench for bindings
Blockbench allows you to edit bindings without editing the JSON for a model directly. With your model open (you can open the wrench.geo.json file directly in Blockbench), right-click on the top level folder in the Outliner. (In the wrench model, this folder is named bb_main.) Select Edit Binding...* from the context menu.
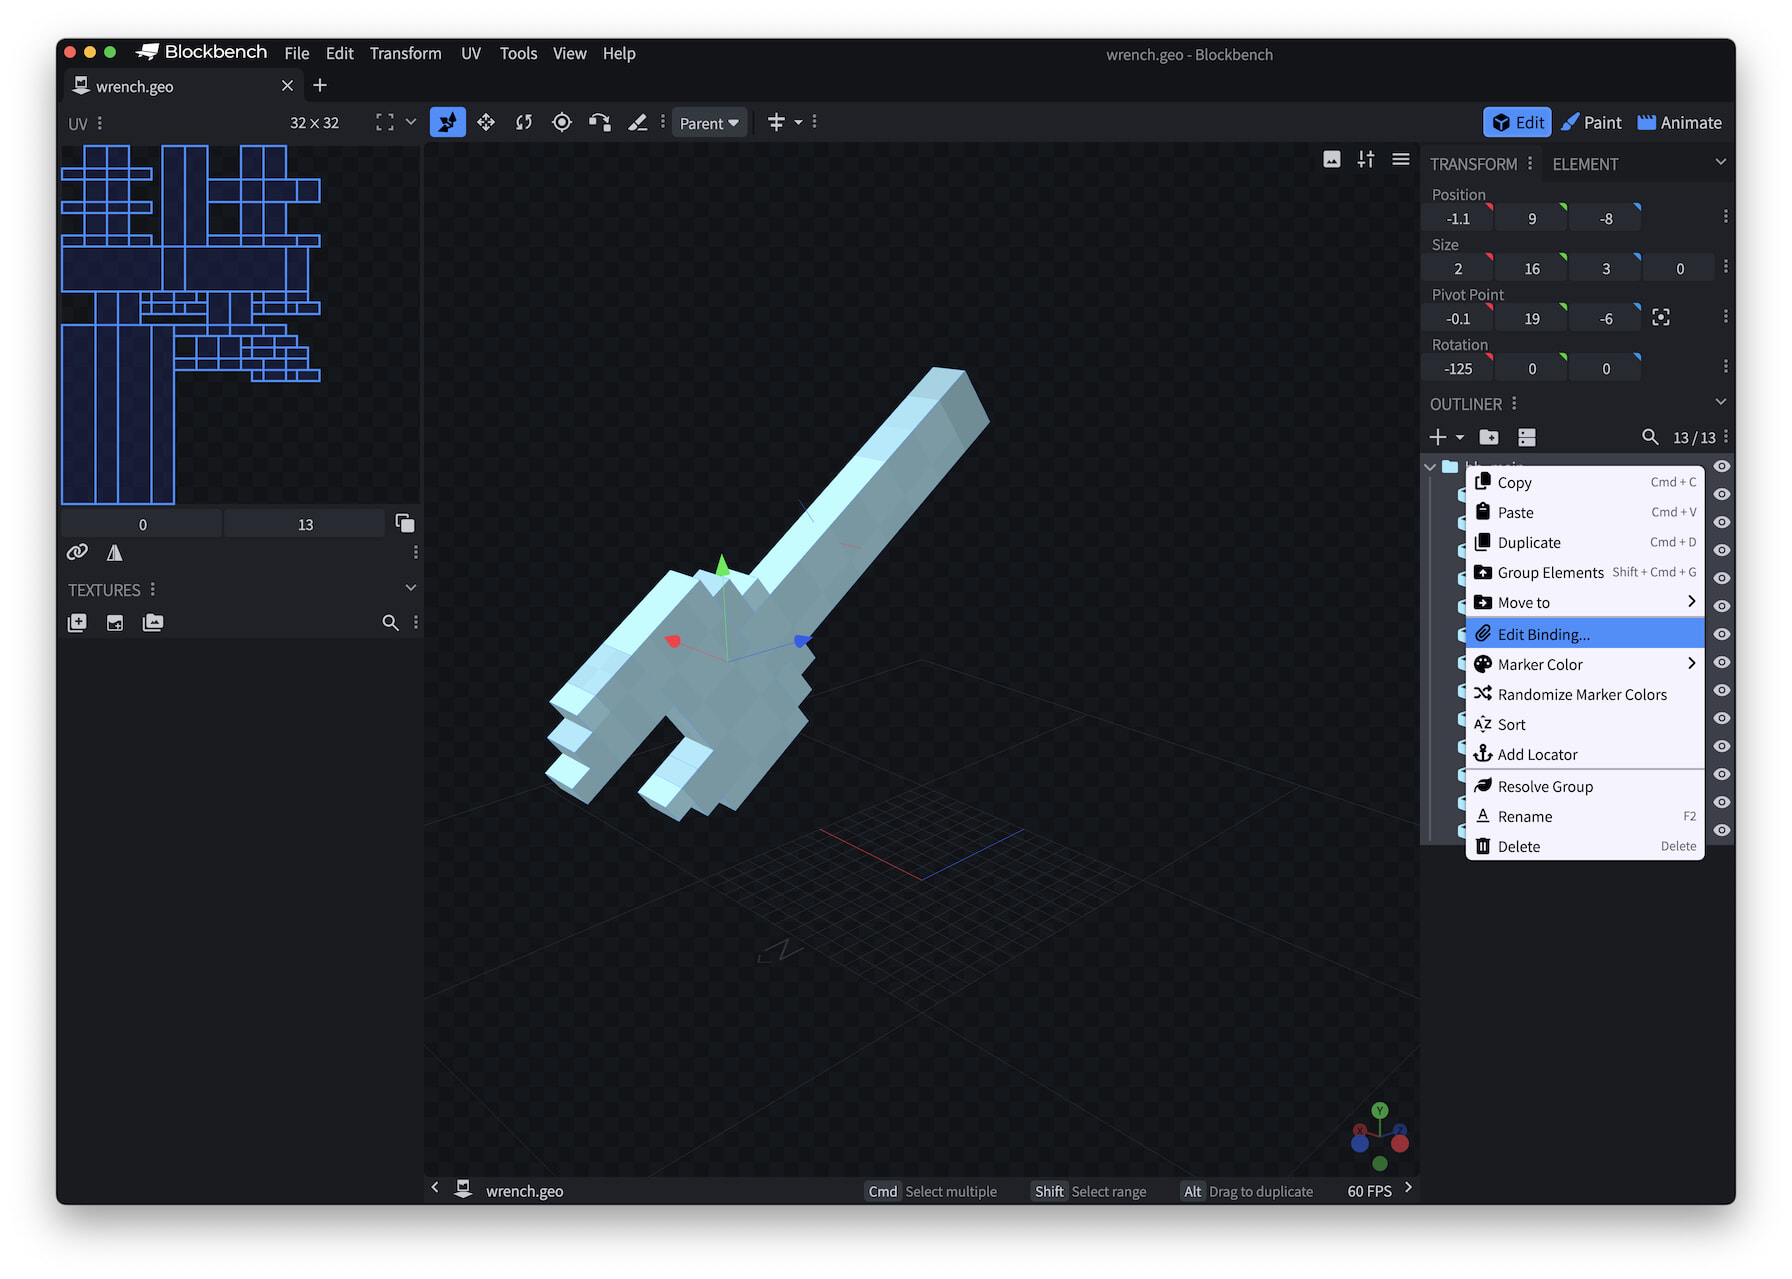
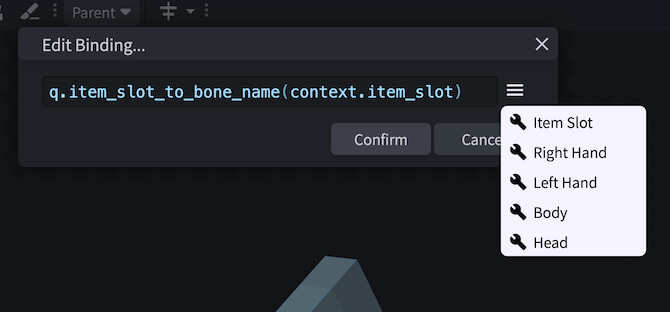
The resulting dialog lets you quickly assign a binding to the model, either directly to a body part or to the Item Slot.
Animations
With the wrench, that's all you need to do---the Custom Items repository already has a wrench.player.json file in its resource pack's attachables folder, as described above. But let's touch on the animations that file specifies—your own custom attachables may require you to set up new animations.
The animations block is pretty straightforward:
"animations": {
  "hold_first_person": "animation.steve_head.hold_first_person",
  "hold_third_person": "animation.steve_head.hold_third_person"
}
Those animations are defined in the animations/first_person.json file, animating the steve_head bone in both first-person and third-person views. (This bone isn't defined in the resource pack; it's part of Steve!)
Like other animations, these are called by conditions defined in the script block. In this case, these Molang queries determine whether the rendering mode is first-person or third-person.
"scripts": {
  "animate": [
    {
      "hold_first_person": "context.is_first_person == 1.0"
    },
    {
      "hold_third_person": "context.is_first_person == 0.0"
    }
  ]
}
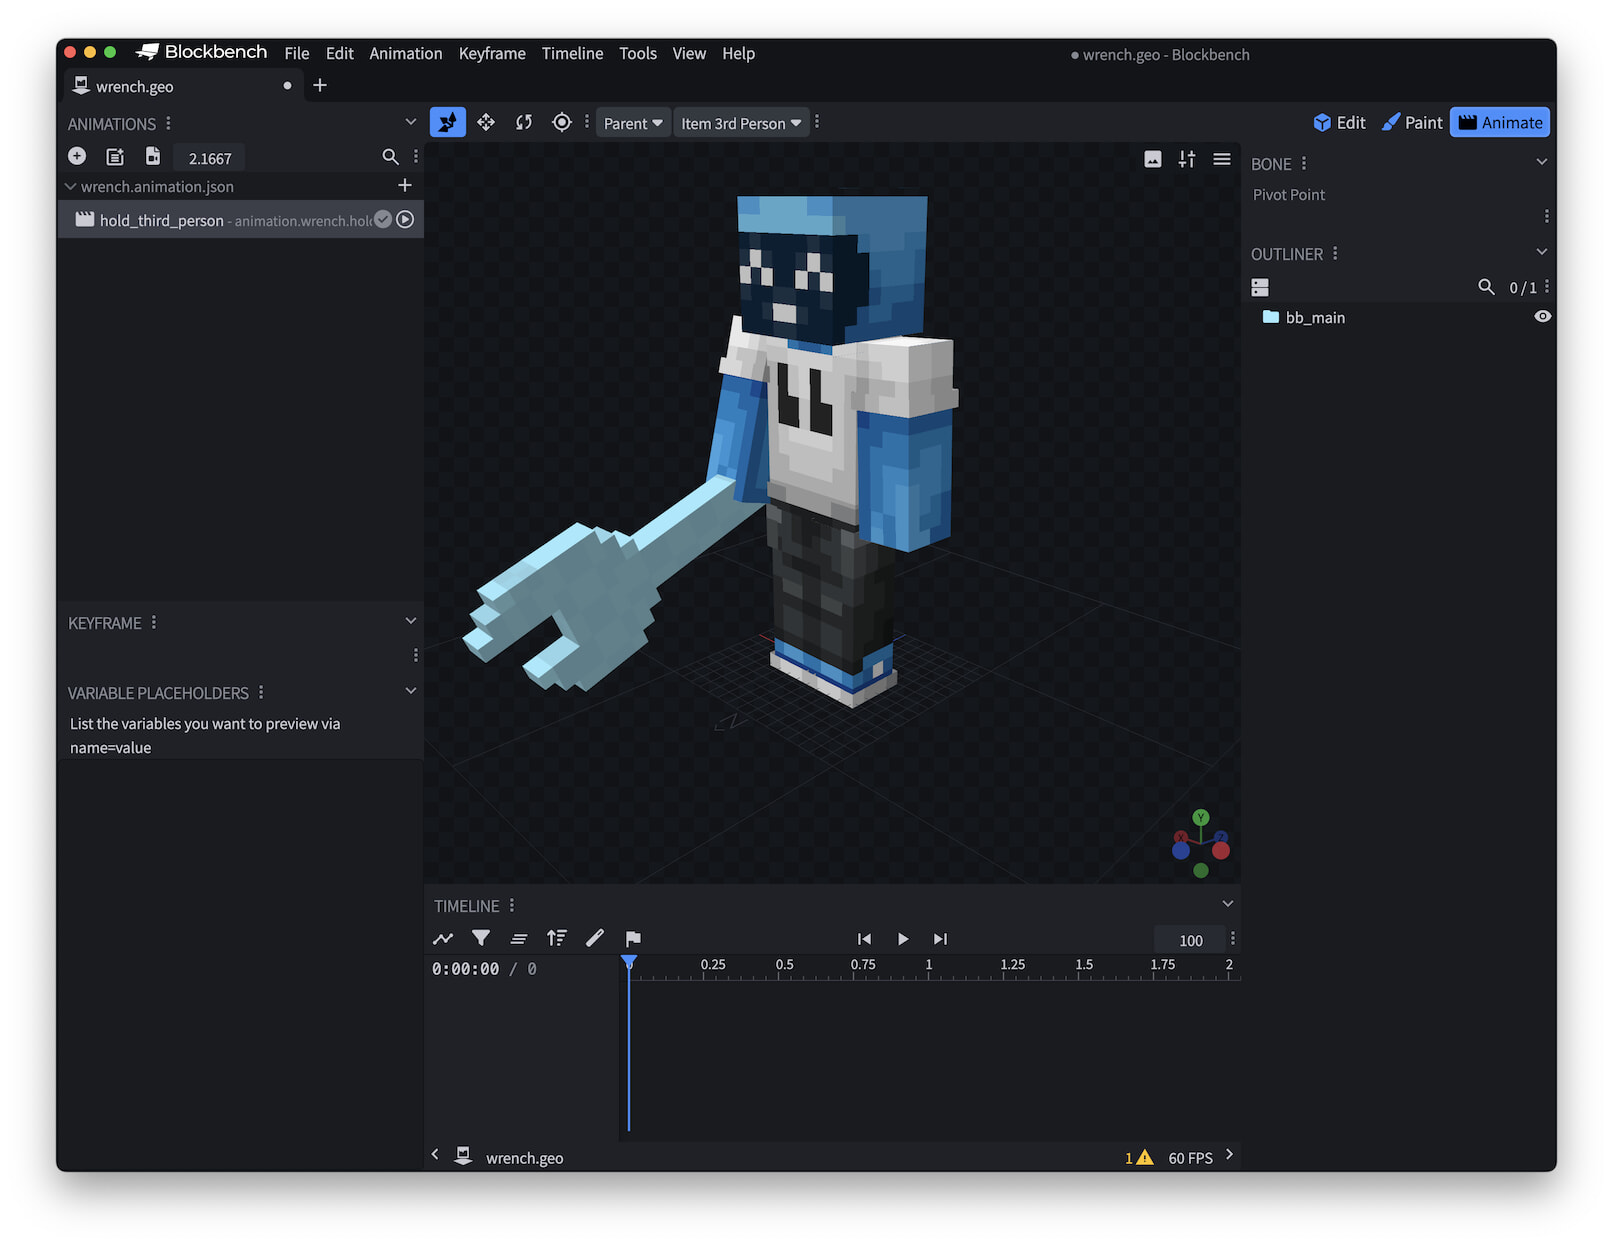
To create your own animations for holding/wearing an attachable, you'll need to create a first-person animation and a third-person animation in Blockbench or a similar tool. You can easily visualize your model with respect to the player by switching Blockbench's animation mode to first-person and third-person. Here's an example of the wrench model in the third-person animation mode:
Attaching by copying bones
Caution
This approach is somewhat more involved and less flexible. It's only good for items that will be attached to one specific entity—the player, a skeleton, an ogre—and only be usable with one item slot. Unless you're sure this approach will be better for your use case, you should stick with the binding approach described above.
Let's attach the wrench model from above to the skeleton using this technique. Start in Visual Studio Code or another text editor for this.
Create a copy of your item's geometry JSON file.
In the
bonessection, delete thebindingkey if it's there.Change the
parentkey value torightItem, or add this line if it's not present.Open the skeleton's geometry file in a separate tab or window in the text editor.
Copy all the individual bone objects in the
bonesarray (everything between the[and]characters).Paste these bones after the closing
}in the bone for the wrench. (Make sure there's a,comma between that bone and the next, or the JSON won't be valid.)
When you're finished, the JSON file will look like this (although we won't show all the data here to save space):
{
  "format_version": "1.16.0",
  "minecraft:geometry": [
    {
      "description": {
        "identifier": "geometry.wrench",
        "texture_width": 32,
        "texture_height": 32,
        "visible_bounds_width": 3,
        "visible_bounds_height": 4,
        "visible_bounds_offset": [0, 1, 0]
      },
      "bones": [
        {
          "name": "wrench",
          "pivot": [0.1, 19, -6],
          "rotation": [125, 0, 0],
          "parent": "rightItem",

          "cubes": [
            // the cubes for the wrench...
          ]
        },
        {
          "name": "body",
          "pivot": [ 0.0, 24.0, 0.0 ],
          "cubes": [
            {
              "origin": [ -4.0, 12.0, -2.0 ],
              "size": [ 8, 12, 4 ],
              "uv": [ 16, 16 ]
            }
          ],
          "parent": "waist"
        },
        {
          "name": "waist",
          "pivot": [ 0.0, 12.0, 0.0 ]
        },
        // the rest of the skeleton bone objects...
      ]
    }
  ]
}
Now, save your new file and load it into Blockbench.
Almost, but not quite: we need to add an animation so when the wrench is picked up, the skeleton's holding it in its right hand. Use Blockbench's animation tools to set a keyframe, then move the wrench to the right hand, and if you'd like, rotate it up a bit and scale it down to be more proportional.
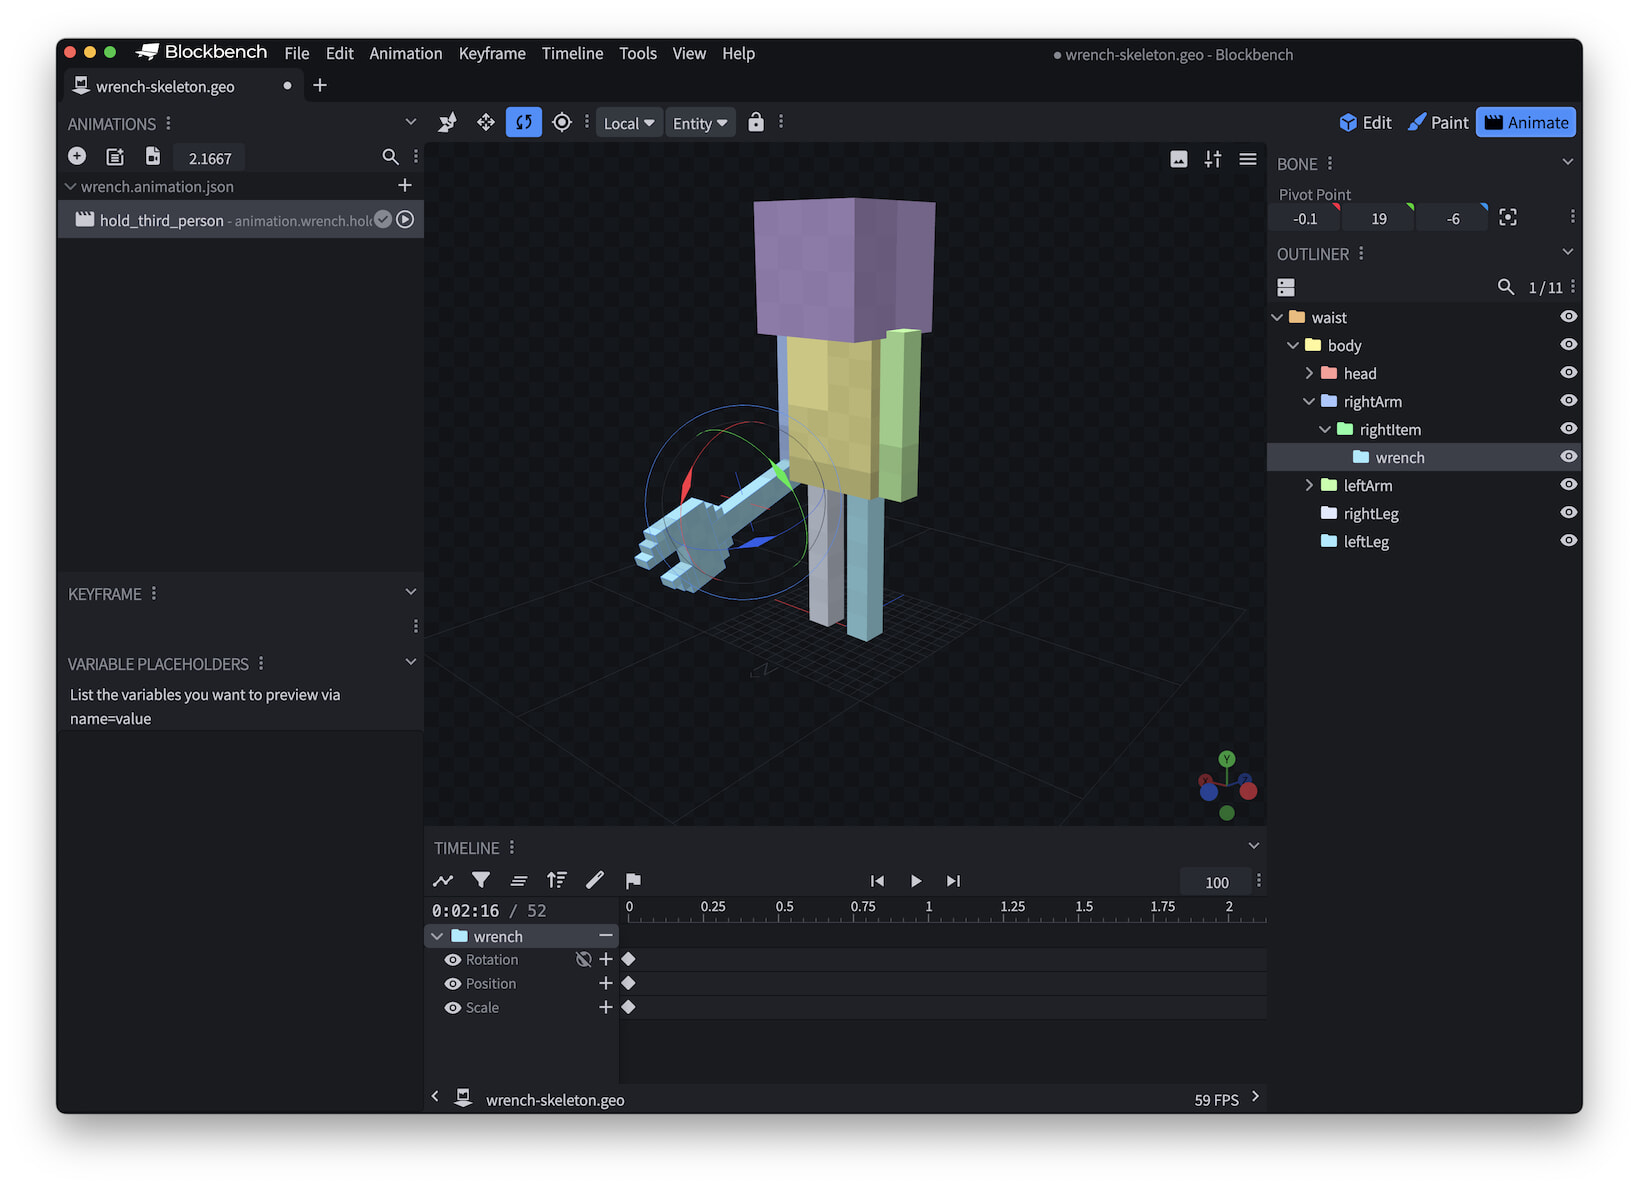
The wrench.animation.json file that Blockbench saves will be similar to this:
{
  "format_version": "1.8.0",
  "animations": {
    "animation.wrench.hold_third_person": {
      "animation_length": 2.1667,
      "bones": {
        "wrench": {
          "rotation": [-17.5, 0, 0],
          "position": [-5, -8, 0],
          "scale": 0.65
        }
      }
    }
  }
}
Once your attachable model is defined the way you want it, you'll need to remove all the cubes from the entity body that are not part of the attachable from the geometry JSON. Delete the cubes arrays from all the bones that don't belong to the attachable itself.
{
  "format_version": "1.16.0",
  "minecraft:geometry": [
    {
      "description": {
        "identifier": "geometry.wrench",
        "texture_width": 32,
        "texture_height": 32,
        "visible_bounds_width": 3,
        "visible_bounds_height": 4,
        "visible_bounds_offset": [0, 1, 0]
      },
      "bones": [
        // keep all the cubes associated with the wrench...
        {
          "name": "wrench",
          "pivot": [0.1, 19, -6],
          "rotation": [125, 0, 0],
          "parent": "rightItem",

          "cubes": [
            {"origin": [-0.9, 9, -8], "size": [2, 16, 3], "uv": [0, 13]},
            {"origin": [-0.9, 25, -11], "size": [2, 4, 9], "uv": [0, 0]},
            {"origin": [-0.9, 29, -5], "size": [2, 2, 3], "uv": [13, 0]},
            // (etc.)
          ]
        },
        // ...but not any of the other cubes.
        {
          "name": "body",
          "pivot": [ 0.0, 24.0, 0.0 ],
          "parent": "waist"
        },
        {
          "name": "waist",
          "pivot": [ 0.0, 12.0, 0.0 ]
        },
        // (etc.)
      ]
    }
  ]
}
Wrapping up
Now you should have a solid understanding of how to make items into attachables, so players and other entities can pick them up, wield them, or wear them! For more on attachables, check out other documentation on the Minecraft Learning Portal: