Note
Access to this page requires authorization. You can try signing in or changing directories.
Access to this page requires authorization. You can try changing directories.
These patterns and practices are designed to help your scripts run successfully every time. Use them to avoid common pitfalls as you start automating your Excel workflow.
Use the Action Recorder to learn new features
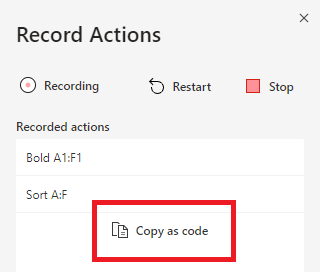
Excel does a lot of things. Most of them can be scripted. The Action Recorder records your Excel actions and translates them into code. This is the easiest way to learn about how different features work with Office Scripts. If you need code for a specific action, switch to the Action Recorder, perform the actions, select Copy as code, and paste the resulting code into your script.
Important
Occasionally, the Action Recorder may use an API that isn't supported outside of Excel on the web. Users of that script on other platforms receive a warning when viewing that script.
Verify an object is present
Scripts often rely on a certain worksheet or table being present in the workbook. However, they might get renamed or removed between script runs. By checking if those tables or worksheets exist before calling methods on them, you can make sure the script doesn't end abruptly.
The following sample code checks if the "Index" worksheet is present in the workbook. If the worksheet is present, the script gets a range and proceeds. If it isn't present, the script logs a custom error message.
// Make sure the "Index" worksheet exists before using it.
let indexSheet = workbook.getWorksheet('Index');
if (indexSheet) {
  let range = indexSheet.getRange("A1");
  // Continue using the range...
} else {
  console.log("Index sheet not found.");
}
The TypeScript ? operator checks if the object exists before calling a method. This can make your code more streamlined if you don't need to do anything special when the object doesn't exist.
// The ? ensures that the delete() API is only called if the object exists.
workbook.getWorksheet('Index')?.delete();
Validate data and workbook state first
Make sure all your worksheets, tables, shapes, and other objects are present before working on the data. Using the previous pattern, check to see if everything is in the workbook and matches your expectations. Doing this before any data is written ensures your script doesn't leave the workbook in a partial state.
The following script requires two tables named "Table1" and "Table2" to be present. The script first checks if the tables are present and then ends with the return statement and an appropriate message if they're not.
function main(workbook: ExcelScript.Workbook) {
  // These tables must be in the workbook for the script.
  const TargetTableName = 'Table1';
  const SourceTableName = 'Table2';

  // Get the table objects.
  let targetTable = workbook.getTable(TargetTableName);
  let sourceTable = workbook.getTable(SourceTableName);

  // Check if the tables are there.
  if (!targetTable || !sourceTable) {
    console.log(`Required tables missing - Check that both the source (${TargetTableName}) and target (${SourceTableName}) tables are present before running the script.`);
    return;
  }

  // Continue...
}
If the verification is happening in a separate function, you still must end the script by issuing the return statement from the main function. Returning from the subfunction doesn't end the script.
The following script has the same behavior as the previous one. The difference is that the main function calls the inputPresent function to verify everything. inputPresent returns a boolean (true or false) to indicate whether all required inputs are present. The main function uses that boolean to decide on continuing or ending the script.
function main(workbook: ExcelScript.Workbook) {

  // Get the table objects.
  if (!inputPresent(workbook)) {
    return;
  }

  // Continue...
}

function inputPresent(workbook: ExcelScript.Workbook): boolean {
  // These tables must be in the workbook for the script.
  const TargetTableName = 'Table1';
  const SourceTableName = 'Table2';

  // Get the table objects.
  let targetTable = workbook.getTable(TargetTableName);
  let sourceTable = workbook.getTable(SourceTableName);

  // Check if the tables are there.
  if (!targetTable || !sourceTable) {
    console.log(`Required tables missing - Check that both the source (${TargetTableName}) and target (${SourceTableName}) tables are present before running the script.`);
    return false;
  }

  return true;
}
When to use a throw statement
A throw statement indicates an unexpected error has occurred. It ends the code immediately. For the most part, you don't need to throw from your script. Usually, the script automatically informs the user that the script failed to run due to an issue. In most cases, it's sufficient to end the script with an error message and a return statement from the main function.
However, if your script is running as part of a Power Automate flow, you may want to stop the flow from continuing. A throw statement stops the script and tells the flow to stop as well.
The following script shows how to use the throw statement in the table-checking example.
function main(workbook: ExcelScript.Workbook) {
  // These tables must be in the workbook for the script.
  const TargetTableName = 'Table1';
  const SourceTableName = 'Table2';

  // Get the table objects.
  let targetTable = workbook.getTable(TargetTableName);
  let sourceTable = workbook.getTable(SourceTableName);

  // Check if the tables are there.
  if (!targetTable || !sourceTable) {
    // Immediately end the script with an error.
    throw `Required tables missing - Check that both the source (${TargetTableName}) and target (${SourceTableName}) tables are present before running the script.`;
  }
When to use a try...catch statement
The try...catch statement is a way to detect if an API call fails and continue running the script.
Consider the following snippet that performs a large data update on a range.
range.setValues(someLargeValues);
If someLargeValues is larger than Excel on the web can handle, the setValues() call fails. The script then also fails with a runtime error. The try...catch statement lets your script recognize this condition, without immediately ending the script and showing the default error.
One approach for giving the script user a better experience is to present them a custom error message. The following snippet shows a try...catch statement logging more error information to better help the reader.
try {
    range.setValues(someLargeValues);
} catch (error) {
    console.log(`The script failed to update the values at location ${range.getAddress()}. Please inspect and run again.`);
    console.log(error);
    return; // End the script (assuming this is in the main function).
}
Another approach to dealing with errors is to have fallback behavior that handles the error case. The following snippet uses the catch block to try an alternate method break up the update into smaller pieces and avoid the error.
Tip
For a full example on how to update a large range, see Write a large dataset.
try {
    range.setValues(someLargeValues);
} catch (error) {
    console.log(`The script failed to update the values at location ${range.getAddress()}. Trying a different approach.`);
    handleUpdatesInSmallerBatches(someLargeValues);
}

// Continue...
}
Note
Using try...catch inside or around a loop slows down your script. For more performance information, see Avoid using try...catch blocks.
See also
Collaborate with us on GitHub
The source for this content can be found on GitHub, where you can also create and review issues and pull requests. For more information, see our contributor guide.
Office Scripts