Note
Access to this page requires authorization. You can try signing in or changing directories.
Access to this page requires authorization. You can try changing directories.
Create a canvas app to manage data stored in Dataverse, using either built-in standard tables, custom tables created by your organization, or both.
When building an app from Dataverse, you don't need to create a connection from Power Apps, unlike with data sources such as SharePoint, Dynamics 365, or Excel. All you need to do is specify the tables you want to display or manage in the app.
Prerequisites
- Switch to an environment where a database is created with sample data. If you have an appropriate license, you can create an environment to meet this need.
- Ensure you have the Environment Maker security role, either directly or through a Dataverse team that is part of the AAD Security Group category. Custom security roles are not currently supported for Canvas App maker scenarios.
Create an app
Sign in to Power Apps.
From the home screen, choose one of the following options based on how you want to create your app using Dataverse:
Create options using Dataverse Benefits Navigation A single-page gallery app Use your existing business data in Dataverse and create a lightweight responsive app. 1. Choose one of the following options:
- Start with data > Select an existing table.
- Start with a page design > Gallery connected to table.
2. Select a table and select Create app.Three screen mobile app Utilize your existing data in Dataverse and create an app using a template with three screens, offering options to browse, view details, create, and edit. Start with an app template > From Dataverse. Then, select a table > Create app. Blank app that uses data from Dataverse Use your existing business data in Dataverse to tailor your app with flexibility, free from the limitations of predesigned templates. In the left navigation pane, select Create > Start with blank canvas > Phone size. The app is created and Power Apps Studio opens, where you continue building the app.
Add a Dataverse table in a blank app
To help you understand how to create an app with data from Dataverse, let's start by creating a blank app and then adding data from Dataverse.
Sign in to Power Apps
In the left navigation pane, select Create > Start with blank canvas > Phone size.
When Power App Studio opens, go to the app authoring menu and select Data.
Note
If this is your first time connecting to Dataverse, you'll be prompted to create a connection. Select Create to establish the connection.
Select Add data and enter Accounts in the search box, and select it.
Close the Data pane by selecting the close icon in the upper right corner.

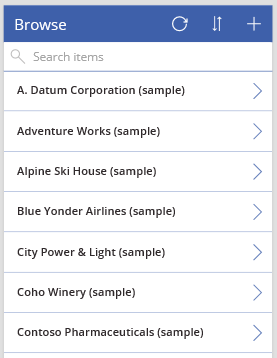
Add a list screen
On the command bar, select New screen > List.
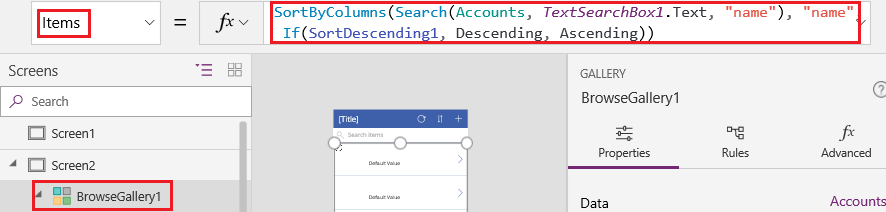
In the left navigation bar, select BrowseGallery1, and then set the value of the Items property to this formula:
SortByColumns(Search(Accounts, TextSearchBox1.Text, "name"), "name", If(SortDescending1, SortOrder.Descending, SortOrder.Ascending))This formula specifies that:
The gallery should show data from the Accounts table.
The data should be sorted in ascending order until a user selects the sort button to toggle the sort order.
If a user types or pastes one or more characters into the search bar (TextSearchBox1), the list shows only those accounts for which the name field contains the characters that the user specified.
You can use these and many other functions to specify how your app appears and behaves.
In the gallery's Properties pane, set the Layout to Title.
Edit the Title text property and rename it to Browse. More information: Customize a gallery
In the left app authoring pane, hover over Screen1, select the ellipsis icon (...), and then select Delete.
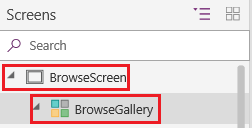
In the left app authoring pane, hover over Screen2, select the ellipsis icon (...), and then select Rename.
Type or paste BrowseScreen, and then rename the gallery in that screen as BrowseGallery.
Add a form screen
Repeat the first step of the previous procedure, except add a Form screen instead of a List screen.
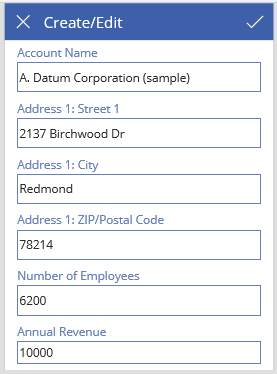
Set the form's DataSource property to Accounts and its Item property to BrowseGallery.Selected as the Advanced tab of the right-hand pane shows.
On the Properties tab of the right-hand pane, select Edit Fields to open the Fields pane.
Select Add field, and then select the checkboxes for these fields:
- Account Name
- Address 1: Street 1
- Address 1: City
- Address 1: ZIP/Postal code
- Number of Employees
- Annual Revenue
Note
Outside of this scenario, you can create a custom field by selecting New field, providing the required information, and then selecting Done. More information: Create a column.

Select Add.
Set the title bar's Text property to show Create/Edit.
The screen reflects your changes.
Rename this screen FormScreen.
Configure icons
On the BrowseScreen, set the OnSelect property of the circular icon near the top of the screen to this formula:
Refresh(Accounts)
Set the OnSelect property of the plus icon to this formula:
NewForm(EditForm1); Navigate(FormScreen, ScreenTransition.None)
Set the OnSelect property of the first arrow pointing to the right to this formula:
EditForm(EditForm1); Navigate(FormScreen, ScreenTransition.None)
On the FormScreen, set the OnSelect property of the cancel icon to this formula:
ResetForm(EditForm1);Navigate(BrowseScreen, ScreenTransition.None)
Set the OnSelect property of the checkmark icon to this formula:
SubmitForm(EditForm1); Navigate(BrowseScreen, ScreenTransition.None)
On the Insert tab, select Icons, and then select the Trash icon.
Set the Trash icon's Color property to White and its OnSelect property to this formula:
Remove(Accounts, BrowseGallery.Selected); Navigate(BrowseScreen, ScreenTransition.None)
Test the app
On the actions menu, select
 Preview the app. More information: Preview an app
Toggle the list between ascending and descending sort orders, and filter the list by one or more characters in the account name.
Add an account, edit the account that you added, start to update the account, but cancel your changes, and then delete the account.