Note
Access to this page requires authorization. You can try signing in or changing directories.
Access to this page requires authorization. You can try changing directories.
This article walks you through how to register a Snowflake source, run a Data Map scan, and configure a data quality connection in Microsoft Purview Unified Catalog. After you complete these steps, you can profile your Snowflake data and run data quality scans.
Supported Snowflake metadata
When you scan Snowflake data sources, Microsoft Purview extracts technical metadata. The scan captures the following objects:
- Servers, databases, schemas, and tables
- Views, foreign keys, and unique constraints
- Stored procedures and their parameters
- Functions and their parameters
- Pipes, stages, and streams
- Tasks and sequences
Register a Snowflake source in Data Map
To register a new Snowflake source in Microsoft Purview Unified Catalog, follow these steps:
- Sign in to the Microsoft Purview portal.
- Select the Data Map solution card. If the Data Map solution card isn't displayed, select View all solutions and then select Data Map from the Core section.
- Select Register.
- On Register sources, select Snowflake.
Set up a Data Map scan
To set up a scan for your registered Snowflake source, follow these steps:
- Select the registered Snowflake source.
- Select New scan.
- Provide the following details:
- Name: The name of the scan.
- Connect via integration runtime: Select the autoresolved integration runtime, Managed Virtual Network IR, or SHIR for your scenario.
- Host for connection: Select the server URL or another host you configured in the data source.
- Credential: Select the credential for your data source. Use Basic Authentication, provide the Snowflake user name, and store the password in the secret key.
- Warehouse: Specify the warehouse name in uppercase. The credential's default role must have USAGE rights on this warehouse.
- Databases: Specify one or more database names in uppercase, separated by semicolons (for example,
DB1;DB2). The credential's default role must have rights on these database objects. - Schema: List the schemas to import, separated by semicolons.
- Select Test connection to validate the settings (available when using Azure Integration Runtime).
- Select Continue.
- Select a scan rule set for classification. You can choose between the system default, existing custom rule sets, or create a new rule set inline.
- Review your scan and select Save and Run.
After the scan finishes, the data asset in Snowflake is available on the Unified Catalog search. For more information about how to connect and manage Snowflake in Microsoft Purview, see Connect to and manage Snowflake in Microsoft Purview.
Important
When you delete the object from the data source, the subsequent scan doesn't automatically remove the corresponding asset in Microsoft Purview.
Set up a Snowflake data quality connection
After the scan completes, the scanned asset is ready for cataloging and governance. To run data quality scans on the asset, set up a Snowflake connection in Microsoft Purview.
Important
- Data quality stewards need read only access to Snowflake to set up the data quality connection.
- The Snowflake connector doesn't accept https://. Remove https:// when you add the server name to configure the data source connection.
- If you disable public access, you need to select Allow trusted Microsoft services for Key Vault. This requirement applies only to Key Vault, not to your Snowflake workspace.
In the Microsoft Purview portal, open Unified Catalog.
Under Health management, select Data quality.
Select a governance domain from the list, then select Connections from the Manage dropdown list.
Configure the connection on the Connections page:
- Add a connection name and description.
- Select source type Snowflake.
- Add the server name, warehouse name, database name, schema name, and table name.
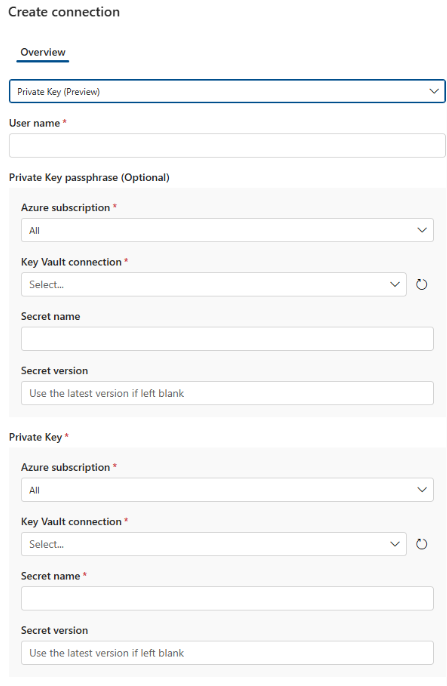
- Select an authentication method: Basic, Private key (preview), or OAuth (preview).
- Add the user name.
- Add credentials: Azure subscription, Key Vault connection, secret name, and secret version.
- Select Enable managed VNet if your Snowflake instance runs on Azure Virtual Network, then add the Azure region, Private Link Resources ID, and Fully Qualified Domain Name.
Test the connection to make sure it works. If you're using Virtual Network, the test connection feature isn't supported.

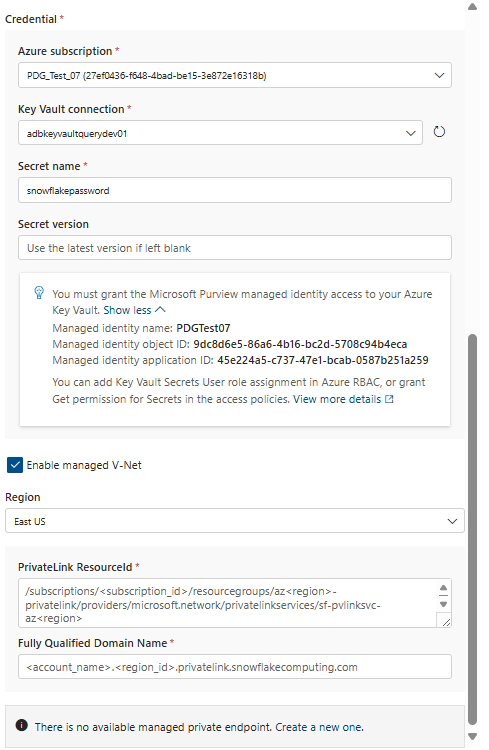
The resource ID for the target Snowflake private link has the following format: /subscriptions/(subscription_id)/resourcegroups/az(region)-privatelink/providers/microsoft.network/privatelinkservices/sf-pvlinksvc-az(region).
- To obtain region-ID and fully qualified name, run
SYSTEM_WHITE_LISTandSYSTEM_WHITE_LIST_PRIVATELINKto get theSNOWFLAKE_DEPLOYMENT,SNOWFLAKE_DEPLOYMENT_REGIONLESS, andOCSP_CACHEvalues for public and allow list hosts. - To obtain Subscription ID, run
SYSTEM$GET_SNOWFLAKE_PLATFORM_INFO()asACCOUNTADMINto obtain the snowflake-vnet-subnet-ids values. The Subscription ID for the Private Link of the Snowflake Azure tenant is obtained from the snowflake-vnet-subnet-ids output.
Private key authentication (preview)
You can create private keys with or without a passphrase by using OpenSSL, a command-line tool for generating cryptographic keys. If you generate a private key with a passphrase, configure both the key and passphrase with the connection as shown in the following screenshot. If you don't provide a passphrase during key generation, omit it in the connection.
The private key generated through the openssl command contains headers/footers that indicate the beginning and ending of the key/encrypted key. Save the entire contents of the file, including headers and new lines, as-is in the Key Vault as the secret value. You can use a command-line tool such as Azure CLI to do this. Without the private key file headers, footers, and original newline formatting, authentication with Snowflake fails.
For security, rotate your keys regularly. When you rotate a key, update it in Key Vault and in the Microsoft Purview connection. New jobs use the updated key. Keep the older key active until any in-progress jobs complete.
OAuth authentication (preview)
You can configure an OAuth-based connection by using Microsoft Entra ID as the OAuth provider. OAuth access tokens are typically short-lived. But data quality assessment jobs can run for a long time, depending on data volume. Set the OAuth access token lifetime to at least six hours, which is the average maximum job duration. Jobs fail if the access token expires before the job completes.
If you can't increase the access token lifetime, or if your policy doesn't allow it, use key-pair-based authentication because key-pair auth doesn't have token lifetime constraints.
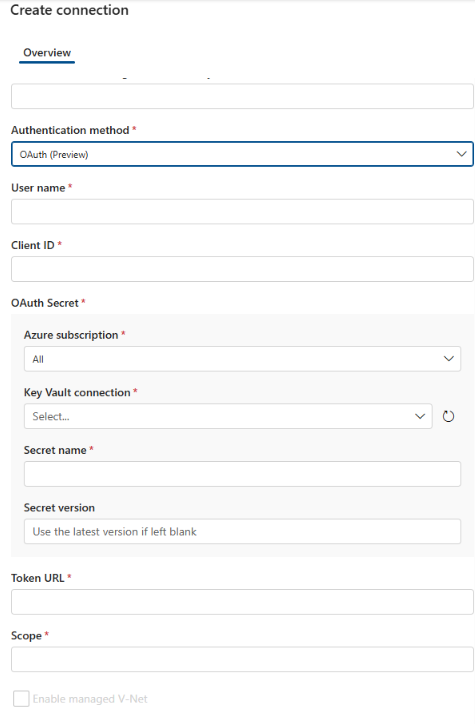
Sample values for the OAuth connection parameters:
- User name: DB41C9CD-96E7-47B0-ADB6-0A4D080229A0 (Value of
login_nameproperty of Snowflake) - Client ID: 632ce887-41bb-4975-b6a9-ae798bf41956 (Client ID from Azure portal)
- Token URL:
https://login.microsoftonline.com/ddfd8861-7cbd-43df-ad13-4f9e958cf53b/oauth2/v2.0/token (Token URL from Azure app) - Scope:
api://d682fa4a-d784-4d28-93e2-7156ff129ae0/.default (Scope as registered with the Azure app)
Understand connection selection
You don't explicitly choose connections when you start assessments or configure schedules. The system selects a connection automatically based on the following rules:
- If only user-password connections exist, the system selects the first one created.
- If key-pair or OAuth connections exist, the system ignores all user-password connections and selects the first key-pair or OAuth connection created.
The following illustration shows how the system selects a connection based on type and creation order.
Suppose there are only user-password-based connections:
- SnowflakeConnectionBob (User-password)
- SnowflakeConnectionAlice (User-password)
- SnowflakeConnectionEve (User-password)
The system selects the SnowflakeConnectionBob connection.
Suppose all types of connections exist and you created them in the following order:
- SnowflakeConnectionBob (User-password)
- SnowflakeConnectionAlice (Key-pair)
- SnowflakeConnectionCharlie (OAuth)
- SnowflakeConnectionEve (User-password)
In this case, the system ignores SnowflakeConnectionBob and SnowflakeConnectionEve. The system considers only the following connections for selection:
- SnowflakeConnectionAlice (Key-pair)
- SnowflakeConnectionCharlie (OAuth)
Typically, the system selects SnowflakeConnectionAlice for assessment and scheduled runs.
Important
After you create the request for a private endpoint connection, raise a support ticket with Snowflake support to approve the private endpoint connection. Provide the details of the managed private endpoint resource ID in this support ticket for the Snowflake team to approve.
Note
Open Authorization (OAuth) and key pair authentication for Snowflake database connections will come. With these options, you can create multiple connections that each use a different authentication method. When multiple connections use different authentication mechanisms, the system picks the last created connection. For example, if you first create a key pair-based connection followed by an OAuth connection, the system picks the OAuth connection. If you want the key pair connection to be picked, you need to delete the OAuth connection. Contact your Microsoft account representative to preview the new Snowflake authentication model for Microsoft Purview data quality scans.
Next steps
After you set up the connection, you can profile your data, create and apply rules, and run a data quality scan. For step-by-step guidance, see the data profiling and data quality scan articles: