Note
Access to this page requires authorization. You can try signing in or changing directories.
Access to this page requires authorization. You can try changing directories.
Summary
This article will help you troubleshoot user accounts whose OneDrive for Business sites have provisioning issues such as:
- Being unable to select a OneDrive tile stopped at the "Setting up" or "We're still working on getting files setup on SharePoint This should take us a few minutes" message.
- Selecting a OneDrive tile that redirects you to the Delve page.
- Selecting a OneDrive tile redirects you to the MyBraryFirstRun.aspx page.
More information
Listed below are some recommendations to help resolve the issue.
If the user account is disabled on the tenant
Navigate to the Microsoft 365 admin center.
Under Users, select Active users.
Search for and select the user's account. A panel opens on the right with the user's information.
If the message "Sign in blocked" is displayed, unblock the user by selecting the "blocked" icon (
 ).
).

Note
If the user account is synced from the Local AD, the user will have to be enabled in the Local AD and wait for the AD sync to occur.
If the user account does not have an appropriate license assigned
- Navigate to the Microsoft 365 admin center.
- Under Users, select Active users.
- Search for and select the user's account. A panel opens on the right with the user's information.
- Select Licenses and Apps.
- Ensure that SharePoint Online app is selected from the available licenses that enable OneDrive.
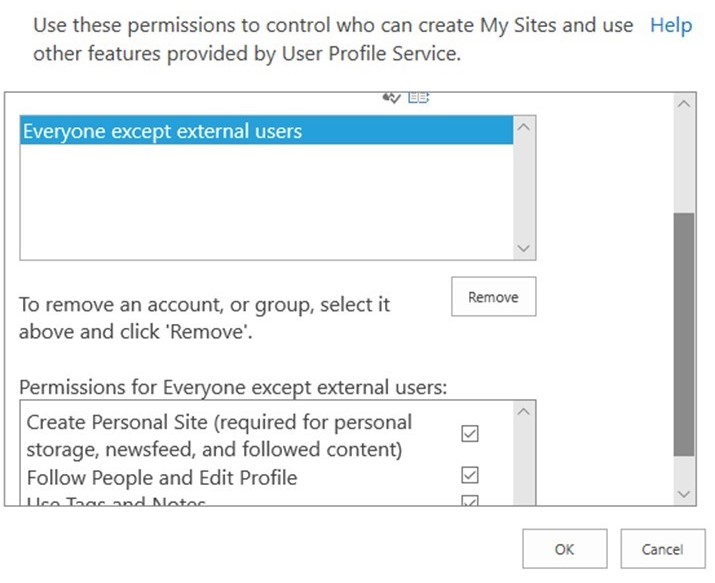
The user account is missing permissions to create Personal or OneDrive sites in user profiles
Everyone except external users: (EEEU) are provided with Create Personal Site permission by default. For any business reason, Create Personal Site is not selected, that user facing the issue should be added to any other Security group that has Create Personal Site selected or added individually.
To check whether Create Personal Site is selected:
- Navigate to the Modern SharePoint Admin Center.
- Select More features. This will open a new tab.
- In the new tab, select Open under User profiles.
- Select Manage user permissions.
- Select the Everyone except external users permission group and check that Create Personal Site is selected.
For more information about this, see Disable OneDrive creation for some users.
The user account does not have a user profile in SharePoint Online
A profile must exist in the SharePoint Online profile database to provision a OneDrive site. A profile is created when a user account is created and synched to the Microsoft 365 portal, or during ODB provisioning if one does not exist.
It's a rare scenario that a profile doesn't exist. For any reason, a profile is taking longer than expected to create, wait at least two hours and then validate again. If the profile still doesn't exist after two hours, contact Microsoft Support.
Note
For tenants with an EDU subscription, user profiles are not created until the user logs into SharePoint Online or an admin has processed the user account for OneDrive pre-provisioning.
To validate that a profile exists:
- Navigate to the Modern SharePoint Admin Center.
- Select More features. This will open a new tab.
- In the new tab, select Open under User profiles.
- Select Manage user profiles.
- In Find profiles, enter the user e-mail and select Find.
The user profile is set as Guest.
To remove a guest attribute from a user profile:
- Navigate to the Modern SharePoint Admin Center.
- Select More features. This will open a new tab.
- In the new tab, select Open under User profiles.
- Select Manage user profiles.
- In Find profiles, enter the user e-mail and select Find.
- In the results displayed, hover your cursor next to the name of the user. In the drop-down box, select Edit my profile.
- In the field Personal site capabilities, remove the value that has been set.
- Select Save and Close.
Still need help? Go to SharePoint Community.