Implement the fork workflow
A fork is a copy of a repository. Forking a repository allows you to experiment with changes freely without affecting the original project.
Most commonly, forks are used to propose changes to someone else's project or use someone else's project as a starting point for your idea.
A fork is a complete copy of a repository, including all files, commits, and (optionally) branches.
Forks are a great way to support an Inner Source workflow: you can create a fork to suggest changes when you don't have permission to write to the original project directly. Once you're ready to share those changes, it's easy to contribute them back using pull requests.
What's in a fork?
A fork starts with all the contents of its upstream (original) repository. You can include all branches or limit them to only the default branch when you create a fork.
Important notes:
- None of the permissions, policies, or build pipelines are copied.
- The new fork acts as if someone cloned the original repository, then pushed it to a new, empty repository.
- After a fork has been created, new files, folders, and branches aren't shared between the repositories unless a Pull Request carries them along.
Sharing code between forks
You can create pull requests in either direction: from fork to upstream or upstream to fork. The most common approach is from fork to upstream.
The destination repository's permissions, policies, builds, and work items will apply to the pull request.
Choosing between branches and forks
Small Teams (2-5 developers): We recommend working in a single repository. Everyone should work in a topic branch, and the main branch should be protected with branch policies.
Larger Teams: As your team grows, you may find yourself outgrowing this arrangement and prefer to switch to a forking workflow.
When to Use Forks:
- Your repository has many casual or infrequent contributors (like an open-source project).
- Only core contributors have direct commit rights into your repository.
- You want collaborators from outside the core team to work from a fork.
- You want to isolate changes until you've had a chance to review the work.
The forking workflow
Here are the basic steps for the forking workflow:
- Create a fork.
- Clone it locally.
- Make your changes locally and push them to a branch.
- Create and complete a pull request to upstream.
- Sync your fork to the latest from upstream.
Step 1: Create the fork
- Navigate to the repository you want to fork and choose "Fork".
- Specify a name and choose the project where you want the fork to be created.
- If the repository contains many topic branches, we recommend you fork only the default branch.
- Choose the ellipsis, then "Fork" to create the fork.
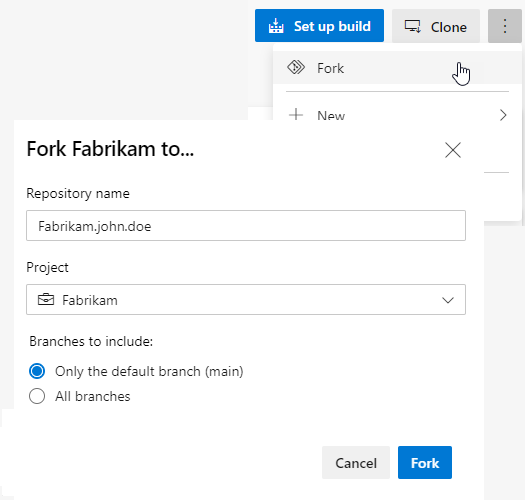
Note
You must have the Create Repository permission in your chosen project to create a fork. We recommend you create a dedicated project for forks where all contributors have the Create Repository permission.
Step 2: Clone your fork locally
Once your fork is ready, clone it using the command line or an IDE like Visual Studio. The fork will be your origin remote.
git clone {your_fork_url}
For convenience, after cloning, you'll want to add the upstream repository (where you forked from) as a remote named upstream:

```bash
git remote add upstream {upstream_url}
Step 3: Make and push changes
It's possible to work directly in main - after all, this fork is your copy of the repo. However, we recommend you still work in a topic branch because:
- It allows you to maintain multiple independent workstreams at the same time.
- It reduces confusion later when you want to sync changes into your fork.
Make and commit your changes as you normally would. When you're done with the changes, push them to origin (your fork).
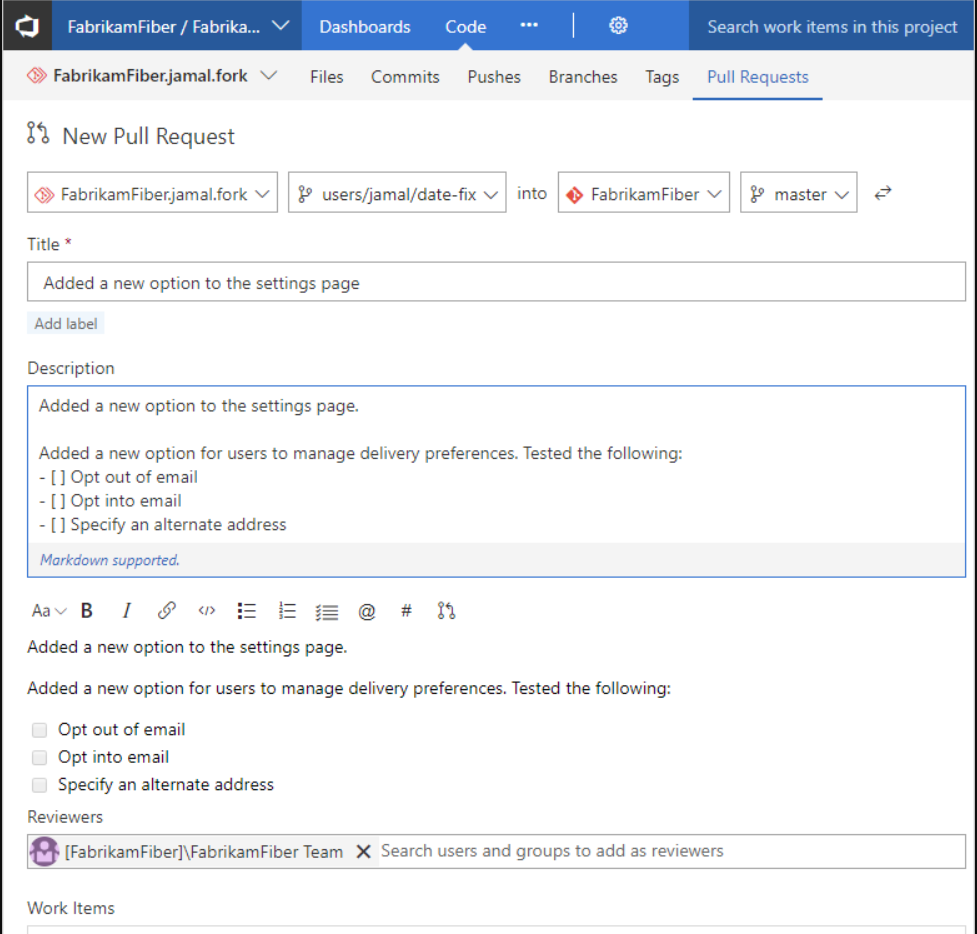
Step 4: Create and complete a pull request
Open a pull request from your fork to the upstream repository. All the policies, required reviewers, and builds will be applied in the upstream repo. Once all policies are satisfied, the pull request can be completed, and the changes become a permanent part of the upstream repo.
Important
Anyone with Read permission can open a pull request to upstream. If a pull request build pipeline is configured, the build will run against the code introduced in the fork.
Step 5: Sync your fork to the latest
When your pull request is accepted into upstream, you'll want to make sure your fork reflects the latest state of the repository.
We recommend rebasing on upstream's main branch (assuming main is the main development branch):
git fetch upstream main
git rebase upstream/main
git push origin
Benefits of fork workflow
The forking workflow lets you isolate changes from the main repository until you're ready to integrate them. When you're ready, integrating code is as easy as completing a pull request.
This approach provides:
- Safety: Changes are isolated until reviewed.
- Collaboration: Multiple people can work on different features simultaneously.
- Quality: All changes go through the same review process.
- Flexibility: Contributors don't need write access to the main repository.