Exercise - Monitor your database
Imagine that you receive an alert from your company's security administrator. A potential security breach has been detected on your network. An unauthorized individual might have accessed your database through malicious activity. How would you track this down?
You know that you need to be actively monitoring your database for suspicious activity. What can you do to not only gain visibility into what's happening in your database, but to also prevent malicious activity from occurring?
Azure SQL Database has built-in features that can help you track what's happening in your database. It can monitor and alert you if it identifies malicious activity.
Azure SQL Database auditing
By enabling auditing, operations that occur on the database are stored for later inspection or to have automated tools analyze them. Auditing is also used for compliance management or understanding how your database is used. Auditing is also required if you wish to use Azure threat detection on your Azure SQL database.
You can use SQL database auditing to:
- Retain an audit trail of selected events. You can define categories of database actions to be audited.
- Report on database activity. You can use preconfigured reports and a dashboard to get started quickly with activity and event reporting.
- Analyze reports. You can find suspicious events, unusual activity, and trends.
Audit logs are written to Append Blobs in an Azure Blob Storage account that you designate. Audit policies can be applied at the server-level or database-level. Once enabled, you can use the Azure portal to view the logs, or send them to Log Analytics or Event Hubs for further processing and analysis.
Auditing in practice
As a best practice, avoid enabling both server blob auditing and database blob auditing together, unless:
- You want to use a different storage account or retention period for a specific database.
- You want to audit event types or categories for a specific database that differs from the rest of the databases on the server. For example, you might have table inserts that need to be audited but only for a specific database.
Otherwise, we recommend that you enable only server-level blob auditing and leave the database-level auditing disabled for all databases.
Follow these steps to set up auditing on your system.
Sign in to the Azure portal using the same account you activated the sandbox with.
In the search bar at the top of the portal, search for your server, then select the server in the portal. Replace NNNNN with the number from your server name.
In the left menu pane, under Security, select Auditing.
Auditing is turned off by default. To enable it on your database server, toggle Enable Azure AQL Auditing to ON.
After the ON button is selected, select the Storage checkbox.
Select your subscription.
You can select an existing storage account, or create a new storage account to store your audits. The storage account must be configured to use the same region as your server.
In this case, define a new storage account. Under Storage account, select Create new. The Create storage account pane displays. Name the storage account <server-name>auditing, replacing <server-name> with your logical server name.
Leave the rest of the options at their defaults, and select OK. Back in the Storage settings pane, leave the defaults, and select OK.
Select Save to save your changes and enable auditing on your database server.
Now generate some audit records and take a look at what you can expect.
Sign back in to the database as the ApplicationUser user.
sqlcmd -S tcp:[server-name].database.windows.net,1433 -d marketplaceDb -U 'ApplicationUser' -P '[password]' -N -l 30Run the following query.
SELECT FirstName, LastName, EmailAddress, Phone FROM SalesLT.Customer;
GO
Back in the Azure portal, on your SQL server, select SQL databases in the left menu pane, and select the marketplace database.
In the left menu pane on your marketplace database, under Security, select Auditing.
Because you enabled auditing at the server-level, you should see that it's enabled here. Select View audit logs in the top menu bar to view the logs.
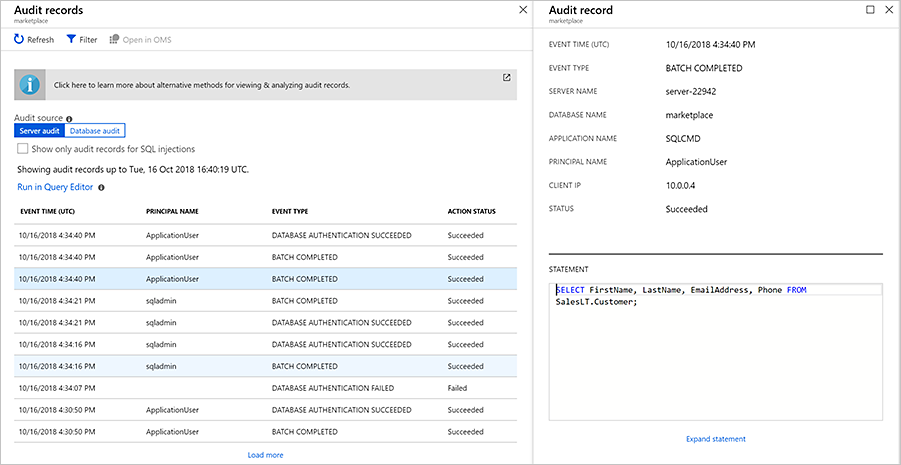
You should see one or more audit records with PRINCIPAL NAME of ApplicationUser and EVENT TYPE of BATCH COMPLETED. One of them should contain the details of the query you executed. You might also see other events such as authentication failures and success. Select any record to see the full details of the event.

These actions configure the audits at the database server level. The audits apply to all databases on the server. You can also configure auditing at a database level.
Take a look at another feature that uses these logs to increase the security of your database.
Advanced Data Security for Azure SQL Database
Advanced Data Security (ADS) provides a set of advanced SQL security capabilities, including data discovery & classification, vulnerability assessment, and Advanced Threat Protection.
- Data discovery & classification (currently in preview) provides capabilities built into Azure SQL Database for discovering, classifying, labeling, and protecting the sensitive data in your databases. It can be used to provide visibility into your database classification state, and to track the access to sensitive data within the database and beyond its borders.
- Vulnerability assessment is an easy to configure service that can discover, track, and help you remediate potential database vulnerabilities. It provides visibility into your security state, and includes actionable steps to resolve security issues, and enhance your database fortifications.
- Advanced Threat Protection detects anomalous activities indicating unusual and potentially harmful attempts to access or exploit your database. It continuously monitors your database for suspicious activities, and provides immediate security alerts on potential vulnerabilities, SQL injection attacks, and anomalous database access patterns. Advanced Threat Protection alerts provide details of the suspicious activity and recommend action on how to investigate and mitigate the threat.
Setup and configuration
Enable ADS on your database. ADS is a server-level setting, so start there.
Back in the Azure portal, go to your SQL server. In the search bar at the top of the page, search for _<server-name>, and then select the server.
In the left menu pane, under Security, select Microsoft Defender for Cloud.
Select Enable Microsoft Defender for SQL.
Select Configure next to the message Enabled at the subscription-level. The Server settings pane displays.
Periodic recurring scans is on by default. When a weekly scan is triggered, a scan result summary is sent to the email address you provide. In this case, turn this off. Also send email notification to admins and subscription owners is enabled by default to send the threats to the service administrators. Select Save at the top to save your settings.
Under Advanced Threat Protection Settings, select Add your contact details... to open the Defender for Cloud Email notifications pane. Here, you can optionally define where notification emails are delivered for both the vulnerability assessment and Advanced Threat Protection as a list of semicolon separated email addresses. Also send email notification to admins and subscription owners is enabled by default to send the threats to the service administrators.
You can also select Enable Auditing.... to turn on Azure SQL Auditing.
Select Save to apply the changes.
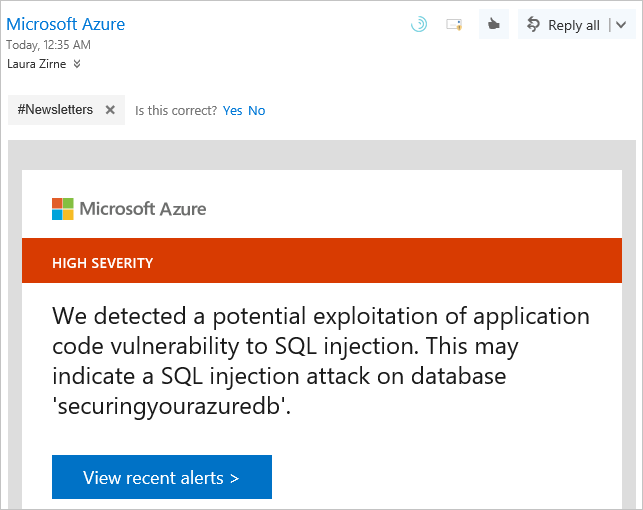
You receive email notifications as vulnerabilities are detected. The email outlines what occurred and the actions to take.

Data discovery & classification
Go to your marketplace database. In the search bar at the top of the Azure portal, search for marketplace, and then select the database.
In the left menu pane, under Security, select Data Discovery & Classification.
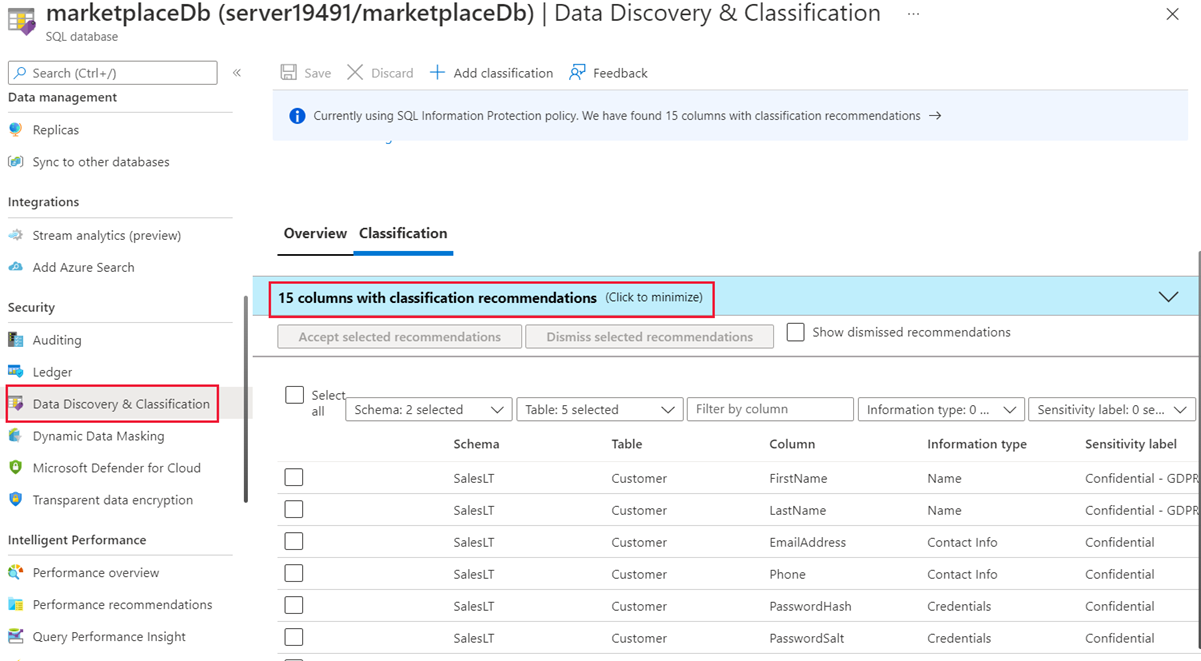
The Classification tab shows columns within your tables that need to be protected. Some of the columns might have sensitive information or might be considered classified in different countries or regions.
A message appears if any columns need protection configured. This message is formatted like 15 columns with classification recommendations. You can select the text to view the recommendations.
Select the columns that you want to classify by selecting the checkmark next to the column, or select the checkbox to the left of the schema header. Select the Accept selected recommendations button to apply the classification recommendations.
Next, edit the columns and then define the information type and the sensitivity label for the database. Select Save to save the changes.
No active recommendations should be listed once you managed the recommendations successfully.
Security vulnerabilities
In the left menu pane, under Security, select Microsoft Defender for Cloud.
The Recommendations section lists configuration issues on your database and the associated risk.
Select a recommendation. On the recommendation pane, you see the details, such as the risk level, which database it applies to, a description of the vulnerability, and the recommended remediation to fix the issue. Apply the remediation to fix the issue or issues. Make sure to address all the vulnerabilities.
Security incidents and alerts
This section displays a list of detected threats.
Address any issues by following the recommendations. For issues such as the SQL injection warnings, you can look at the query and work backward to where the query is being executed in code. Once found, you should rewrite the code so it no longer has the issue.
