Note
Access to this page requires authorization. You can try signing in or changing directories.
Access to this page requires authorization. You can try changing directories.
This article describes how to restore a SQL Server instance or an individual database in an Azure virtual machine (VM) by using snapshot backups (preview). It provides step‑by‑step guidance for instance‑level and database‑level restores.
Note
- This preview feature supports the Alternate Location Restore (ALR) only.
- Integration with the Resiliency experience is currently not supported for snapshot backup of SQL Server instances (preview).
Prerequisites
Before you restore from a SQL instance snapshot recovery point, review the following prerequisites:
- The SQL instance is backed up using snapshot backup, and the backup is available in the Recovery Services vault.
- The required permissions to perform restore operations in Azure are available.
Restore the entire SQL instance
The SQL instance restore from snapshot backup allows you to restore the entire SQL instance, including all databases, to a previous state. This operation is useful in scenarios when you need to restore the entire SQL Server instance at once.
To restore the entire SQL instance, follow these steps:
Go to the Recovery Services vault and select Protected items > Backup items.
On the Backup items pane, select SQL Server in Azure VM (Snapshot backup) (Preview).

On the Backup Items pane, for the required backup instance, select View details.
On the selected backup instance pane, select Restore.
On the Restore pane, on the Basics tab, select Next > Restore point.
On the Restore point tab, for Select restore type, choose Alternate location restore (ALR) or Restore as disk.
- Alternate location restore: Restores the SQL instance or database to a different location on another virtual machine (VM).
- Restore as disk: Restores individual disks and attach them to the virtual machine of your choice.
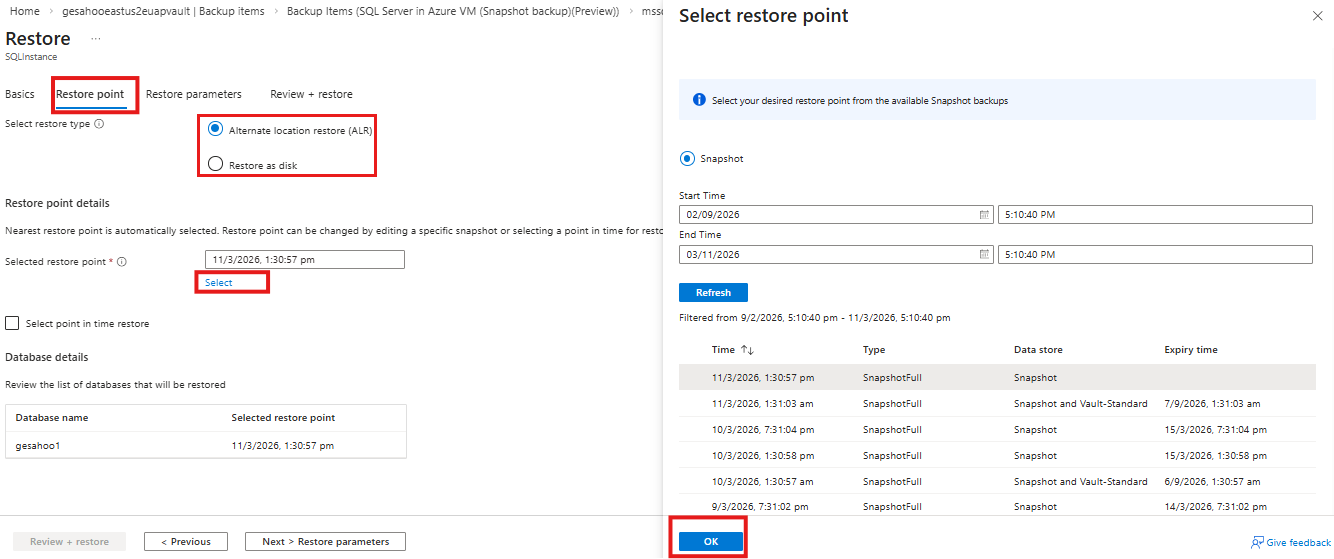
For Selected restore point, click Select to select an available restore point.
By default, the latest restore point is selected.
On the Select restore point pane, select the required snapshot restore point from the list, and select OK.
On the Restore pane, on the Restore point tab, you can select Point in time restore to apply transaction logs for a more granular restore.
The available log points for each database show the log backup frequency you set up during backup configuration.

Select Next > Restore parameters.
On the Restore parameters tab, select the Target Server and Target Instance where you want to restore.

For Managed Identities, select the required managed identity for Azure Backup to do the restore operation, and select Validate.

If necessary roles are missing, select Assign missing roles. If you don't have permissions, download the assignment template and share it with your admin to complete the role assignment.
After validation, select Next > Review + restore.
On the Review + restore tab, review the restore settings, and select Restore.


Restore an individual SQL database
You can restore an individual SQL database from a snapshot backup without affecting the entire SQL instance. Use this operation when an issue affects a single database, such as corruption, accidental deletion, or other failures. You can restore only the affected database to a previous state.
To restore an individual SQL database in an instance, follow these steps:
Go to the Recovery Services vault and select Protected items > Backup items.
On the Backup items pane, select SQL Database in Azure VM.
On the Backup Items pane, select View details corresponding to the database listed under its instance with the Backup type set to Snapshot backup.
On the selected SQL database backup item pane, select Restore.
On the Restore pane, on the Basics tab, select Next > Restore point.
On the Restore point tab, for Selected restore point, click Select.
On the Restore point tab, for Restore point details, select Log or Snapshot to choose the required restore point.
- Snapshot: Allows you to select from available snapshot restore points in the subscription (Snapshot data store) or the vault (Vault standard), with snapshot data store selections providing faster restores.
- Log: Allows you to restore the database by applying the appropriate logs to the closest available snapshot restore point, enabling granular point-in-time recovery.

For Selected restore point, click Select.
On the Select restore point pane, select the required snapshot restore point or log point-in-time based on the selected option, and select OK.
On the Restore pane, on the Restore point tab, select Next > Restore parameters.
On the Restore parameters tab, select the Target Server and Target Instance, and Target resource group where you want to restore.
For Restored DB Name, enter the restored database name along with the target path.
For Managed Identity, select the required identity, and select Validate.
If necessary roles are missing, select Assign missing roles. If you don't have permissions, download the assignment template and share it with your admin to complete the role assignment.
After validation, select Next > Review + restore.
On the Review + restore tab, review the restore settings, and select Restore.

Next step
Manage and monitor SQL Server database and instance snapshot (preview) backups.