In this article, you learn how to create a network topology with Azure Virtual Network Manager. You can choose between two connectivity topologies and complete the steps by using either the Azure portal or Azure PowerShell:
Use the tabs throughout this article to select your topology, and then select whether you want to use the Azure portal or Azure PowerShell.
Select the network topology you want to create. Then select the Azure portal or PowerShell tab to complete the steps.
With a mesh topology, all the virtual networks of the same region in the network groups included in the configuration can communicate with one another. You can enable cross-region connectivity by enabling the global mesh setting in the connectivity configuration.
With a hub-and-spoke topology, you select a virtual network to act as a hub, and all spoke virtual networks have bi-directional peering with only the hub by default. You can also enable direct connectivity between spoke virtual networks in the same spoke network group and enable the spoke virtual networks to use the gateway in the hub virtual network.
Create a network group
This section helps you create a network group containing the virtual networks you're using for the mesh topology.
Note
This how-to guide assumes you created an Azure Virtual Network Manager instance using the quickstart guide.
Browse to your resource group, and select your Virtual Network Manager resource.
Under Settings, select Network groups. Then select + Create.
On the Create a network group pane, enter or select the following information, and then select Create:
| Setting |
Value |
| Name |
Enter a name for your network group. |
| Description |
(Optional) Provide a description of this network group. |
| Member type |
Select Virtual network from the dropdown menu. |
Confirm that the new network group is now listed on the Network groups pane.
Define network group members
Azure Virtual Network Manager provides two methods for adding membership to a network group. You can manually add virtual networks or use Azure Policy to conditionally add virtual networks to the network group. This how-to manually adds membership. For information on defining group membership with Azure Policy, see Define network group membership with Azure Policy.
To manually add the desired virtual networks to your network group for use in your connectivity configuration, follow these steps:
From the list of network groups, select your network group. Under Manually add members, select Add virtual networks.
On Manually add members, select all desired virtual networks and select Add.
To review the network group membership that you manually added, select Group Members on the Network Group page under Settings.
Create a mesh connectivity configuration
This section guides you through creating a mesh configuration with the network group you created in the previous section.
Select Configurations under Settings, and then select + Create.
Select Connectivity configuration from the drop-down menu to begin creating a connectivity configuration.
On Basics, enter the following information, and select Next: Topology >.
| Setting |
Value |
| Name |
Enter a name for this configuration. |
| Description |
Optional Enter a description about what this configuration does. |
On the Topology tab, select the Mesh topology if not already selected, and leave the Enable mesh connectivity across regions unchecked. Cross-region connectivity isn't required for this setup since all the virtual networks in the network group are in the same region.
On Add network groups, select the network group you want to add to this configuration. Then select Select to save.
Important
Add multiple network groups to a mesh connectivity configuration to establish connectivity between all the member virtual networks of all the selected network groups in the same regions by default. Enable mesh connectivity across regions connects all virtual networks of all selected network groups across all regions.
Select Review + create and then Create to create the mesh connectivity configuration.
Deploy the mesh configuration
To apply this configuration in your environment, deploy the configuration to the regions where your selected virtual networks reside.
Select Deployments under Settings, and then select Deploy configuration.
On Deploy a configuration, select the following settings:
| Setting |
Value |
| Configurations |
Select Include connectivity configurations in your goal state. |
| Connectivity Configurations |
Select the name of the configuration you created in the previous section. |
| Target regions |
Select all the regions that apply to virtual networks you select for the configuration. To gradually roll out this configuration, select a subset of regions. |
Select Next and then select Deploy to complete the deployment.
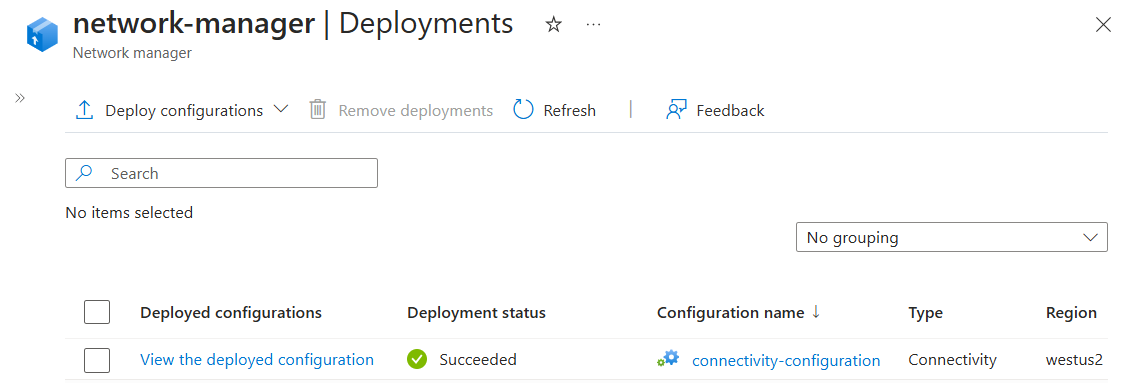
The deployment displays in the list for the selected region. The deployment of the configuration can take a few minutes to complete. Select the Refresh button to check on the status of the deployment.
Confirm deployment
See view applied configurations.
To test connectivity between virtual networks, deploy a test virtual machine into each virtual network and start an ICMP request between them.
Create a network group and add members
This section helps you create a network group containing the virtual networks you're using for the mesh topology.
Create a network group for virtual networks by using New-AzNetworkManagerGroup.
$ng = @{
    Name = 'myNetworkGroup'
    ResourceGroupName = 'myAVNMResourceGroup'
    NetworkManagerName = 'myAVNM'
}
$networkgroup = New-AzNetworkManagerGroup @ng
Add the static member to the static membership group by using New-AzNetworkManagerStaticMember.
    $vnet = get-AZVirtualNetwork -ResourceGroupName 'myAVNMResourceGroup' -Name 'VNetA'
    $sm = @{
    NetworkGroupName = $networkgroup.name
    ResourceGroupName = 'myAVNMResourceGroup'
    NetworkManagerName = 'myAVNM'
    Name = 'staticMember'
    ResourceId = $vnet.id
    }
    $staticmember = New-AzNetworkManagerStaticMember @sm
Create a mesh connectivity configuration
This section guides you through how to create a mesh configuration with the network group you created in the previous section.
Create a connectivity group item to add a network group to by using New-AzNetworkManagerConnectivityGroupItem.
$gi = @{
    NetworkGroupId = $networkgroup.Id
}
$groupItem = New-AzNetworkManagerConnectivityGroupItem @gi
Create a configuration group and add the group item from the previous step.
[System.Collections.Generic.List[Microsoft.Azure.Commands.Network.Models.PSNetworkManagerConnectivityGroupItem]]$configGroup = @()
$configGroup.Add($groupItem)
Create the connectivity configuration by using New-AzNetworkManagerConnectivityConfiguration.
$config = @{
    Name = 'connectivityconfig'
    ResourceGroupName = 'myAVNMResourceGroup'
    NetworkManagerName = 'myAVNM'
    ConnectivityTopology = 'Mesh'
    AppliesToGroup = $configGroup
}
$connectivityconfig = New-AzNetworkManagerConnectivityConfiguration @config
Deploy the mesh configuration
Commit the configuration to the target regions by using Deploy-AzNetworkManagerCommit.
[System.Collections.Generic.List[string]]$configIds = @()
$configIds.add($connectivityconfig.id)
[System.Collections.Generic.List[string]]$target = @()
$target.Add("westus")

$deployment = @{
    Name = 'myAVNM'
    ResourceGroupName = 'myAVNMResourceGroup'
    ConfigurationId = $configIds
    TargetLocation = $target
    CommitType = 'Connectivity'
}
Deploy-AzNetworkManagerCommit @deployment
Confirm deployment
Go to one of the virtual networks in the portal and select Network Manager under Settings. You should see the configuration listed on that page.
To test connectivity between virtual networks, deploy a test virtual machine into each virtual network and start an ICMP request between them.
Create a network group
This section helps you create a network group containing the virtual networks you're using as the spokes for the hub-and-spoke topology.
Note
This how-to guide assumes you created an Azure Virtual Network Manager instance using the quickstart guide.
Browse to your resource group, and select your Virtual Network Manager resource.
Under Settings, select Network groups. Then select + Create.
On the Create a network group pane, enter or select the following information, and then select Create:
| Setting |
Value |
| Name |
Enter a name for your network group. |
| Description |
(Optional) Provide a description of this network group. |
| Member type |
Select Virtual network from the dropdown menu. |
Confirm that the new network group is now listed on the Network groups pane.
Define network group members
Azure Virtual Network Manager provides two methods for adding membership to a network group. You can manually add virtual networks or use Azure Policy to conditionally add virtual networks to the network group. This how-to manually adds membership. For information on defining group membership with Azure Policy, see Define network group membership with Azure Policy.
To manually add the desired virtual networks to your network group for use in your connectivity configuration, follow these steps:
From the list of network groups, select your network group. Under Manually add members, select Add virtual networks.
On Manually add members, select all desired virtual networks and select Add.
To review the network group membership that you manually added, select Group Members on the Network Group page under Settings.
Create a hub and spoke connectivity configuration
This section guides you through creating a hub and spoke configuration with the network group you created in the previous section.
Select Configurations under Settings, and then select + Create.
Select Connectivity configuration from the drop-down menu to begin creating a connectivity configuration.
On Basics, enter the following information, and select Next: Topology >.
| Setting |
Value |
| Name |
Enter a name for this configuration. |
| Description |
(Optional) Enter a description about what this configuration does. |
On the Topology tab, select the Hub and spoke topology under Topology.
Select the Delete existing peerings checkbox if you want to remove all previously created virtual network peerings between virtual networks in the network groups included in this configuration. Then select Select a hub.
On Select a hub, select the virtual network intended as the hub virtual network and select Select.
Select + Add network groups.
On Add network groups, select the network groups you want to add to this configuration as spokes. Then select Add to save.
Select the settings you want to enable for each spoke network group. The following three options appear next to each network group name under Spoke network groups:
- Direct connectivity: Select Enable peering within network group if you want to establish connectivity between virtual networks in the network group. By default, this connectivity is only established between virtual networks in this network group that belong to the same region.
- Global Mesh: This option is only selectable if direct connectivity is enabled. Select Enable mesh connectivity across regions if you want to establish connectivity across regions for all virtual networks in this network group.
- Gateway: Select Use hub as a gateway if you have a virtual network gateway in the hub virtual network that you want the virtual networks of this spoke network group to use to pass traffic to on-premises.
Select Review + Create > Create to create the hub and spoke connectivity configuration.
Deploy the hub and spoke configuration
To apply this configuration in your environment, deploy the configuration to the regions where your selected virtual networks reside.
Select Deployments under Settings, and then select Deploy a configuration.
On Deploy a configuration, select the following settings:
| Setting |
Value |
| Configurations |
Select Include connectivity configurations in your goal state. |
| Connectivity configurations |
Select the name of the configuration you created in the previous section. |
| Target regions |
Select all the regions that apply to virtual networks you select for the configuration. To gradually roll out this configuration, select a subset of regions. |
Select Next and then select Deploy to complete the deployment.
The deployment displays in the list for the selected region. The deployment of the configuration can take a few minutes to complete. Select the Refresh button to check on the status of the deployment.
Note
If you're currently using virtual network peerings created outside of Azure Virtual Network Manager and want to manage your topology and connectivity by using Azure Virtual Network Manager, you have a few options for deployment to eliminate or minimize downtime to your network:
- Deploy Azure Virtual Network Manager connectivity configurations on top of existing peerings. Connectivity configurations are fully compatible with preexisting manual peerings. When you deploy a connectivity configuration, by default Azure Virtual Network Manager reuses existing peerings that achieve the connectivity described in the configuration and establishes additional connectivity as needed. This behavior means that you don't need to delete any existing peerings between the hub and spoke virtual networks.
- Fully manage connectivity by using Azure Virtual Network Manager. If you want to fully manage connectivity from a single control plane, you can opt to Delete existing peerings to remove all previously created peerings from the network groups' virtual networks targeted in this configuration upon deployment.
Confirm configuration deployment
See view applied configurations.
To test direct connectivity between spoke virtual networks, deploy a virtual machine into each spoke virtual network. Then initiate an ICMP request from one virtual machine to the other.
Use a Virtual WAN hub as the hub
Important
Using an Azure Virtual WAN hub in Azure Virtual Network Manager hub-and-spoke connectivity configurations is currently in preview. While in preview, functionality, availability, and other aspects of this feature might change in response to feedback.
This preview version is provided without a service level agreement, and isn't recommended for production workloads. Certain features might not be supported or can have constrained capabilities.
For more information, see Supplemental Terms of Use for Microsoft Azure Previews.
This section shows how to create an Azure Virtual Network Manager hub-and-spoke connectivity configuration where the hub is a Virtual WAN hub.
Prerequisites
- Read about Hub-and-spoke topology behavior with hub virtual networks and Virtual WAN hubs.
- Have an existing Azure Virtual Network Manager instance and at least one network group.
- Have an existing Virtual WAN and virtual hub.
- Have permission to create or update connectivity configurations in Azure Virtual Network Manager and create or select connection policies in Virtual WAN.
Create the connectivity configuration
In the Azure portal, go to your Network manager instance.
Select Configurations under Settings, and then select + Create.
Select Connectivity configuration.
On the Basics tab, enter a name and optional description, and then select Next: Topology >.
Select the Virtual WAN hub and connection policy
On the Topology tab, select Hub and spoke, and then select Select a hub.
In the Select a hub pane, select your Virtual WAN hub, and then select Select.
Select Select connection policy.
Select an existing connection policy, or select Create new to create a policy that applies to Virtual WAN virtual network connections that this connectivity configuration creates or updates.
A connection policy defines routing behavior for the virtual network connections, including route table association and propagation, route maps, and internet security behavior. For more information, see Connection policy.
Add spoke network groups
Select + Add network groups.
On Add network groups, select one or more network groups to use as spokes, and then select Add.
When you deploy this connectivity configuration:
- For virtual networks that aren't already connected to the selected Virtual WAN hub, Azure Virtual Network Manager creates Virtual WAN virtual network connections and applies the selected connection policy.
- For virtual networks that are already connected to the selected Virtual WAN hub, Azure Virtual Network Manager updates the existing connections to apply the selected connection policy.
Create, deploy, and validate
Select Review + Create > Create to create the connectivity configuration.
Open Deployments under Settings, and then select Deploy a configuration.
On the deployment page, select Include connectivity configurations in your goal state, select your new connectivity configuration, select the target regions, and then select Deploy.
In your Virtual WAN resource, go to Virtual network connections and verify that the expected spoke virtual network connections are in a connected state.
In the virtual hub, review effective routes to confirm route behavior reflects the selected connection policy.
Create a virtual network group and add members
This section shows you how to create a network group that contains the virtual networks you're using for the hub-and-spoke topology.
Create a network group for virtual networks by using New-AzNetworkManagerGroup.
$ng = @{
        Name = 'myNetworkGroup'
        ResourceGroupName = 'myAVNMResourceGroup'
        NetworkManagerName = 'myAVNM'
    }
    $networkgroup = New-AzNetworkManagerGroup @ng
Add the static member to the static membership group by using New-AzNetworkManagerStaticMember.
    $vnet = get-AZVirtualNetwork -ResourceGroupName 'myAVNMResourceGroup' -Name 'VNetA'
    $sm = @{
    NetworkGroupName = $networkgroup.name
    ResourceGroupName = 'myAVNMResourceGroup'
    NetworkManagerName = 'myAVNM'
    Name = 'staticMember'
    ResourceId = $vnet.id
    }
    $staticmember = New-AzNetworkManagerStaticMember @sm
Create a hub-and-spoke connectivity configuration
This section shows you how to create a hub-and-spoke configuration by using the network group you created in the previous section.
Create a spokes connectivity group item to add a network group by using New-AzNetworkManagerConnectivityGroupItem. You can enable direct connectivity by using the -GroupConnectivity flag, global mesh by using the -IsGlobal flag, or use the gateway in the hub virtual network by using the -UseHubGateway flag.
$spokes = @{
    NetworkGroupId = $networkgroup.Id
}
$spokesGroup = New-AzNetworkManagerConnectivityGroupItem @spokes -UseHubGateway -GroupConnectivity 'DirectlyConnected' -IsGlobal
Create a spokes connectivity group and add the group item from the previous step.
[System.Collections.Generic.List[Microsoft.Azure.Commands.Network.Models.NetworkManager.PSNetworkManagerConnectivityGroupItem]]$configGroup = @()
$configGroup.Add($spokesGroup)
Create a hub connectivity group item and define the virtual network you use as the hub by using New-AzNetworkManagerHub.
[System.Collections.Generic.List[Microsoft.Azure.Commands.Network.Models.NetworkManager.PSNetworkManagerHub]]$hubList = @()

$hub = @{
    ResourceId = '/subscriptions/aaaa0a0a-bb1b-cc2c-dd3d-eeeeee4e4e4e/resourceGroups/myAVNMResourceGroup/providers/Microsoft.Network/virtualNetworks/VNetA'
    ResourceType = 'Microsoft.Network/virtualNetworks'
}
$hubvnet = New-AzNetworkManagerHub @hub

$hubList.Add($hubvnet)
Create the connectivity configuration by using New-AzNetworkManagerConnectivityConfiguration.
$config = @{
    Name = 'connectivityconfig'
    ResourceGroupName = 'myAVNMResourceGroup'
    NetworkManagerName = 'myAVNM'
    ConnectivityTopology = 'HubAndSpoke'
    Hub = $hubList
    AppliesToGroup = $configGroup
}
$connectivityconfig = New-AzNetworkManagerConnectivityConfiguration @config -DeleteExistingPeering -IsGlobal
Note
If you're currently using virtual network peerings created outside of Azure Virtual Network Manager and want to manage your topology and connectivity by using Azure Virtual Network Manager, you have a few options for deployment to eliminate or minimize downtime to your network:
- Deploy Azure Virtual Network Manager connectivity configurations on top of existing peerings. Connectivity configurations are fully compatible with preexisting manual peerings. When you deploy a connectivity configuration, by default Azure Virtual Network Manager reuses existing peerings that achieve the connectivity described in the configuration and establishes additional connectivity as needed. This behavior means that you don't need to delete any existing peerings between the hub and spoke virtual networks.
- Fully manage connectivity by using Azure Virtual Network Manager. If you want to fully manage connectivity from a single control plane, you can opt to Delete existing peerings to remove all previously created peerings from the network groups' virtual networks targeted in this configuration upon deployment.
Deploy the hub and spoke configuration
Commit the configuration to the target regions by using Deploy-AzNetworkManagerCommit.
[System.Collections.Generic.List[string]]$configIds = @()
$configIds.add($connectivityconfig.id)
[System.Collections.Generic.List[string]]$regions = @()
$regions.Add("westus")

$deployment = @{
    Name = 'myAVNM'
    ResourceGroupName = 'myAVNMResourceGroup'
    ConfigurationId = $configIds
    TargetLocation = $regions
    CommitType = 'Connectivity'
}
Deploy-AzNetworkManagerCommit @deployment
Confirm configuration deployment
Go to one of the virtual networks in the Azure portal and select Peerings under Settings. You see a new peering connection created between the hub and the spoke virtual networks with AVNM in the name.
To test direct connectivity between spokes, deploy a virtual machine into each spokes virtual network. Then start an ICMP request from one virtual machine to the other.