Note
Access to this page requires authorization. You can try signing in or changing directories.
Access to this page requires authorization. You can try changing directories.
In this quickstart, you create a Microsoft Foundry resource and verify that you can connect to it successfully.
The Microsoft Foundry resource is the primary Azure resource type for building, deploying, and managing generative AI models, applications, and agents. It provides an Azure-managed boundary for identity, access control, networking, security, billing, and monitoring, so your AI workloads follow the same resource model as everything else in Azure.
Within that boundary, a single surface brings together your agents, model deployments, and evaluations, with Azure OpenAI and Foundry Tools (formerly Azure AI services) reachable through one endpoint and key. You can group related work into projects that keep individual use cases separate while sharing the same underlying resource.
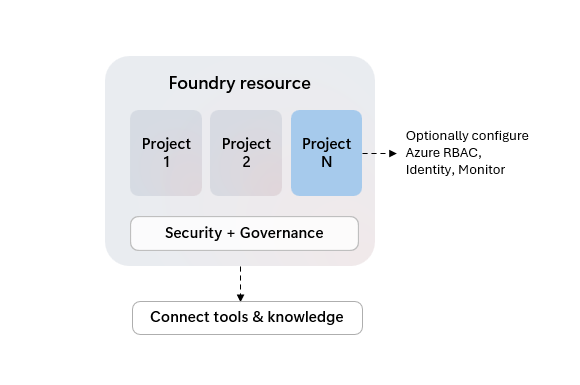
Three ways to create a Foundry resource
Choose the path that matches your governance requirements:
| Approach | When to use it | How to create it |
|---|---|---|
| Basic setup — public networking, Microsoft-managed encryption, default storage. | Quick prototypes, individual developers, or tenants without strict security requirements. | This quickstart (Azure portal, Azure CLI, or Azure PowerShell). |
| With security controls — your network, your encryption key, your identity, your policies. | IT admins enforcing an organization security baseline. | The Azure portal advanced tabs (Storage, Network, Identity, Encryption) shown in Configure advanced security settings in the Azure portal, or the Bicep and Terraform quickstarts. |
| Standard setup for agents — security controls plus your own Azure Cosmos DB, AI Search, and Storage account for agent thread storage. | Production agent deployments with data residency, compliance, or capacity-management requirements. Variants apply to Speech, Language, Vision, and Content Understanding. | The Storage > Agent service section of the Azure portal create wizard (shown in Configure advanced security settings in the Azure portal), or the Bicep and Terraform quickstarts. |
Create your first resource
To create your first resource, with basic Azure settings, follow the below steps using either Azure portal, Azure CLI, or PowerShell.
Prerequisites
- A valid Azure subscription - Create one for free.
- Azure RBAC role to create resources. You need one of the following roles assigned on your Azure subscription or resource group:
- Contributor
- Owner
- Custom role with
Microsoft.CognitiveServices/accounts/writepermission
Create a new Microsoft Foundry resource
If your organization requires customized Azure configurations like alternative names, security controls or cost tags, you might need to use the Azure portal or template options to comply with your organization's Azure Policy compliance.
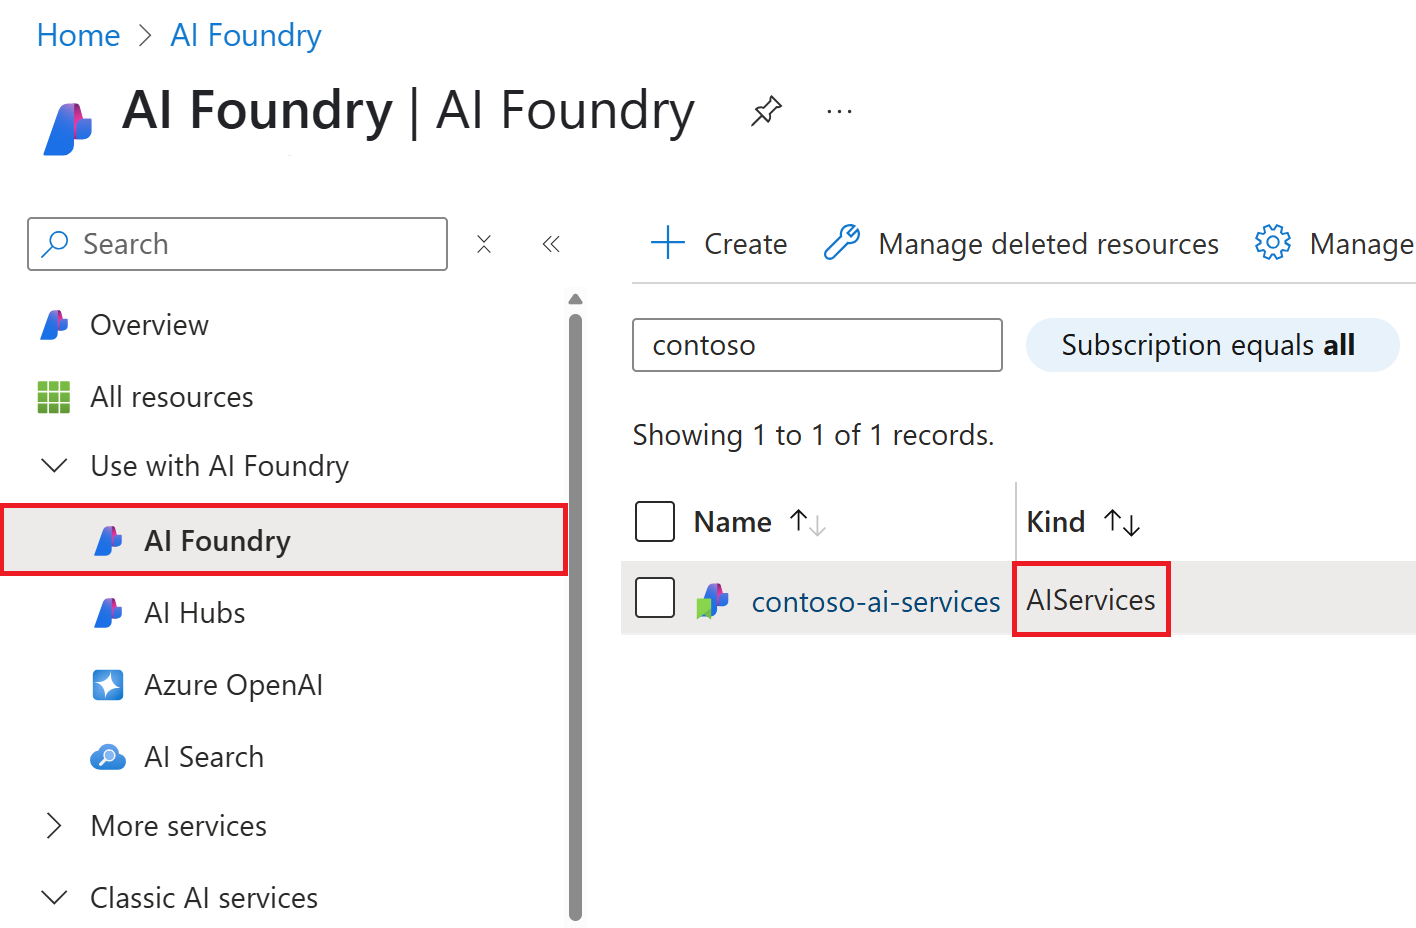
The Foundry resource is listed under Foundry > Foundry in the Azure portal. The API kind is AIServices. Look for the logo as shown here:
Tip
Foundry portal provides a way to create a new Foundry resource with basic, defaulted, settings.
To create a Foundry resource in the Azure portal follow these instructions:
Select this Foundry resource link: https://portal.azure.com/#create/Microsoft.CognitiveServicesAIFoundry
On the Create page, provide the following information:
Project details Description Subscription Select one of your available Azure subscriptions. Resource group The Azure resource group that will contain your Foundry resource. You can create a new group or add it to a preexisting group. Region The location of your Foundry Tool instance. Different locations may introduce latency, but have no impact on the runtime availability of your resource. Name A descriptive name for your Foundry resource. For example, MyAIServicesResource. Configure other settings for your resource as needed, read and accept the conditions (as applicable), and then select Review + create.
Tip
If your subscription doesn't allow you to create a Foundry resource, you might need to enable the privilege of that Azure resource provider using the Azure portal, PowerShell command or an Azure CLI command. If you are not the subscription owner, ask someone with the role of Owner or Admin to complete the registration for you or ask for the /register/action privileges to be granted to your account.
Clean up resources
If you want to clean up and remove a Foundry resource, you can delete the resource or resource group. Deleting the resource group also deletes any other resources contained in the group.
- In the Azure portal, expand the menu on the left side to open the menu of services, and choose Resource Groups to display the list of your resource groups.
- Locate the resource group containing the resource to be deleted.
- If you want to delete the entire resource group, select the resource group name. On the next page, Select Delete resource group, and confirm.
- If you want to delete only the Foundry resource, select the resource group to see all the resources within it. On the next page, select the resource that you want to delete, select the ellipsis menu for that row, and select Delete.
Use this quickstart to create a Foundry resource using Azure Command-Line Interface (CLI) commands.
Prerequisites
- A valid Azure subscription - Create one for free.
- The Azure CLI version 2.0 or later.
- Azure RBAC role to create resources. You need one of the following roles assigned on your Azure subscription or resource group:
- Contributor
- Owner
- Custom role with
Microsoft.CognitiveServices/accounts/writepermission
Install the Azure CLI and sign in
Install the Azure CLI. To sign into your local installation of the CLI, run the az login command:
az login
Create a new resource group
Before you create a Foundry resource, you must have an Azure resource group to contain the resource. When you create a new resource, you can either create a new resource group, or use an existing one. This article shows how to create a new resource group.
To create a resource, you'll need one of the Azure locations available for your subscription. You can retrieve a list of available locations with the az account list-locations command. Most Foundry Tools can be accessed from several locations. Choose the one closest to you, or see which locations are available for the service.
Important
- Remember your Azure location, as you will need it when calling the Microsoft Foundry resources.
- The availability of some Foundry Tools can vary by region. For more information, see Azure products by region.
az account list-locations --query "[].{Region:name}" --out table
After you have your Azure location, create a new resource group in the Azure CLI using the az group create command. In the example below, replace the Azure location westus2 with one of the Azure locations available for your subscription.
az group create --name ai-services-resource-group --location westus2
Create a Foundry resource
To create and subscribe to a new Foundry resource, use the az cognitiveservices account create command. This command adds a new billable resource to the resource group you created earlier. When you create your new resource, you'll need to know the kind of service you want to use, along with its pricing tier (or SKU) and an Azure location.
Important
Azure provides more than one resource kinds for Foundry Tools. Be sure to create one with the kind of AIServices.
You can create a Foundry resource named foundry-multi-service-resource with the command below.
az cognitiveservices account create --name foundry-multi-service-resource --resource-group ai-services-resource-group --kind AIServices --sku S0 --location westus2 --yes
Tip
If your subscription doesn't allow you to create a Foundry resource, you might need to enable the privilege of that Azure resource provider using the Azure portal, PowerShell command or an Azure CLI command. If you are not the subscription owner, ask someone with the role of Owner or Admin to complete the registration for you or ask for the /register/action privileges to be granted to your account.
Get current quota usage for your resource
Use the az cognitiveservices account list-usage command to get the usage for your resource.
az cognitiveservices account list-usage --name foundry-multi-service-resource --resource-group ai-services-resource-group --subscription subscription-name
Clean up resources
If you want to clean up and remove a Foundry resource, you can delete it or the resource group. Deleting the resource group also deletes any other resources contained in the group.
To remove the resource group and its associated resources, use the az group delete command.
az group delete --name ai-services-resource-group
Use this quickstart to create a Foundry resource using Azure PowerShell commands.
Prerequisites
- A valid Azure subscription - Create one for free.
- Azure PowerShell version 5.0 or later.
- Azure RBAC role to create resources. You need one of the following roles assigned on your Azure subscription or resource group:
- Contributor
- Owner
- Custom role with
Microsoft.CognitiveServices/accounts/writepermission
Install Azure PowerShell and sign in
Install Azure PowerShell. To sign in, run the Connect-AzAccount command:
Connect-AzAccount
Create a new Microsoft Foundry resource group
Before you create a Foundry resource, you must have an Azure resource group to contain the resource. When you create a new resource, you can either create a new resource group, or use an existing one. This article shows how to create a new resource group.
To create a resource, you'll need one of the Azure locations available for your subscription. You can retrieve a list of available locations with the Get-AzLocation command. Most Foundry Tools can be accessed from several locations. Choose the one closest to you, or see which locations are available for the service.
Important
- Remember your Azure location, as you will need it when calling the Foundry resources.
- The availability of some Foundry Tools can vary by region. For more information, see Azure products by region.
Get-AzLocation | Select-Object -Property Location, DisplayName
After you have your Azure location, create a new resource group in Azure PowerShell using the New-AzResourceGroup command. In the example below, replace the Azure location westus2 with one of the Azure locations available for your subscription.
New-AzResourceGroup -Name ai-services-resource-group -Location westus2
Create a Foundry resource
To create and subscribe to a new Foundry resource, use the New-AzCognitiveServicesAccount command. This command adds a new billable resource to the resource group you created earlier. When you create your new resource, you'll need to know the "kind" of service you want to use, along with its pricing tier (or SKU) and an Azure location:
Important
Azure provides more than one resource kinds for Foundry Tools. Be sure to create one with the Type (kind) of AIServices.
You can create a Foundry resource named foundry-multi-service-resource with the command below.
New-AzCognitiveServicesAccount -ResourceGroupName ai-services-resource-group -Name foundry-multi-service-resource -Type AIServices -SkuName S0 -Location westus2
Tip
If your subscription doesn't allow you to create a Foundry resource, you might need to enable the privilege of that Azure resource provider using the Azure portal, PowerShell command or an Azure CLI command. If you are not the subscription owner, ask someone with the role of Owner or Admin to complete the registration for you or ask for the /register/action privileges to be granted to your account.
Get current quota usage for your resource
Use the Get-AzCognitiveServicesAccountUsage command to get the usage for your resource.
Get-AzCognitiveServicesAccountUsage -ResourceGroupName ai-services-resource-group -Name foundry-multi-service-resource
Clean up resources
If you want to clean up and remove a Foundry resource, you can delete it or the resource group. Deleting the resource group also deletes any other resources contained in the group.
To remove the resource group and its associated resources, use the Remove-AzResourceGroup command.
Remove-AzResourceGroup -Name ai-services-resource-group
Configure advanced security settings in the Azure portal
The Azure portal Create a Foundry resource wizard exposes additional tabs for security and storage controls. Use these tabs when you create a resource with the with security controls or standard setup for agents approaches described earlier. Each tab corresponds to a specific governance concern; the following sections describe what each one controls and when to use it.
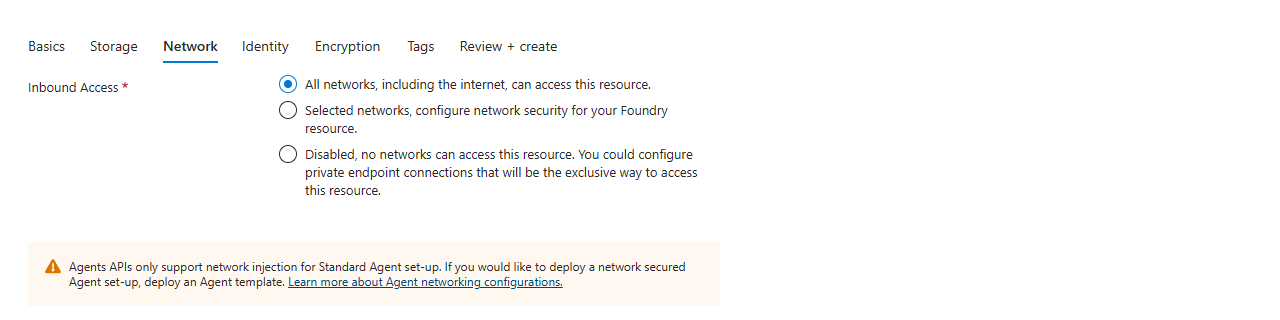
Network tab — restrict who can reach your resource
On the Network tab, under Inbound Access, choose how the resource is reachable from outside Azure:
- All networks — public endpoint open to the internet. Use only for prototypes.
- Selected networks — public endpoint scoped to specific virtual networks and IP ranges.
- Disabled — public endpoint turned off. Reach the resource exclusively through private endpoints. Use this option for regulated workloads or when your organization's network policy bans public endpoints.
Identity tab — choose how the resource authenticates to other services
On the Identity tab, enable a system-assigned managed identity (one identity tied to the resource lifecycle) or attach user-assigned managed identities (reusable identities you can grant to multiple resources). Use a managed identity instead of API keys whenever the Foundry resource needs to call Azure Storage, Azure Cosmos DB, Azure Key Vault, or any other Azure-RBAC-protected service. For role assignment guidance, see Role-based access control for Foundry.
Encryption tab — bring your own key for at-rest encryption
On the Encryption tab, the default is Microsoft-managed keys. Select Encrypt data using a customer-managed key (CMK) when your organization requires control over the key lifecycle, key rotation cadence, or revocation. CMK requires an Azure Key Vault with soft-delete and purge protection, and a managed identity with Key Vault Crypto Service Encryption User rights. For prerequisites and rotation guidance, see Customer-managed keys for encryption.

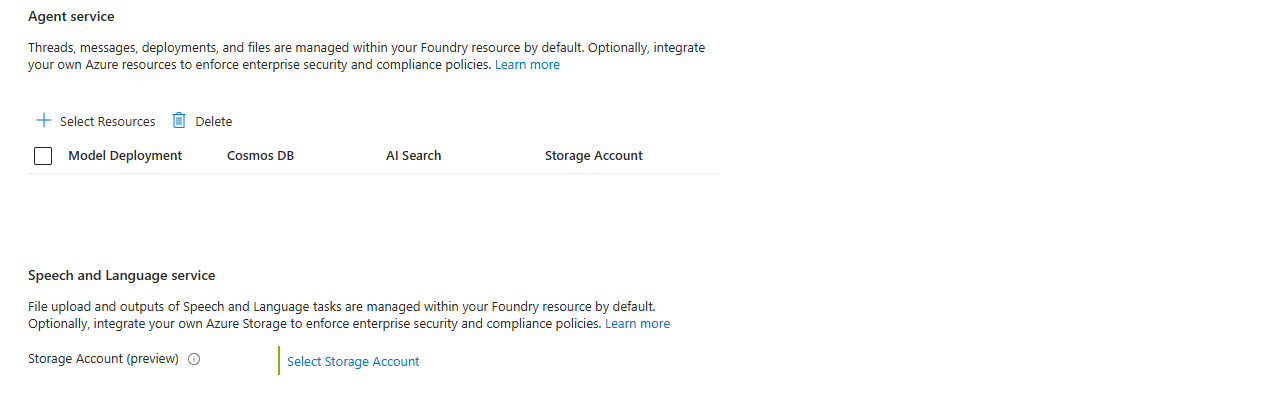
Storage tab — bring your own data stores for the Agent service
On the Storage tab, the Credential storage and application logging section lets you point the resource at your own Azure Key Vault and Application Insights instances instead of Microsoft-managed defaults.
The Agent service section is where you opt into the standard setup for agents. Select Select Resources to bind your own Azure Cosmos DB account (for thread storage), Azure AI Search index (for knowledge retrieval), and Storage account (for files) to a model deployment. Use this option when you need data residency, customer-managed encryption on agent data, or capacity isolation for production agent workloads. Speech and Language services have an analogous Storage Account (preview) option. For the architecture and prerequisites, see Agent service capability hosts.
Access your resource
With your first resource created, you can access and manage it by using the Azure portal, the Azure CLI, or Azure PowerShell:
- Azure portal — browse to your resource in the Azure portal to view its status, endpoint, keys, and configuration.
- Azure CLI — use the az cognitiveservices account commands to query and update the resource in scripts and automation.
- Azure PowerShell — use the Az.CognitiveServices cmdlets to query and update the resource in scripts and automation.
Verify your setup
Verify that your resource is set up correctly by using the Azure portal, the Azure CLI, or Azure PowerShell.
- Sign in to the Azure portal and go to your Foundry resource.
- On the Overview page, confirm that Status is Available (or that the provisioning state shows as succeeded).
- On the Overview page, note the Endpoint value. You use this endpoint to call the resource.
- Under Resource Management > Keys and Endpoint, confirm that keys and the endpoint are listed. This confirmation means the resource is provisioned and ready to use.
Grant or obtain developer permissions
Azure Role Based Access Control (RBAC) differentiates permissions between management and development actions. To build with Foundry, your user account must be assigned developer permissions ("data actions"). You can either use one of the built-in RBAC roles, or use a custom RBAC role.
Built-in Azure RBAC developer roles for Foundry include:
| Role | Description |
|---|---|
| Foundry Project Manager | Grants development permissions, and project management permissions. Can invite other users to collaborate on a project as 'Foundry User'. |
| Foundry User | Grants development permissions. |
| Foundry Account Owner | Grants full access to manage AI projects and accounts. Can invite other users to collaborate on a project as 'Foundry User'. |
| Foundry Owner | Grants full access to managed AI projects and accounts and build and develop with projects. |
Important
The Foundry RBAC roles were recently renamed. Foundry User, Foundry Owner, Foundry Account Owner, and Foundry Project Manager were previously named Azure AI User, Azure AI Owner, Azure AI Account Owner, and Azure AI Project Manager. You might still see the previous names in some places while the rename rolls out. The role IDs and core permissions are unchanged by the rename.
Note
The Foundry Owner role will be available to assign in the Azure and Foundry portal soon.
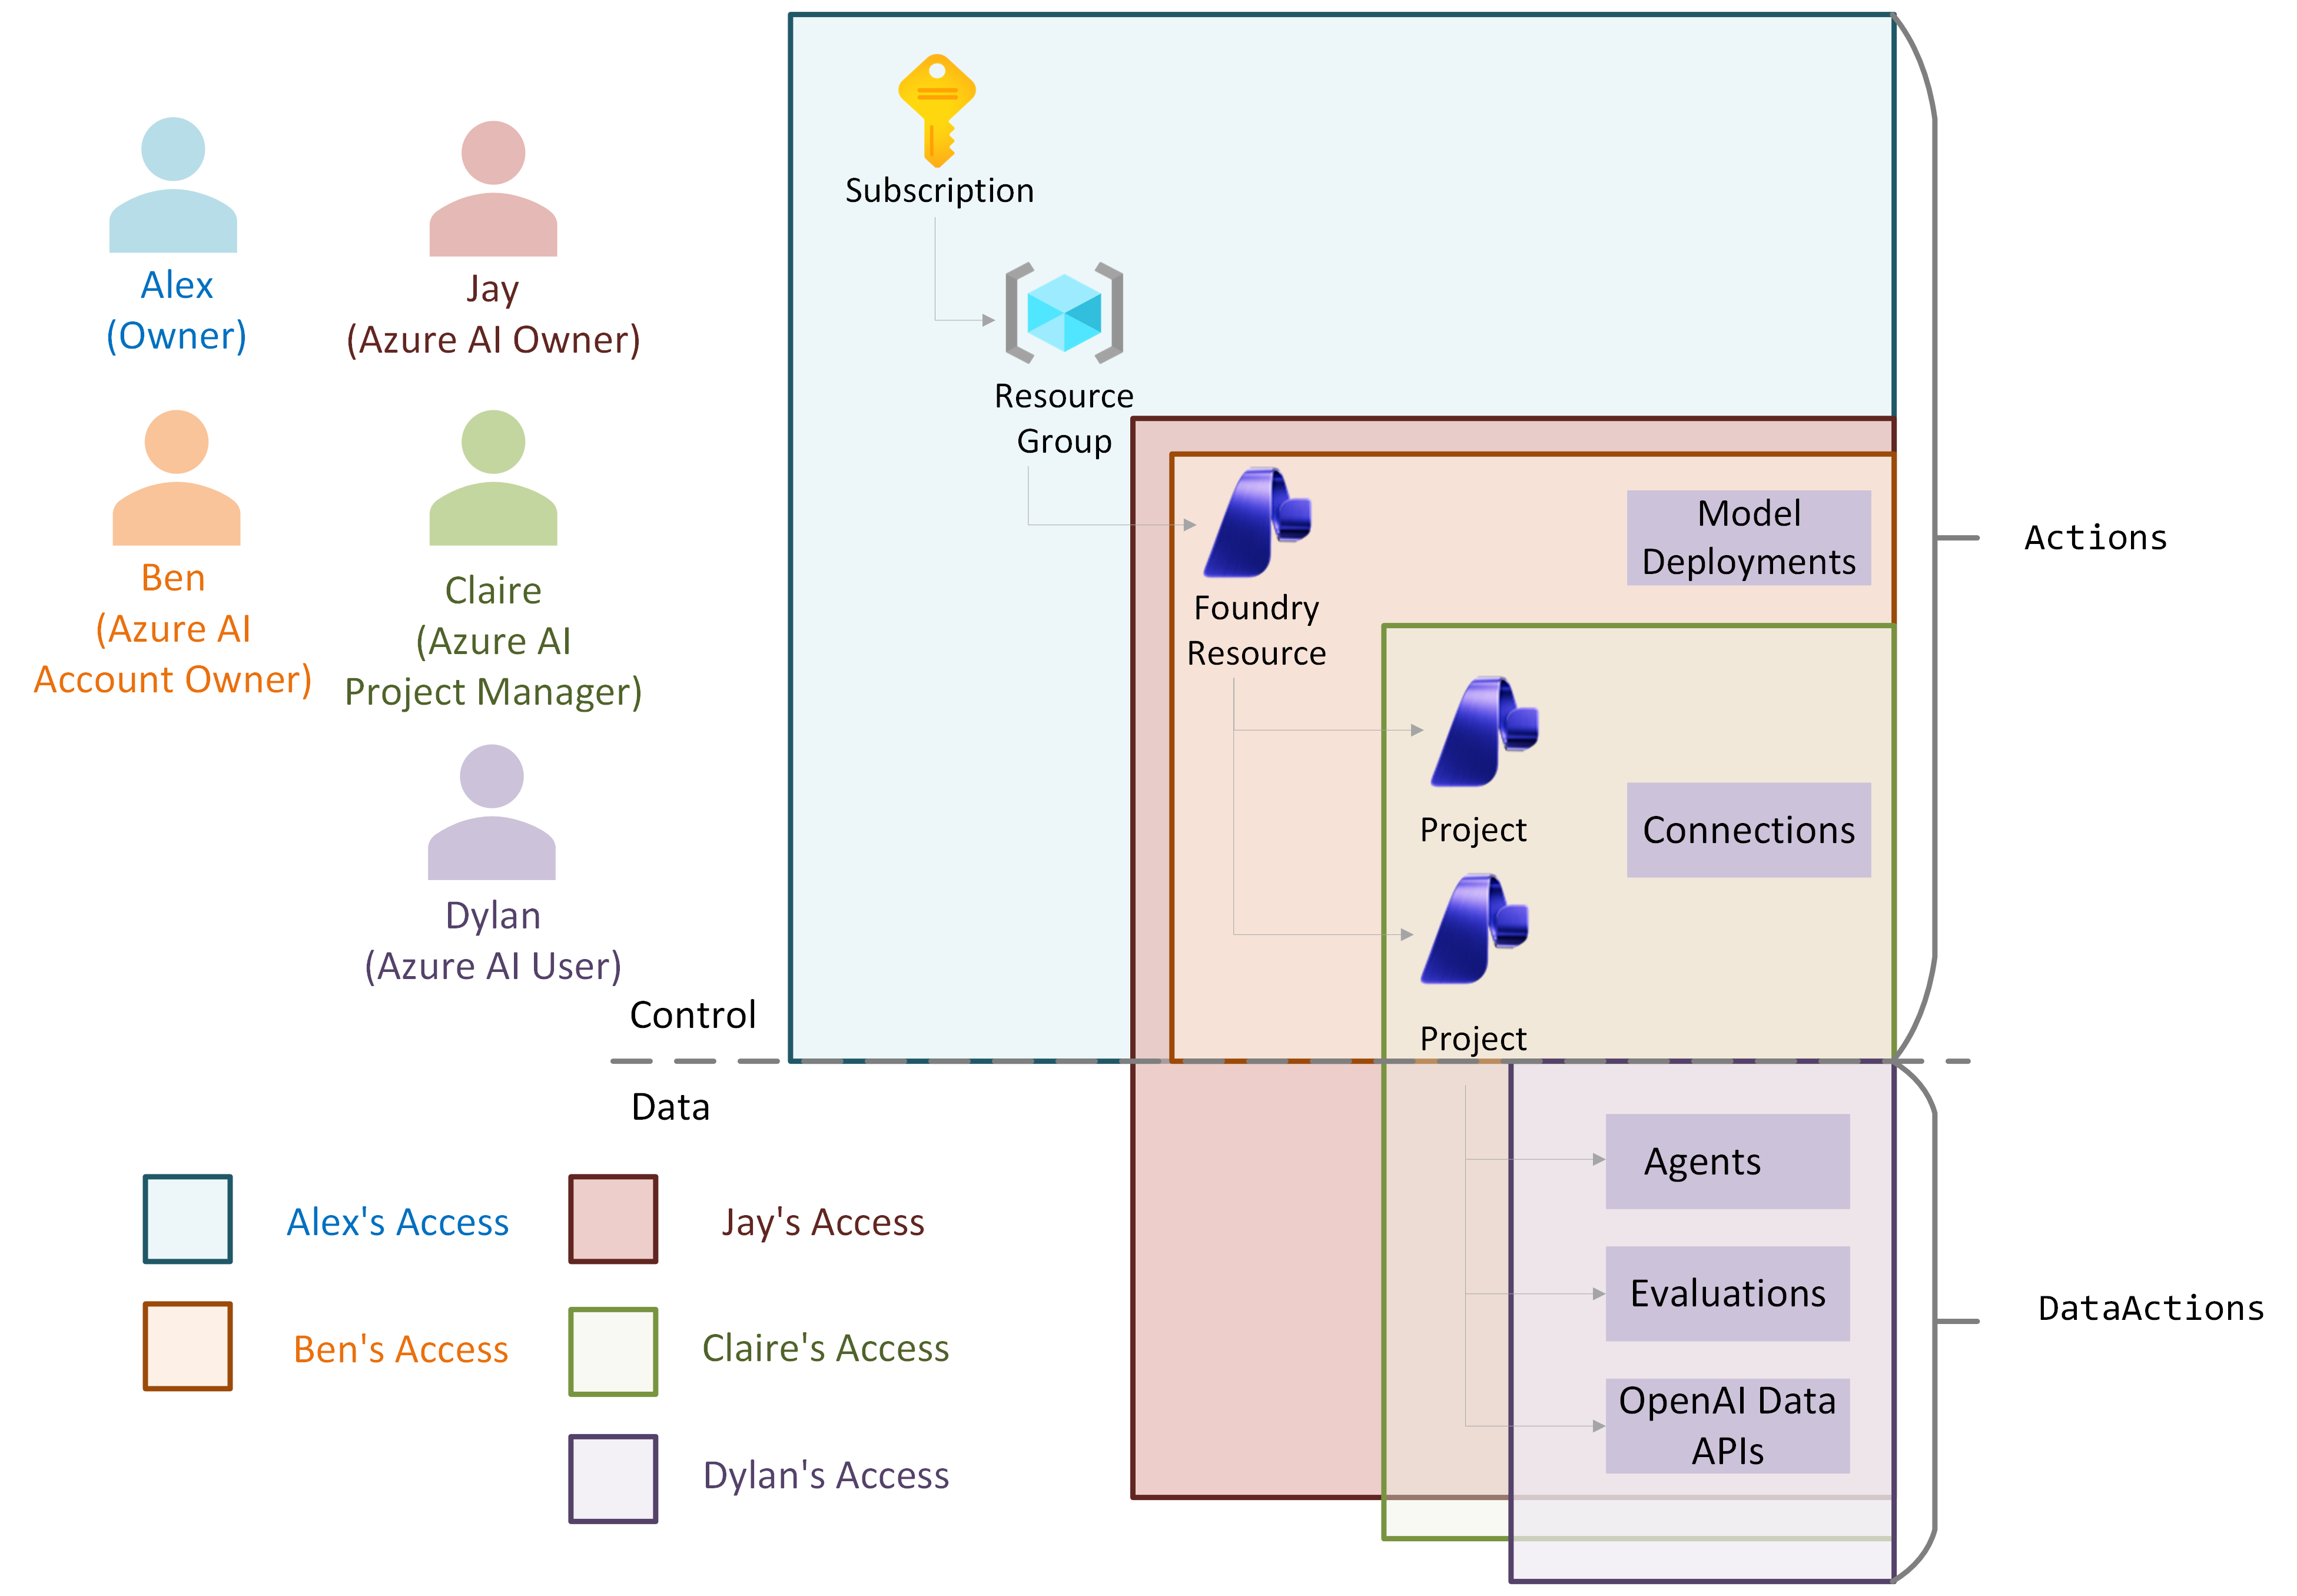
For larger enterprises with strict role based access requirements, use the Foundry User role to grant least privilege developer permissions. For smaller enterprises wanting their developers to self-serve within their organization, use the Foundry Owner role for developer permissions as well as resource creation permissions.
Only authorized users, typically the Azure subscription or resource group owner, can assign a role via the Azure portal.
Important
Azure Owner and Contributor roles do only include management permissions, and not development permissions. Development permissions are required to build with all capabilities in Foundry.
Start building in your first project
With permissions set up, you're now ready to start building Foundry. In Foundry portal open or create your first project. Projects organize your agent and model customization work in Foundry, and you can create multiple under the same resource.
Explore some of the services that come bundled with your resource:
| Service | Description |
|---|---|
 Foundry Agent Service Foundry Agent Service |
Combine the power of generative AI models with tools that allow agents to access and interact with real-world data sources. |
| Azure Model Inference |
Performs model inference for flagship models in the Foundry model catalog. |
 Azure OpenAI Azure OpenAI |
Performs a wide variety of natural language tasks. |
 Content Safety Content Safety |
A Foundry tool that detects unwanted content. |
 Document Intelligence Document Intelligence |
Turn documents into intelligent data-driven solutions. |
 Language Language |
Build apps with industry-leading natural language understanding capabilities. |
 Speech Speech |
Speech to text, text to speech, translation, and speaker recognition. |
 Translator Translator |
Uses AI-powered translation technology to translate more than 100 in-use, at-risk, and endangered languages and dialects. |
Next steps
- Create a project to organize your work.
- Connect tools to build more rich applications.
- Learn about access control in Foundry to invite others to your working environment.
- Secure your resource using private networking