In this article, you learn how to fine-tune a professional voice through the Microsoft Foundry portal.
Important
Professional voice fine-tuning is currently only available in some regions. After your voice model is trained in a supported region, you can copy the professional voice model to a Microsoft Foundry resource in another region as needed. For more information, see the footnotes in the Speech service table.
Training duration varies depending on how much data you use. It takes about 10 compute hours on average to fine-tune a professional voice. With a Microsoft Foundry standard (S0) resource, you can train four voices simultaneously. If you reach the limit, wait until at least one of your voice models finishes training, and then try again.
Choose a training method
After you validate your data files, use them to build your custom voice model. When you create a custom voice, you can choose to train it with one of the following methods:
Neural - HD Voice: Create an HD voice in the same language of your training data. Azure neural HD voices are LLM-based, optimized for dynamic conversations. Learn more about neural HD voices here.
Neural: Create a voice in the same language as your training data.
Neural - multilingual: Create a voice that speaks multiple languages using the single-language training data. For example, with the en-US primary training data, you can create a voice that speaks en-US, de-DE, zh-CN etc. secondary languages.
The primary language of the training data and the secondary languages must be in the languages that are supported for multilingual voice training. You don't need to prepare training data in the secondary languages.
Neural - multi style: Create a custom voice that speaks in multiple styles and emotions, without adding new training data. Multiple style voices are useful for video game characters, conversational chatbots, audiobooks, content readers, and more.
To create a multiple style voice, you need to prepare a set of general training data, at least 300 utterances. Select one or more of the preset target speaking styles. You can also create multiple custom styles by providing style samples, of at least 100 utterances per style, as extra training data for the same voice. The supported preset styles vary according to different languages. See available preset styles across different languages.
Neural - cross lingual: Create a voice that speaks a different language from your training data. For example, with the zh-CN training data, you can create a voice that speaks en-US.
The language of the training data and the target language must both be one of the languages that are supported for cross lingual voice training. You don't need to prepare training data in the target language, but your test script must be in the target language.
The language of the training data must be one of the languages that are supported for custom voice, cross-lingual, or multiple style training.
Train your custom voice model
To create a custom voice in Microsoft Foundry portal, follow these steps for one of the following methods:
In the new Microsoft Foundry portal, the Fine-tune a model wizard uses a single Training method dropdown that covers all variants. These steps continue from the wizard you opened in Create a professional voice, after you upload training data on the Training data pane.
- On the Training data pane, select the Training method that matches your scenario. Options include Neural - HD, Neural - Default, Neural - multilingual, Neural - multi style, and Neural - cross lingual. For details about each method, see Choose a training method.
- Select the training recipe Version. The latest version is selected by default. The supported features and training time can vary by version. In some cases, you can choose an earlier version to reduce training time.
- Confirm the Model language.
- From the Select dataset dropdown, select the dataset that you uploaded.
- Select Next.
- On the Review pane, review the settings and accept the terms of use.
- Select Train to start training the model.
In the Microsoft Foundry (classic) portal, select a training method below and follow the corresponding steps.
Sign in to the Microsoft Foundry portal.
Select Fine-tuning from the left pane and then select AI Service fine-tuning.
Select the professional voice fine-tuning task (by model name) that you started as described in the create professional voice article.
Select Train model > + Train model.
Select Neural - HD as the training method for your model. To use a different training method, see Neural, Neural - cross lingual, Neural - multi style, or Neural - multilingual.
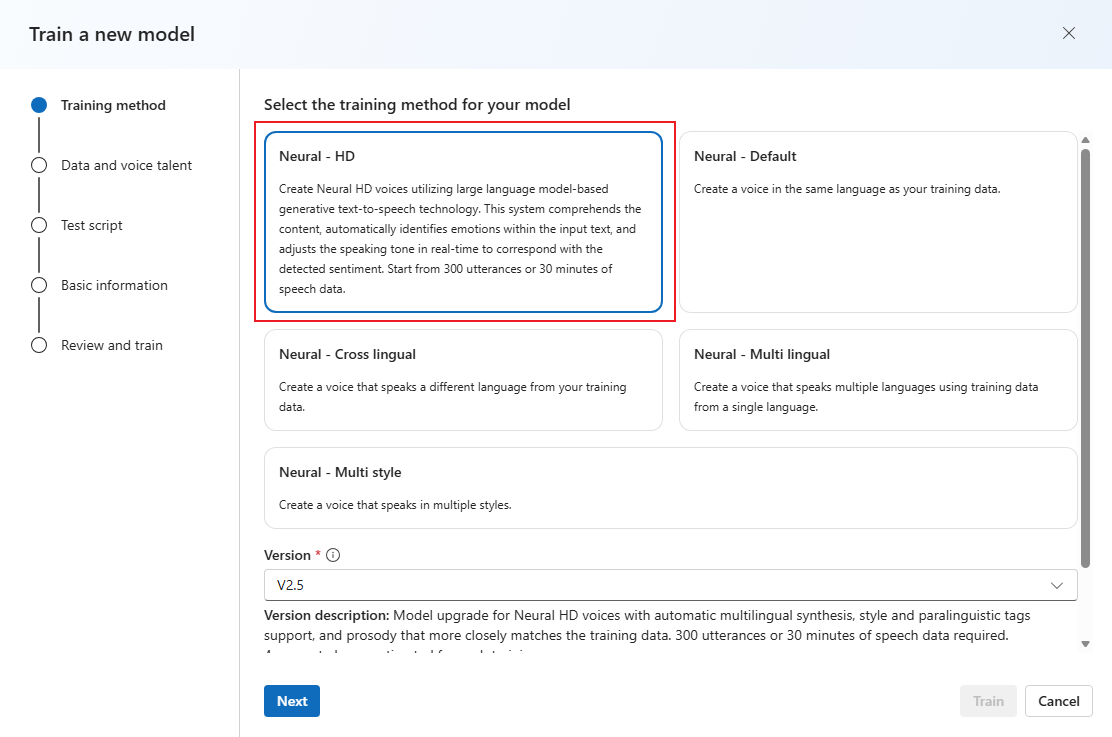
Select a version of the training recipe for your model. The latest version is selected by default. The supported features and training time can vary by version. Normally, use the latest version. In some cases, choose an earlier version to reduce training time.
Select the data that you want to use for training. Duplicate audio names are removed from the training. Make sure that the data you select doesn't contain the same audio names across multiple .zip files.
You can select only successfully processed datasets for training. Check your data processing status if you don't see your training set in the list.
Select a speaker file with the voice talent statement that corresponds to the speaker in your training data.
Select Next.
Select a test script and then select Next.
- Each training generates 100 sample audio files automatically to help you test the model with a default script.
- Alternatively, you can select Add my own test script and provide your own test script with up to 100 utterances to test the model at no extra cost. The generated audio files are a combination of the automatic test scripts and custom test scripts. For more information, see test script requirements.
Enter a Voice model name. Choose a name carefully. The model name is used as the voice name in your speech synthesis request by the SDK and SSML input. Only letters, numbers, and a few punctuation characters are allowed. Use different names for different neural voice models.
Optionally, enter the Description to help you identify the model. A common use of the description is to record the names of the data that you used to create the model.
Select the checkbox to accept the terms of use and then select Next.
Review the settings and select the box to accept the terms of use.
Select Train to start training the model.
Sign in to the Microsoft Foundry portal.
Select Fine-tuning from the left pane and then select AI Service fine-tuning.
Select the professional voice fine-tuning task (by model name) that you started as described in the create professional voice article.
Select Train model > + Train model.
Select Neural as the training method for your model. To use a different training method, see Neural - cross lingual, Neural - multi style, Neural - multilingual, or Neural - HD Voice.
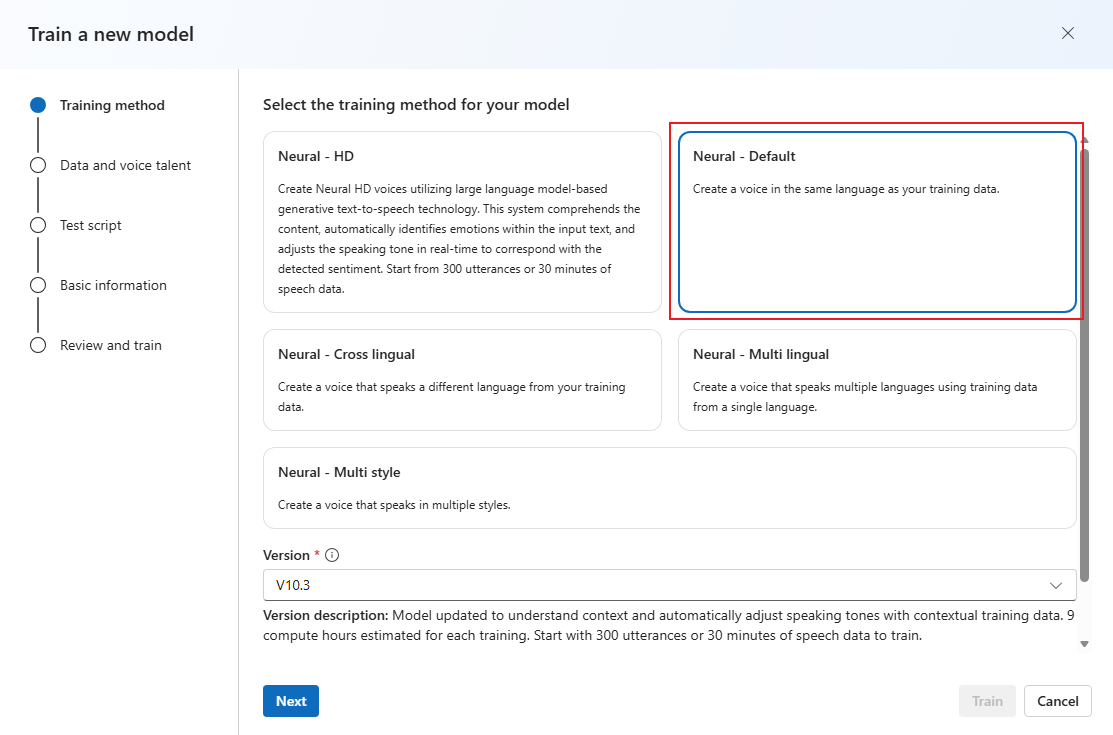
Select a version of the training recipe for your model. The latest version is selected by default. The supported features and training time can vary by version. Normally, use the latest version. In some cases, choose an earlier version to reduce training time. See Bilingual training for more information about bilingual training and differences between locales.
Select Next.
Select the data that you want to use for training. Duplicate audio names are removed from the training. Make sure that the data you select doesn't contain the same audio names across multiple .zip files.
You can select only successfully processed datasets for training. If you don't see your training set in the list, check your data processing status.
Select a speaker file with the voice talent statement that corresponds to the speaker in your training data.
Select Next.
Select a test script and then select Next.
- Each training generates 100 sample audio files automatically to help you test the model with a default script.
- Alternatively, you can select Add my own test script and provide your own test script with up to 100 utterances to test the model at no extra cost. The generated audio files are a combination of the automatic test scripts and custom test scripts. For more information, see test script requirements.
Enter a Voice model name. Choose a name carefully. The model name is used as the voice name in your speech synthesis request by the SDK and SSML input. Only letters, numbers, and a few punctuation characters are allowed. Use different names for different neural voice models.
Optionally, enter the Description to help you identify the model. A common use of the description is to record the names of the data that you used to create the model.
Select the checkbox to accept the terms of use and then select Next.
Review the settings and select the box to accept the terms of use.
Select Train to start training the model.
Bilingual training
If you select the Neural training type, you can train a voice to speak in multiple languages. The zh-CN, zh-HK, and zh-TW locales support bilingual training for the voice to speak both Chinese and English. Depending in part on your training data, the synthesized voice can speak English with an English native accent or English with the same accent as the training data.
Note
To enable a voice in the zh-CN locale to speak English with the same accent as the sample data, you should upload English data to a Contextual training set, or choose Chinese (Mandarin, Simplified), English bilingual when creating a project or specify the zh-CN (English bilingual) locale for the training set data via REST API.
In your contextual training set, include at least 100 sentences or 10 minutes of English content and do not exceed the amount of Chinese content.
The following table shows the differences among the locales:
| Speech Studio locale |
REST API locale |
Bilingual support |
Chinese (Mandarin, Simplified) |
zh-CN |
If your sample data includes English, the synthesized voice speaks English with an English native accent, instead of the same accent as the sample data, regardless of the amount of English data. |
Chinese (Mandarin, Simplified), English bilingual |
zh-CN (English bilingual) |
If you want the synthesized voice to speak English with the same accent as the sample data, we recommend including over 10% English data in your training set. Otherwise, the English speaking accent might not be ideal. |
Chinese (Cantonese, Simplified) |
zh-HK |
If you want to train a synthesized voice capable of speaking English with the same accent as your sample data, make sure to provide over 10% English data in your training set. Otherwise, it defaults to an English native accent. The 10% threshold is calculated based on the data accepted after successful uploading, not the data before uploading. If some uploaded English data is rejected due to defects and doesn't meet the 10% threshold, the synthesized voice defaults to an English native accent. |
Chinese (Taiwanese Mandarin, Traditional) |
zh-TW |
If you want to train a synthesized voice capable of speaking English with the same accent as your sample data, make sure to provide over 10% English data in your training set. Otherwise, it defaults to an English native accent. The 10% threshold is calculated based on the data accepted after successful uploading, not the data before uploading. If some uploaded English data is rejected due to defects and doesn't meet the 10% threshold, the synthesized voice defaults to an English native accent. |
Sign in to the Microsoft Foundry portal.
Select Fine-tuning from the left pane and then select AI Service fine-tuning.
Select the professional voice fine-tuning task (by model name) that you started as described in the create professional voice article.
Select Train model > + Train model.
Select Neural - multilingual as the training method for your model. To use a different training method, see Neural, Neural - cross lingual, Neural - multi style, or Neural - HD Voice.
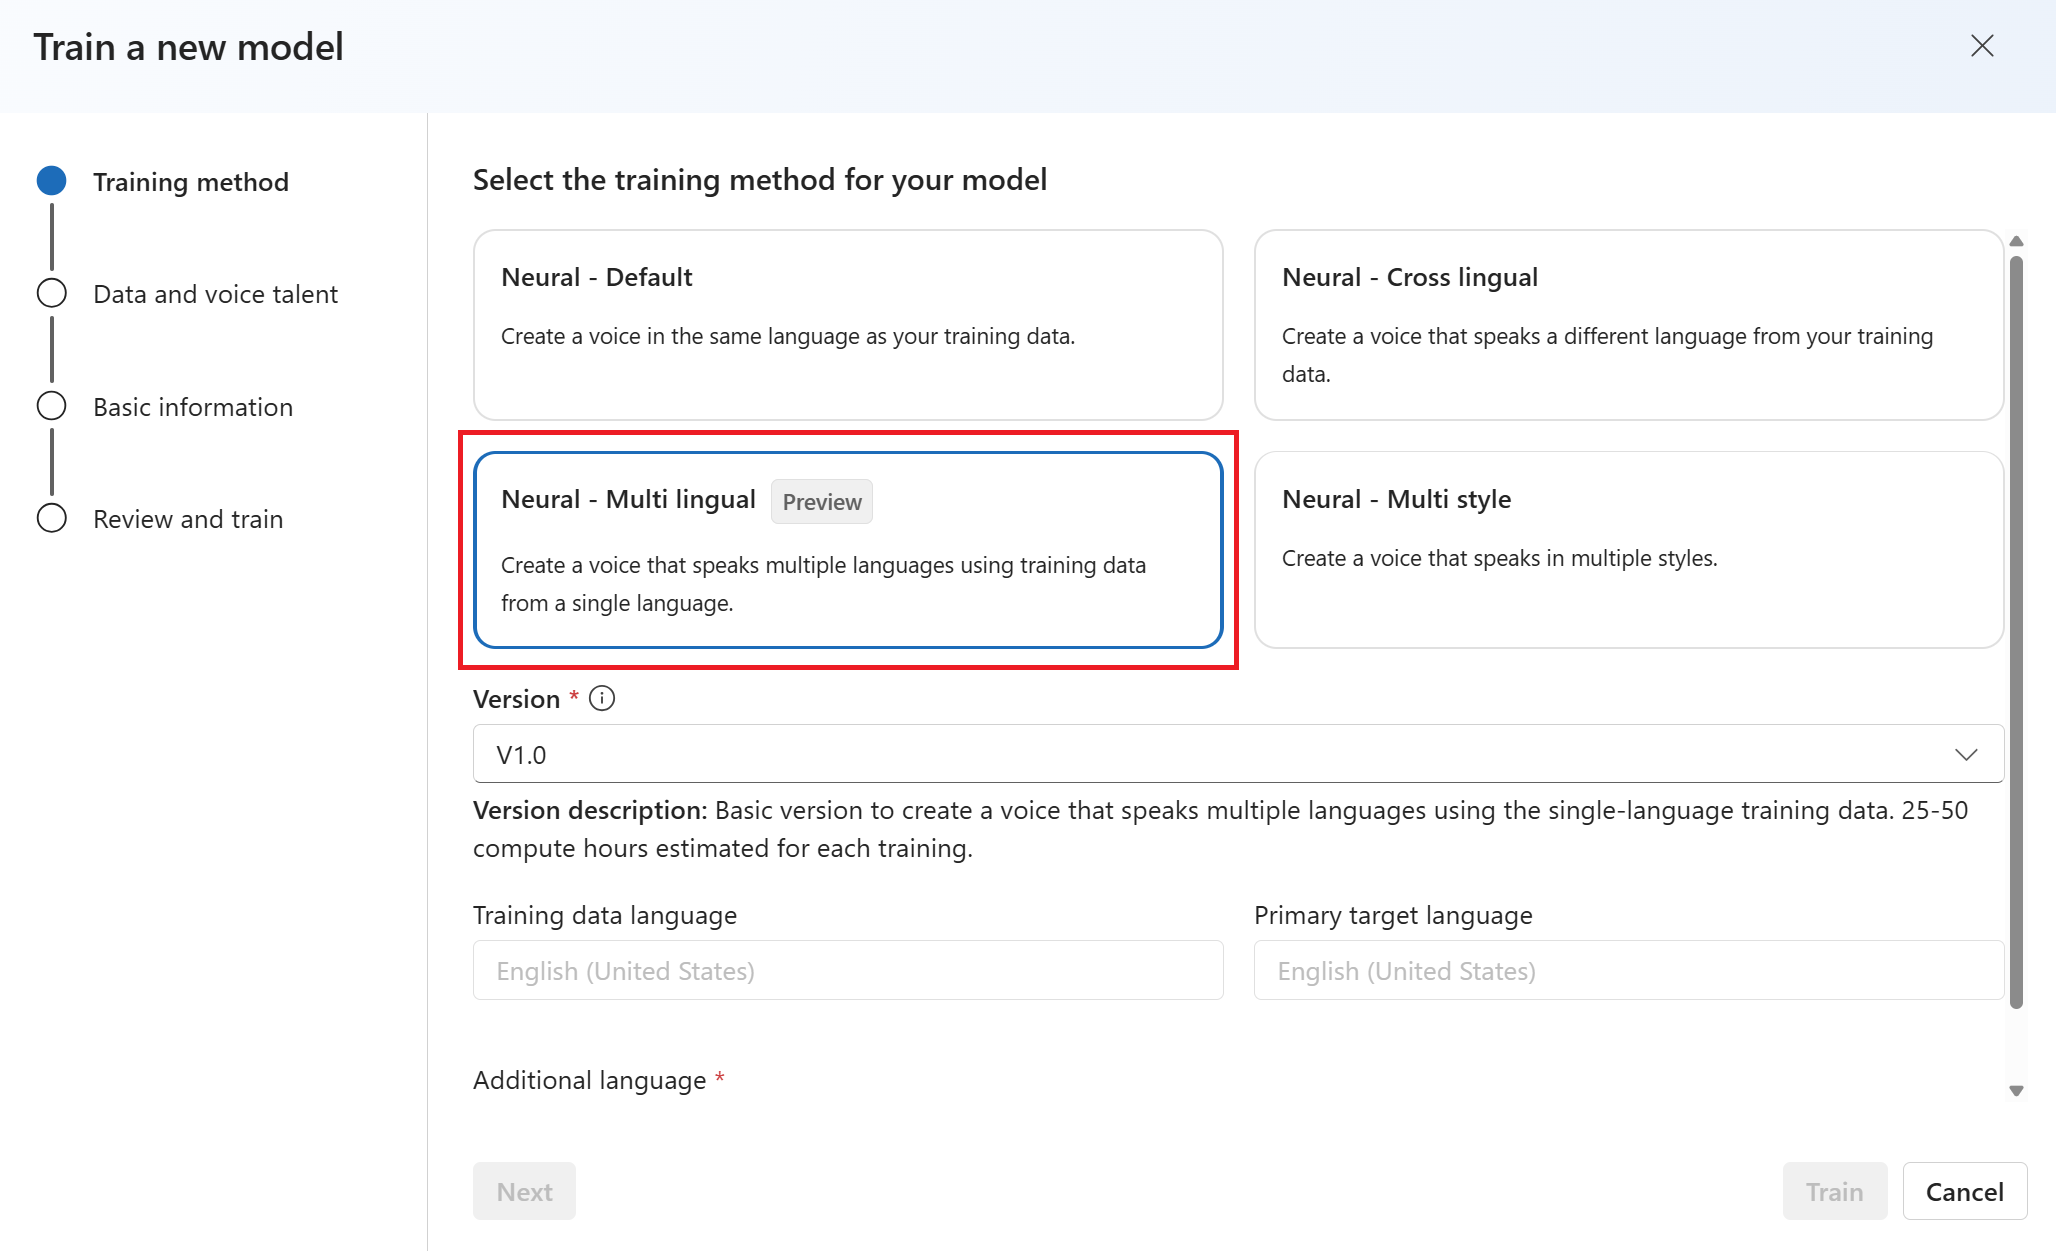
Select a version of the training recipe for your model. The latest version is selected by default. The supported features and training time can vary by version. Normally, we recommend the latest version. In some cases, you can choose an earlier version to reduce training time.
Select the Additional language that your voice speaks. You can select one or more secondary languages for a voice model and the voice speaks languages you selected from training data.
Select the data that you want to use for training. Duplicate audio names are removed from the training. Make sure that the data you select doesn't contain the same audio names across multiple .zip files.
You can select only successfully processed datasets for training. Check your data processing status if you don't see your training set in the list.
Select a speaker file with the voice talent statement that corresponds to the speaker in your training data.
Select Next.
Select a test script and then select Next.
- Each training generates 100 sample audio files automatically to help you test the model with a default script.
- Alternatively, you can select Add my own test script and provide your own test script with up to 100 utterances to test the model at no extra cost. The generated audio files are a combination of the automatic test scripts and custom test scripts. For more information, see test script requirements.
Enter a Voice model name. Choose a name carefully. The model name is used as the voice name in your speech synthesis request by the SDK and SSML input. Only letters, numbers, and a few punctuation characters are allowed. Use different names for different neural voice models.
Optionally, enter the Description to help you identify the model. A common use of the description is to record the names of the data that you used to create the model.
Select the checkbox to accept the terms of use and then select Next.
Review the settings and select the box to accept the terms of use.
Select Train to start training the model.
Sign in to the Microsoft Foundry portal.
Select Fine-tuning from the left pane and then select AI Service fine-tuning.
Select the professional voice fine-tuning task (by model name) that you started as described in the create professional voice article.
Select Train model > + Train model.
Select Neural - multi style as the training method for your model. To use a different training method, see Neural, Neural - cross lingual, Neural - multilingual, or Neural - HD Voice.
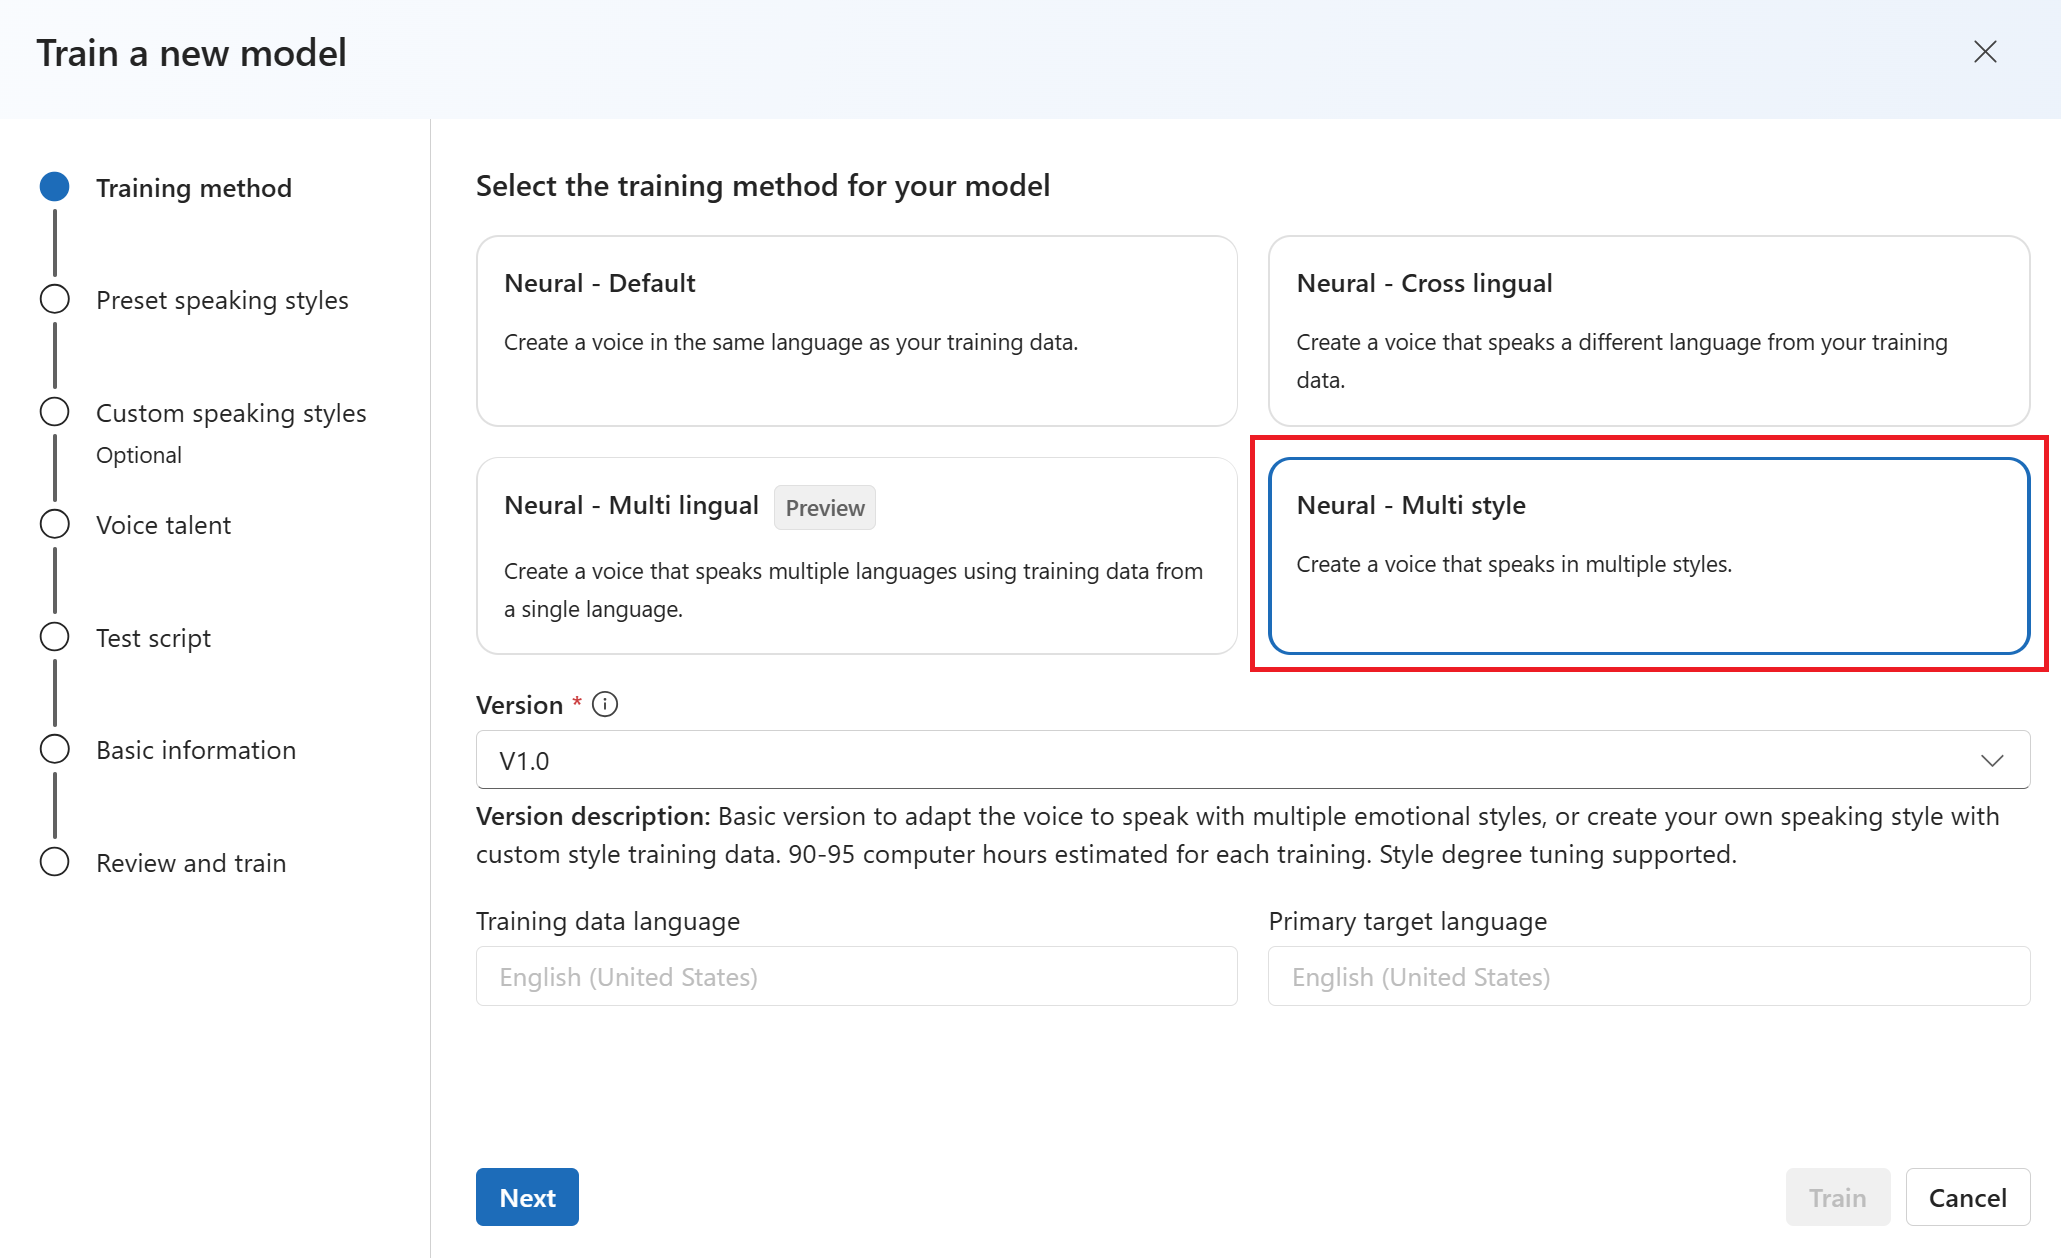
Select a version of the training recipe for your model. The latest version is selected by default. The supported features and training time can vary by version. Normally, we recommend the latest version. In some cases, you can choose an earlier version to reduce training time.
Select Next.
Select one or more preset speaking styles to train.
Select the data that you want to use for training. Duplicate audio names are removed from the training. Make sure that the data you select doesn't contain the same audio names across multiple .zip files.
You can select only successfully processed datasets for training. Check your data processing status if you don't see your training set in the list.
Select Next.
Optionally, you can add other custom speaking styles. The maximum number of custom styles varies by languages: English (United States) allows up to 10 custom styles, Chinese (Mandarin, Simplified) allows up to four custom styles, and Japanese (Japan) allows up to five custom styles.
- Select + Add a custom style and enter a custom style name of your choice. This name is used by your application within the
style element of Speech Synthesis Markup Language (SSML).
- Select style samples as training data. Ensure that the training data for custom speaking styles comes from the same speaker as the data used to create the default style.
Select Next.
Select a speaker file with the voice talent statement that corresponds to the speaker in your training data.
Select Next.
Select a test script and then select Next.
- Each training generates 100 sample audio files automatically to help you test the model with a default script.
- Alternatively, you can select Add my own test script and provide your own test script with up to 100 utterances to test the model at no extra cost. The generated audio files are a combination of the automatic test scripts and custom test scripts. For more information, see test script requirements.
Enter a Voice model name. Choose a name carefully. The model name is used as the voice name in your speech synthesis request by the SDK and SSML input. Only letters, numbers, and a few punctuation characters are allowed. Use different names for different neural voice models.
Optionally, enter the Description to help you identify the model. A common use of the description is to record the names of the data that you used to create the model.
Select the checkbox to accept the terms of use and then select Next.
Review the settings and select the box to accept the terms of use.
Select Train to start training the model.
Available preset styles across different languages
The following table summarizes the different preset styles according to different languages.
| Speaking style |
Language (locale) |
| angry |
English (United States) (en-US)
Japanese (Japan) (ja-JP) 1
Chinese (Mandarin, Simplified) (zh-CN) 1 |
| calm |
Chinese (Mandarin, Simplified) (zh-CN) 1 |
| chat |
Chinese (Mandarin, Simplified) (zh-CN) 1 |
| cheerful |
English (United States) (en-US)
Japanese (Japan) (ja-JP) 1
Chinese (Mandarin, Simplified) (zh-CN) 1 |
| disgruntled |
Chinese (Mandarin, Simplified) (zh-CN) 1 |
| excited |
English (United States) (en-US) |
| fearful |
Chinese (Mandarin, Simplified) (zh-CN) 1 |
| friendly |
English (United States) (en-US) |
| hopeful |
English (United States) (en-US) |
| sad |
English (United States) (en-US)
Japanese (Japan) (ja-JP) 1
Chinese (Mandarin, Simplified) (zh-CN) 1 |
| shouting |
English (United States) (en-US) |
| serious |
Chinese (Mandarin, Simplified) (zh-CN) 1 |
| terrified |
English (United States) (en-US) |
| unfriendly |
English (United States) (en-US) |
| whispering |
English (United States) (en-US) |
1 The neural voice style is available in public preview. For the current list of regions that support styles in public preview, see the Speech service regions table.
Sign in to the Microsoft Foundry portal.
Select Fine-tuning from the left pane and then select AI Service fine-tuning.
Select the professional voice fine-tuning task (by model name) that you started as described in the create professional voice article.
Select Train model > + Train model.
Select Neural - Cross lingual as the training method for your model. To use a different training method, see Neural, Neural - multi style, Neural - multilingual, or Neural - HD Voice.
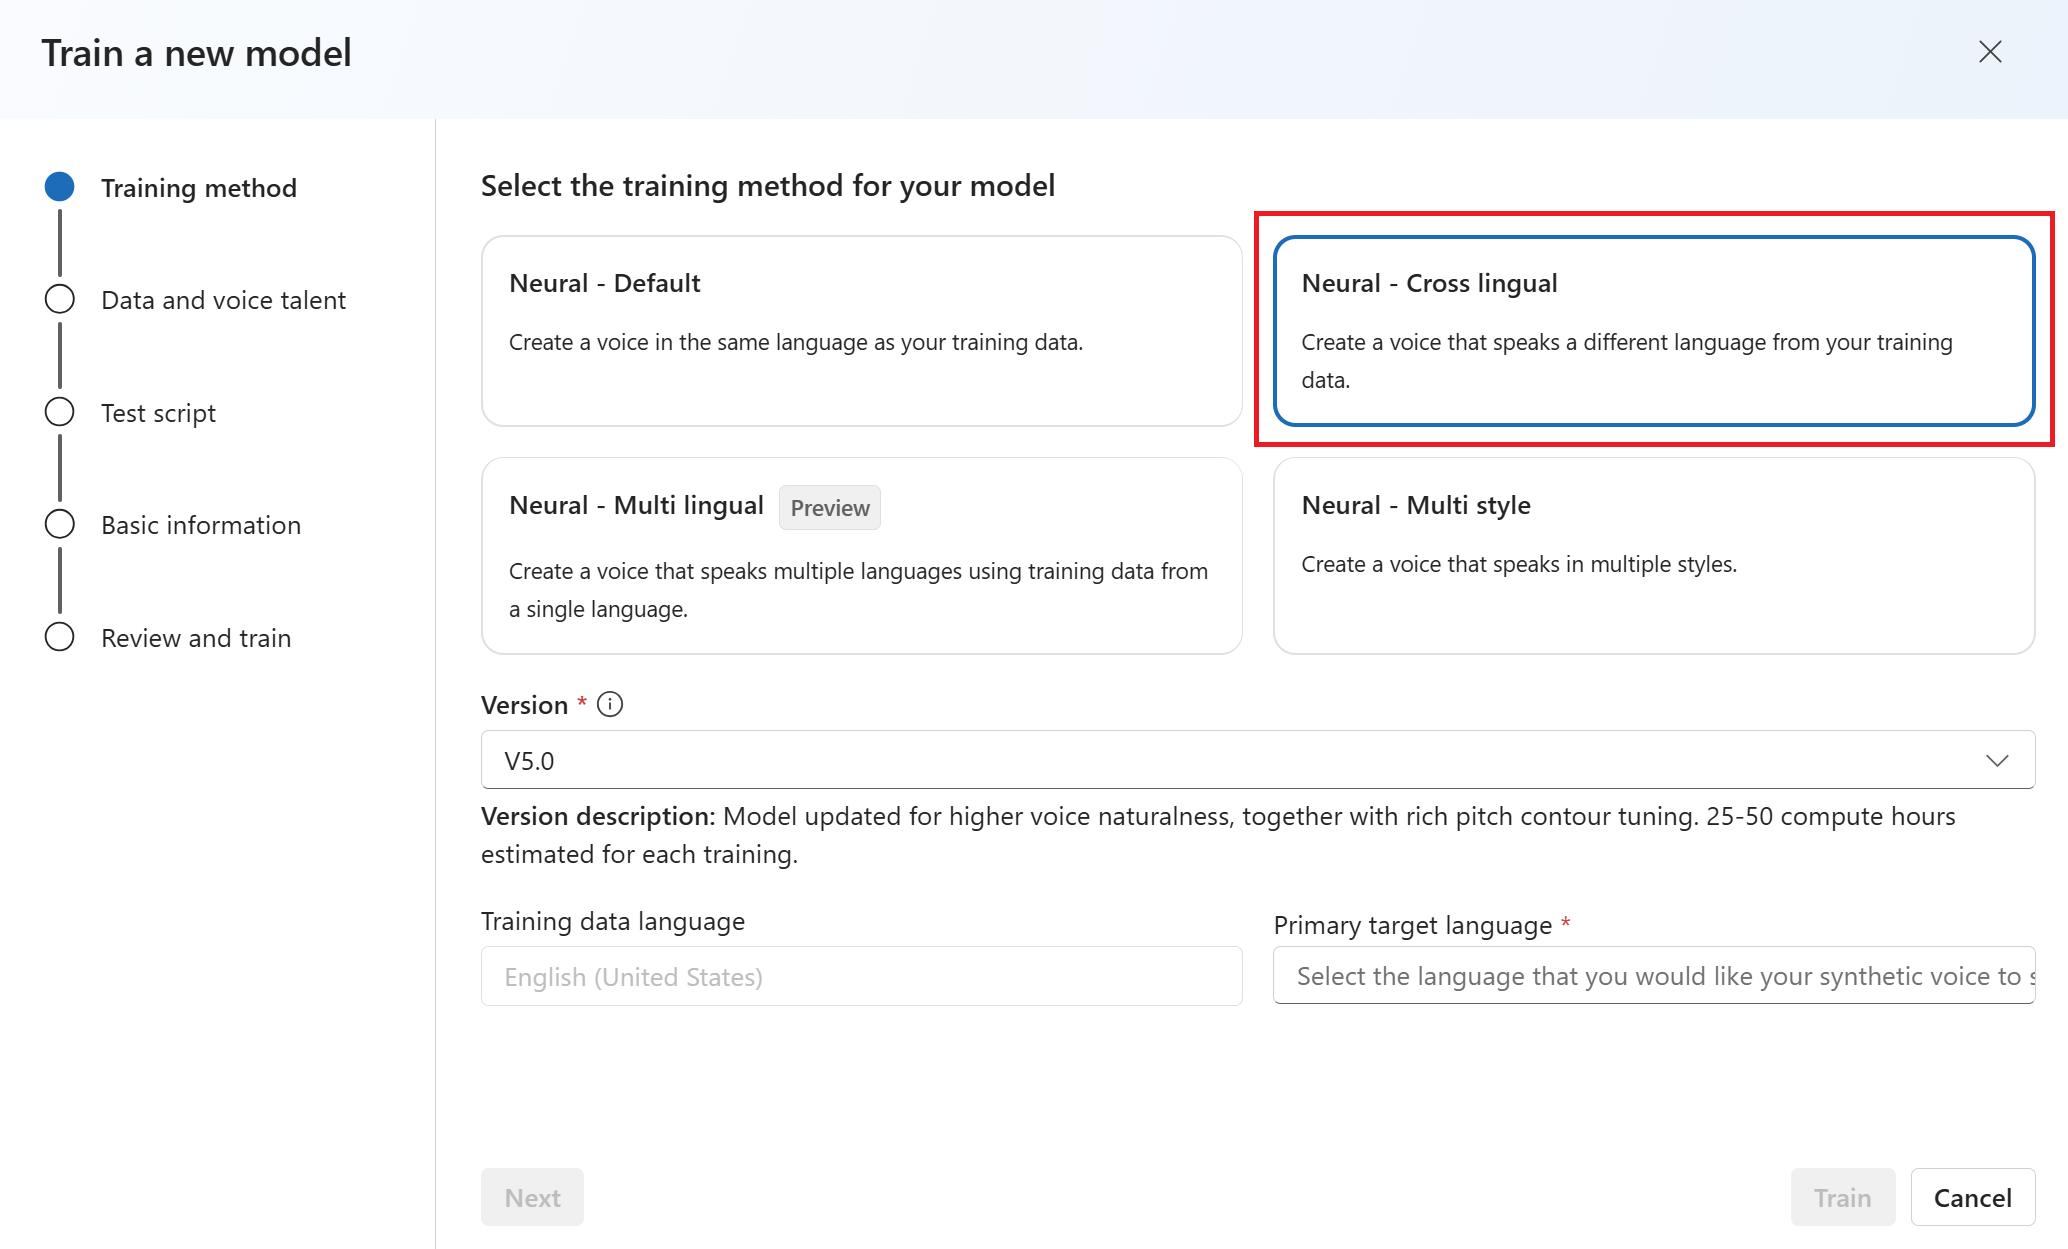
Select a version of the training recipe for your model. The latest version is selected by default. The supported features and training time can vary by version. Normally, we recommend the latest version. In some cases, you can choose an earlier version to reduce training time.
Select the Primary target language that your voice speaks. The voice speaks a different language from your training data. You can select only one target language for a voice model.
Select Next.
Select the data that you want to use for training. Duplicate audio names are removed from the training. Make sure that the data you select doesn't contain the same audio names across multiple .zip files.
You can select only successfully processed datasets for training. Check your data processing status if you don't see your training set in the list.
Select a speaker file with the voice talent statement that corresponds to the speaker in your training data.
Select Next.
Select a test script and then select Next.
- Each training generates 100 sample audio files automatically to help you test the model with a default script.
- Alternatively, you can select Add my own test script and provide your own test script with up to 100 utterances to test the model at no extra cost. The generated audio files are a combination of the automatic test scripts and custom test scripts. For more information, see test script requirements.
Enter a Voice model name. Choose a name carefully. The model name is used as the voice name in your speech synthesis request by the SDK and SSML input. Only letters, numbers, and a few punctuation characters are allowed. Use different names for different neural voice models.
Optionally, enter the Description to help you identify the model. A common use of the description is to record the names of the data that you used to create the model.
Select the checkbox to accept the terms of use and then select Next.
Review the settings and select the box to accept the terms of use.
Select Train to start training the model.
Monitor the training process
The Train model table displays a new entry that corresponds to this newly created model. The status reflects the process of converting your data to a voice model, as described in this table:
| State |
Meaning |
| Processing |
Your voice model is being created. |
| Succeeded |
Your voice model has been created and can be deployed. |
| Failed |
Your voice model has failed in training. The cause of the failure might be, for example, unseen data problems or network issues. |
| Canceled |
The training for your voice model was canceled. |
While the model status is Processing, you can select the model and then select Cancel training to cancel training. You're not charged for this canceled training.
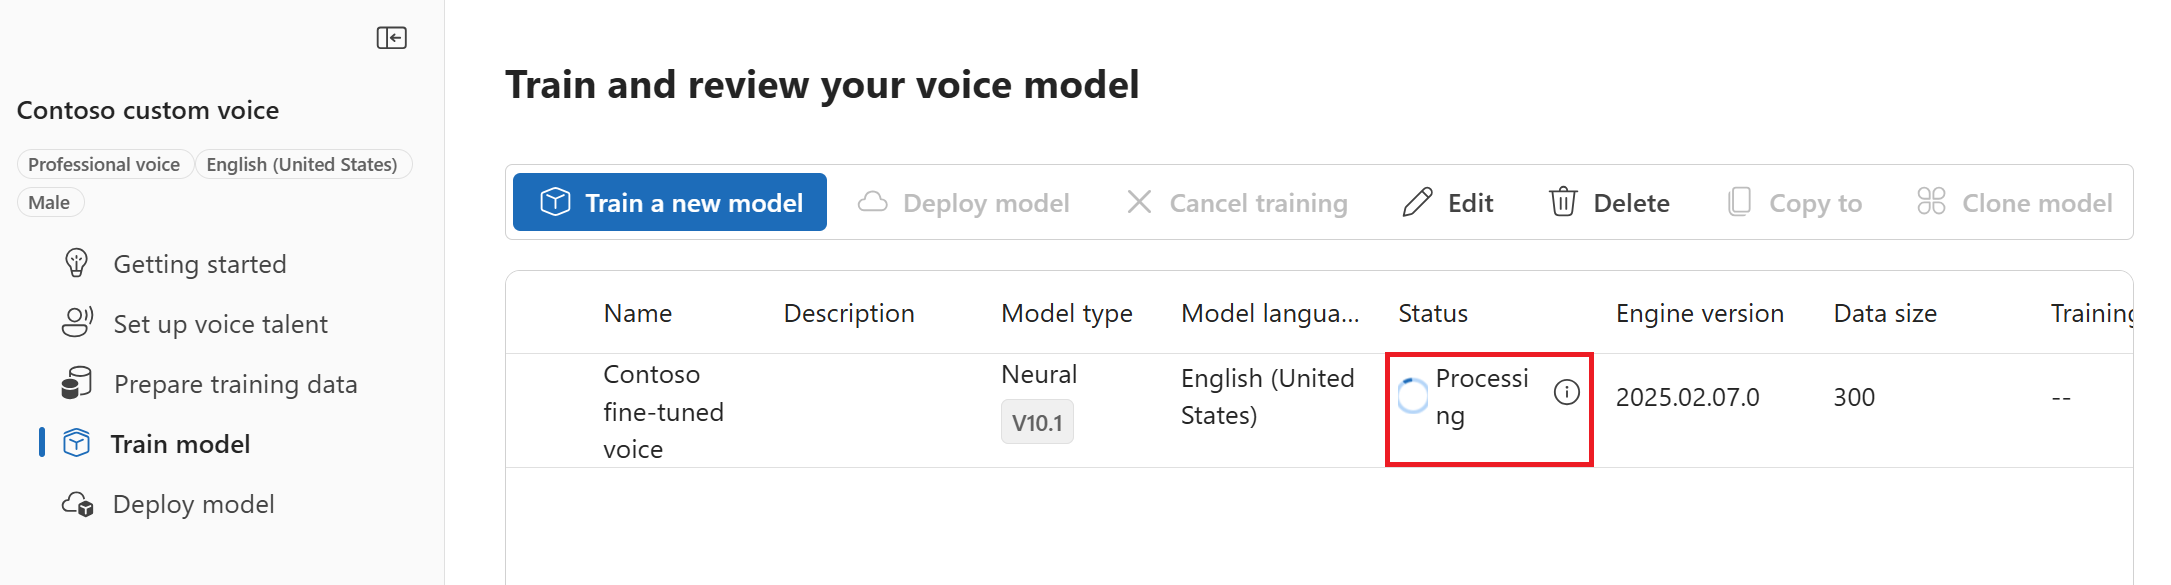
After you finish training the model successfully, you can review the model details and Test your voice model.
Rename your model
You have to clone your model to rename it. You can't rename the model directly.
- Select the model.
- Select Clone model to create a clone of the model with a new name in the current project.
- Enter the new name on the Clone voice model window.
- Select Submit. The text Neural is automatically added as a suffix to your new model name.
Test your voice model
After your voice model is successfully built, you can use the generated sample audio files to test it before you deploy it.
The quality of the voice depends on many factors, such as:
- The size of the training data.
- The quality of the recording.
- The accuracy of the transcript file.
- How well the recorded voice in the training data matches the personality of the designed voice for your intended use case.
Select DefaultTests under Testing to listen to the sample audio files. The default test samples include 100 sample audio files generated automatically during training to help you test the model. In addition to these 100 audio files provided by default, your own test script utterances are also added to DefaultTests set. This addition is at most 100 utterances. You're not charged for the testing with DefaultTests.
If you want to upload your own test scripts to further test your model, select Add test scripts to upload your own test script.
Before you upload test script, check the Test script requirements. You're charged for the extra testing with the batch synthesis based on the number of billable characters. See Azure Speech in Foundry Tools pricing.
Under Add test scripts, select Browse for a file to select your own script, then select Add to upload it.
Test script requirements
The test script must be a .txt file that is less than 1 MB. Supported encoding formats include ANSI/ASCII, UTF-8, UTF-8-BOM, UTF-16-LE, or UTF-16-BE.
Unlike the training transcription files, the test script should exclude the utterance ID, which is the filename of each utterance. Otherwise, these IDs are spoken.
Here's an example set of utterances in one .txt file:
This is the waistline, and it's falling.
We have trouble scoring.
It was Janet Maslin.
Each paragraph of the utterance results in a separate audio. If you want to combine all sentences into one audio, make them a single paragraph.
Note
The generated audio files are a combination of the automatic test scripts and custom test scripts.
Update engine version for your voice model
Azure text to speech engines are updated from time to time to capture the latest language model that defines the pronunciation of the language. After you train your voice, you can apply your voice to the new language model by updating to the latest engine version.
- When a new engine is available, you're prompted to update your neural voice model.
- Go to the model details page and follow the on-screen instructions to install the latest engine.
- Alternatively, select Install the latest engine later to update your model to the latest engine version. You're not charged for engine update. The previous versions are still kept.
- You can check all engine versions for the model from the Engine version list, or remove one if you don't need it anymore.
The updated version is automatically set as default. But you can change the default version by selecting a version from the drop-down list and selecting Set as default.
If you want to test each engine version of your voice model, you can select a version from the list, then select DefaultTests under Testing to listen to the sample audio files. If you want to upload your own test scripts to further test your current engine version, first make sure the version is set as default, then follow the steps in Test your voice model.
Updating the engine creates a new version of the model at no extra cost. After you update the engine version for your voice model, you need to deploy the new version to create a new endpoint. You can only deploy the default version.
After you create a new endpoint, you need to transfer the traffic to the new endpoint in your product.
To learn more about the capabilities and limits of this feature, and the best practice to improve your model quality, see Characteristics and limitations for using custom voice.
Copy your voice model to another project
Note
In this context "project" refers to a fine-tuning task rather than a Microsoft Foundry project.
After training you can copy your voice model to another project for the same region or another region.
For example, you can copy a professional voice model that was trained in one region, to a project for another region. Professional voice fine-tuning is currently only available in some regions.
To copy your custom voice model to another project:
- On the Train model tab, select a voice model that you want to copy, and then select Copy to project.
- Select the Subscription, Target region, Connected AI Service resource (Foundry resource), and Target fine-tuning task where you want to copy the model.
- Select Copy to to copy the model.
- Select View model under the notification message for the successful copying.
Navigate to the project where you copied the model to deploy the model copy.
Next steps
In this article, you learn how to fine-tune a professional voice through the Speech Studio portal.
Important
Professional voice fine-tuning is currently only available in some regions. After your voice model is trained in a supported region, you can copy it to a Foundry resource for Speech in another region as needed. For more information, see the footnotes in the Speech service table.
Training duration varies depending on how much data you use. It takes about 10 compute hours on average to fine-tune a professional voice. Standard subscription (S0) users can train four voices simultaneously. If you reach the limit, wait until at least one of your voice models finishes training, and then try again.
Choose a training method
After you validate your data files, use them to build your custom voice model. When you create a custom voice, you can choose to train it with one of the following methods:
Neural - HD Voice: Create a HD voice in the same language of your training data. Azure neural HD voices are LLM-based, optimized for dynamic conversations. Learn more about neural HD voices here.
Neural: Create a voice in the same language as your training data.
Neural - multilingual: Create a voice that speaks multiple languages using the single-language training data. For example, with the en-US primary training data, you can create a voice that speaks en-US, de-DE, zh-CN etc. secondary languages.
The primary language of the training data and the secondary languages must be in the languages that are supported for multilingual voice training. You don't need to prepare training data in the secondary languages.
Neural - multi style: Create a custom voice that speaks in multiple styles and emotions, without adding new training data. Multiple style voices are useful for video game characters, conversational chatbots, audiobooks, content readers, and more.
To create a multiple style voice, you need to prepare a set of general training data, at least 300 utterances. Select one or more of the preset target speaking styles. You can also create multiple custom styles by providing style samples, of at least 100 utterances per style, as extra training data for the same voice. The supported preset styles vary according to different languages. See available preset styles across different languages.
Neural - cross lingual: Create a voice that speaks a different language from your training data. For example, with the zh-CN training data, you can create a voice that speaks en-US.
The language of the training data and the target language must both be one of the languages that are supported for cross lingual voice training. You don't need to prepare training data in the target language, but your test script must be in the target language.
The language of the training data must be one of the languages that are supported for custom voice, cross-lingual, or multiple style training.
Train your custom voice model
To create a custom voice in Speech Studio, follow these steps for one of the following methods:
Sign in to the Speech Studio.
Select Custom voice > <Your project name> > Train model > Train a new model.
Select Neural - HD Voice as the training method for your model. To use a different training method, see Neural, Neural - cross lingual, Neural - multi style, or Neural - multilingual.
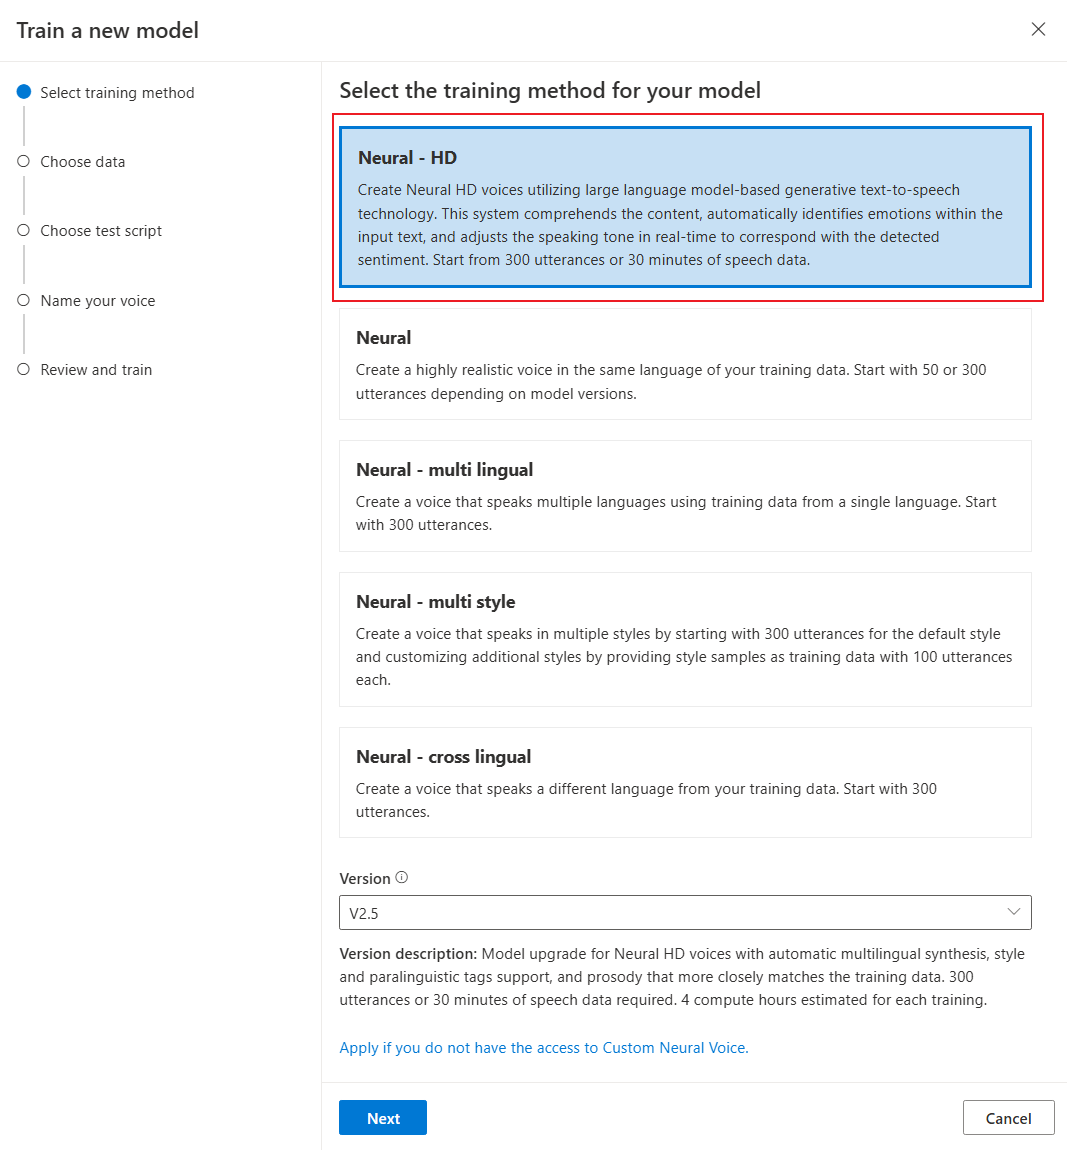
Note
HD voices are only available in regions that support High performance type. For information about regions where the High performance endpoint type is supported, see the Custom voice high performance endpoint column in the Text to speech tab of the regions table.
Select the data that you want to use for training. Duplicate audio names are removed from the training. Make sure that the data you select doesn't contain the same audio names across multiple .zip files.
You can select only successfully processed datasets for training. Check your data processing status if you don't see your training set in the list.
Prefer to select training data processed as Contextual.
Select a speaker file with the voice talent statement that corresponds to the speaker in your training data.
Select Next.
Each training process automatically generates 100 primary language sample audio files to help you test the model with a default script.
Optionally, you can also select Add my own test script and provide your own test script with up to 100 utterances to test the default style at no extra cost. The generated audio files are a combination of the automatic test scripts and custom test scripts. For more information, see test script requirements.
- Enter a Name to help you identify the model. Choose a name carefully. The model name is used as the voice name in your speech synthesis request by the SDK and SSML input. Only letters, numbers, and a few punctuation characters are allowed. Use different names for different neural voice models. The Dragon HD suffix is automatically added to your model name.
- Optionally, enter the Description to help you identify the model. A common use of the description is to record the names of the data that you used to create the model.
- Select Next.
- Review the settings and select the box to accept the terms of use.
- Select Submit to start training the model.
Sign in to the Speech Studio.
Select Custom voice > <Your project name> > Train model > Train a new model.
Select Neural as the training method for your model and then select Next. To use a different training method, see Neural - cross lingual, Neural - multi style, Neural - multilingual, or Neural - HD Voice.
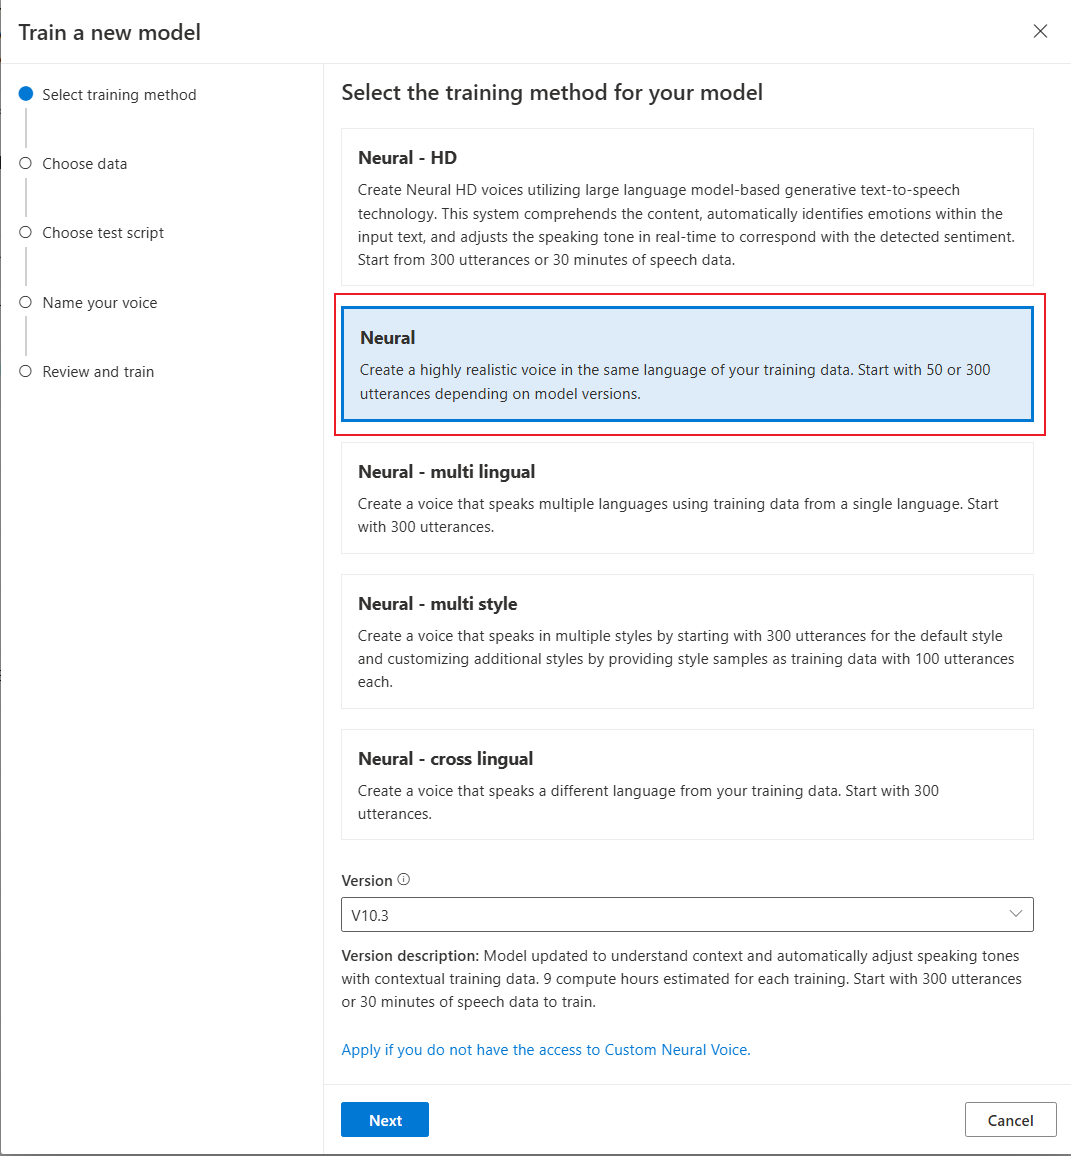
Select a version of the training recipe for your model. The latest version is selected by default. The supported features and training time can vary by version. Normally, use the latest version. In some cases, choose an earlier version to reduce training time. See Bilingual training for more information about bilingual training and differences between locales.
Note
Model versions V3.0, V7.0, and V8.0 retire on July 25, 2025. The voice models already created on these retired versions aren't affected.
Select the data that you want to use for training. Duplicate audio names are removed from the training. Make sure that the data you select doesn't contain the same audio names across multiple .zip files.
You can select only successfully processed datasets for training. If you don't see your training set in the list, check your data processing status.
Select a speaker file with the voice talent statement that corresponds to the speaker in your training data.
Select Next.
Each training process automatically generates 100 sample audio files to help you test the model with a default script.
Optionally, you can also select Add my own test script and provide your own test script with up to 100 utterances to test the model at no extra cost. The generated audio files are a combination of the automatic test scripts and custom test scripts. For more information, see test script requirements.
Enter a Name to help you identify the model. Choose a name carefully. The SDK and SSML input use the model name as the voice name in your speech synthesis request. Only letters, numbers, and a few punctuation characters are allowed. Use different names for different neural voice models.
Optionally, enter the Description to help you identify the model. A common use of the description is to record the names of the data that you used to create the model.
Select Next.
Review the settings and select the box to accept the terms of use.
Select Submit to start training the model.
Bilingual training
If you select the Neural training type, you can train a voice to speak in multiple languages. The zh-CN, zh-HK, and zh-TW locales support bilingual training for the voice to speak both Chinese and English. Depending in part on your training data, the synthesized voice can speak English with an English native accent or English with the same accent as the training data.
Note
To enable a voice in the zh-CN locale to speak English with the same accent as the sample data, you should upload English data to a Contextual training set, or choose Chinese (Mandarin, Simplified), English bilingual when creating a project or specify the zh-CN (English bilingual) locale for the training set data via REST API.
In your contextual training set, include at least 100 sentences or 10 minutes of English content and do not exceed the amount of Chinese content.
The following table shows the differences among the locales:
| Speech Studio locale |
REST API locale |
Bilingual support |
Chinese (Mandarin, Simplified) |
zh-CN |
If your sample data includes English, the synthesized voice speaks English with an English native accent, instead of the same accent as the sample data, regardless of the amount of English data. |
Chinese (Mandarin, Simplified), English bilingual |
zh-CN (English bilingual) |
If you want the synthesized voice to speak English with the same accent as the sample data, we recommend including over 10% English data in your training set. Otherwise, the English speaking accent might not be ideal. |
Chinese (Cantonese, Simplified) |
zh-HK |
If you want to train a synthesized voice capable of speaking English with the same accent as your sample data, make sure to provide over 10% English data in your training set. Otherwise, it defaults to an English native accent. The 10% threshold is calculated based on the data accepted after successful uploading, not the data before uploading. If some uploaded English data is rejected due to defects and doesn't meet the 10% threshold, the synthesized voice defaults to an English native accent. |
Chinese (Taiwanese Mandarin, Traditional) |
zh-TW |
If you want to train a synthesized voice capable of speaking English with the same accent as your sample data, make sure to provide over 10% English data in your training set. Otherwise, it defaults to an English native accent. The 10% threshold is calculated based on the data accepted after successful uploading, not the data before uploading. If some uploaded English data is rejected due to defects and doesn't meet the 10% threshold, the synthesized voice defaults to an English native accent. |
Sign in to the Speech Studio.
Select Custom voice > <Your project name> > Train model > Train a new model.
Select Neural - multilingual as the training method for your model. To use a different training method, see Neural or Neural - cross lingual or Neural - multi style or Neural - HD Voice.
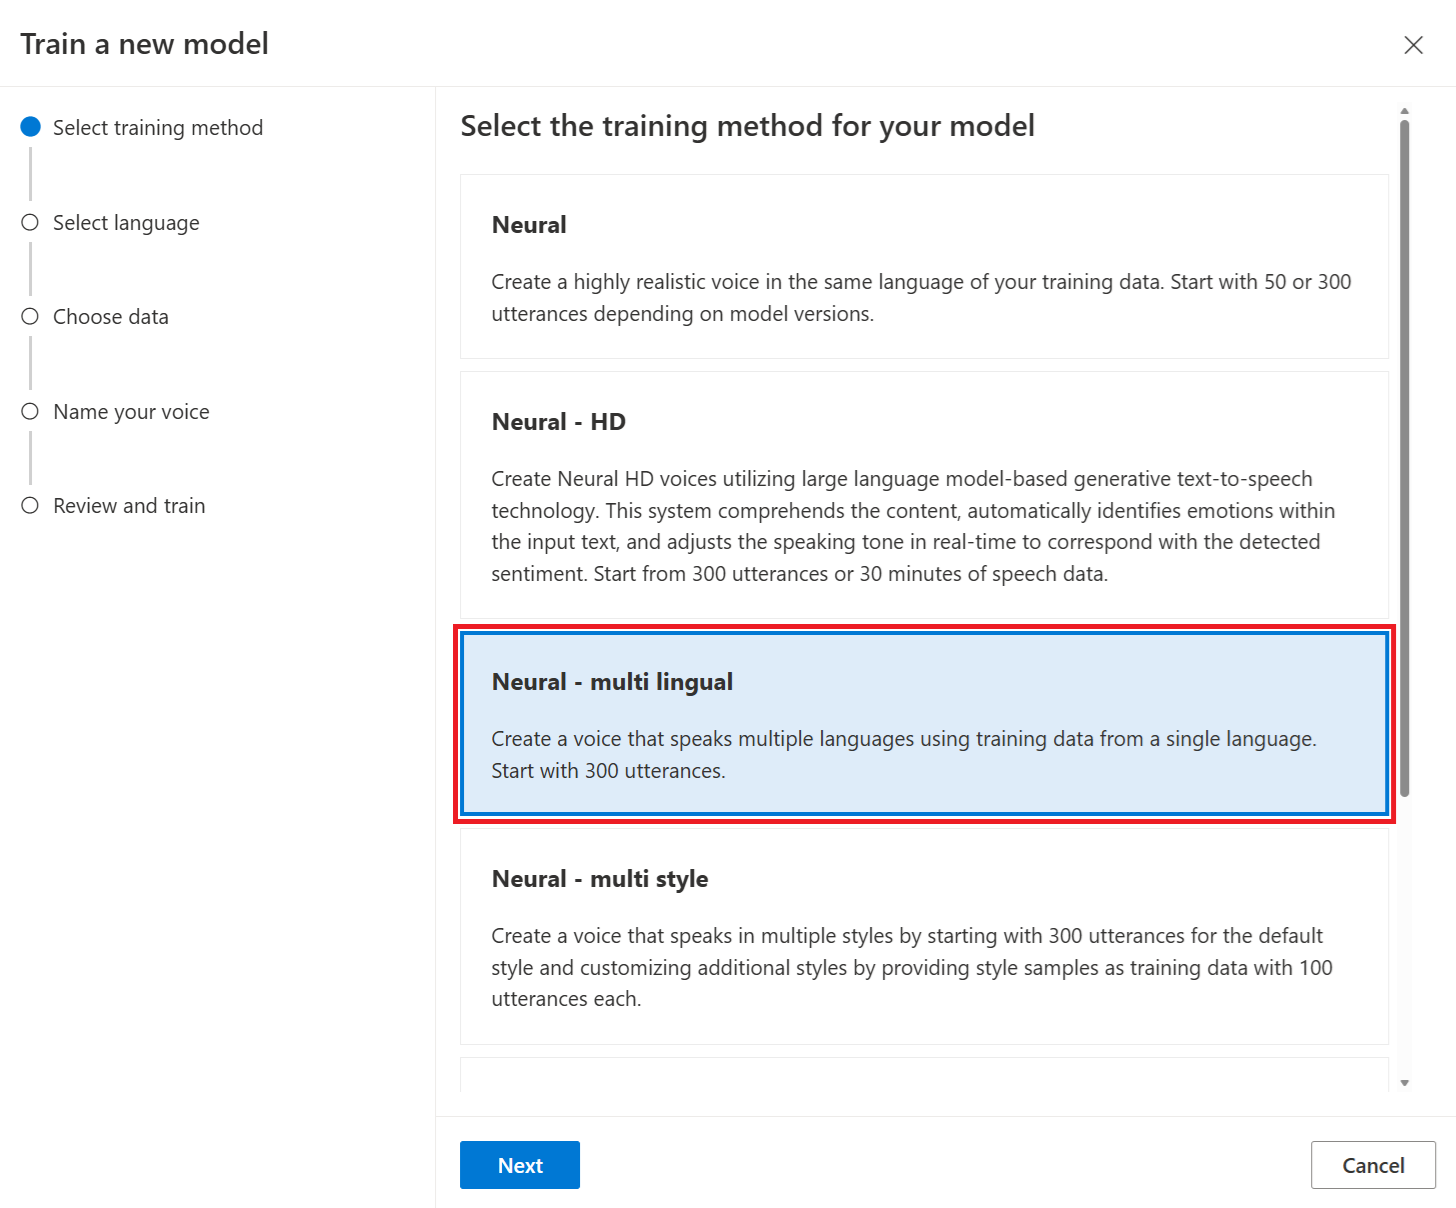
Select the Secondary language that your voice speaks. You can select one or more secondary languages for a voice model and the voice speaks languages you selected from training data.
Select the data that you want to use for training. Duplicate audio names are removed from the training. Make sure that the data you select doesn't contain the same audio names across multiple .zip files.
You can select only successfully processed datasets for training. Check your data processing status if you don't see your training set in the list.
Select a speaker file with the voice talent statement that corresponds to the speaker in your training data.
Select Next.
Each training generates 100 primary language sample audio files automatically to help you test the model with a default script.
Enter a Name to help you identify the model. Choose a name carefully. The model name is used as the voice name in your speech synthesis request by the SDK and SSML input. Only letters, numbers, and a few punctuation characters are allowed. Use different names for different neural voice models.
Optionally, enter the Description to help you identify the model. A common use of the description is to record the names of the data that you used to create the model.
Select Next.
Review the settings and select the box to accept the terms of use.
Select Submit to start training the model.
Sign in to the Speech Studio.
Select Custom voice > <Your project name> > Train model > Train a new model.
Select Neural - multi style as the training method for your model. To use a different training method, see Neural or Neural - cross lingual or Neural - multilingual or Neural - HD Voice.
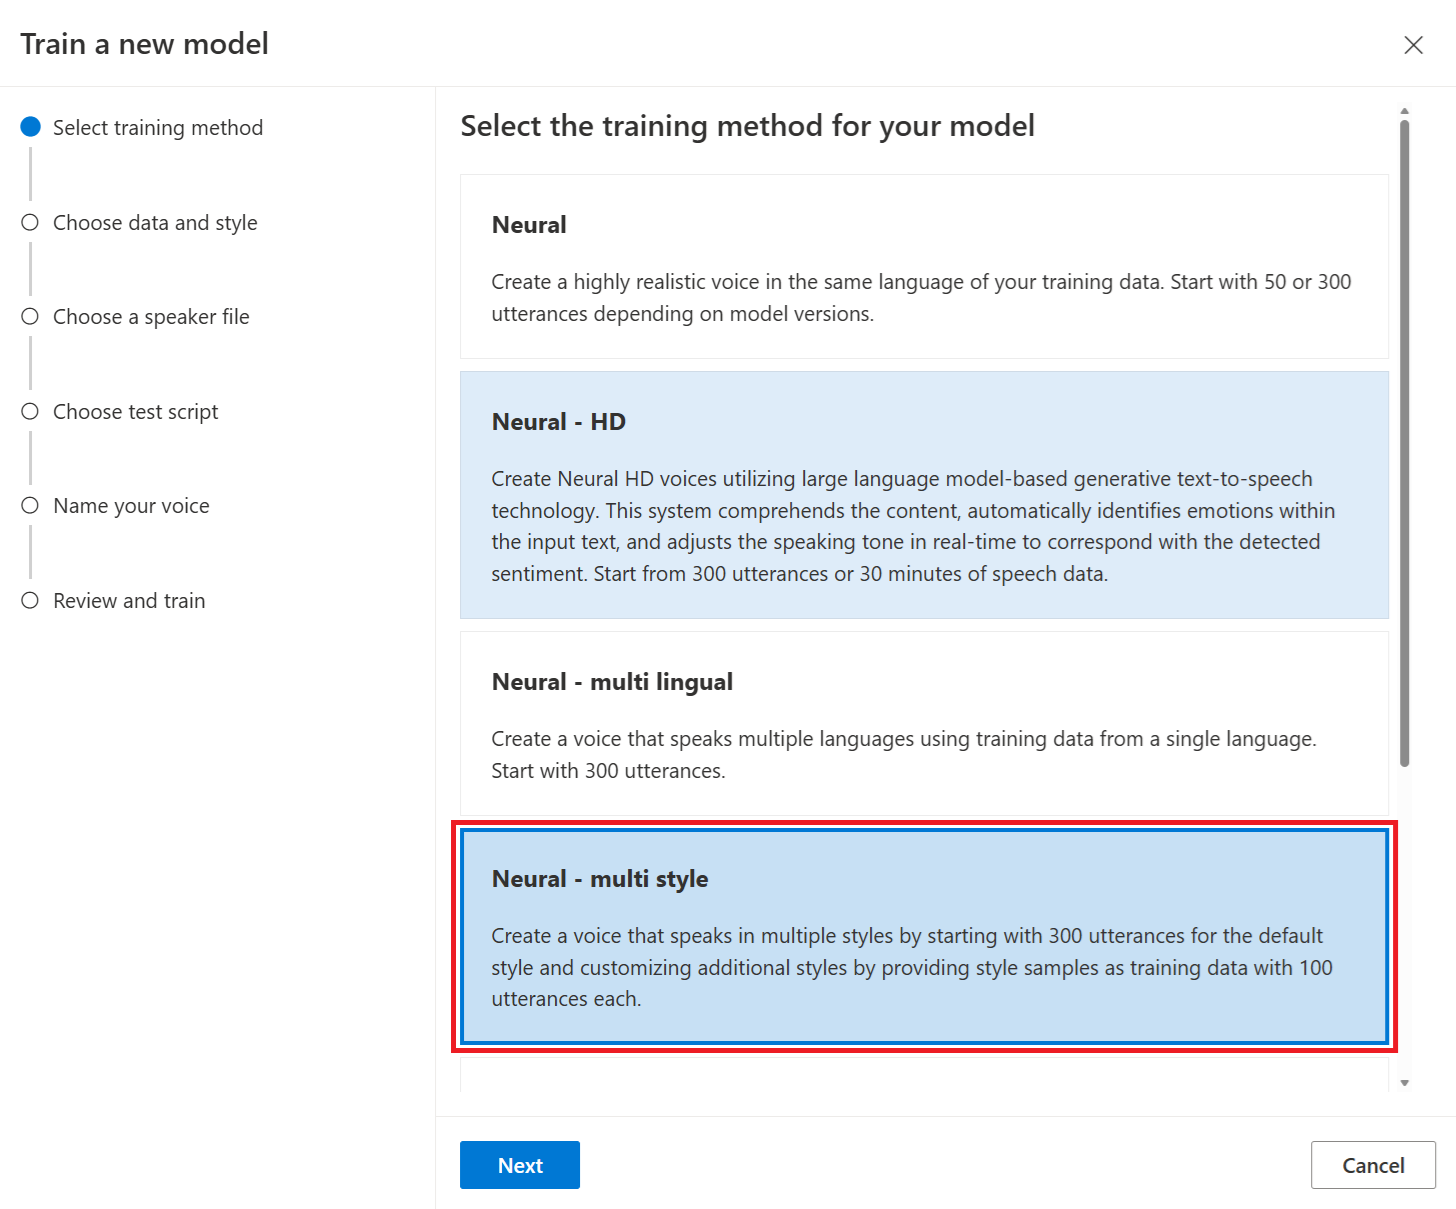
Select one or more preset speaking styles to train.
Select the data that you want to use for training. Duplicate audio names are removed from the training. Make sure that the data you select doesn't contain the same audio names across multiple .zip files.
You can select only successfully processed datasets for training. Check your data processing status if you don't see your training set in the list.
Select Next.
Optionally, you can add other custom speaking styles. The maximum number of custom styles varies by languages: English (United States) allows up to 10 custom styles, Chinese (Mandarin, Simplified) allows up to four custom styles, and Japanese (Japan) allows up to five custom styles.
- Select Add a custom style and enter a custom style name of your choice. This name is used by your application within the
style element of Speech Synthesis Markup Language (SSML). You can also use the custom style name as SSML by using the Audio Content Creation tool in Speech Studio.
- Select style samples as training data. Ensure that the training data for custom speaking styles comes from the same speaker as the data used to create the default style.
Select Next.
Select a speaker file with the voice talent statement that corresponds to the speaker in your training data.
Select Next.
Each training automatically generates 100 sample audio files for the default style and 20 for each preset style to help you test the model with a default script.
Optionally, you can also select Add my own test script and provide your own test script with up to 100 utterances to test the default style at no extra cost. The generated audio files are a combination of the automatic test scripts and custom test scripts. For more information, see test script requirements.
- Enter a Name to help you identify the model. Choose a name carefully. The model name is used as the voice name in your speech synthesis request by the SDK and SSML input. Only letters, numbers, and a few punctuation characters are allowed. Use different names for different neural voice models.
- Optionally, enter the Description to help you identify the model. A common use of the description is to record the names of the data that you used to create the model.
- Select Next.
- Review the settings and select the box to accept the terms of use.
- Select Submit to start training the model.
Available preset styles across different languages
The following table summarizes the different preset styles according to different languages.
| Speaking style |
Language (locale) |
| angry |
English (United States) (en-US)
Japanese (Japan) (ja-JP) 1
Chinese (Mandarin, Simplified) (zh-CN) 1 |
| calm |
Chinese (Mandarin, Simplified) (zh-CN) 1 |
| chat |
Chinese (Mandarin, Simplified) (zh-CN) 1 |
| cheerful |
English (United States) (en-US)
Japanese (Japan) (ja-JP) 1
Chinese (Mandarin, Simplified) (zh-CN) 1 |
| disgruntled |
Chinese (Mandarin, Simplified) (zh-CN) 1 |
| excited |
English (United States) (en-US) |
| fearful |
Chinese (Mandarin, Simplified) (zh-CN) 1 |
| friendly |
English (United States) (en-US) |
| hopeful |
English (United States) (en-US) |
| sad |
English (United States) (en-US)
Japanese (Japan) (ja-JP) 1
Chinese (Mandarin, Simplified) (zh-CN) 1 |
| shouting |
English (United States) (en-US) |
| serious |
Chinese (Mandarin, Simplified) (zh-CN) 1 |
| terrified |
English (United States) (en-US) |
| unfriendly |
English (United States) (en-US) |
| whispering |
English (United States) (en-US) |
1 The neural voice style is available in public preview. For the current list of regions that support styles in public preview, see the Speech service regions table.
Sign in to the Speech Studio.
Select Custom voice > <Your project name> > Train model > Train a new model.
Select Neural - cross lingual as the training method for your model. To use a different training method, see Neural or Neural - multi style or Neural - multilingual or Neural - HD Voice.
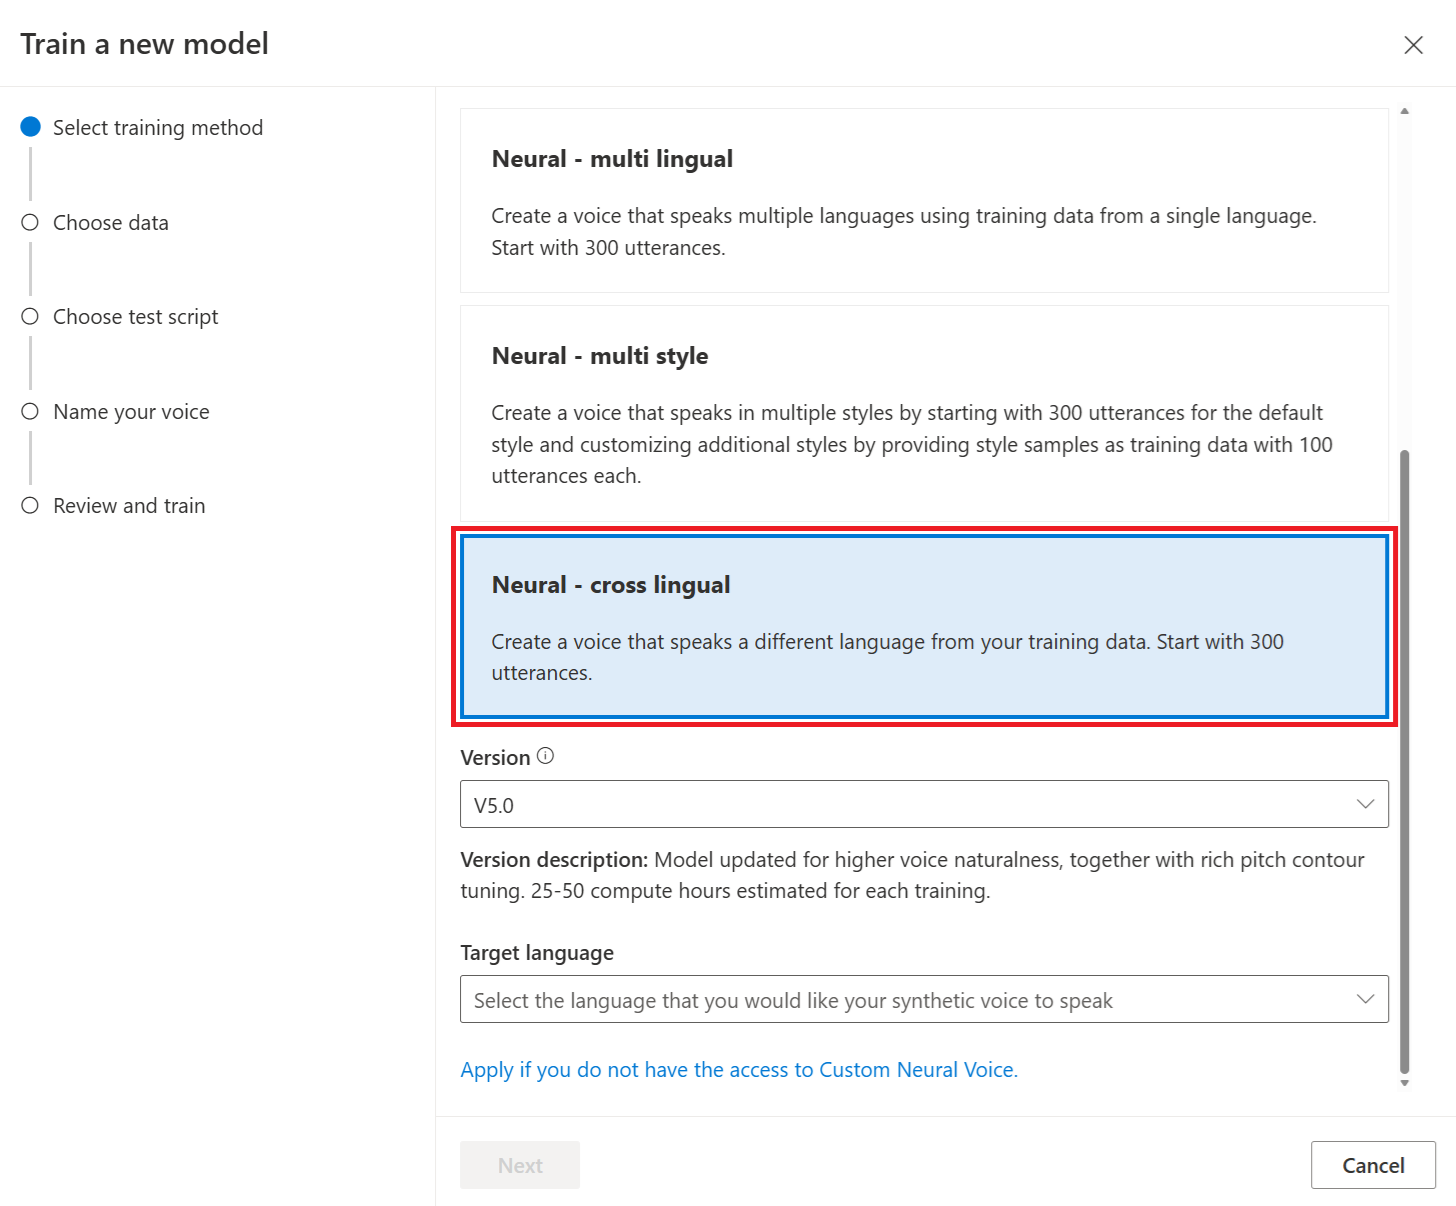
Select a version of the training recipe for your model. The latest version is selected by default. The supported features and training time can vary by version. Normally, we recommend the latest version.
Note
Model version V3.0 was retired on July 25, 2025. The voice models already created on these retired versions aren't affected.
Select the Target language that your voice speaks. The voice speaks a different language from your training data. You can select only one target language for a voice model.
Select the data that you want to use for training. Duplicate audio names are removed from the training. Make sure that the data you select doesn't contain the same audio names across multiple .zip files.
You can select only successfully processed datasets for training. Check your data processing status if you don't see your training set in the list.
Select a speaker file with the voice talent statement that corresponds to the speaker in your training data.
Select Next.
Each training generates 100 sample audio files automatically to help you test the model with a default script.
Optionally, you can also select Add my own test script and provide your own test script with up to 100 utterances to test the model at no extra cost. The generated audio files are a combination of the automatic test scripts and custom test scripts. For more information, see Test script requirements.
Enter a Name to help you identify the model. Choose a name carefully. The model name is used as the voice name in your speech synthesis request by the SDK and SSML input. Only letters, numbers, and a few punctuation characters are allowed. Use different names for different neural voice models.
Optionally, enter the Description to help you identify the model. A common use of the description is to record the names of the data that you used to create the model.
Select Next.
Review the settings and select the box to accept the terms of use.
Select Submit to start training the model.
Monitor the training process
The Train model table displays a new entry that corresponds to this newly created model. The status reflects the process of converting your data to a voice model, as described in this table:
| State |
Meaning |
| Processing |
Your voice model is being created. |
| Succeeded |
Your voice model has been created and can be deployed. |
| Failed |
Your voice model has failed in training. The cause of the failure might be, for example, unseen data problems or network issues. |
| Canceled |
The training for your voice model was canceled. |
While the model status is Processing, you can select Cancel training to cancel your voice model. You're not charged for this canceled training.
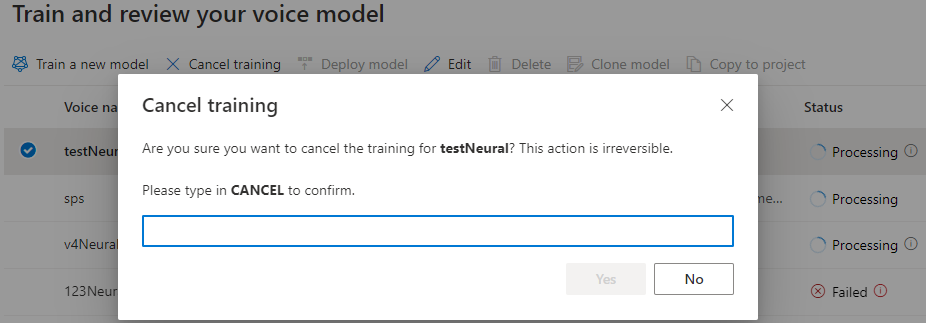
After you finish training the model successfully, you can review the model details and Test your voice model.
You can use the Audio Content Creation tool in Speech Studio to create audio and fine-tune your deployed voice. If applicable for your voice, you can select one of multiple styles.
Rename your model
If you want to rename the model you built, select Clone model to create a clone of the model with a new name in the current project.
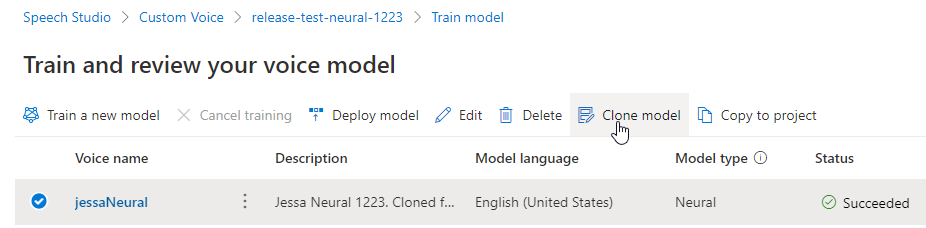
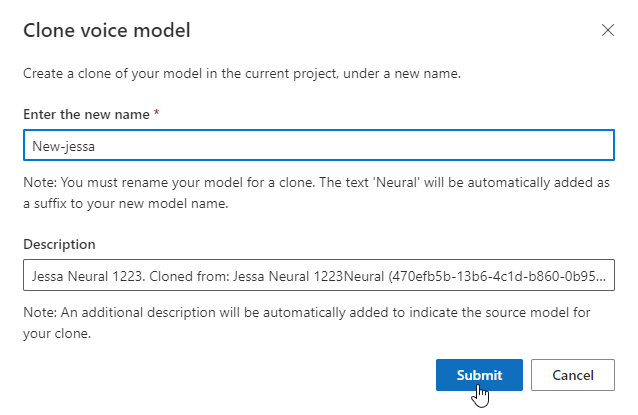
Enter the new name on the Clone voice model window, then select Submit. The text Neural is automatically added as a suffix to your new model name.
Test your voice model
After your voice model is successfully built, you can use the generated sample audio files to test it before you deploy it.
The quality of the voice depends on many factors, such as:
- The size of the training data.
- The quality of the recording.
- The accuracy of the transcript file.
- How well the recorded voice in the training data matches the personality of the designed voice for your intended use case.
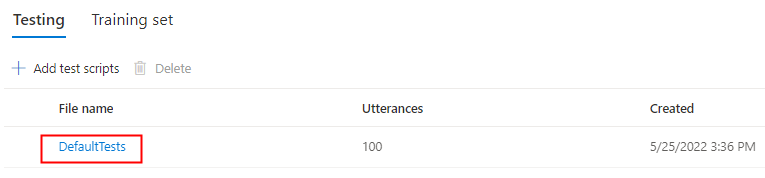
Select DefaultTests under Testing to listen to the sample audio files. The default test samples include 100 sample audio files generated automatically during training to help you test the model. In addition to these 100 audio files provided by default, your own test script utterances are also added to DefaultTests set. This addition is at most 100 utterances. You're not charged for the testing with DefaultTests.
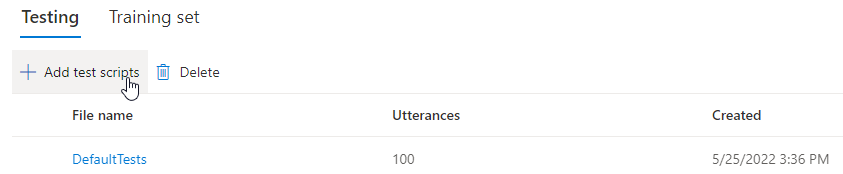
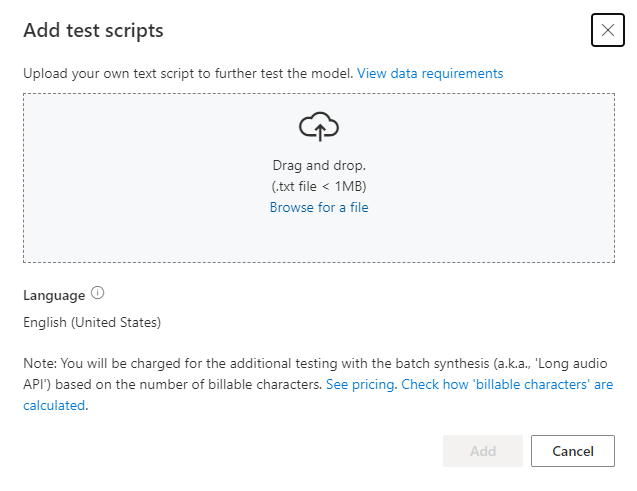
If you want to upload your own test scripts to further test your model, select Add test scripts to upload your own test script.
Before you upload test script, check the Test script requirements. You're charged for the extra testing with the batch synthesis based on the number of billable characters. See Azure Speech in Foundry Tools pricing.
Under Add test scripts, select Browse for a file to select your own script, then select Add to upload it.
Test script requirements
The test script must be a .txt file that is less than 1 MB. Supported encoding formats include ANSI/ASCII, UTF-8, UTF-8-BOM, UTF-16-LE, or UTF-16-BE.
Unlike the training transcription files, the test script should exclude the utterance ID, which is the filename of each utterance. Otherwise, these IDs are spoken.
Here's an example set of utterances in one .txt file:
This is the waistline, and it's falling.
We have trouble scoring.
It was Janet Maslin.
Each paragraph of the utterance results in a separate audio. If you want to combine all sentences into one audio, make them a single paragraph.
Note
The generated audio files are a combination of the automatic test scripts and custom test scripts.
Update engine version for your voice model
Azure text to speech engines are updated from time to time to capture the latest language model that defines the pronunciation of the language. After you train your voice, you can apply your voice to the new language model by updating to the latest engine version.
When a new engine is available, you're prompted to update your neural voice model.

Go to the model details page and follow the on-screen instructions to install the latest engine.
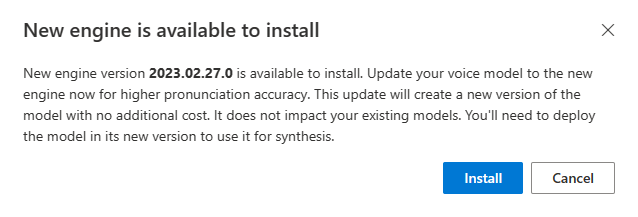
Alternatively, select Install the latest engine later to update your model to the latest engine version.
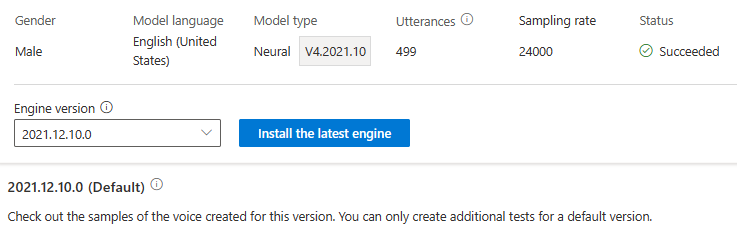
You're not charged for engine update. The previous versions are still kept.
You can check all engine versions for the model from the Engine version list, or remove one if you don't need it anymore.
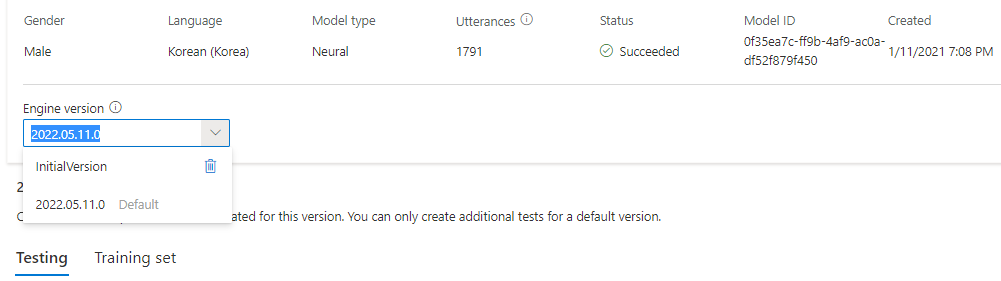
The updated version is automatically set as default. But you can change the default version by selecting a version from the drop-down list and selecting Set as default.
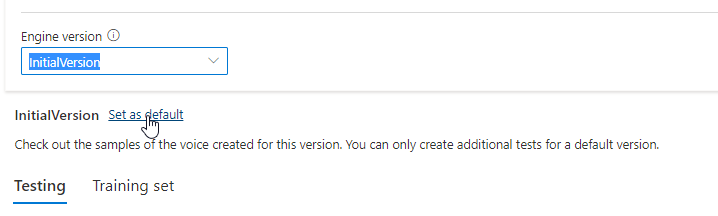
If you want to test each engine version of your voice model, you can select a version from the list, then select DefaultTests under Testing to listen to the sample audio files. If you want to upload your own test scripts to further test your current engine version, first make sure the version is set as default, then follow the steps in Test your voice model.
Updating the engine creates a new version of the model at no extra cost. After you update the engine version for your voice model, you need to deploy the new version to create a new endpoint. You can only deploy the default version.
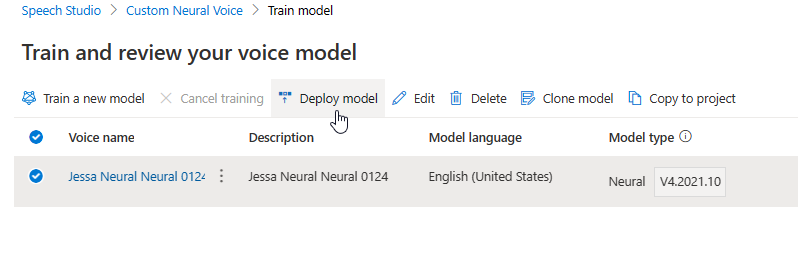
After you create a new endpoint, you need to transfer the traffic to the new endpoint in your product.
To learn more about the capabilities and limits of this feature, and the best practice to improve your model quality, see Characteristics and limitations for using custom voice.
Copy your voice model to another project
You can copy your voice model to another project for the same region or another region. For example, you can copy a neural voice model that was trained in one region, to a project for another region.
Note
Professional voice fine-tuning is currently only available in some regions. You can copy a neural voice model from those regions to other regions. For more information, see the regions for custom voice.
To copy your custom voice model to another project:
On the Train model tab, select a voice model that you want to copy, and then select Copy to project.
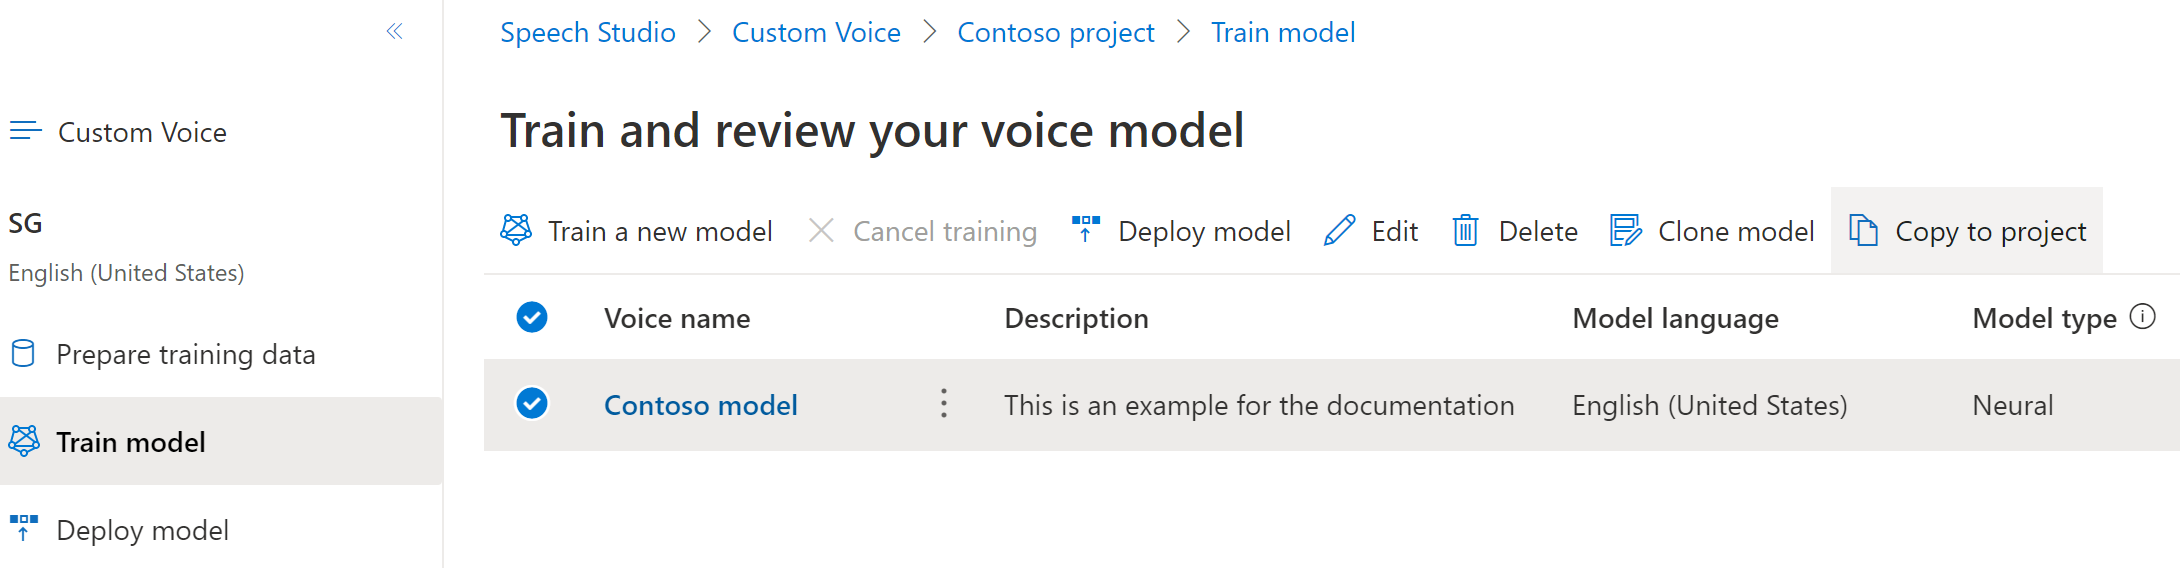
Select the Subscription, Region, Speech resource, and Project where you want to copy the model. You must have a speech resource and project in the target region, otherwise you need to create them first.
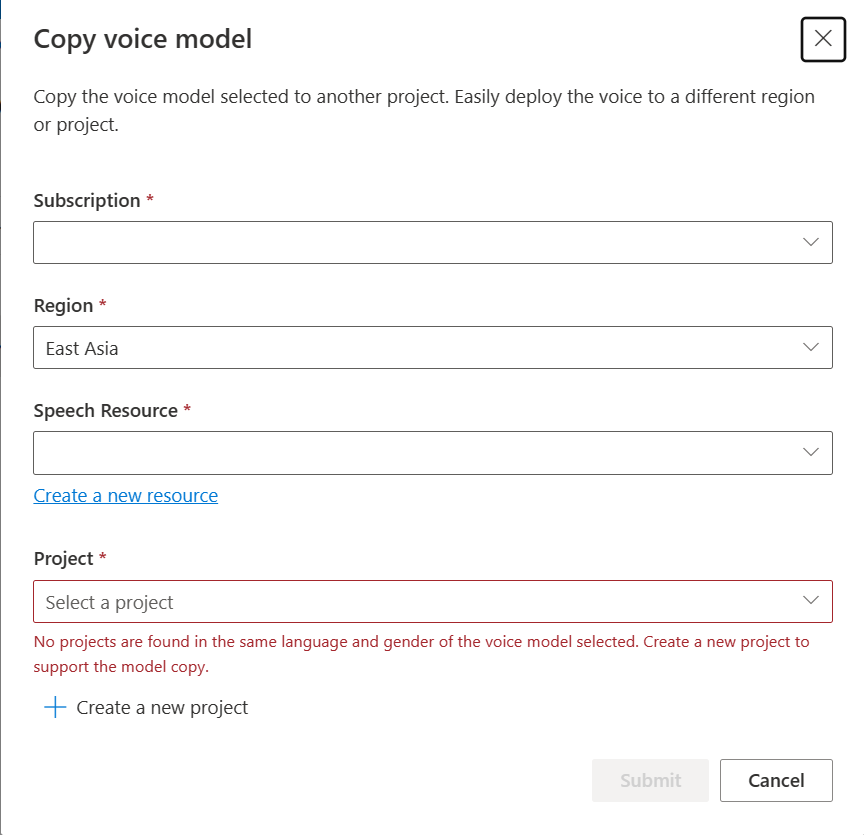
Select Submit to copy the model.
Select View model under the notification message for the successful copying.
Navigate to the project where you copied the model to deploy the model copy.
Next steps
In this article, you learn how to fine-tune a professional voice through the custom voice API.
Important
Professional voice fine-tuning is currently only available in some regions. After your voice model is trained in a supported region, you can copy it to a Foundry resource in another region as needed. For more information, see the footnotes in the Speech service table.
Training duration varies depending on how much data you use. It takes about 10 compute hours on average to fine-tune a professional voice. Standard subscription (S0) users can train four voices simultaneously. If you reach the limit, wait until at least one of your voice models finishes training, and then try again.
Choose a training method
After you validate your data files, use them to build your custom voice model. When you create a custom voice, you can choose to train it with one of the following methods:
Neural - HD Voice: Create a HD voice in the same language of your training data. Azure neural HD voices are LLM-based, optimized for dynamic conversations. Learn more about neural HD voices here.
Neural: Create a voice in the same language as your training data.
Neural - multi style: Create a custom voice that speaks in multiple styles and emotions, without adding new training data. Multiple style voices are useful for video game characters, conversational chatbots, audiobooks, content readers, and more.
To create a multiple style voice, you need to prepare a set of general training data, at least 300 utterances. Select one or more of the preset target speaking styles. You can also create multiple custom styles by providing style samples, of at least 100 utterances per style, as extra training data for the same voice. The supported preset styles vary according to different languages. See available preset styles across different languages.
Neural - cross lingual: Create a voice that speaks a different language from your training data. For example, with the fr-FR training data, you can create a voice that speaks en-US.
The language of the training data and the target language must both be one of the languages that are supported for cross lingual voice training. You don't need to prepare training data in the target language, but your test script must be in the target language.
The language of the training data must be one of the languages that are supported for custom voice, cross lingual, or multiple style or HD voice training.
Create a voice model
To create an HD voice, use the Models_Create operation of the custom voice API. Construct the request body according to the following instructions:
- Set the required
projectId property. See create a project.
- Set the required
consentId property. See add voice talent consent.
- Set the required
trainingSetId property. See create a training set.
- Set the required recipe
kind property to HD for neural voice training. The recipe kind indicates the training method and can't be changed later. To use a different training method, see Neural, Neural - cross lingual, or Neural - multi style. See Bilingual training for more information about bilingual training and differences between locales.
- Set the required
voiceName property. The voice name automatically adds the Dragon HD suffix and can't be changed later. Choose a name carefully. The SDK and SSML input use the voice name in your speech synthesis request. Only letters, numbers, and a few punctuation characters are allowed before the specific suffix. Use different names for different neural voice models.
- Optionally, set the
description property for the voice description. The voice description can be changed later.
Make an HTTP PUT request using the URI as shown in the following Models_Create example.
- Replace
YourResourceKey with your Speech resource key.
- Replace
YourResourceName with your Speech resource name.
- Replace
JessicaModelId with a model ID of your choice. The case sensitive ID will be used in the model's URI and can't be changed later.
curl -v -X PUT -H "Ocp-Apim-Subscription-Key: YourResourceKey" -H "Content-Type: application/json" -d '{
  "voiceName": "Jessica",
  "description": "Jessica HD voice",
  "recipe": {
    "kind": "HD"
  },
  "projectId": "ProjectId",
  "consentId": "JessicaConsentId",
  "trainingSetId": "JessicaTrainingSetId"
} '  "https://YourResourceName.cognitiveservices.azure.com/customvoice/models/JessicaModelId?api-version=2026-01-01"
You should receive a response body in the following format:
{
  "id": "JessicaModelId",
  "voiceName": "Jessica:DragonHDLatestNeural",
  "description": "Jessica HD voice",
  "recipe": {
    "kind": "HD",
    "version": "V1.0"
  },
  "projectId": "ProjectId",
  "consentId": "JessicaConsentId",
  "trainingSetId": "JessicaTrainingSetId",
  "locale": "en-US",
  "engineVersion": "2023.07.04.0",
  "status": "NotStarted",
  "createdDateTime": "2023-04-01T05:30:00.000Z",
  "lastActionDateTime": "2023-04-02T10:15:30.000Z"
}
To create a neural voice, use the Models_Create operation of the custom voice API. Construct the request body according to the following instructions:
- Set the required
projectId property. See create a project.
- Set the required
consentId property. See add voice talent consent.
- Set the required
trainingSetId property. See create a training set.
- Set the required recipe
kind property to Default for neural voice training. The recipe kind indicates the training method and can't be changed later. To use a different training method, see Neural - cross lingual, Neural - multi style, or Neural - HD Voice. See Bilingual training for more information about bilingual training and differences between locales.
- Set the required
voiceName property. Choose a name carefully. The voice name is used in your speech synthesis request by the SDK and SSML input. Only letters, numbers, and a few punctuation characters are allowed. Use different names for different neural voice models.
- Optionally, set the
description property for the voice description. The voice description can be changed later.
Make an HTTP PUT request using the URI as shown in the following Models_Create example.
- Replace
YourResourceKey with your Speech resource key.
- Replace
YourResourceName with your Speech resource name.
- Replace
JessicaModelId with a model ID of your choice. The case sensitive ID will be used in the model's URI and can't be changed later.
curl -v -X PUT -H "Ocp-Apim-Subscription-Key: YourResourceKey" -H "Content-Type: application/json" -d '{
  "voiceName": "Jessica",
  "description": "Jessica voice",
  "recipe": {
    "kind": "Default"
  },
  "projectId": "ProjectId",
  "consentId": "JessicaConsentId",
  "trainingSetId": "JessicaTrainingSetId"
} '  "https://YourResourceName.cognitiveservices.azure.com/customvoice/models/JessicaModelId?api-version=2026-01-01"
You should receive a response body in the following format:
{
  "id": "JessicaModelId",
  "voiceName": "Jessica",
  "description": "Jessica voice",
  "recipe": {
    "kind": "Default",
    "version": "V10.0"
  },
  "projectId": "ProjectId",
  "consentId": "JessicaConsentId",
  "trainingSetId": "JessicaTrainingSetId",
  "locale": "en-US",
  "engineVersion": "2023.07.04.0",
  "status": "NotStarted",
  "createdDateTime": "2023-04-01T05:30:00.000Z",
  "lastActionDateTime": "2023-04-02T10:15:30.000Z"
}
To create a multi-style neural voice, use the Models_Create operation of the custom voice API. Construct the request body according to the following instructions:
- Set the required
projectId property. See create a project.
- Set the required
consentId property. See add voice talent consent.
- Set the required
trainingSetId property. See create a training set.
- Set the required recipe
kind property to MultiStyle for multiple style voice training. The recipe kind indicates the training method and can't be changed later. To use a different training method, see Neural or Neural - cross lingual or Neural - HD Voice.
- Set the required
voiceName property. Choose a name carefully. The voice name is used in your speech synthesis request by the SDK and SSML input. Only letters, numbers, and a few punctuation characters are allowed. Use different names for different neural voice models.
- Set the required
locale property for the language for your voice model.
- Set the required
presetStyles property to one or more of the available preset styles for the target language.
- Optionally, set the
styleTrainingSetIds property to provide training data for your custom speaking styles. The maximum number of custom styles varies by languages: English (United States) allows up to 10 custom styles, Chinese (Mandarin, Simplified) allows up to four custom styles, and Japanese (Japan) allows up to five custom styles.
The styleTrainingSetIds property is a dictionary of style names and training set IDs.
- For each dictionary key, specify a custom style name of your choice. This name is used by your application within the
style element of Speech Synthesis Markup Language (SSML).
- For each dictionary value, specify the ID of a training set that you already created for the same voice model. The training set must contain at least 100 utterances for each style.
- Optionally, set the
description property for the voice description. The voice description can be changed later.
Make an HTTP PUT request using the URI as shown in the following Models_Create example.
- Replace
YourResourceKey with your Speech resource key.
- Replace
YourResourceName with your Speech resource name.
- Replace
JessicaModelId with a model ID of your choice. The case sensitive ID will be used in the model's URI and can't be changed later.
curl -v -X PUT -H "Ocp-Apim-Subscription-Key: YourResourceKey" -H "Content-Type: application/json" -d '{
  "voiceName": "JessicaNeuralMultiStyle",
  "description": "Jessica multi-style voice",
  "recipe": {
    "kind": "MultiStyle"
  },
  "projectId": "ProjectId",
  "consentId": "JessicaConsentId",
  "trainingSetId": "JessicaTrainingSetId",
  "locale": "en-US",
  "properties": {
    "presetStyles": [
      "cheerful",
      "sad"
    ],
    "styleTrainingSetIds": {
      "happyJessica": "JessicaHappyTrainingSetId",
      "myStyle2": "JessicaStyle2TrainingSetId"
    }
  }
} '  "https://YourResourceName.cognitiveservices.azure.com/customvoice/models/JessicaModelId?api-version=2026-01-01"
You should receive a response body in the following format:
{
  "id": "JessicaModelId",
  "voiceName": "JessicaNeuralMultiStyle",
  "description": "Jessica multi-style voice",
  "recipe": {
    "kind": "MultiStyle",
    "version": "V1.0"
  },
  "projectId": "ProjectId",
  "consentId": "JessicaConsentId",
  "trainingSetId": "JessicaTrainingSetId",
  "locale": "en-US",
  "engineVersion": "2023.07.04.0","properties": {
    "presetStyles": [
      "cheerful",
      "sad"
    ],
    "styleTrainingSetIds": {
      "happyJessica": "JessicaHappyTrainingSetId",
      "myStyle2": "JessicaStyle2TrainingSetId"
    },
    "voiceStyles": [
      "cheerful",
      "sad",
      "happyJessica",
      "myStyle2"
    ]
  }
  "status": "NotStarted",
  "createdDateTime": "2023-04-01T05:30:00.000Z",
  "lastActionDateTime": "2023-04-02T10:15:30.000Z"
}
To create a cross lingual neural voice, use the Models_Create operation of the custom voice API. Construct the request body according to the following instructions:
- Set the required
projectId property. See create a project.
- Set the required
consentId property. See add voice talent consent.
- Set the required
trainingSetId property. See create a training set.
- Set the required recipe
kind property to CrossLingual for cross lingual voice training. The recipe kind indicates the training method and can't be changed later. To use a different training method, see Neural or Neural - multi style or Neural - HD Voice.
- Set the required
voiceName property. Choose a name carefully. The voice name is used in your speech synthesis request by the SDK and SSML input. Only letters, numbers, and a few punctuation characters are allowed. Use different names for different neural voice models.
- Set the required
locale property for the language that your voice speaks. The voice speaks a different language from your training data. You can specify only one target language for a voice model.
- Optionally, set the
description property for the voice description. The voice description can be changed later.
Make an HTTP PUT request using the URI as shown in the following Models_Create example.
- Replace
YourResourceKey with your Speech resource key.
- Replace
YourResourceName with your Speech resource name.
- Replace
JessicaModelId with a model ID of your choice. The case sensitive ID will be used in the model's URI and can't be changed later.
curl -v -X PUT -H "Ocp-Apim-Subscription-Key: YourResourceKey" -H "Content-Type: application/json" -d '{
  "voiceName": "JessicaCrossLingualNeural",
  "description": "Jessica cross lingual voice",
  "recipe": {
    "kind": "CrossLingual"
  },
  "projectId": "ProjectId",
  "consentId": "JessicaConsentId",
  "trainingSetId": "Jessica-en-US-TrainingSetId",
  "locale": "fr-FR"
} '  "https://YourResourceName.cognitiveservices.azure.com/customvoice/models/JessicaModelId?api-version=2026-01-01"
You should receive a response body in the following format:
{
  "id": "JessicaModelId",
  "voiceName": "JessicaNeuralCrossLingual",
  "description": "Jessica cross lingual voice",
  "recipe": {
    "kind": "CrossLingual",
    "version": "V5.0"
  },
  "projectId": "ProjectId",
  "consentId": "JessicaConsentId",
  "trainingSetId": "Jessica-en-US-TrainingSetId",
  "locale": "fr-FR",
  "engineVersion": "2023.11.14.0",
  "status": "NotStarted",
  "createdDateTime": "2023-04-01T05:30:00.000Z",
  "lastActionDateTime": "2023-04-02T10:15:30.000Z"
}
Not currently supported via the REST API.
Bilingual training
If you select the Neural training type, you can train a voice to speak in multiple languages. The zh-CN, zh-HK, and zh-TW locales support bilingual training for the voice to speak both Chinese and English. Depending in part on your training data, the synthesized voice can speak English with an English native accent or English with the same accent as the training data.
Note
To enable a voice in the zh-CN locale to speak English with the same accent as the sample data, you should upload English data to a Contextual training set, or choose Chinese (Mandarin, Simplified), English bilingual when creating a project or specify the zh-CN (English bilingual) locale for the training set data via REST API.
In your contextual training set, include at least 100 sentences or 10 minutes of English content and do not exceed the amount of Chinese content.
The following table shows the differences among the locales:
| Speech Studio locale |
REST API locale |
Bilingual support |
Chinese (Mandarin, Simplified) |
zh-CN |
If your sample data includes English, the synthesized voice speaks English with an English native accent, instead of the same accent as the sample data, regardless of the amount of English data. |
Chinese (Mandarin, Simplified), English bilingual |
zh-CN (English bilingual) |
If you want the synthesized voice to speak English with the same accent as the sample data, we recommend including over 10% English data in your training set. Otherwise, the English speaking accent might not be ideal. |
Chinese (Cantonese, Simplified) |
zh-HK |
If you want to train a synthesized voice capable of speaking English with the same accent as your sample data, make sure to provide over 10% English data in your training set. Otherwise, it defaults to an English native accent. The 10% threshold is calculated based on the data accepted after successful uploading, not the data before uploading. If some uploaded English data is rejected due to defects and doesn't meet the 10% threshold, the synthesized voice defaults to an English native accent. |
Chinese (Taiwanese Mandarin, Traditional) |
zh-TW |
If you want to train a synthesized voice capable of speaking English with the same accent as your sample data, make sure to provide over 10% English data in your training set. Otherwise, it defaults to an English native accent. The 10% threshold is calculated based on the data accepted after successful uploading, not the data before uploading. If some uploaded English data is rejected due to defects and doesn't meet the 10% threshold, the synthesized voice defaults to an English native accent. |
Available preset styles across different languages
The following table summarizes the different preset styles according to different languages.
| Speaking style |
Language (locale) |
| angry |
English (United States) (en-US)
Japanese (Japan) (ja-JP) 1
Chinese (Mandarin, Simplified) (zh-CN) 1 |
| calm |
Chinese (Mandarin, Simplified) (zh-CN) 1 |
| chat |
Chinese (Mandarin, Simplified) (zh-CN) 1 |
| cheerful |
English (United States) (en-US)
Japanese (Japan) (ja-JP) 1
Chinese (Mandarin, Simplified) (zh-CN) 1 |
| disgruntled |
Chinese (Mandarin, Simplified) (zh-CN) 1 |
| excited |
English (United States) (en-US) |
| fearful |
Chinese (Mandarin, Simplified) (zh-CN) 1 |
| friendly |
English (United States) (en-US) |
| hopeful |
English (United States) (en-US) |
| sad |
English (United States) (en-US)
Japanese (Japan) (ja-JP) 1
Chinese (Mandarin, Simplified) (zh-CN) 1 |
| shouting |
English (United States) (en-US) |
| serious |
Chinese (Mandarin, Simplified) (zh-CN) 1 |
| terrified |
English (United States) (en-US) |
| unfriendly |
English (United States) (en-US) |
| whispering |
English (United States) (en-US) |
1 The neural voice style is available in public preview. For the current list of regions that support styles in public preview, see the Speech service regions table.
Get training status
To get the training status of a voice model, use the Models_Get operation of the custom voice API. Construct the request URI according to the following instructions:
Make an HTTP GET request using the URI as shown in the following Models_Get example.
- Replace
YourResourceKey with your Speech resource key.
- Replace
YourResourceName with your Speech resource name.
- Replace
JessicaModelId if you specified a different model ID in the previous step.
curl -v -X GET "https://YourResourceName.cognitiveservices.azure.com/customvoice/models/JessicaModelId?api-version=2026-01-01" -H "Ocp-Apim-Subscription-Key: YourResourceKey"
You should receive a response body in the following format.
Note
The recipe kind and other properties depend on how you trained the voice. In this example, the recipe kind is Default for neural voice training.
{
  "id": "JessicaModelId",
  "voiceName": "Jessica",
  "description": "Jessica voice",
  "recipe": {
    "kind": "Default",
    "version": "V9.0"
  },
  "projectId": "ProjectId",
  "consentId": "JessicaConsentId",
  "trainingSetId": "JessicaTrainingSetId",
  "locale": "en-US",
  "engineVersion": "2023.07.04.0",
  "status": "Succeeded",
  "createdDateTime": "2023-04-01T05:30:00.000Z",
  "lastActionDateTime": "2023-04-02T10:15:30.000Z"
}
You might need to wait for several minutes before the training is completed. Eventually the status will change to either Succeeded or Failed.
Next steps
