Note
Access to this page requires authorization. You can try signing in or changing directories.
Access to this page requires authorization. You can try changing directories.
After you build and test an agent, the next step is often sharing it with others in the surfaces where they already work. Publishing a Foundry agent to Microsoft 365 Copilot and Teams lets you and others interact with and discover your agent through the Microsoft 365 Copilot and Teams UI. What gets published is the agent's stable endpoint, so end users always interact with a consistent agent entity while you seamlessly roll out new agent versions that receive traffic through the endpoint.
This article explains how to publish agents from the Foundry portal.
Important
Publishing agents to Microsoft 365 Copilot and Microsoft Teams is an "Early Access Preview" and is licensed to you as part of your Azure subscription and subject to terms applicable to "Previews" and "Early Access Previews" in the Supplemental Terms of Use for Microsoft Azure Previews and the Microsoft Products and Services Data Protection Addendum ("DPA").
Use of Azure AI Foundry Agent Service to host agents that operate with third-party servers or agents, is at your own risk. We recommend reviewing all data being shared with third-party servers or agents and being cognizant of third-party practices for retention and location of data.
External tools or services (including Microsoft tools and services external to Azure AI Foundry) with which Azure AI Foundry Agent Service interacts are subject to their own data processing terms. Agents published to Copilot or Teams are also subject to supplemental terms.
It's your responsibility to manage whether your data flows outside of your organization's Azure compliance and geographic boundaries and any related implications.
Note
Publishing from the Foundry portal isn't available for projects that disable public network access because additional networking configuration is required. To publish these agents, use the REST API. For more information, see Publish a virtual network agent to Microsoft 365 and Teams.
Prerequisites
Access to the Microsoft Foundry portal
A Foundry project with an agent version you tested and want to publish
The following role assignments:
Permission to create an Azure Bot Service resource (
Microsoft.BotService/botServices/write) and configure its channels (Microsoft.BotService/botServices/channels/write) in the resource group where you publish. The Azure Bot Service Contributor Role grants exactly these permissions. The broader Contributor or Owner roles also work. Foundry roles don't grant these permissions. For details, see Azure Bot Service setup.Foundry User role on the Foundry project scope to create, manage, and publish agents.
Important
The Foundry RBAC roles were recently renamed. Foundry User, Foundry Owner, Foundry Account Owner, and Foundry Project Manager were previously named Azure AI User, Azure AI Owner, Azure AI Account Owner, and Azure AI Project Manager. You might still see the previous names in some places while the rename rolls out. The role IDs and core permissions are unchanged by the rename.
For details, see Role-based access control in the Foundry portal.
Test your agent thoroughly in the Foundry portal before publishing. Confirm it responds correctly and any tools work as expected.
Select the active agent version you want consumers to interact with in Microsoft 365 and Teams.
Verify that required Azure resource providers are registered in your subscription. The publishing process creates an Azure Bot Service resource, which requires the
Microsoft.BotServiceprovider.If you use Azure CLI, you can register the provider with:
az provider register --namespace Microsoft.BotService
Select an active agent version
The active version is the version that your agent's stable endpoint serves to consumers, so confirm it before you publish. For more information about agent versions and other settings, see Configure your agent endpoint and settings.
Set the active version from either of two entry points.
From the Details tab
- Open your agent and select the Details tab.
- In Agent configuration, next to Active version, select Edit.
- Select Always use latest, or select a specific version.
From the Publish button
- In the Microsoft Foundry portal, select Publish.
- Next to Active version, select the arrow.
- Select Always use latest, or select a specific version.
What happens when you publish?
When you publish an agent, Foundry performs the following steps:
- Validates the properties you submit, such as the display name, description, and version.
- Compiles a Teams app manifest as a
.zippackage. For more information, see App manifest schema for Microsoft Teams. - Submits the manifest to the Microsoft 365 Copilot and Teams agent catalogs on your behalf.
- Enables the
activityprotocol, which the agent needs to exchange messages with Microsoft 365 and Teams. - Enables an authorization scheme, either
BotServiceRbacorBotServiceTenant, that controls who can call the agent, based on the scope you select.
Who can see and call the agent
The scope you select controls visibility — who can discover the agent in the Microsoft 365 Copilot and Teams stores. Foundry sets the matching authorization scheme, which controls who can call the agent:
- Just you (Foundry portal) or
publishScopeset toShared(REST API): EnablesBotServiceRbacand requires no admin approval. The agent appears in the stores only for you. If you add it to a Teams chat, participants who have the required Foundry permissions on the project can use it. - People in your organization (Foundry portal) or
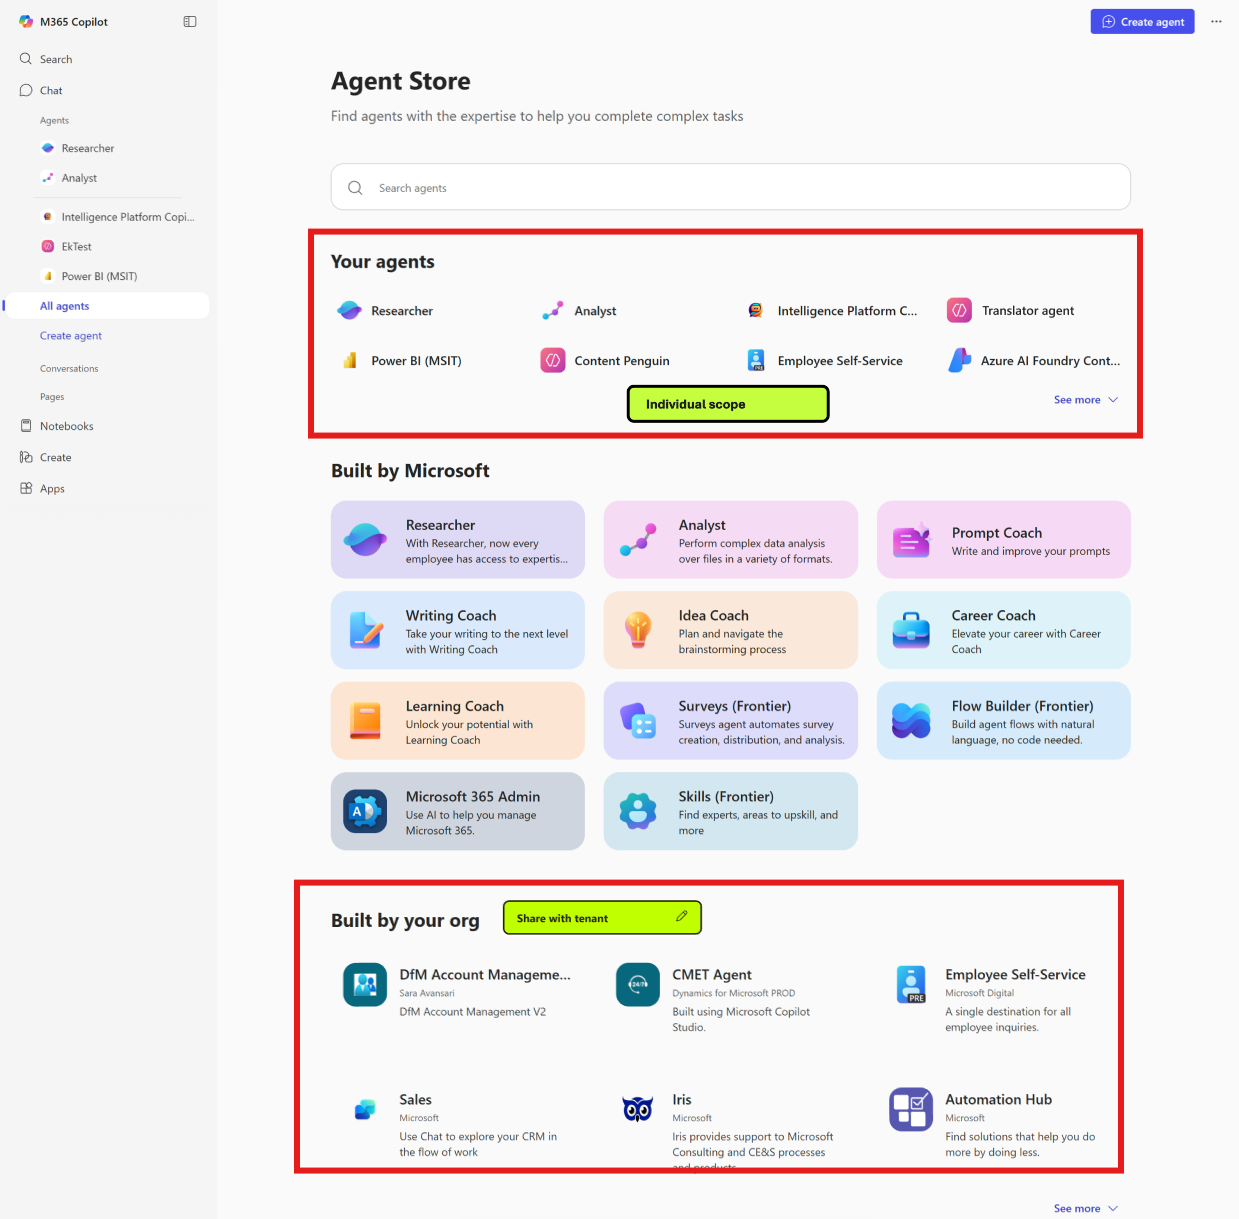
publishScopeset toTenant(REST API): EnablesBotServiceTenantand requires admin approval in the Microsoft 365 admin center. After approval, the agent appears for everyone in your tenant under Built by your org, and anyone in the tenant can discover and use it.
Publish to Microsoft 365 and Teams
Publishing from the portal calls Foundry's Microsoft 365 publish API and builds the Teams app package for you. To publish by using the REST API instead, for example to automate publishing or to publish from a project that disables public network access, see Publish a virtual network agent to Microsoft 365 and Teams. Steps 1 through 4 in that article are the REST equivalent of this portal flow and work for any project; only the final networking step is specific to disabled public network access.
You can open the publish dialog from the Details tab (in the Channels section, select Teams & Microsoft 365 Copilot) or from the Publish button. These steps use the Publish button.
In Microsoft Foundry portal, select Publish, and then select Teams and Microsoft 365 Copilot.
Expected result: The Publish to Teams and Microsoft 365 dialog opens.
An Azure Bot Service resource is either automatically created or shown as read-only if one already exists.
Complete the required metadata:
Field Description Name Display name for your agent (appears in the agent store) Publish version Three-part version number (major.minor.patch) Short description One-sentence description of what your agent does Description Longer description of your agent's responsibilities and the actions it can take Developer Your name or organization name (under Author) To add optional metadata, expand More and complete the following fields:
Field Description Developer website URL to your website (HTTPS required) Terms of use URL to your terms of use (HTTPS required) Privacy statement URL to your privacy policy (HTTPS required) Warning
Don't include secrets, API keys, or sensitive information in any metadata fields. These fields are visible to users.
Select Next: Publish options.
Choose how to publish. You can either publish your agent directly from Foundry or download and customize the agent manifest, then manually sideload it in Teams.
Direct publish
On the Publish options step, select the Direct publish tab.
Expected result: Section Choose who can use this agent is displayed.
Under Choose who can use this agent, select a scope:
Option Behavior Admin approval Best for Just you Available immediately. The agent appears under Your agents in the agent store. Share it with others by sending the agent link. Not required Personal testing, small teams, pilots People in your organization The agent is submitted for admin approval. Your Microsoft 365 admin reviews the request and assigns access. Once approved, the agent appears under Built by your org for all tenant users. Required Organization-wide distribution, production deployments Just you:
- Available immediately after publishing — no admin approval required.
- Only you see the agent initially under Your agents in the agent store.
- Share with specific users by sending the agent link.
People in your organization:
After publishing, a Microsoft 365 admin must review and approve the request in the Microsoft 365 admin center.
Once approved, the agent appears under Built by your org in the agent store for all tenant users.
App policies in your tenant control which users can access the agent.
To check approval status, go to the Microsoft 365 admin center and look for your agent under Requests.
Select Publish.
Expected result: A Publish successful dialog confirms the agent was successfully published.
Download and customize
If you want to customize the agent manifest before distributing:
On the Publish options step, select the Download & customize tab.
Expected result: The tab displays instructions for after downloading and a Download ZIP button.
Select Download ZIP.
Expected result: A
.zipfile containing the agent manifest downloads to your local machine.Customize the manifest in the downloaded package as needed.
In Microsoft Teams, upload the package you downloaded
- Go to Apps > Manage your apps > Upload an app
- Select Upload a custom app or Submit an app to your org and choose the downloaded
.zipfile.
Update a published agent in M365/Teams
Update the active agent version
To roll out a new agent version, update the agent's version selector in the Foundry portal. The stable endpoint URL stays the same — no need to republish to M365/Teams.
Update end user metadata in M365/Teams
To update metadata visible in Teams and M365 (display name, descriptions, URLs), in the Publish dropdown select Update agent Teams and Microsoft 365 Copilot display properties. The updated fields overwrite the existing values; unchanged fields are carried forward; and version will auto increment if not manually incremented.
Limitations
For agent publishing limitations, including requirements when your project disables public network access, see Limitations.
Troubleshoot publishing
Use the following table to resolve errors that occur while you publish from the portal. For more extensive troubleshooting, including how to find a published agent in the store and resolve errors when you chat with it, see Troubleshooting.
| Symptom | Cause | Resolution |
|---|---|---|
| Error publishing the agent | Invalid metadata or version | Ensure the agent has a unique identity (agent.identity isn't null). Confirm the developer name is 32 characters or fewer. |
| Azure Bot Service creation fails | Missing permissions or unregistered provider | Confirm you have permission to create resources. Register Microsoft.BotService if needed. |
The Azure bot services field shows a 403 AuthorizationFailed error for Microsoft.BotService/botServices/write |
Your identity doesn't have permission to create or update the Azure Bot Service resource in the target resource group | Assign the Azure Bot Service Contributor Role (or the broader Contributor or Owner role) on the resource group that contains the bot service, then refresh your credentials and reopen the publish flow. |
If the portal shows This agent uses an older format that can no longer be published to Teams and Microsoft 365 Copilot. Upgrade to new format to publish., the agent uses the older agent application format, which the generally available publish flow doesn't support for new publishing. Upgrade the agent to the new format, and then publish. Existing agents in the older format keep working and can still be updated. See Migrate from agent applications to the new agent model.
FAQs
If I select Organization scope, where do I approve the agent?
In the Microsoft 365 admin center. Once approved, the agent appears under Built by your org in the agent store.
If I publish my agent to Individual Scope (previously called Shared Scope), how do I share it with others in my organization?
The agent appears under Your agents in the agent store for Microsoft 365 Copilot. You can share it by sending the agent link to selected users in your organization.
What happens when I create a new agent version if my agent is published to M365?
If the version selector is set to "Always use latest" (the default), the new version is automatically served in M365/Teams. If pinned to a specific version, you must update the version selector to serve the new version.