Hi @Gorthi Sai Sri Sindhuja Greetings! It looks like you are trying to set a relationship through the target property. In addition to the details shared by Sander, I would like to point that the target property in the model definition specifies which types of twins the relationship can reach. For example, you might include a target to specify that a Building model can only have a has relationship with twins that are of model Floor. This cannot be used to set/bind targets relationships with the actual digital twins. Please refer the section Targeted and non-targeted relationships in Azure Digital Twins documentation for more details on this.
To establish a relationship, you can use the upsert_relationship method of the Python SDK and pass the source and target twin details to create this relationship.
Here is a sample code to achieve this.
import asyncio
from azure.identity import DefaultAzureCredential
from azure.digitaltwins.core import DigitalTwinsClient
import json

async def main():
    adt_instance_url = "https://<ADTHostName>"
    credential = DefaultAzureCredential()
    client = DigitalTwinsClient(adt_instance_url, credential)
    print("Service client created – ready to go")

    with open("Home.json") as f:
        dtdl = json.load(f)

    print()

    homeModel = {
        "@id": "dtmi:com:contoso:home;1",
        "@type": "Interface",
        "@context": "dtmi:dtdl:context;2",
        "displayName": "Home",
        "contents": [
            {
                "@type": "Property",
                "name": "id",
                "schema": "string"
            },
            {
                "@type": "Relationship",
                "name": "rel_has_floors",
                "target": "dtmi:com:contoso:floor;1"
            }
        ]
    }

    floorModel = {
        "@id": "dtmi:com:contoso:floor;1",
        "@type": "Interface",
        "@context": "dtmi:dtdl:context;2",
        "displayName": "Floor",
        "contents": [
            {
                "@type": "Property",
                "name": "level",
                "schema": "string"
            }
        ]
    }

    # Upload the models to ADT instance
    client.create_models([homeModel, floorModel])

    #Creating a twin for home
    twin_data = {
        "$metadata": {
            "$model": "dtmi:com:contoso:home;1"
        },
        "id": f"Hello World!"
    }

    #Create the digital twin using the upsert_digital_twin method
    digital_twin_id = "Home1"
    client.upsert_digital_twin(digital_twin_id, twin_data)

    #Creating Twins for floors
    twin_data = {
        "$metadata": {
            "$model": "dtmi:com:contoso:floor;1"
        },
        "level": f"Test level"
    }

    digital_twin_id = "Floor1"
    client.upsert_digital_twin(digital_twin_id, twin_data)
    digital_twin_id = "Floor2"
    client.upsert_digital_twin(digital_twin_id, twin_data)
    digital_twin_id = "Floor3"
    client.upsert_digital_twin(digital_twin_id, twin_data)

    create_relationship(client, "Home1", "Floor1")
    create_relationship(client, "Home1", "Floor2")
    create_relationship(client, "Home1", "Floor3")


def create_relationship(client, src_id, target_id):
    relationship = {
        "$targetId": target_id,
        "$model": "dtmi:com:contoso:home;1",
        "$relationshipName": "rel_has_floors"
    }
    rel_id = f"{src_id}-rel_has_floors->{target_id}"
    try:
        client.upsert_relationship(src_id, rel_id, relationship)
        print("Created relationship successfully")
    except Exception as e:
        print(f"Create relationship error: {e}")


if __name__ == "__main__":
    loop = asyncio.get_event_loop()
    loop.run_until_complete(main())
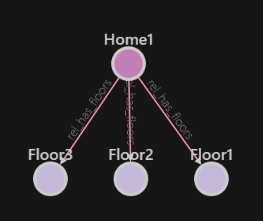
Please note that the src_id is the source /parent digital twin ID and target_id is the ID of the twin to which the relationship needs to be established.
Once the code executes, you can see that the twins get created with the correct relationships on the ADT instance. Please refer the below image.

Hope this helps!
We noticed your feedback that the above answer was not helpful. Thank you for taking time to share your feedback. Kindly let us know what we could have done better to improve the answer and make your engagement experience good. We are here to help you and strive to make your experience better and greatly value your feedback. Looking forward to your reply. Much appreciate your feedback! If you wish, you may consider re-surveying/rating for the engagement you received on the thread.
If the response helps, please mark the answer as Accepted Answer and Yes to help identify solution to other community members facing a similar issue.

