Building Windows Azure Service Part2: Service Project
In this post, you will create a Windows Azure service project using Microsoft Visual Studio 2010.
To create the Windows Azure service project
From the start menu, select All Programs and right-click Microsoft Visual Studio 2010.
Choose Run as Administrator.If the User Account Control dialog appears, click Continue.
From the File menu, click New Project.
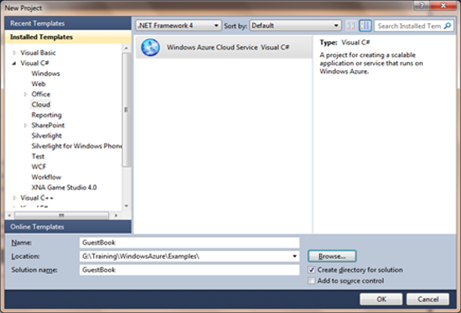
In the New Project dialog window expand the language of your choice (in this walkthrough, we are using C#) and then select Cloud.
In the templates list, select Windows Azure Cloud Service.
In the Name box, enter GuestBook.
In the Location box, enter the location where to store the project.
Click OK to create the project.
Figure 2 Creating Windows Azure Service Project
In the New Cloud Service Project dialog window, in the .NET Framework Roles panel select ASP.NET Web Role.
Click the right arrow to add an instance of the selected role to the solution.
The role shows in the Cloud Service Solution right panel.
Click the pencil icon.
Rename the role GuestBook_WebRole.
Click OK to create the cloud service solution.
Figure 3 Assigning Roles to the Service Project
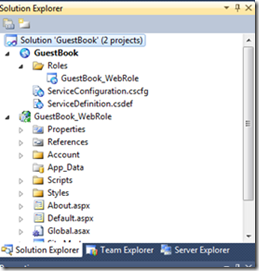
In Solution Explorer review the project structure.
Figure 4 GuestBook Service Project Structure
As shown in the previous illustration, the solution contains two separate projects.
GuestBook project. It contains the following files and folder:
- ServiceDefinition.csdef. This is the application definition file that specifies the application requirements for the Windows Azure fabric such as which roles are used, their trust level, the end points exposed by each role, the local storage requirements and the certificates used by the roles. It also defines specific application settings. The following code shows the content of the definition file.
<?xml version="1.0" encoding="utf-8"?> <ServiceDefinition name="GuestBook" xmlns="https://schemas.microsoft.com/ServiceHosting/2008/10/ServiceDefinition"> <WebRole name="GuestBook_WebRole"> <InputEndpoints> <InputEndpoint name="HttpIn" protocol="http" port="80" /> </InputEndpoints> <ConfigurationSettings> <Setting name="DiagnosticsConnectionString" /> <Setting name="DataConnectionString" /> </ConfigurationSettings> </WebRole> <WorkerRole name="GuestBook_WorkerRole"> <ConfigurationSettings> <Setting name="DiagnosticsConnectionString" /> <Setting name="DataConnectionString" /> </ConfigurationSettings> </WorkerRole> </ServiceDefinition>- ServicesConfiguration.cscfg. This is the configuration file that specifies the number of instances for each role and assigns the values for the configuration settings as defined in the ServiceDefinition.csdef file. The following code shows the content of the configuration file.
 <?xml version="1.0"?>
<ServiceConfiguration serviceName="GuestBook" xmlns="https://schemas.microsoft.com/ServiceHosting/2008/10/ServiceConfiguration">
  <Role name="GuestBook_WebRole">
    <Instances count="1" />
    <ConfigurationSettings>
      <Setting name="DiagnosticsConnectionString" value="UseDevelopmentStorage=true" />
      <Setting name="DataConnectionString" value="UseDevelopmentStorage=true" />
    </ConfigurationSettings>
  </Role>
  <Role name="GuestBook_WorkerRole">
    <Instances count="1" />
    <ConfigurationSettings>
      <Setting name="DiagnosticsConnectionString" value="UseDevelopmentStorage=true" />
      <Setting name="DataConnectionString" value="UseDevelopmentStorage=true" />
    </ConfigurationSettings>
  </Role>
</ServiceConfiguration>
The separation between service definition and configuration enables you to update the settings of a deployed application by just uploading a new service configuration file.
- Roles node. It enables you to configure what roles the cloud service includes that are web, worker or both. It also enables you to specify which project to associate with these roles.
Adding and configuring roles in the Roles node will update the definition and configuration files.
GuestBook_WebRole project. This is a standard ASP.NET web application modified for the Windows Azure environment. It contains an additional class that provides the entry point for the web role and contains methods for initializing, starting and stopping the role.
For related topics, see the following posts.
- Building Windows Azure Service Part1: Introduction
- Building Windows Azure Service Part3: Table Storage
- Building Windows Azure Service Part4: Web Role UI Handler
- Building Windows Azure Service Part5: Worker Role Background Tasks Handler
- Building Windows Azure Service Part6: Service Configuration
- Building Windows Azure Service Part7: Service Testing


