Connect your Windows 8 App to Skydrive
In this post I will show you how to connect your Windows Store App to Skydrive in order to get all your picture albums.
First of all you need to reserve a space for you app in the Windows Store. Just go to https://dev.windows.com and sign in. Go to Dashboard and click submit an app. Then you have to choose a name for your app (see image below) and reserve it. Now you are ready for the next step.

Next you will need to install the Live SDK for Windows Store Apps. Just follow this link in order to do so.
Once you got the SDK installed just open Visual Studio 2012 and create a Windows Store App based on the Grid Template. We will use this sample template without making much changes to the template or the datasource.

Now we have a very simple project based on the Grid App template which will allow us to have the Skydrive folders and the respective images inside in a few steps.
The first step we will do is to associate the app with the Windows Store App account we created previously. For that just right-click on the project folder, "store" and then "associate App with the store" (see image below). Just follow the wizard steps and you will have your app associated with the store. This step will populate the App's manifest file with information like Package Name, Package Display Name, Publisher ID and Publisher Display Name.

The next step is to add LiveSDK reference to the project in order to be able to use the Live Services to authenticate the user and request access to Skydrive.

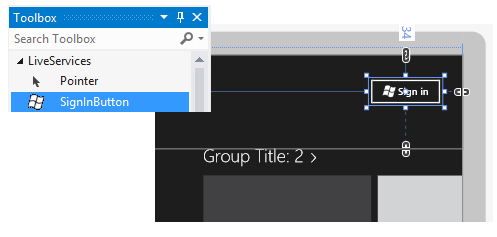
Now we have to add a button to the main page. So lets go to the "GroupedItemsPage.xaml" page, open the Toolbox and drag a button over there (see the following image).
Of course that right now this button doesn't do anything so we need to configure what we want it to do and we do that by configuring the scopes. In this context the scopes are what we want permission to so we are requesting permission to have single sign-on, the users basic information and access to skydrive. Another thing that is very important is the event handler for session changed because the SignInButton will only make the connection and request the Session Token. We will then have to use the token to make the request to Skydrive.

The next thing we will do is implement the SessionChanged event (see following picture). The result of the SignInButton gives us two essential values: Status and Session. As you can see in the image below we are using the status in order to check if the user gave us authorization to access his information. If the result is "Connected" then we have succeeded and we may proceed with what we want to do next. In this particular scenario what we want to do is save the session in first place. I will save the session in a global variable because we will need access to it later on.
Then we will create a LiveConnectClient and give it the current session as a parameter. This will allow us to query the Live services accordingly to our level of permission. Next we will get the basic info from the user using the GetAsync method and passing the string "me" as a parameter. Then, just to give the user some feedback, I will set the page title equal to his name as you might see below.
The final step is to call a method that will load the photos from the user's Skydrive.

In order to keep the coherence with the project template we will use the same approach to load data as it was before. And for this one to work we will need to go to the LoadState method and clear the content of it because we only want the user to see the info when he is signed in.

So, the real job to load the photos will be done in the SampleDataSource class. Go to this class and more concretly to this class constructor and clear all the content. This content will be replaced by a method that I will call "LoadData". This is the method that will get the user's pictures from Skydrive.
This is an asyncronous method and the way we will do this is very simple. If you know the structure of the DataGrid in the main page you know that this control receives groups that contain items inside so we have to keep the same structure. In first place we need to create a LiveConnectClient in order to be able to retrieve the user data. In order to get the Skydrive photo albums we do an async call to the Live Services passing "me/albums" as a parameter. This will give us all the folders that are defined as picture folders. We then create our groups based on this information. Then we have to make another call to the Live Services where we pass a string as parameter that is composed by the album id and the string "/files". This call will return information about every item inside this folder. We will use this information to create our items and put them inside every group.
If you look carefully when creating groups and items there are some fields left blank. This is because I wanted to keep this post as much simple as I could so I didn't changed the way this classes are created.

Now, if you run the sample you should be fine to get all the pictures from your skydrive. You will be prompted to garantee access to Skydrive and then your albums and pictures will be loaded to the screen.
Be aware that there are some guidelines that should be followed in order to have your app approved in the store. In this post I didn't focus on this but you should look for it in this document.
Have fun!