Note
Access to this page requires authorization. You can try signing in or changing directories.
Access to this page requires authorization. You can try changing directories.
Create, share, and manage a Genie Agent, the natural-language chat interface that business users use to ask questions of their data in Azure Databricks. Data analysts configure each agent with Unity Catalog, example SQL queries, instructions, and trusted assets; business users query it through the chat UI.
Note
Genie Agents were formerly known as Genie Spaces.
Technical requirements and limits
The following requirements and limits apply when using Genie Agents:
- Unity Catalog: The data for the Genie Agent must be registered to Unity Catalog. You can add up to 30 tables or views to a Genie Agent.
- Compute: Genie Agents require a pro or serverless SQL warehouse. When you create or configure a Genie Agent, you must have at least CAN USE permission on the selected warehouse. Your compute credentials are embedded into the Genie Agent and used to process all queries for all users.
- Capacity: Each Genie Agent can support up to 10,000 conversations, and each conversation can include up to 10,000 messages.
Required permissions
To create or edit a Genie Agent, you must have the following permissions and entitlements:
- Entitlements: You must have the Databricks SQL workspace entitlement. See Manage entitlements.
- Compute: CAN USE access on at least one pro or serverless SQL warehouse.
- Data access:
SELECTprivileges on the data used in the agent. - Genie Agent ACLs: At least CAN EDIT permissions on the Genie Agent. Genie Agent creators automatically have CAN MANAGE permissions on agents they create. See Genie Agent ACLs.
Note
Configuring data and compute access requires elevated permissions, generally restricted to an administrator. See Create a SQL warehouse and Manage privileges in Unity Catalog.
Manage Genie access
Genie uses partner-powered AI features, which must be enabled at the account and workspace levels. To learn how to manage these features for your account, see Partner-powered AI features.
Note
You must be an account administrator to manage access to this feature. If you disable Partner-powered AI features, users with the Databricks SQL entitlement can still click the Genie Agents icon in the sidebar, but they cannot access any Genie Agents.
Create a Genie Agent
To create a Genie Agent:
- Click Genie Agents in the sidebar.
- Click New in the upper-right corner of the screen.
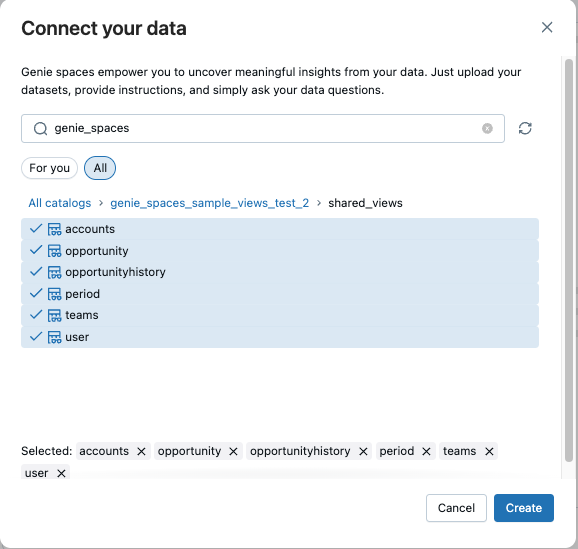
- Choose the data sources that you want to include in your Genie Agent. Then, click Create.
Set up an agent with Genie Code
When you create an agent, Genie Code launches automatically. It reads your data and suggests context that helps Genie answer questions accurately, such as descriptions of your tables and example queries. Review the suggestions and accept the ones you want to keep. To fill a specific gap, describe the context you want Genie Code to add.
Tip
Tell Genie Code to do this for you:
Create a Genie agent for our sales team that answers questions about weekly revenue, units sold, and returns by store and region. Use the sales and store tables in the retail catalog.
You can also ask Genie Code to create an agent for you when you don't yet know which tables to use. Describe your business domain, the questions you want the agent to answer, and the data it should use. Genie Code identifies relevant data, confirms the sources with you, and builds the agent with that same starting context.
Before sharing the agent with users, Databricks recommends adding example SQL queries, instructions, and knowledge store configurations to improve response accuracy. See Tune Genie Agent quality.
Review query suggestions
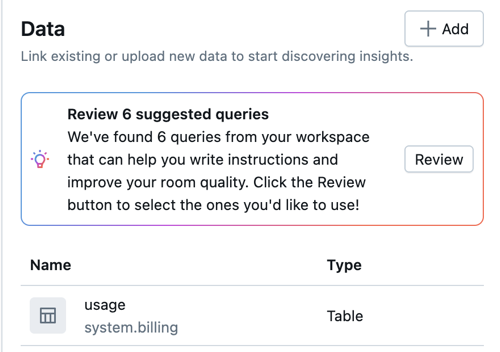
To learn about your agent's data, Genie accesses information in your workspace to better understand relationships between tables and your business semantics. When you add data assets to an agent, Genie automatically searches for relevant popular workspace queries associated with those assets. Your user credentials are used to find relevant queries for which you have at least CAN VIEW permissions. If the search returns queries, a notification appears in the Data tab of the Instructions panel. Click Review to see the suggested queries.
For more information about query access permissions, see Query ACLs.
Use the Review Suggested Queries dialog to review, edit, accept, or reject the suggested queries. Other users with at least CAN EDIT access on the Genie Agent can review queries, provided they have at least CAN VIEW access on the query itself.
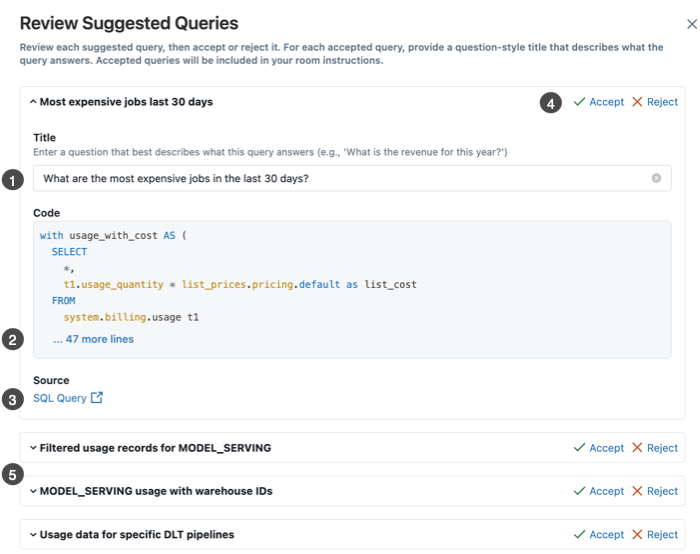
- The Title text is prepopulated with a question. Revise or edit the question by typing in the Title field.
- The Code field contains the complete text of the suggested SQL query. This field is not editable. To view the full query, click ... more lines.
- If you have sufficient permissions on the query, you can click SQL query to open the query in the Query history UI. See View query history.
- After you determine whether the query is relevant for your agent, click Accept or Reject to add it to your agent or dismiss the suggestion accordingly.
- Click the other suggestions to expand and review.
Accepted queries appear in the SQL Queries context for the agent. After they are added to the agent, the suggested queries and associated questions are fully editable. See Add example SQL queries and functions.
If no suggested queries are returned:
- You might not have sufficient access to relevant queries.
- There might be no relevant data. If queries have not run on your included tables, the search might not return results.
- Queries irrelevant to the Genie Agent are not considered. For example, queries that only perform basic write operations on the included assets are not considered relevant examples for Genie.
- Genie does not suggest queries on tables that are not added to the agent. If you've created joined tables or views specifically for the Genie Agent, but relevant Databricks SQL queries typically run against a different source table, Genie does not return those queries in the results.
Manage data objects
To manage which data objects are included in a Genie Agent, click Configure > Data. Click the Add button to add more tables. Click the  to the right of the table name to remove a table from the agent.
To view details about a data object, click the object name. The data object view shows two tabs:
- Overview: Shows the columns in the data object, including column names, data types, and descriptions.
- Sample data: Shows sample data from the table to help you understand the context and content of the data.
Note
Genie can query tables beyond those explicitly added to an agent. Access is controlled by Unity Catalog permissions, not by the Genie Agent itself. While Genie uses the attached tables and views by default, users can query other tables by prompting for joins or editing SQL directly. Similarly, if instructions or metadata reference tables outside the agent, Genie can include them in generated queries.
Configure settings
Customize your Genie Agent by configuring additional settings. Click Configure > Settings to access the following settings:
- Title: The title appears in the workspace browser with other workspace objects. Choose a title that will help end users discover your Genie Agent.
- Default warehouse: This compute resource powers the SQL statements generated in the Genie Agent. When you save a warehouse selection, your compute credentials are embedded into the Genie Agent and used to process all Genie queries for all users. You must have at least CAN EDIT permissions on the agent to change the warehouse. If a different author changes the warehouse later, their compute credentials are embedded instead. A Genie Agent can use a pro or serverless SQL warehouse. For optimal performance, Databricks recommends using a serverless SQL warehouse.
- Tags: Use tags to organize and categorizeGenie Agents for easier management. See Add tags.
- Thumbnail: Add a thumbnail image to the Genie Agent. Thumbnails appear on the Genie Agent's initial chat page and in Genie One.
- Description: Users see the description when they open the Genie Agente. Use this text area to describe the agent's purpose. The description field supports Markdown formatting so that you can style your text and supply links to helpful context and references. For more information on markdown syntax, see the Markdown Guide cheat sheet.
- Common questions: Common questions are optional examples of the types of questions users can ask. They appear on the agent's chat landing page and can be added during creation or later from the agent's Settings. Author-defined common questions take priority and appear first. When you provide enough common questions to fill the chat landing page, only your questions appear. When you provide fewer, Genie fills the remaining slots with auto-generated questions.
Expect to iterate on your Genie Agent based on testing and usage. For guidance on best practices for creating and iterating on an agent, see Curate an effective Genie Agent.
Add tags
You must have at least CAN EDIT permissions on a Genie Agent to add a tag. To add a governed tag, you must also have the ASSIGN permission on the governed tag. For more information on tags, see Apply tags to Unity Catalog securable objects.
Important
This feature is in Public Preview.
Click Configure > Settings.
Click General.
Under Tags, add or update a tag:
- If there are no tags, click the Add tags button.
- If there are tags, click the
 Add/Edit tags icon.
Select an existing tag Key and Value or enter a name of a new tag.
- Tags that are governed are in the Governed section header and have a lock icon
 .
. - Tag keys are required. Whether a tag value is required depends on the tag key.
- Tags that are governed are in the Governed section header and have a lock icon
Share a Genie Agent
Note
Genie Agents use embedded compute credentials from the author who configured the warehouse. All queries run using these embedded compute credentials. However, agent end users have their own data credentials applied on queries, so they only see data they are supposed to see. Any question about data they can't access generates an empty response.
To restrict the data each user can see within the same Genie Agent, apply row-level security to the underlying tables in Unity Catalog. Row filters and column masks defined in Unity Catalog are enforced per user automatically, regardless of how the Genie Agent is shared. See Row filters and column masks.
When you share a Genie Agent, users must have the following permissions to interact with the agent:
- Entitlements: The consumer access or Databricks SQL workspace entitlement. See Manage entitlements.
- Compute: Queries run using the compute credentials embedded by the author who configured the warehouse. End users do not need direct warehouse permissions.
- Data access: At least
SELECTprivileges on all of the Unity Catalog data objects used in the agent. Users only see data they have permission to access. - Genie Agent ACLs: At least CAN VIEW/CAN RUN permissions on the Genie Agent. See Genie Agent ACLs.
New Genie Agents are saved to your user folder by default. Like other workspace objects, they inherit permissions from their enclosing folder. You can use your workspace folder structure to share them with other users. See Workspace browser.
You can also specify certain users or groups (including all account users) to share with at a given permission level: CAN MANAGE, CAN EDIT, CAN RUN, and CAN VIEW.
To share with specific users or groups:
- Click Share.
- Enter the users or groups you want to share the agent with. Then, click Add and set appropriate permission levels. Individual users and members of small groups receive an email notification confirming that the agent has been shared.
- Use the Copy link button at the bottom of the Share dialog to get a shareable link to the Genie Agent. Privileged users can click the link to open the Genie Agent in a new tab and ask questions.
To share with all account users:
- Click Share.
- Select All account users.
- Set the appropriate permission level.
Agent users can also share individual conversations. See Share a conversation.
To share a Genie Agent with users outside your organization using OpenSharing, see Share a Genie Agent using OpenSharing.
Clone a Genie Agent
Cloning a Genie Agent creates a copy that includes all setup context and instructions. Cloning is useful when you want to test changes in a separate agent or reuse the original context in a new one. After an agent is cloned, the new agent is independent of the original. You can make edits and adjustments without impacting the original.
The following elements are copied to a cloned Genie Agent:
- Tables and settings
- General instructions
- Example SQL queries
- SQL functions
Existing chat threads and data from the Monitor tab are not copied to the new agent.
To clone a Genie Agent, do the following:
- Open the Genie Agent you want to clone.
- Click the
 kebab menu in the upper-right corner of the agent.
 - Click Clone.
- (Optional) In the Clone dialog, specify a new name and workspace folder location for the cloned Genie Agent.
- Click Clone to create the new agent.
Export a Genie Agent as a metric view
You can export the context from a Genie Agent as a metric view. This creates a metric view based on the data and semantic context configured in the agent.
To export a Genie Agent as a metric view, do the following:
- Open the Genie Agent you want to export.
- Click the kebab menu in the upper-right corner of the agent.
- Select Export to metric view.
- Select the path for the new metric view.
- (Optional) Click
 on the upper-right corner of the page to open Genie Code and refine the metric view definition.
 - Click Create.
Additional resources
- For guidance about best practices and help with troubleshooting issues, see Curate an effective Genie Agent.
- To learn how to add SQL examples, instructions, and configure settings, see Tune Genie Agent quality.
- To learn how to test, review responses, and monitor the agent, see Test and monitor a Genie Agent.
- To learn how to use audit logs to track activity and usage in a Genie Agent, see Genie Agent events.
- See Use the Genie Agents API to learn how to programmatically import and export Genie Agents and use the Genie conversation API. Also see the Genie API reference.
- To learn how to create a multi-agent system using Custom Agents, see Use Genie in multi-agent systems (Model Serving).