Prepopulate user authentication contact information for Microsoft Entra self-service password reset (SSPR)
To use Microsoft Entra self-service password reset (SSPR), authentication information for a user must be present. Most organizations have users register their authentication data themselves while collecting information for MFA. Some organizations prefer to bootstrap this process through synchronization of authentication data that already exists in Active Directory Domain Services (AD DS). This synchronized data is made available to Microsoft Entra ID and SSPR without requiring user interaction. When users need to change or reset their password, they can do so even if they haven't previously registered their contact information.
You can prepopulate authentication contact information if you meet the following requirements:
- You have properly formatted the data in your on-premises directory.
- You have configured Microsoft Entra Connect for your Microsoft Entra tenant.
Phone numbers must be in the format +CountryCode PhoneNumber, such as +1 4251234567.
Note
There must be a space between the country code and the phone number.
Password reset doesn't support phone extensions. Even in the +1 4251234567X12345 format, extensions are removed before the call is placed.
Fields populated
If you use the default settings in Microsoft Entra Connect, the following mappings are made to populate authentication contact information for SSPR:
| On-premises Active Directory | Microsoft Entra ID |
|---|---|
| telephoneNumber | Office phone |
| mobile | Mobile phone |
After a user verifies their mobile phone number, the Phone field under Authentication contact info in Microsoft Entra ID is also populated with that number.
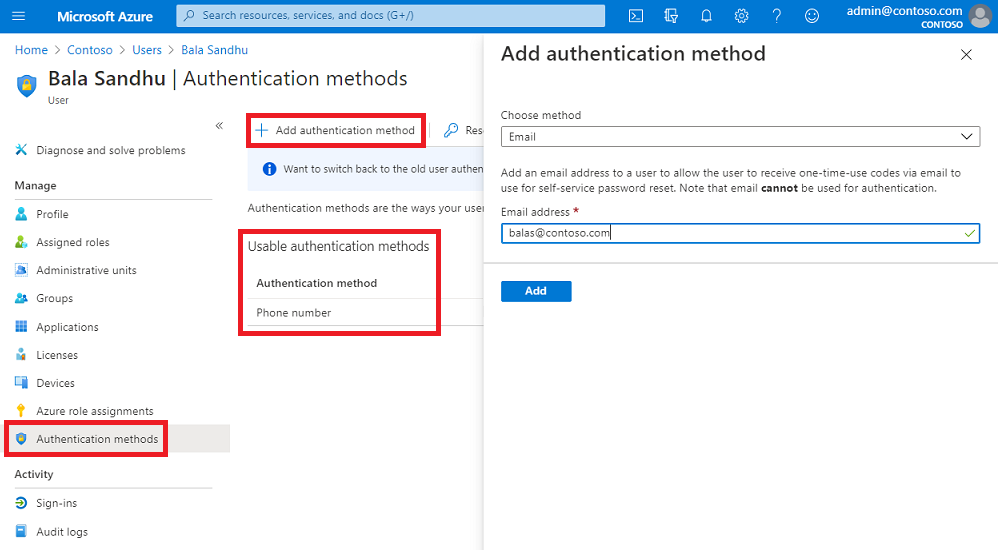
Authentication contact info
On the Authentication methods page for a Microsoft Entra user in the Microsoft Entra admin center, a Global Administrator can manually set the authentication contact information. You can review existing methods under the Usable authentication methods section, or +Add authentication methods, as shown in the following example screenshot:
The following considerations apply for this authentication contact info:
- If the Phone field is populated and Mobile phone is enabled in the SSPR policy, the user sees that number on the password reset registration page and during the password reset workflow.
- If the Email field is populated and Email is enabled in the SSPR policy, the user sees that email on the password reset registration page and during the password reset workflow.
Security questions and answers
The security questions and answers are stored securely in your Microsoft Entra tenant and are only accessible to users via My Security-Info's Combined registration experience. Administrators can't see, set, or modify the contents of another users' questions and answers.
What happens when a user registers
When a user registers, the registration page sets the following fields:
- Authentication Phone
- Authentication Email
- Security Questions and Answers
If you provided a value for Mobile phone or Alternate email, users can immediately use those values to reset their passwords, even if they haven't registered for the service.
Users also see those values when they register for the first time, and can modify them if they want to. After they successfully register, these values are persisted in the Authentication Phone and Authentication Email fields, respectively.
Set and read the authentication data through PowerShell
The following fields can be set through PowerShell:
- Alternate email
- Mobile phone
- Office phone
- Can only be set if you're not synchronizing with an on-premises directory.
You can use Microsoft Graph PowerShell to interact with Microsoft Entra ID, or use the Microsoft Graph REST API for managing authentication methods.
Use Microsoft Graph PowerShell
To get started, download and install the Microsoft Graph PowerShell module.
To quickly install from recent versions of PowerShell that support Install-Module, run the following commands. The first line checks to see if the module is already installed:
Get-Module Microsoft.Graph
Install-Module Microsoft.Graph
Select-MgProfile -Name "beta"
Connect-MgGraph -Scopes "User.ReadWrite.All"
After the module is installed, use the following steps to configure each field.
Set the authentication data with Microsoft Graph PowerShell
Connect-MgGraph -Scopes "User.ReadWrite.All"

Update-MgUser -UserId 'user@domain.com' -otherMails @("emails@domain.com")
Update-MgUser -UserId 'user@domain.com' -mobilePhone "+1 4251234567"
Update-MgUser -UserId 'user@domain.com' -businessPhones "+1 4252345678"

Update-MgUser -UserId 'user@domain.com' -otherMails @("emails@domain.com") -mobilePhone "+1 4251234567" -businessPhones "+1 4252345678"
Read the authentication data with Microsoft Graph PowerShell
Connect-MgGraph -Scopes "User.Read.All"

Get-MgUser -UserId 'user@domain.com' | select otherMails
Get-MgUser -UserId 'user@domain.com' | select mobilePhone
Get-MgUser -UserId 'user@domain.com' | select businessPhones

Get-MgUser -UserId 'user@domain.com' | Select businessPhones, mobilePhone, otherMails | Format-Table
Next steps
Once authentication contact information is prepopulated for users, complete the following tutorial to enable self-service password reset:
Feedback
Coming soon: Throughout 2024 we will be phasing out GitHub Issues as the feedback mechanism for content and replacing it with a new feedback system. For more information see: https://aka.ms/ContentUserFeedback.
Submit and view feedback for