Build a custom chat app in Python using the prompt flow SDK
Important
Some of the features described in this article might only be available in preview. This preview is provided without a service-level agreement, and we don't recommend it for production workloads. Certain features might not be supported or might have constrained capabilities. For more information, see Supplemental Terms of Use for Microsoft Azure Previews.
In this quickstart, we walk you through setting up your local development environment with the prompt flow SDK. We write a prompt, run it as part of your app code, trace the LLM calls being made, and run a basic evaluation on the outputs of the LLM.
Prerequisites
Before you can follow this quickstart, you first need to create the resources you need for your application, we recommend creating the following resources:
An AI Studio hub for connecting to external resources.
An AI Studio project for organizing your project artifacts and sharing traces and evaluation runs
An Azure AI services resource connected to your project, for providing intelligent APIs and models
An Azure OpenAI chat model deployment (gpt-35-turbo or gpt-4)
An AI Studio hub, project, and deployed Azure OpenAI chat model. Complete the AI Studio playground quickstart to create these resources if you haven't already. You can also create these resources by following the SDK guide to create a hub and project article.
Also, you must have the necessary permissions to add role assignments for storage accounts in your Azure subscription. Granting permissions (adding role assignment) is only allowed by the Owner of the specific Azure resources. You might need to ask your IT admin for help to grant access to call Azure OpenAI Service using your identity.
Grant access to call Azure OpenAI Service using your identity
To use security best practices, instead of API keys we use Microsoft Entra ID to authenticate with Azure OpenAI using your user identity.
You or your administrator needs to grant your user identity the Cognitive Services OpenAI User role on the Azure AI Services resource that you're using. This role grants you the ability to call the Azure OpenAI service using your user identity.
To grant yourself access to the Azure AI Services resource that you're using:
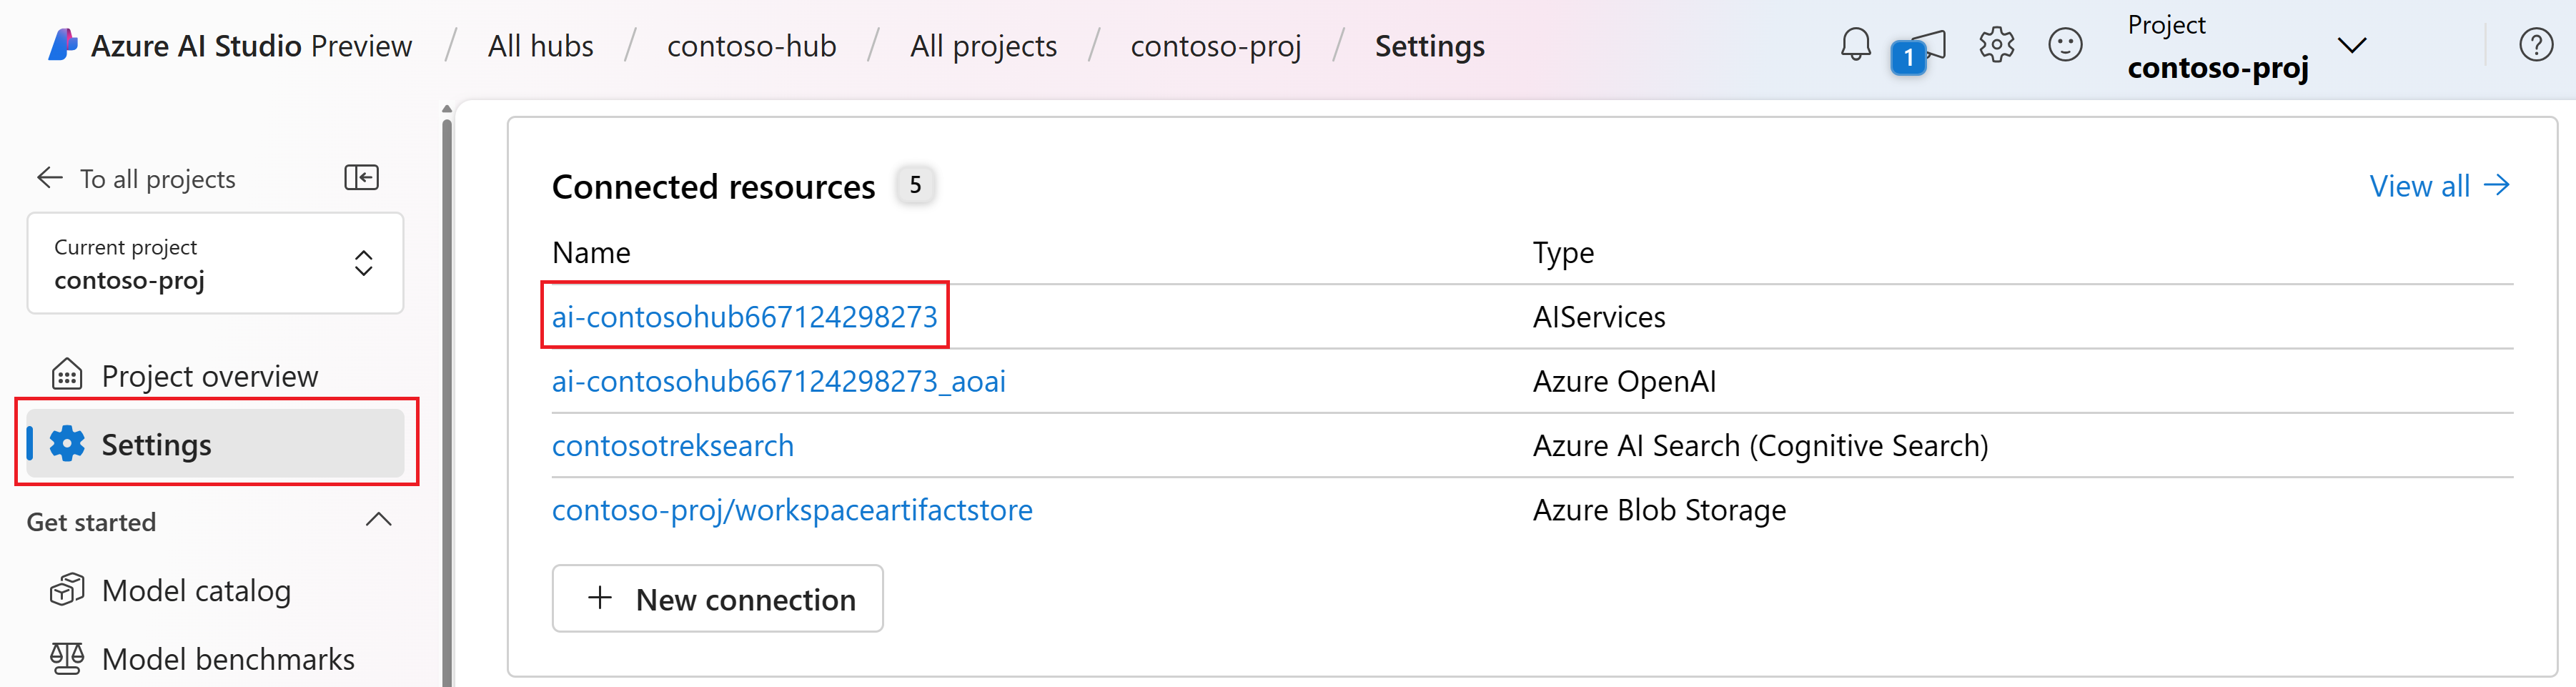
In AI Studio, go to your project and select Settings from the left pane.
In the Connected resources section, select the connection name with type AIServices.
Note
If you don't see the AIServices connection, use the Azure OpenAI connection instead.
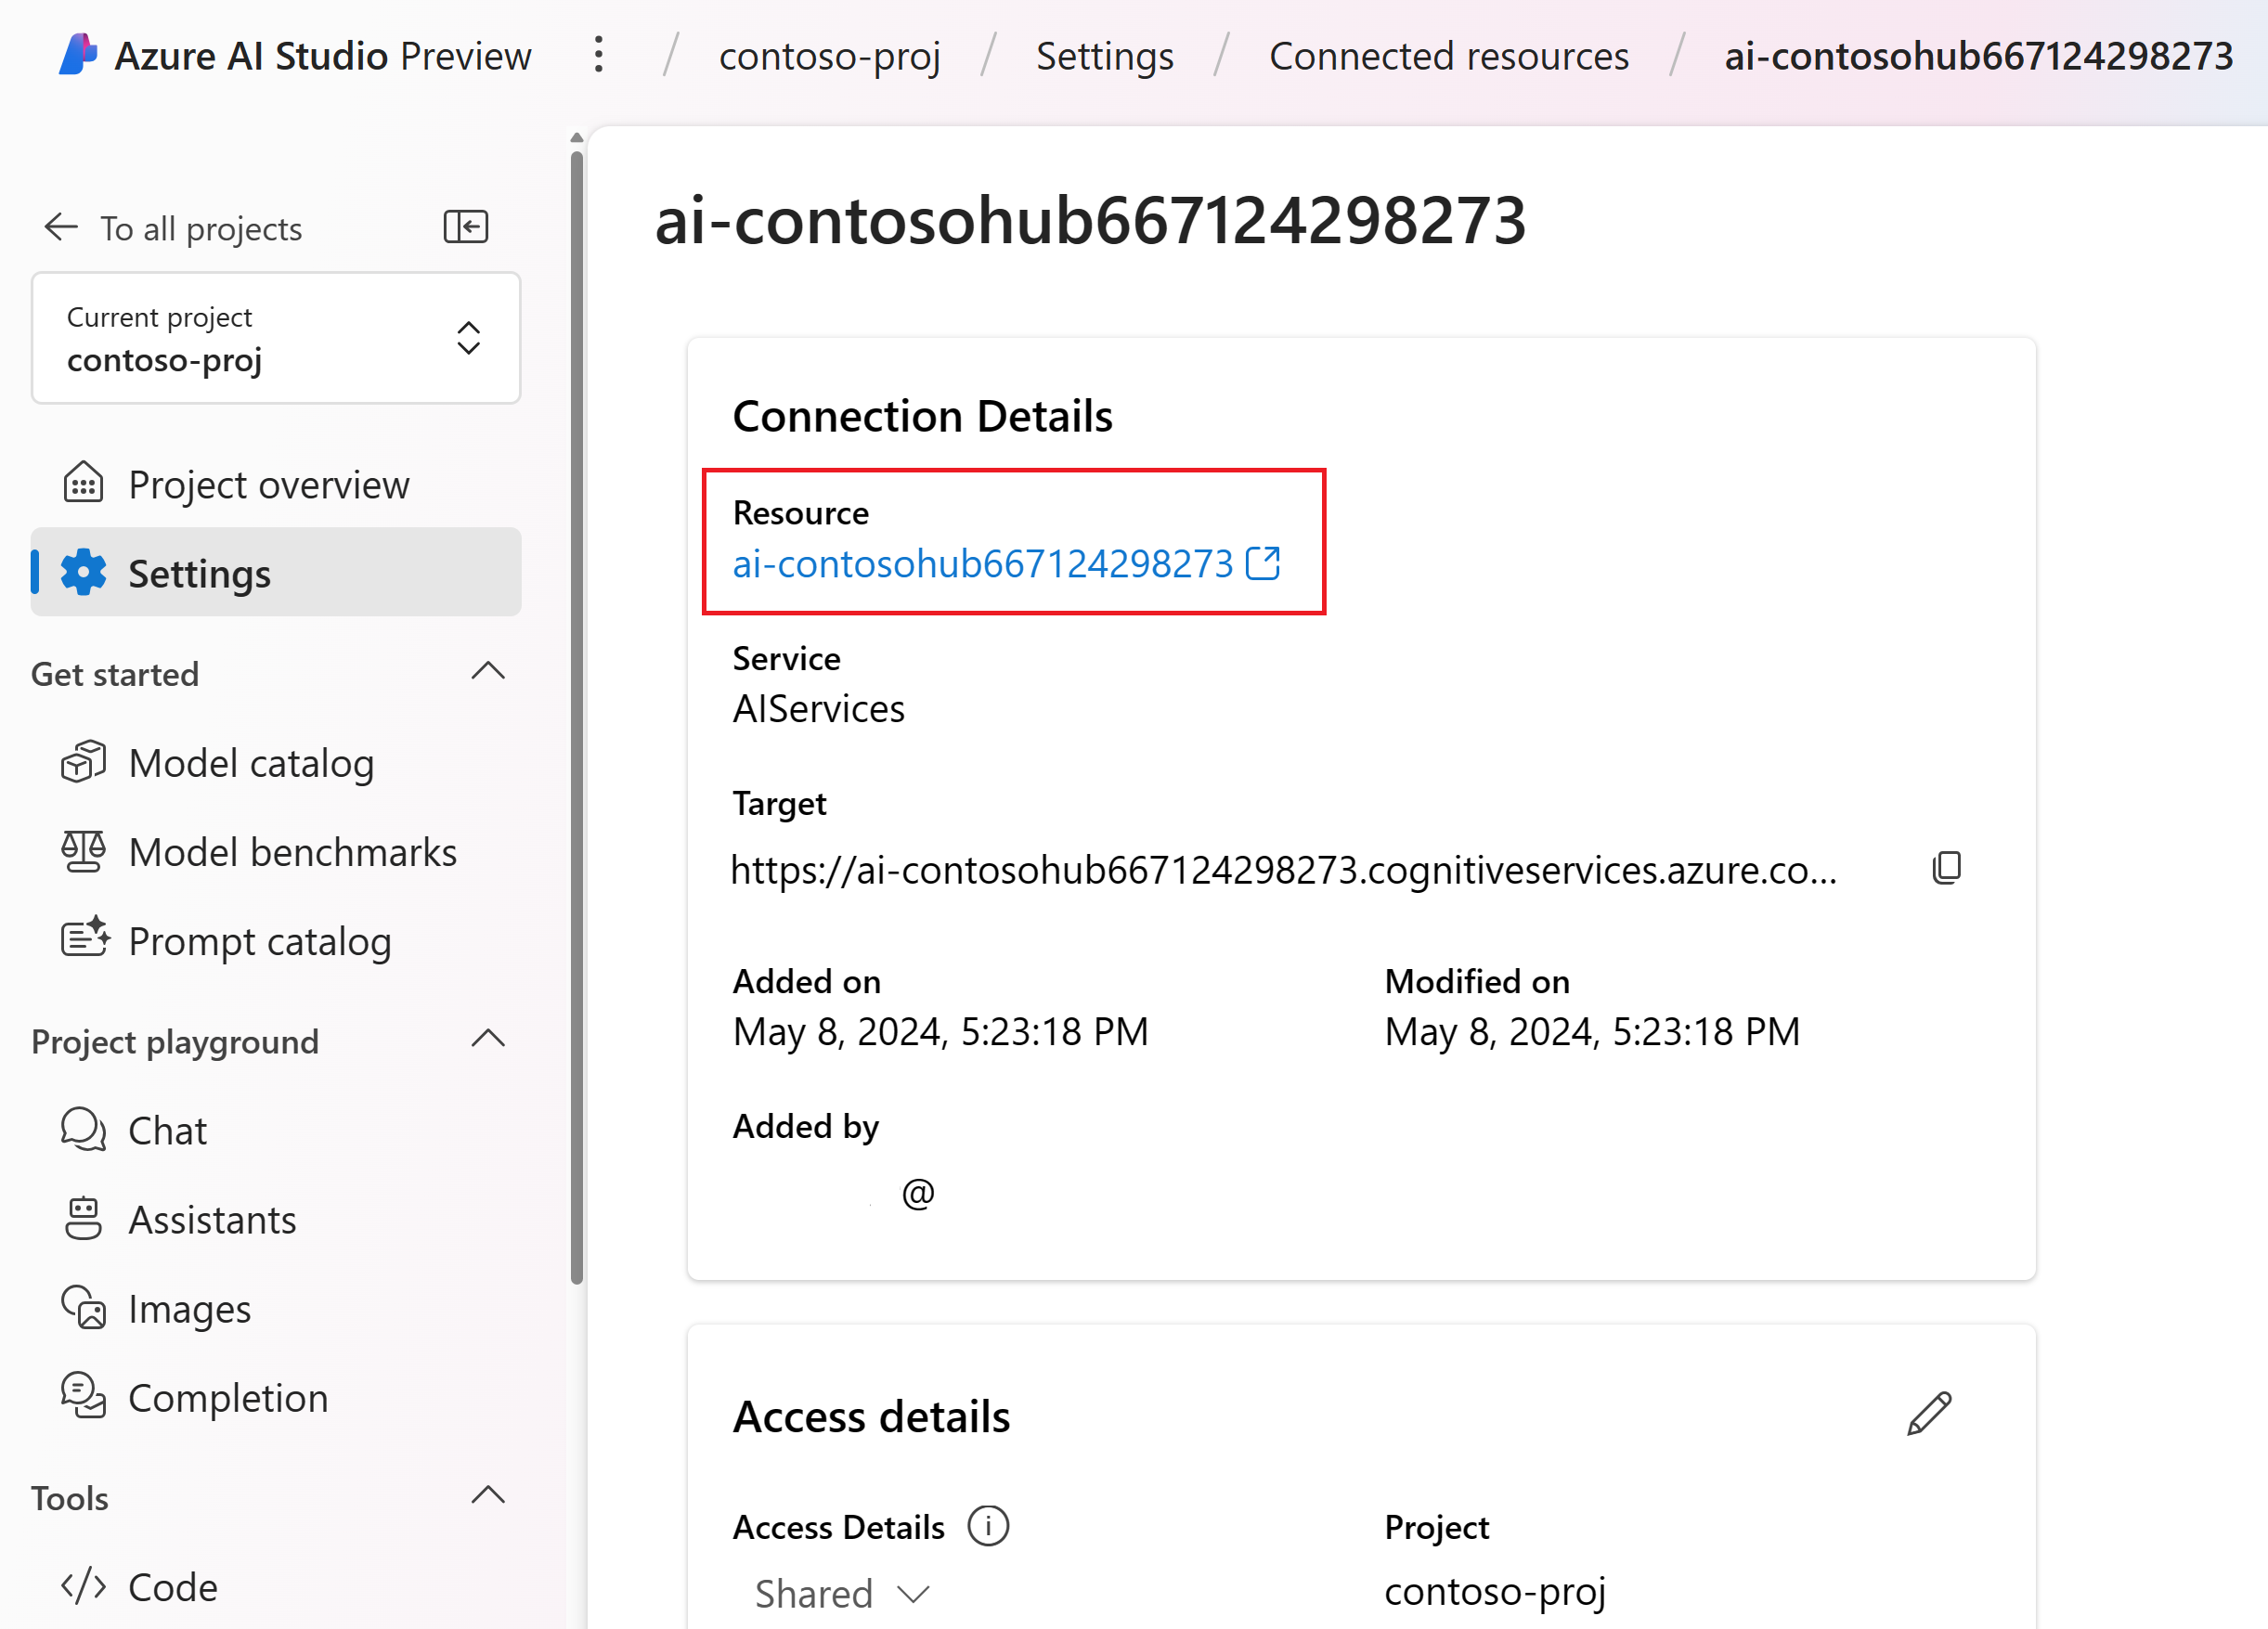
On the resource details page, select the link under the Resource heading to open the AI services resource in the Azure portal.
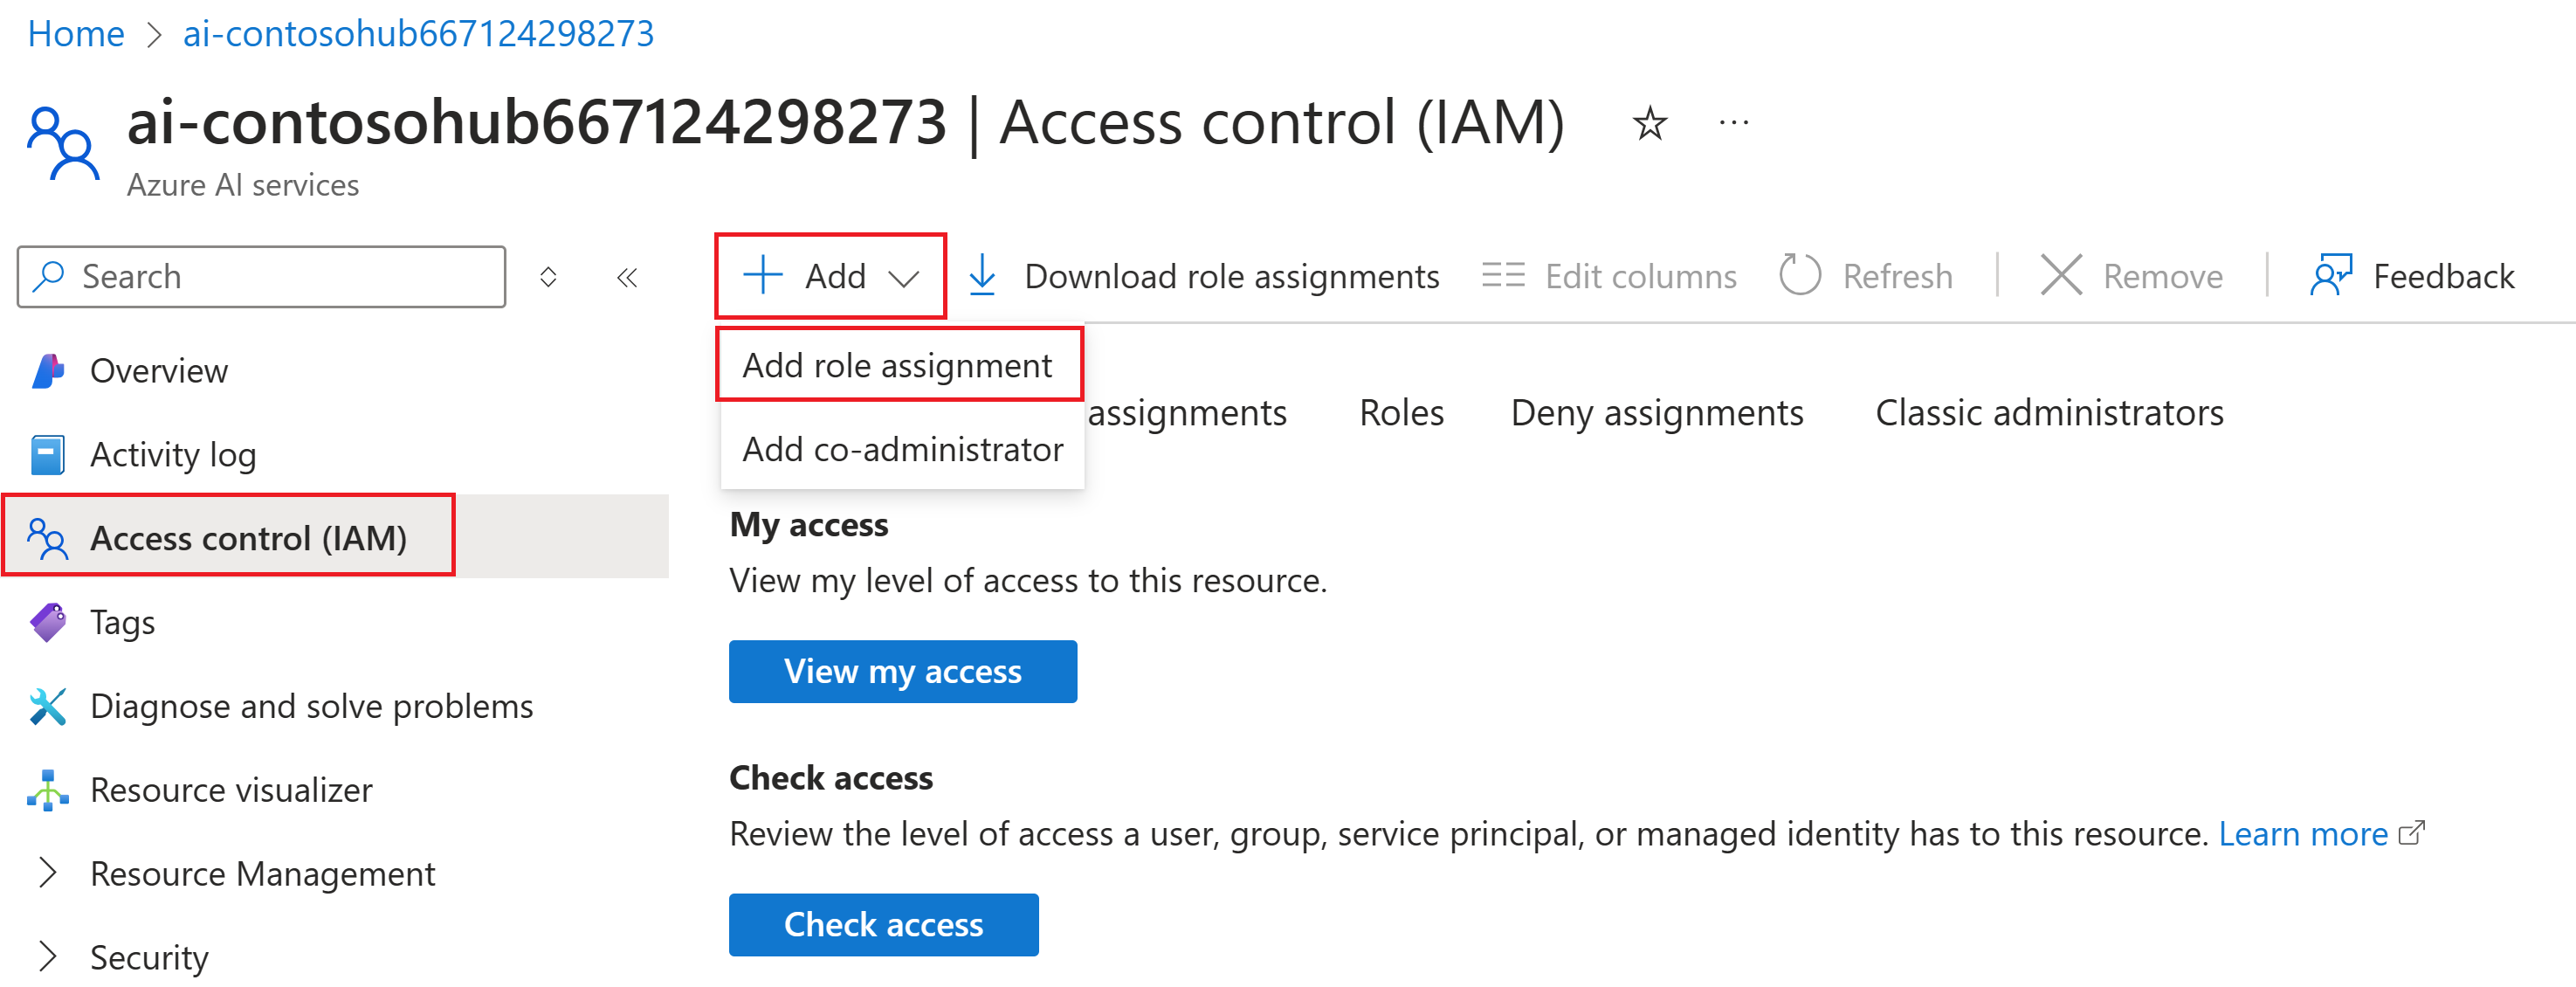
From the left page in the Azure portal, select Access control (IAM) > + Add > Add role assignment.
Search for the Cognitive Services OpenAI User role and then select it. Then select Next.
Select User, group, or service principal. Then select Select members.
In the Select members pane that opens, search for the name of the user that you want to add the role assignment for. Select the user and then select Select.
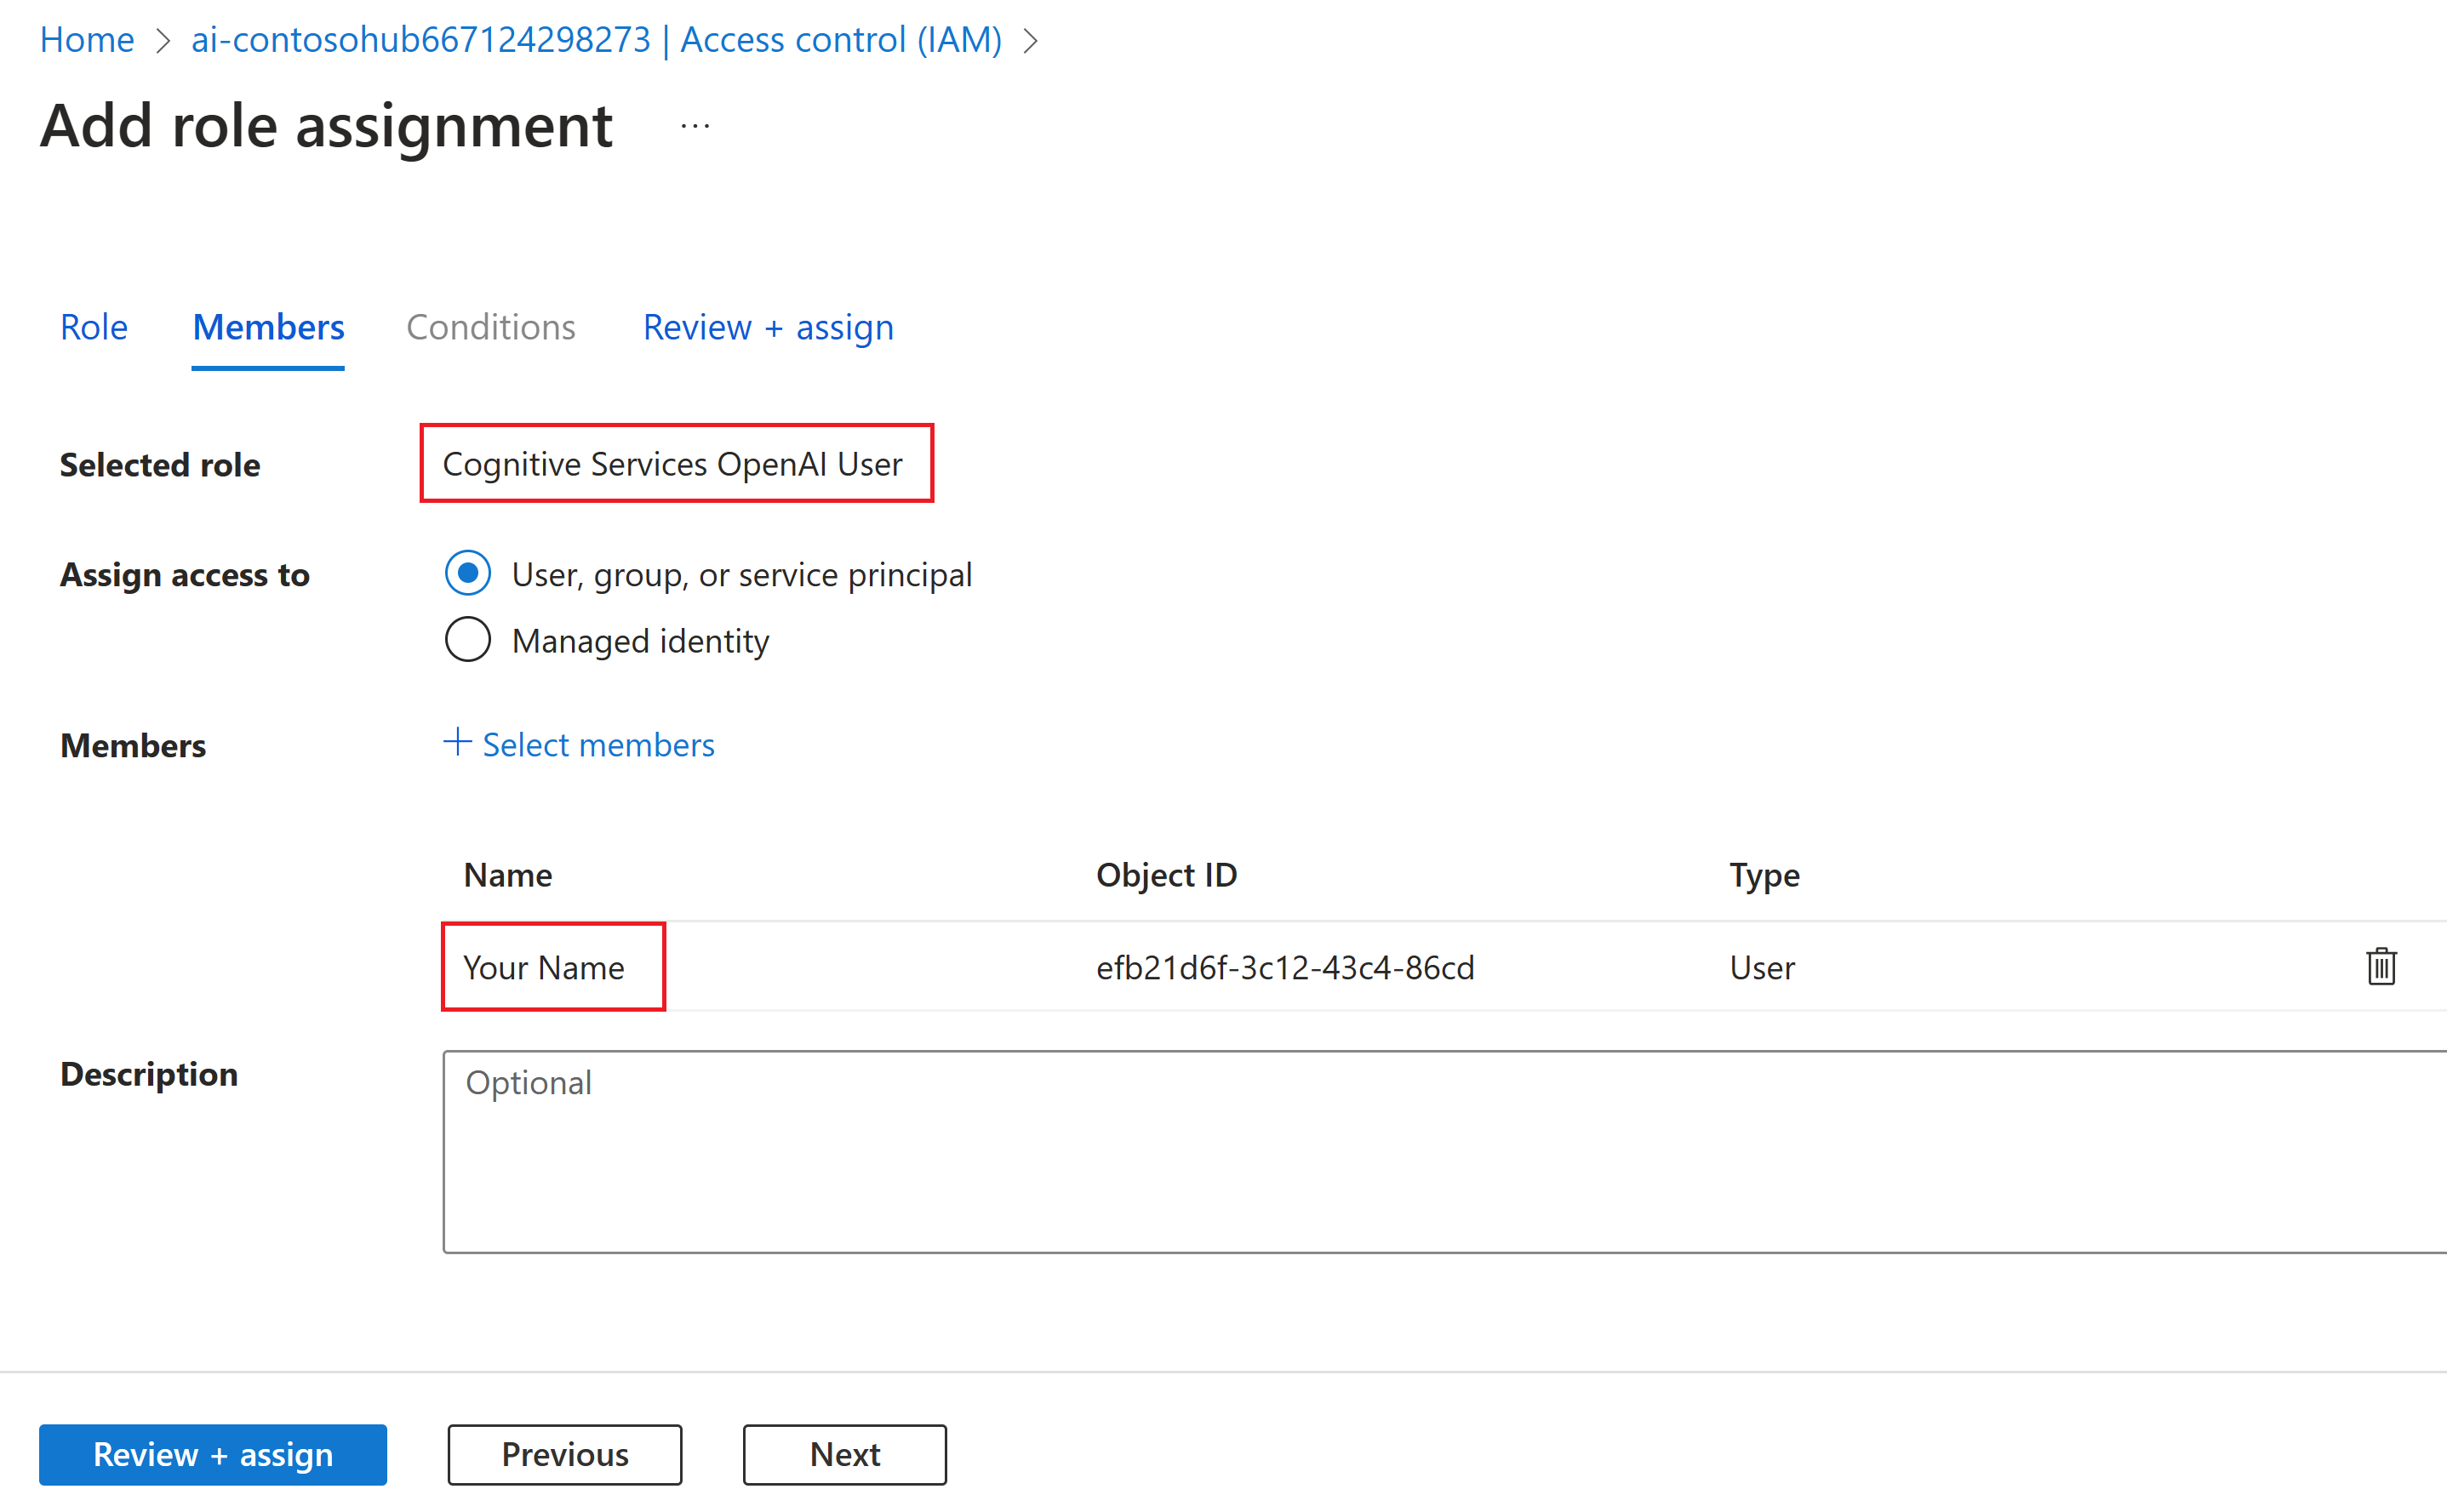
Continue through the wizard and select Review + assign to add the role assignment.


Install the Azure CLI and login
Now we install the Azure CLI and login from your local development environment, so that you can use your user credentials to call the Azure OpenAI service.
In most cases you can install the Azure CLI from your terminal using the following command:
You can follow instructions How to install the Azure CLI if these commands don't work for your particular operating system or setup.
After you install the Azure CLI, login using the az login command and sign-in using the browser:
az login
Now we create our app and call the Azure OpenAI Service from code.
Create a new Python environment
First we need to create a new Python environment we can use to install the prompt flow SDK packages. DO NOT install packages into your global python installation. You should always use a virtual or conda environment when installing python packages, otherwise you can break your global install of Python.
If needed, install Python
We recommend using Python 3.10 or later, but having at least Python 3.8 is required. If you don't have a suitable version of Python installed, you can follow the instructions in the VS Code Python Tutorial for the easiest way of installing Python on your operating system.
Create a virtual environment
If you already have Python 3.10 or higher installed, you can create a virtual environment using the following commands:
Activating the Python environment means that when you run python or pip from the command line, you'll be using the Python interpreter contained in the .venv folder of your application.
Note
You can use the deactivate command to exit the python virtual environment, and can later reactivate it when needed.
Install the prompt flow SDK
In this section, we use prompt flow to build our application. [https://microsoft.github.io/promptflow/](Prompt flow) is a suite of development tools designed to streamline the end-to-end development cycle of LLM-based AI applications, from ideation, prototyping, testing, evaluation to production deployment and monitoring.
Use pip to install the prompt flow SDK into the virtual environment that you created.
pip install promptflow
pip install azure-identity
The prompt flow SDK takes a dependency on multiple packages, that you can choose to separately install if you don't want all of them:
promptflow-core: contains the core prompt flow runtime used for executing LLM codepromptflow-tracing: lightweight library used for emitting OpenTelemetry traces in standardspromptflow-devkit: contains the prompt flow test bed and trace viewer tools for local development environmentsopenai: client libraries for using the Azure OpenAI servicepython-dotenv: used to set environment variables by reading them from.envfiles
Configure your environment variables
Your AI services endpoint and deployment name are required to call the Azure OpenAI service from your code. In this quickstart, you save these values in a .env file, which is a file that contains environment variables that your application can read. You can find these values in the AI Studio chat playground.
Create a
.envfile, and paste the following code:AZURE_OPENAI_ENDPOINT=endpoint_value AZURE_OPENAI_DEPLOYMENT_NAME=deployment_name AZURE_OPENAI_API_VERSION=2024-02-15-previewNavigate to the chat playground inside of your AI Studio project. First validate that chat is working with your model by sending a message to the LLM.
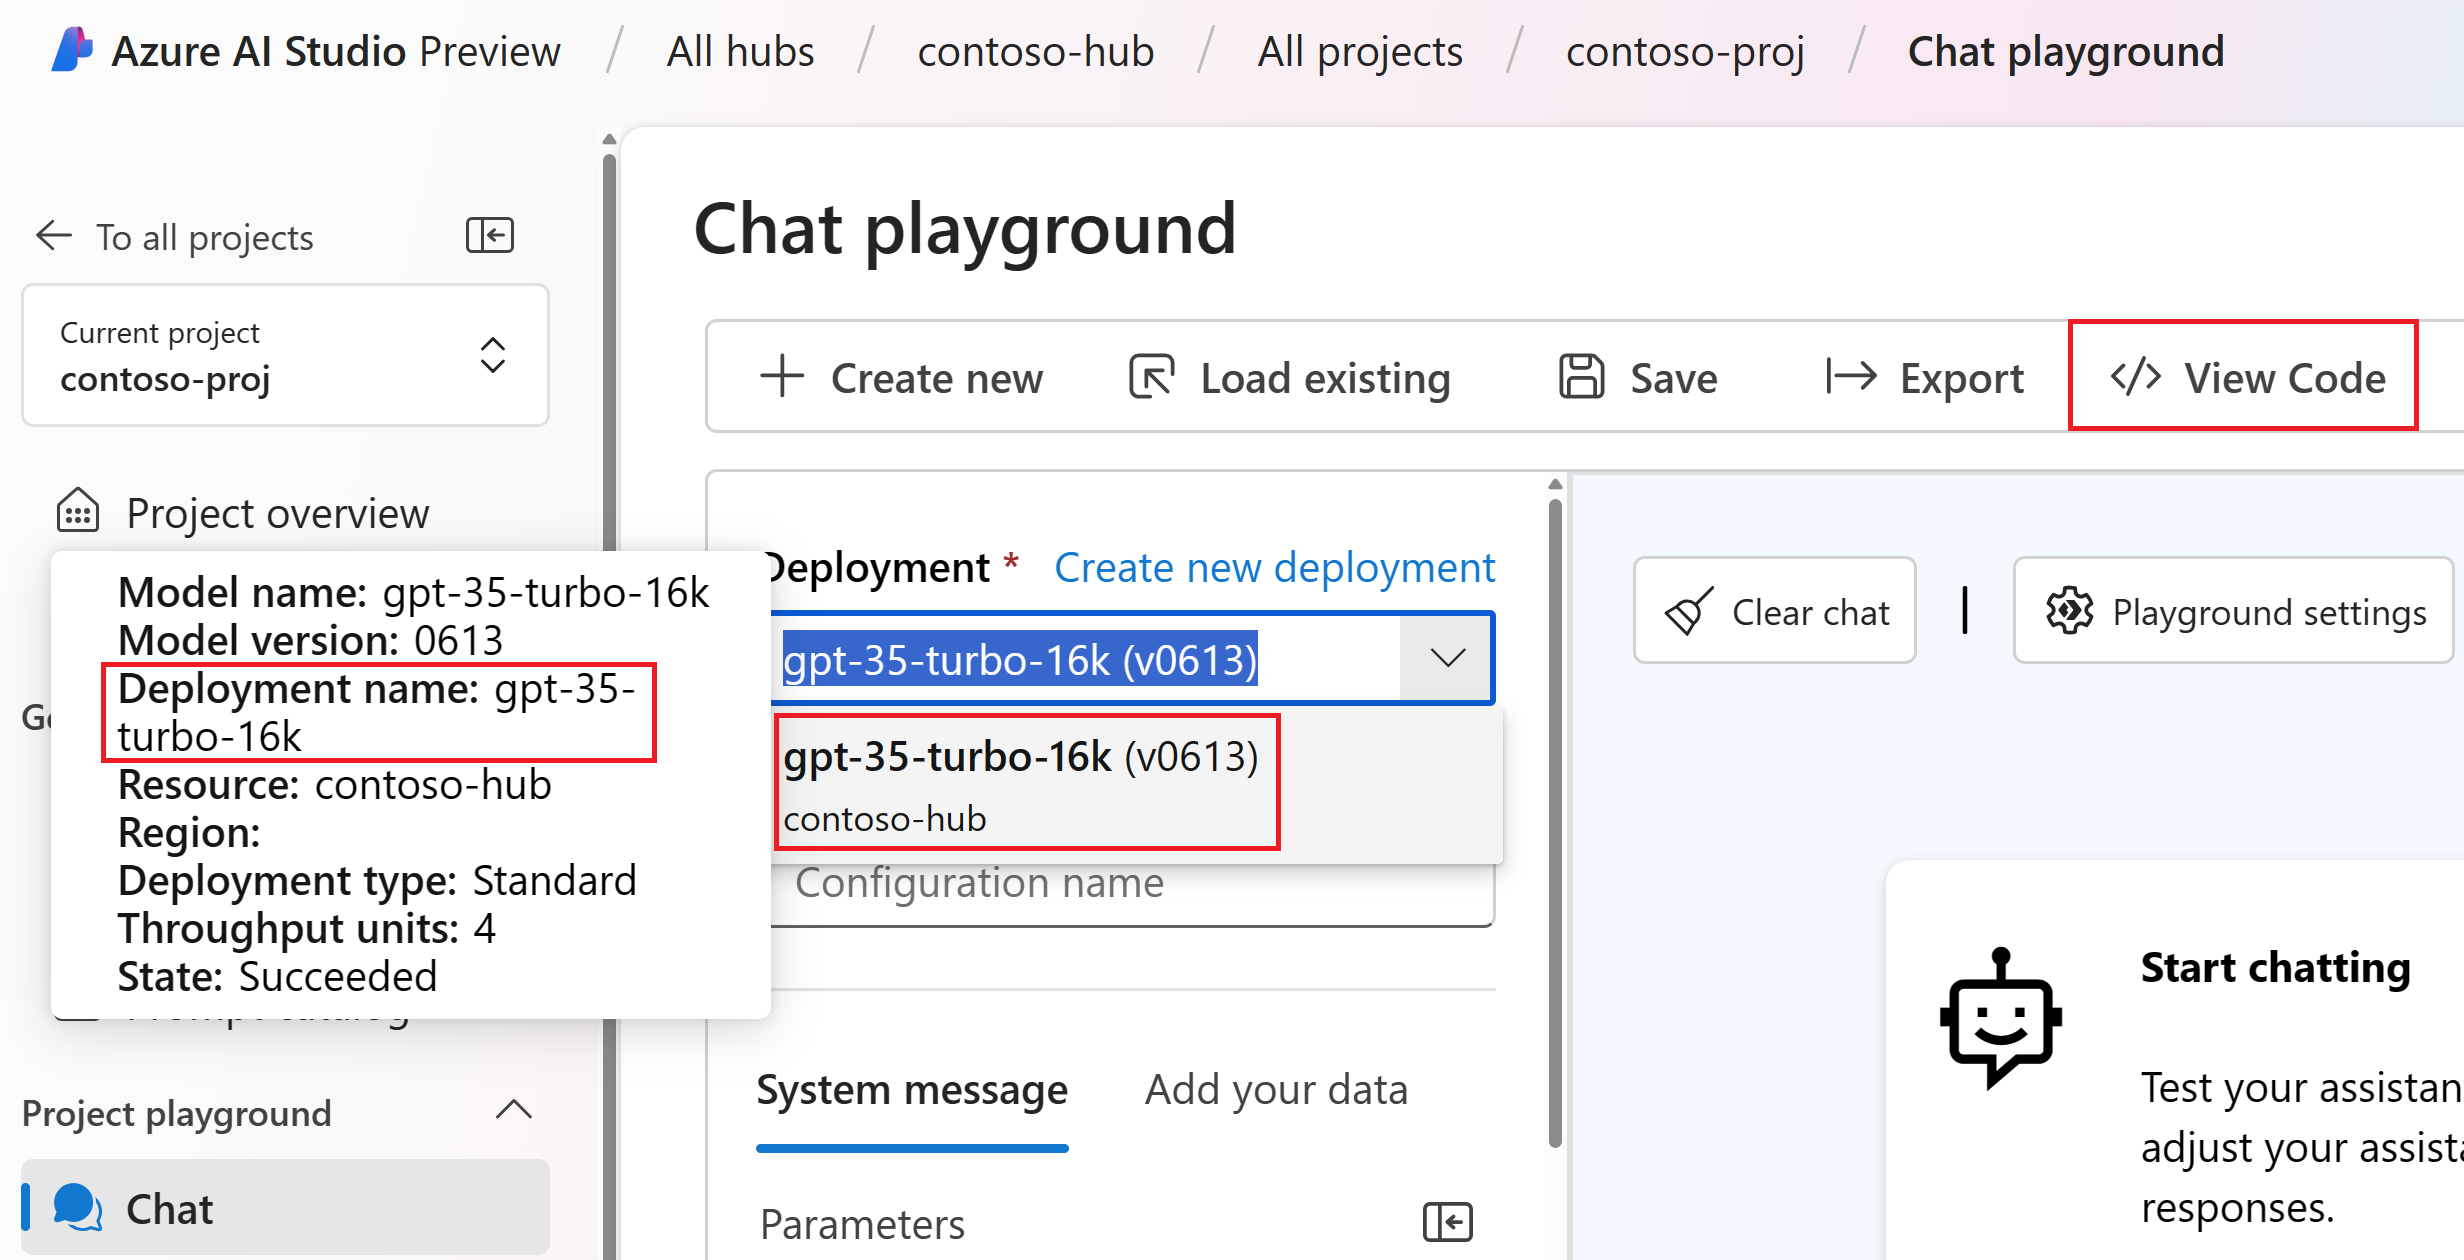
Find the Azure OpenAI deployment name in the chat playground. Select the deployment in the dropdown and hover over the deployment name to view it. In this example, the deployment name is gpt-35-turbo-16k.
In the
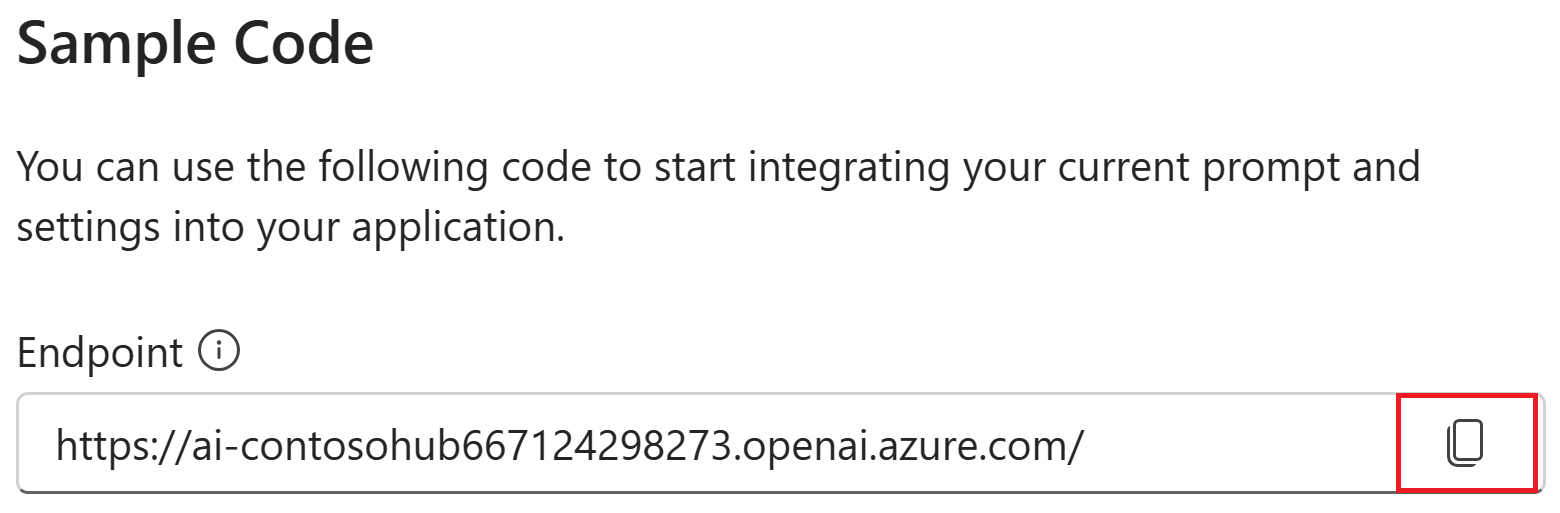
.envfile, replacedeployment_namewith the name of the deployment from the previous step. In this example, we're using the deployment namegpt-35-turbo-16k.Select the <> View Code button and copy the endpoint value.
In the
.envfile, replaceendpoint_valuewith the endpoint value copied from the dialog in the previous step.


Warning
Key based authentication is supported but isn't recommended by Microsoft. If you want to use keys you can add your key to the .env, but please ensure that your .env is in your .gitignore file so that you don't accidentally checked into your git repository.
Create a basic chat prompt and app
First create a prompt template file, for this we'll use Prompty which is the prompt template format supported by prompt flow.
Create a chat.prompty file and copy the following code into it:
---
name: Chat Prompt
description: A basic prompt that uses the chat API to answer questions
model:
    api: chat
    configuration:
        type: azure_openai
    parameters:
        max_tokens: 256
        temperature: 0.2
inputs:
    chat_input:
        type: string
    chat_history:
        type: list
        is_chat_history: true
        default: []
outputs:
  response:
    type: string
sample:
    chat_input: What is the meaning of life?
---
system:
You are an AI assistant who helps people find information.

{% for item in history %}
{{item.role}}:
{{item.content}}
{% endfor %}

user:
{{chat_input}}
Now let's create a Python file that uses this prompt template. Create a chat.py file and paste the following code into it:
import os
from dotenv import load_dotenv
load_dotenv()

from promptflow.core import Prompty, AzureOpenAIModelConfiguration

model_config = AzureOpenAIModelConfiguration(
    azure_deployment=os.getenv("AZURE_OPENAI_DEPLOYMENT_NAME"),
    api_version=os.getenv("AZURE_OPENAI_API_VERSION"),
    azure_endpoint=os.getenv("AZURE_OPENAI_ENDPOINT")
)

prompty = Prompty.load("chat.prompty", model={'configuration': model_config})
result = prompty(
    chat_history=[
        {"role": "user", "content": "Does Azure OpenAI support customer managed keys?"},
        {"role": "assistant", "content": "Yes, customer managed keys are supported by Azure OpenAI."}
    ],
    chat_input="Do other Azure AI services support this too?")

print(result)
Now from your console, run the Python code:
python chat.py
You should now see the output from running the prompty:
Yes, other Azure AI services also support various capabilities and features. Some of the Azure AI services include Azure Cognitive Services, Azure Machine Learning, Azure Bot Service, and Azure Databricks. Each of these services offers different AI capabilities and can be used for various use cases. If you have a specific service or capability in mind, feel free to ask for more details.
Trace the execution of your chat code
Now we take a look at how prompt flow tracing can provide insights into the various LLM calls that are happening in our Python scripts.
At the start of your chat.py file, add the following code to enable prompt flow tracing:
from promptflow.tracing import start_trace
start_trace()
Rerun your chat.py again:
python chat.py
This time you see a link in the output to view a prompt flow trace of the execution:
Starting prompt flow service...
Start prompt flow service on port 23333, version: 1.10.1.
You can stop the prompt flow service with the following command:'pf service stop'.
Alternatively, if no requests are made within 1 hours, it will automatically stop.
You can view the trace detail from the following URL:
http://localhost:23333/v1.0/ui/traces/?#collection=aistudio-python-quickstart&uiTraceId=0x59e8b9a3a23e4e8893ec2e53d6e1e521
If you select that link, you'll then see the trace showing the steps of the program execution, what was passed to the LLM and the response output.

Prompt flow tracing also allows you to trace specific function calls and log traces to AI Studio, for more information be sure to check out How to use tracing in the prompt flow SDK.
Evaluate your prompt
Now let's show how we can use prompt flow evaluators to generate metrics that can score the quality of the conversation on a scale from 0 to 5. We run the prompt again but this time we store the results into an array containing the full conversation, and then pass that to a ChatEvaluator to score.
First, install the promptflow-evals package:
pip install promptflow-evals
Now copy the following code to an evaluate.py file:
import os
from dotenv import load_dotenv
load_dotenv()

from promptflow.core import Prompty, AzureOpenAIModelConfiguration
from promptflow.evals.evaluators import ChatEvaluator

model_config = AzureOpenAIModelConfiguration(
    azure_deployment=os.getenv("AZURE_OPENAI_DEPLOYMENT_NAME"),
    api_version=os.getenv("AZURE_OPENAI_API_VERSION"),
    azure_endpoint=os.getenv("AZURE_OPENAI_ENDPOINT")
)

chat_history=[
    {"role": "user", "content": "Does Azure OpenAI support customer managed keys?"},
    {"role": "assistant", "content": "Yes, customer managed keys are supported by Azure OpenAI."}
]
chat_input="Do other Azure AI services support this too?"

prompty = Prompty.load("chat.prompty", model={'configuration': model_config})
response = prompty(chat_history=chat_history, chat_input=chat_input)

conversation = chat_history
conversation += [
    {"role": "user", "content": chat_input},
    {"role": "assistant", "content": response}
]

chat_eval = ChatEvaluator(model_config=model_config)
score = chat_eval(conversation=conversation)

print(score)
Run the evaluate.py script:
python evaluate.py
You should see an output that looks like this:
{'gpt_coherence': 5.0, 'gpt_fluency': 5.0, 'evaluation_per_turn': {'gpt_coherence': {'score': [5.0, 5.0]}, 'gpt_fluency': {'score': [5.0, 5.0]}}}
Looks like we scored 5 for coherence and fluency of the LLM responses on this conversation!
For more information on how to use prompt flow evaluators, including how to make your own custom evaluators and log evaluation results to AI Studio, be sure to check out Evaluate your app using the prompt flow SDK.
Related content
Feedback
Coming soon: Throughout 2024 we will be phasing out GitHub Issues as the feedback mechanism for content and replacing it with a new feedback system. For more information see: https://aka.ms/ContentUserFeedback.
Submit and view feedback for