Manage modules in Azure Automation
Azure Automation uses a number of PowerShell modules to enable cmdlets in runbooks and DSC resources in DSC configurations. Supported modules include:
- Azure PowerShell Az.Automation.
- Azure PowerShell AzureRM.Automation.
- Other PowerShell modules.
- Internal
Orchestrator.AssetManagement.Cmdletsmodule. - Python 2 modules.
- Custom modules that you create.
When you create an Automation account, Azure Automation imports some modules by default. See Default modules.
Sandboxes
When Automation executes runbook and DSC compilation jobs, it loads the modules into sandboxes where the runbooks can run and the DSC configurations can compile. Automation also automatically places any DSC resources in modules on the DSC pull server. Machines can pull the resources when they apply the DSC configurations.
Cloud sandbox supports a maximum of 48 system calls, and restricts all other calls for security reasons. Other functionality such as credential management and some networking is not supported in the cloud sandbox.
Due to the number of modules and cmdlets included, it's difficult to know beforehand which of the cmdlets will make unsupported calls. Generally, we have seen issues with cmdlets which require elevated access, require a credential as a parameter, or cmdlets related to networking. Any cmdlets that perform full stack network operations are not supported in the sandbox, including Connect-AipService from the AIPService PowerShell module and Resolve-DnsName from the DNSClient module.
These are known limitations with the sandbox. The recommended workaround is to deploy a Hybrid Runbook Worker or use Azure Functions.
Important
Do not include the keyword "AzureRm" in any script designed to be executed with the Az module. Inclusion of the keyword, even in a comment, may cause the AzureRm to load and then conflict with the Az module.
Default modules
All new Automation accounts have the latest version of the PowerShell Az module imported by default. The Az module replaces AzureRM and is the recommended module to use with Azure. Default modules in the new Automation account includes the existing 24 AzureRM modules and 60+ Az modules.
There is a native option to update modules to the latest Az module by the user for Automation accounts. The operation will handle all the module dependencies at the backend thereby removing the hassles of updating the modules manually or executing the runbook to update Azure modules.
If the existing Automation account has only AzureRM modules, the Update Az modules option will update the Automation account with the user selected version of the Az module.
If the existing Automation account has AzureRM and some Az modules, the option will import the remaining Az modules to the Automation account. The existing Az modules will take preference and the update operation will not update those modules. This is to ensure the update module operation doesn't lead to any runbook execution failure by inadvertently updating a module being used by a runbook. The recommended way for this scenario is to first delete the existing Az modules and then perform the update operations to get the latest Az module imported in the Automation account. Such module types, not imported by default, are referred to as Custom. Custom modules will always take preference over default modules.
For example: If you already have the Az.Aks module imported with version 2.3.0 which is provided by Az module 6.3.0 and you try to update the Az module to the latest 6.4.0 version. The update operation will import all the Az modules from 6.4.0 package, except Az.Aks. To have the latest version of Az.Aks, first delete the existing module and then perform the update operation, or you can also update this module separately as described in Import Az modules to import a different version of a specific module.
The following table lists the modules that Azure Automation imports by default when you create your Automation account. Automation can import newer versions of these modules. However, you can't remove the original version from your Automation account, even if you delete a newer version.
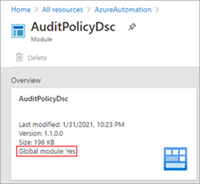
The default modules are also known as global modules. In the Azure portal, the Global module property will be true when viewing a module that was imported when the account was created.
Note
We don't recommend altering modules and runbooks in Automation accounts used for deployment of the Start/Stop VMs during off-hours
| Module name | Version |
|---|---|
| Az.* | See full list under Package Details at PowerShell Gallery |
| AuditPolicyDsc | 1.1.0.0 |
| Azure | 1.0.3 |
| Azure.Storage | 1.0.3 |
| AzureRM.Automation | 1.0.3 |
| AzureRM.Compute | 1.2.1 |
| AzureRM.Profile | 1.0.3 |
| AzureRM.Resources | 1.0.3 |
| AzureRM.Sql | 1.0.3 |
| AzureRM.Storage | 1.0.3 |
| ComputerManagementDsc | 5.0.0.0 |
| GPRegistryPolicyParser | 0.2 |
| Microsoft.PowerShell.Core | 0 |
| Microsoft.PowerShell.Diagnostics | |
| Microsoft.PowerShell.Management | |
| Microsoft.PowerShell.Security | |
| Microsoft.PowerShell.Utility | |
| Microsoft.WSMan.Management | |
| Orchestrator.AssetManagement.Cmdlets | 1 |
| PSDscResources | 2.9.0.0 |
| SecurityPolicyDsc | 2.1.0.0 |
| StateConfigCompositeResources | 1 |
| xDSCDomainjoin | 1.1 |
| xPowerShellExecutionPolicy | 1.1.0.0 |
| xRemoteDesktopAdmin | 1.1.0.0 |
Internal cmdlets
Azure Automation supports internal cmdlets that are only available when you execute runbooks in the Azure sandbox environment or on a Windows Hybrid Runbook Worker. The internal module Orchestrator.AssetManagement.Cmdlets is installed by default in your Automation account and when the Windows Hybrid Runbook Worker role is installed on the machine.
The following table defines the internal cmdlets. These cmdlets are designed to be used instead of Azure PowerShell cmdlets to interact with your Automation account resources. They can retrieve secrets from encrypted variables, credentials, and encrypted connections.
| Name | Description |
|---|---|
| Get-AutomationCertificate | Get-AutomationCertificate [-Name] <string> [<CommonParameters>] |
| Get-AutomationConnection | Get-AutomationConnection [-Name] <string> [-DoNotDecrypt] [<CommonParameters>] |
| Get-AutomationPSCredential | Get-AutomationPSCredential [-Name] <string> [<CommonParameters>] |
| Get-AutomationVariable | Get-AutomationVariable [-Name] <string> [-DoNotDecrypt] [<CommonParameters>] |
| Set-AutomationVariable | Set-AutomationVariable [-Name] <string> -Value <Object> [<CommonParameters>] |
| Start-AutomationRunbook | Start-AutomationRunbook [-Name] <string> [-Parameters <IDictionary>] [-RunOn <string>] [-JobId <guid>] [<CommonParameters>] |
| Wait-AutomationJob | Wait-AutomationJob -Id <guid[]> [-TimeoutInMinutes <int>] [-DelayInSeconds <int>] [-OutputJobsTransitionedToRunning] [<CommonParameters>] |
Note that the internal cmdlets differ in naming from the Az and AzureRM cmdlets. Internal cmdlet names don't contain words like Azure or Az in the noun, but do use the word Automation. We recommend their use over the use of Az or AzureRM cmdlets during runbook execution in an Azure sandbox or on a Windows Hybrid Runbook Worker because they require fewer parameters and run in the context of your job during execution.
Use Az or AzureRM cmdlets for manipulating Automation resources outside the context of a runbook.
Python modules
You can create Python 2 runbooks in Azure Automation. For Python module information, see Manage Python 2 packages in Azure Automation.
Custom modules
Azure Automation supports custom PowerShell modules that you create to use with your runbooks and DSC configurations. One type of custom module is an integration module that optionally contains a file of metadata to define the custom functionality for the module cmdlets. An example of the use of an integration module is provided in Add a connection type.
Azure Automation can import a custom module to make its cmdlets available. Behind the scenes, it stores the module and uses it in the Azure sandboxes, just like it does other modules.
Migrate to Az modules
This section tells how to migrate to the Az modules in Automation. For more information, see Migrate Azure PowerShell from AzureRM to Az.
We don't recommend running AzureRM modules and Az modules in the same Automation account. When you're sure you want to migrate from AzureRM to Az, it's best to fully commit to a complete migration. Automation often reuses sandboxes within the Automation account to save on startup times. If you don't make a full module migration, you might start a job that uses only AzureRM modules, and then start another job that uses only Az modules. The sandbox soon crashes, and you receive an error stating that the modules aren’t compatible. This situation results in randomly occurring crashes for any particular runbook or configuration.
Note
When you create a new Automation account, even after migration to Az modules, Automation will still install the AzureRM modules by default.
Test your runbooks and DSC configurations prior to module migration
Be sure to test all runbooks and DSC configurations carefully, in a separate Automation account, before migrating to the Az modules.
Stop and unschedule all runbooks that use AzureRM modules
To ensure that you don't run any existing runbooks or DSC configurations that use AzureRM modules, you must stop and unschedule all affected runbooks and configurations. First, make sure that you review each runbook or DSC configuration and its schedules separately, to ensure that you can reschedule the item in the future if necessary.
When you're ready to remove your schedules, you can either use the Azure portal or the Remove-AzureRmAutomationSchedule cmdlet. See Remove a schedule.
Remove AzureRM modules
It's possible to remove the AzureRM modules before you import the Az modules. However, if you do, you can interrupt source control synchronization and cause any scripts that are still scheduled to fail. If you decide to remove the modules, see Uninstall AzureRM.
Import Az modules
Importing an Az module into your Automation account doesn't automatically import the module into the PowerShell session that runbooks use. Modules are imported into the PowerShell session in the following situations:
- When a runbook invokes a cmdlet from a module.
- When a runbook imports the module explicitly with the Import-Module cmdlet.
- When a runbook imports the module explicitly with the using module statement. The using statement is supported starting with Windows PowerShell 5.0 and supports classes and enum type import.
- When a runbook imports another dependent module.
You can import the Az modules into the Automation account from the Azure portal. Because Az.Accounts is a dependency for the other Az modules, be sure to import this module before any others.
Note
With the introduction of PowerShell 7.1 (preview) support, the Browse gallery option has been updated with the following changes:
- Browse gallery is available on Process Automation > Modules blade.
- The Modules page displays two new columns - Module version and Runtime version
Sign in to the Azure portal.
Search for and select Automation Accounts.
On the Automation Accounts page, select your Automation account from the list.
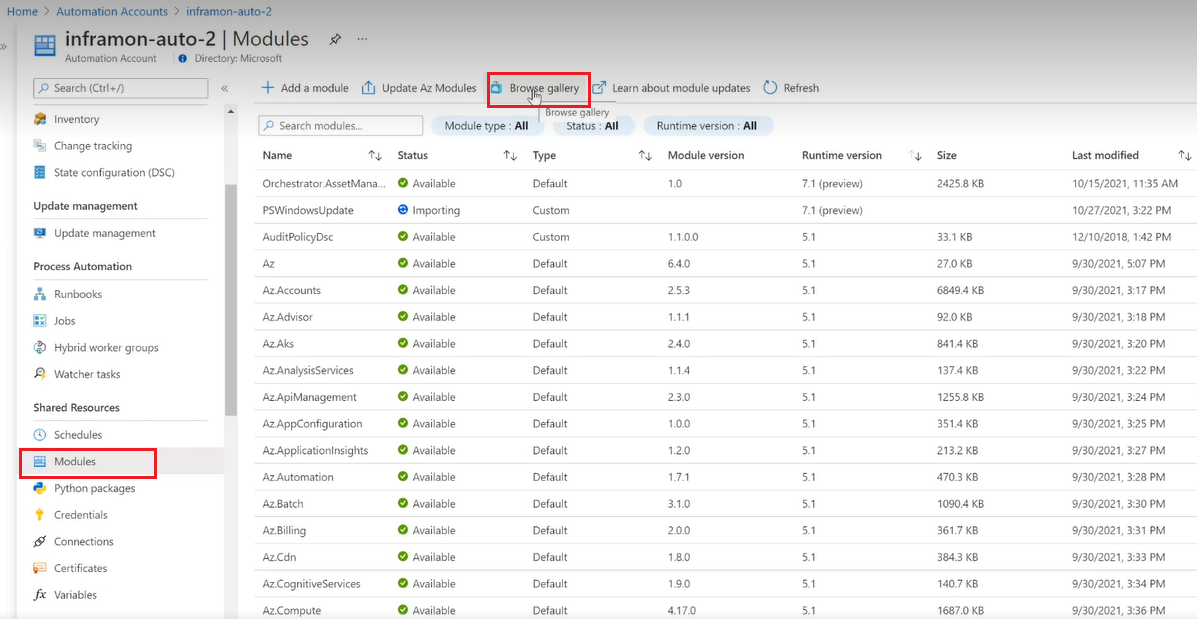
From your Automation account, under Shared Resources, select Modules.
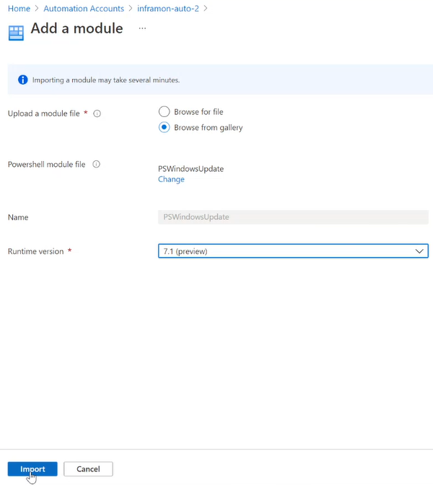
Select Add a module. In the Add a module page, you can select either of the following options:
- Browse for file - selects a file from your local machine.
- Browse from Gallery - you can browse and select an existing module from gallery.
Click Select to select a module.
Select Runtime version and click Import.
On the Modules page, you can view the imported module under the Automation account.
You can also do this import through the PowerShell Gallery, by searching for the module to import. When you find the module, select it, and choose the Azure Automation tab. Select Deploy to Azure Automation.
Test your runbooks
After you've imported the Az modules into the Automation account, you can start editing your runbooks and DSC configurations to use the new modules. One way to test the modification of a runbook to use the new cmdlets is by using the Enable-AzureRmAlias -Scope Process command at the beginning of the runbook. By adding this command to your runbook, the script can run without changes.
Author modules
We recommend that you follow the considerations in this section when you author a custom PowerShell module for use in Azure Automation. To prepare your module for import, you must create at least a .psd1, .psm1, or PowerShell module .dll file with the same name as the module folder. Then you zip up the module folder so that Azure Automation can import it as a single file. The .zip package should have the same name as the contained module folder.
To learn more about authoring a PowerShell module, see How to Write a PowerShell Script Module.
Version folder
PowerShell side-by-side module versioning allows you to use more than one version of a module within PowerShell. This can be useful if you have older scripts that have been tested and only work against a certain version of a PowerShell module, but other scripts require a newer version of the same PowerShell module.
To construct PowerShell modules so they contain multiple versions, create the module folder and then create a folder within this module folder for each version of the module you want to be usable. In the following example, a module called TestModule provides two versions, 1.0.0 and 2.0.0.
TestModule
   1.0.0
   2.0.0
Within each of the version folders, copy your PowerShell .psm1, .psd1, or PowerShell module .dll files that make up a module into the respective version folder. Zip up the module folder so that Azure Automation can import it as a single .zip file. While Automation only shows the highest version of the module imported, if the module package contains side-by-side versions of the module, they are all available for use in your runbooks or DSC configurations.
While Automation supports modules containing side-by-side versions within the same package, it does not support using multiple versions of a module across module package imports. For example, you import module A, which contains versions 1 and 2 into your Automation account. Later you update module A to include versions 3 and 4, when you import into your Automation account, only versions 3 and 4 are usable within any runbooks or DSC configurations. If you require all versions - 1, 2, 3, and 4 to be available, the .zip file your import should contain versions 1, 2, 3, and 4.
If you’re going to use different versions of the same module between runbooks, you should always declare the version you want to use in your runbook using the Import-Module cmdlet and include the parameter -RequiredVersion <version>. Even if the version you want to use is the latest version. This is because runbook jobs may run in the same sandbox. If the sandbox has already explicitly loaded a module of a certain version number, because a previous job in that sandbox said to do so, future jobs in that sandbox won't automatically load the latest version of that module. This is because some version of it is already loaded in the sandbox.
For a DSC resource, use the following command to specify a particular version:
Import-DscResource -ModuleName <ModuleName> -ModuleVersion <version>
Help information
Include a synopsis, description, and help URI for every cmdlet in your module. In PowerShell, you can define help information for cmdlets by using the Get-Help cmdlet. The following example shows how to define a synopsis and help URI in a .psm1 module file.
<#
     .SYNOPSIS
      Gets a Contoso User account
#>
function Get-ContosoUser {
[CmdletBinding](DefaultParameterSetName='UseConnectionObject', `
HelpUri='https://www.contoso.com/docs/information')]
[OutputType([String])]
param(
   [Parameter(ParameterSetName='UserAccount', Mandatory=true)]
   [ValidateNotNullOrEmpty()]
   [string]
   $UserName,

   [Parameter(ParameterSetName='UserAccount', Mandatory=true)]
   [ValidateNotNullOrEmpty()]
   [string]
   $Password,

   [Parameter(ParameterSetName='ConnectionObject', Mandatory=true)]
   [ValidateNotNullOrEmpty()]
   [Hashtable]
   $Connection
)

switch ($PSCmdlet.ParameterSetName) {
   "UserAccount" {
      $cred = New-Object -TypeName System.Management.Automation.PSCredential -ArgumentList $UserName, $Password
      Connect-Contoso -Credential $cred
   }
   "ConnectionObject" {
      Connect-Contoso -Connection $Connection
  }
}
}
Providing this information shows help text via the Get-Help cmdlet in the PowerShell console. This text is also displayed in the Azure portal.
Connection type
If the module connects to an external service, define a connection type by using a custom integration module. Each cmdlet in the module should accept an instance of that connection type (connection object) as a parameter. Users map parameters of the connection asset to the cmdlet's corresponding parameters each time they call a cmdlet.
The following runbook example uses a Contoso connection asset called ContosoConnection to access Contoso resources and return data from the external service. In this example, the fields are mapped to the UserName and Password properties of a PSCredential object and then passed to the cmdlet.
$contosoConnection = Get-AutomationConnection -Name 'ContosoConnection'

$cred = New-Object -TypeName System.Management.Automation.PSCredential -ArgumentList $contosoConnection.UserName, $contosoConnection.Password
Connect-Contoso -Credential $cred
}
An easier and better way to approach this behavior is by directly passing the connection object to the cmdlet:
$contosoConnection = Get-AutomationConnection -Name 'ContosoConnection'

Connect-Contoso -Connection $contosoConnection
}
You can enable similar behavior for your cmdlets by allowing them to accept a connection object directly as a parameter, instead of just connection fields for parameters. Usually you want a parameter set for each, so that a user who isn't using Automation can call your cmdlets without constructing a hashtable to act as the connection object. The parameter set UserAccount is used to pass the connection field properties. ConnectionObject lets you pass the connection straight through.
Output type
Define the output type for all cmdlets in your module. Defining an output type for a cmdlet allows design-time IntelliSense to help determine the output properties of the cmdlet during authoring. This practice is especially helpful during graphical runbook authoring, for which design-time knowledge is key to an easy user experience with your module.
Add [OutputType([<MyOutputType>])], where MyOutputType is a valid type. To learn more about OutputType, see About Functions OutputTypeAttribute. The following code is an example of adding OutputType to a cmdlet:
function Get-ContosoUser {
[OutputType([String])]
param(
   [string]
   $Parameter1
)
# <script location here>
}
This behavior is similar to the "type ahead" functionality of a cmdlet's output in the PowerShell integration service environment, without having to run it.
Cmdlet state
Make all cmdlets in your module stateless. Multiple runbook jobs can simultaneously run in the same AppDomain and the same process and sandbox. If there is any state shared on those levels, jobs can affect each other. This behavior can lead to intermittent and hard-to-diagnose issues. Here is an example of what not to do:
$globalNum = 0
function Set-GlobalNum {
   param(
       [int] $num
   )

   $globalNum = $num
}
function Get-GlobalNumTimesTwo {
   $output = $globalNum * 2

   $output
}
Module dependency
Ensure that the module is fully contained in a package that can be copied by using xcopy. Automation modules are distributed to the Automation sandboxes when runbooks execute. The modules must work independently of the host that runs them.
You should be able to zip up and move a module package, and have it function as normal when it's imported into another host's PowerShell environment. For this to happen, ensure that the module doesn't depend on any files outside the module folder that is zipped up when the module is imported into Automation.
Your module shouldn't depend on any unique registry settings on a host. Examples are the settings that are made when a product is installed.
Module file paths
Make sure that all files in the module have paths with fewer than 140 characters. Any paths over 140 characters in length cause problems with importing runbooks. Automation can't import a file with path size over 140 characters into the PowerShell session with Import-Module.
Import modules
This section defines several ways that you can import a module into your Automation account.
Import modules in the Azure portal
To import a module in the Azure portal:
- In the portal, search for and select Automation Accounts.
- On the Automation Accounts page, select your Automation account from the list.
- Under Shared Resources, select Modules.
- Select Add a module.
- Select the .zip file that contains your module.
- Select OK to start to import process.
Import modules by using PowerShell
You can use the New-AzAutomationModule cmdlet to import a module into your Automation account. The cmdlet takes a URL for a module .zip package.
New-AzAutomationModule -Name <ModuleName> -ContentLinkUri <ModuleUri> -ResourceGroupName <ResourceGroupName> -AutomationAccountName <AutomationAccountName>
You can also use the same cmdlet to import a module from the PowerShell Gallery directly. Make sure to grab ModuleName and ModuleVersion from the PowerShell Gallery.
$moduleName = <ModuleName>
$moduleVersion = <ModuleVersion>
New-AzAutomationModule -AutomationAccountName <AutomationAccountName> -ResourceGroupName <ResourceGroupName> -Name $moduleName -ContentLinkUri "https://www.powershellgallery.com/api/v2/package/$moduleName/$moduleVersion"
Import modules from the PowerShell Gallery
You can import PowerShell Gallery modules either directly from the Gallery or from your Automation account.
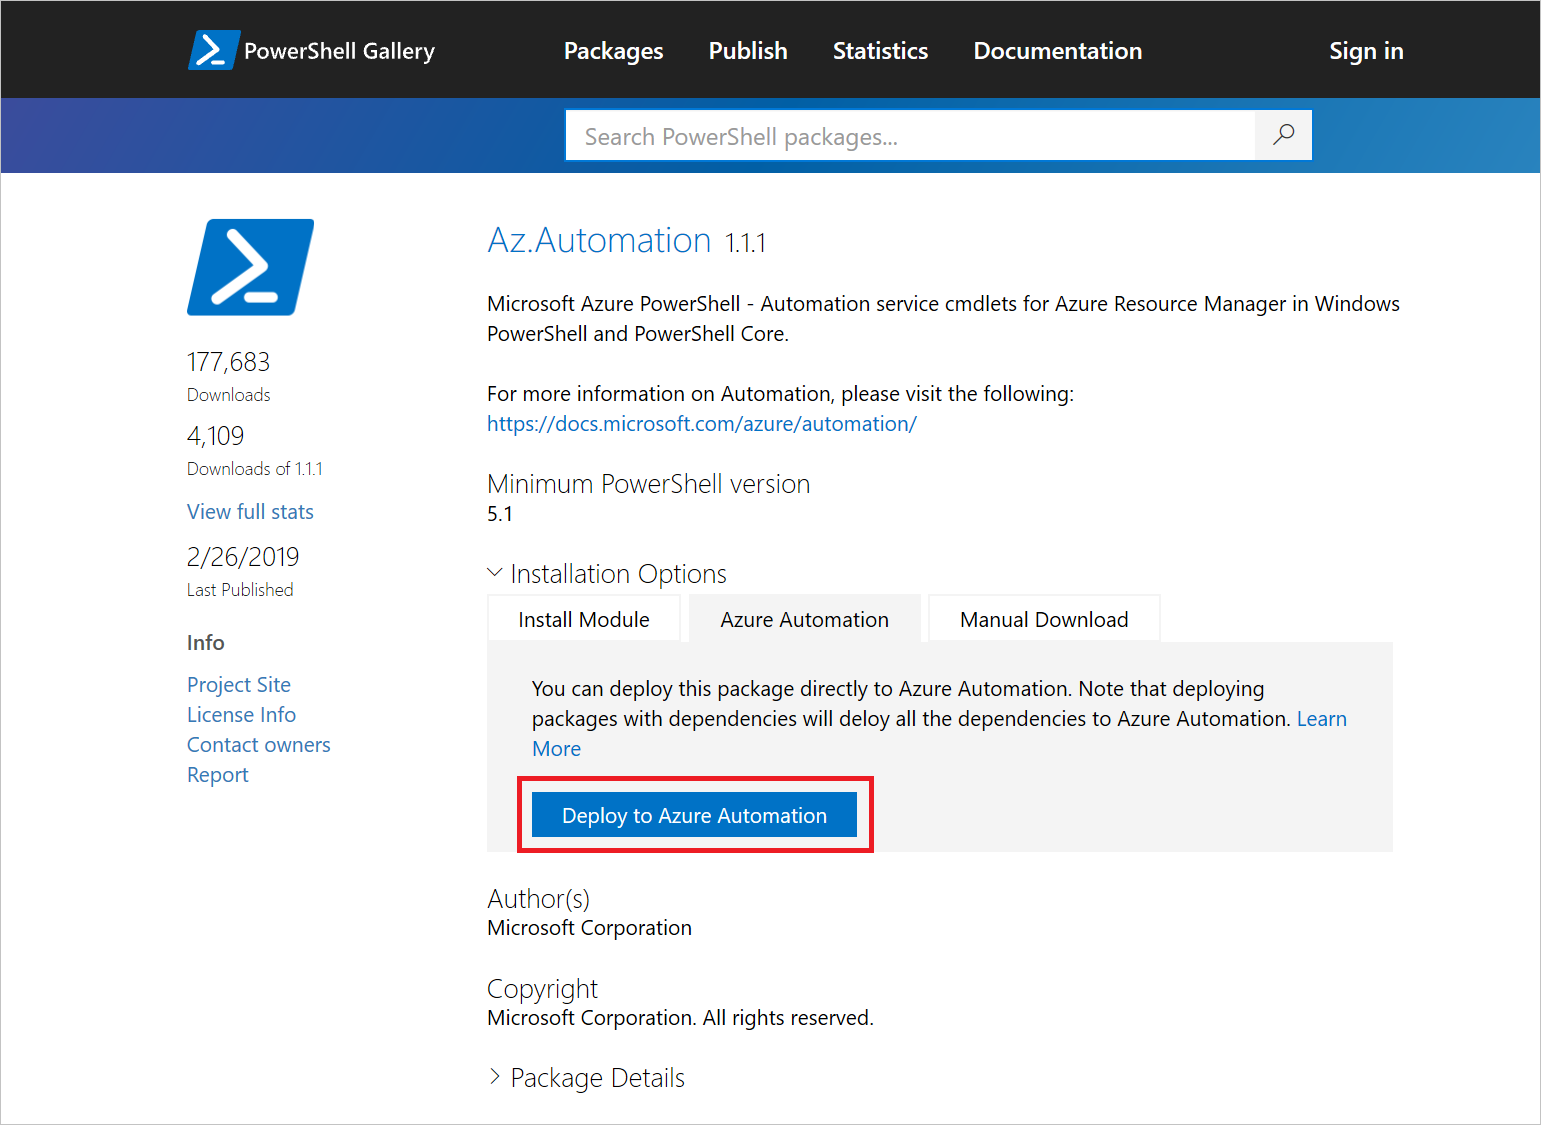
To import a module directly from the PowerShell Gallery:
- Go to https://www.powershellgallery.com and search for the module to import.
- Under Installation Options, on the Azure Automation tab, select Deploy to Azure Automation. This action opens the Azure portal.
- On the Import page, select your Automation account, and select OK.
To import a PowerShell Gallery module directly from your Automation account:
- In the portal, search for and select Automation Accounts.
- On the Automation Accounts page, select your Automation account from the list.
- Under Shared Resources, select Modules.
- Select Browse gallery, and then search the Gallery for a module.
- Select the module to import, and select Import.
- Select OK to start the import process.

Delete modules
If you have problems with a module, or you need to roll back to a previous version of a module, you can delete it from your Automation account. You can't delete the original versions of the default modules that are imported when you create an Automation account. If the module to delete is a newer version of one of the default modules, it rolls back to the version that was installed with your Automation account. Otherwise, any module you delete from your Automation account is removed.
Delete modules in the Azure portal
To remove a module in the Azure portal:
- In the portal, search for and select Automation Accounts.
- On the Automation Accounts page, select your Automation account from the list.
- Under Shared Resources, select Modules.
- Select the module you want to remove.
- On the Module page, select Delete. If this module is one of the default modules, it rolls back to the version that existed when the Automation account was created.
Delete modules by using PowerShell
To remove a module through PowerShell, run the following command:
Remove-AzAutomationModule -Name <moduleName> -AutomationAccountName <automationAccountName> -ResourceGroupName <resourceGroupName>
Next steps
For more information about using Azure PowerShell modules, see Get started with Azure PowerShell.
To learn more about creating PowerShell modules, see Writing a Windows PowerShell module.
Feedback
Coming soon: Throughout 2024 we will be phasing out GitHub Issues as the feedback mechanism for content and replacing it with a new feedback system. For more information see: https://aka.ms/ContentUserFeedback.
Submit and view feedback for