Note
Access to this page requires authorization. You can try signing in or changing directories.
Access to this page requires authorization. You can try changing directories.
You can use a GitHub Actions workflow to define a workflow to automatically build and deploy code to your function app in Azure Functions.
A YAML file (.yml) that defines the workflow configuration is maintained in the /.github/workflows/ path in your repository. This definition contains the actions and parameters that make up the workflow, which is specific to the development language of your functions. A GitHub Actions workflow for Functions performs the following tasks, regardless of language:
- Set up the environment.
- Build the code project.
- Deploy the package to a function app in Azure.
The Azure Functions action handles the deployment to an existing function app in Azure.
You can create a workflow configuration file for your deployment manually. You can also generate the file from a set of language-specific templates in one of these ways:
- In the Azure portal
- Using the Azure CLI
- From your GitHub repository
If you don't want to create your YAML file by hand, select a different method at the top of the article.
Prerequisites
An Azure account with an active subscription. Create an account for free.
A GitHub account. If you don't have one, sign up for free.
A working function app hosted on Azure with source code in a GitHub repository.
- Azure CLI, when developing locally. You can also use the Azure CLI in Azure Cloud Shell.
Generate deployment credentials
Since GitHub Actions uses your publish profile to access your function app during deployment, you first need to get your publish profile and store it securely as a GitHub secret.
Important
The publish profile is a valuable credential that allows access to Azure resources. Make sure you always transport and store it securely. In GitHub, the publish profile must only be stored in GitHub secrets.
Download your publish profile
To download the publishing profile of your function app:
In the Azure portal, locate the page for your function app, expand Settings > Configuration in the left column.
In the Configuration page, select the General settings tab and make sure that SCM Basic Auth Publishing Credentials is turned On. When this setting is Off, you can't use publish profiles, so select On and then Save.
Go back to the function app's Overview page, and then select Get publish profile.
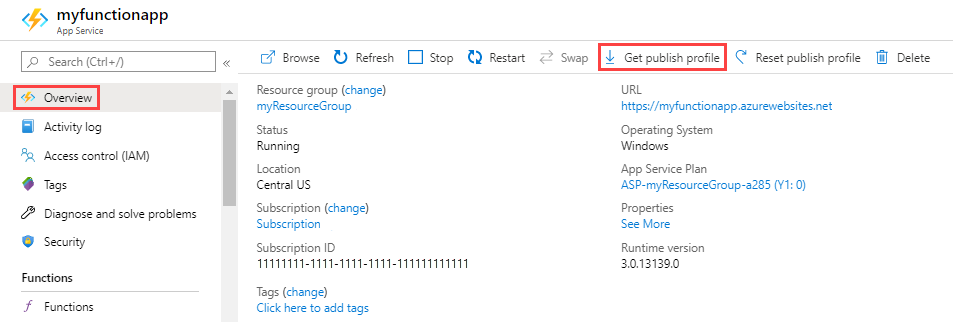
Save and copy the contents of the file.
Add the GitHub secret
In GitHub, go to your repository.
Go to Settings.
Select Secrets and variables > Actions.
Select New repository secret.
Add a new secret with the name
AZURE_FUNCTIONAPP_PUBLISH_PROFILEand the value set to the contents of the publishing profile file.Select Add secret.
GitHub can now authenticate to your function app in Azure.
Create the workflow from a template
The best way to manually create a workflow configuration is to start from the officially supported template.
Choose either Windows or Linux to make sure that you get the template for the correct operating system.
Copy the language-specific template from the Azure Functions actions repository using the following link:
Update the
env.AZURE_FUNCTIONAPP_NAMEparameter with the name of your function app resource in Azure. You may optionally need to update the parameter that sets the language version used by your app, such asDOTNET_VERSIONfor C#.Add this new YAML file in the
/.github/workflows/path in your repository.
Create the workflow configuration in the portal
When you use the portal to enable GitHub Actions, Functions creates a workflow file based on your application stack and commits it to your GitHub repository in the correct directory.
The portal automatically gets your publish profile and adds it to the GitHub secrets for your repository.
During function app create
You can get started quickly with GitHub Actions through the Deployment tab when you create a function in Azure portal. To add a GitHub Actions workflow when you create a new function app:
In the Azure portal, select Deployment in the Create Function App flow.

Enable Continuous Deployment if you want each code update to trigger a code push to Azure portal.
Enter your GitHub organization, repository, and branch.
Complete configuring your function app. Your GitHub repository now includes a new workflow file in
/.github/workflows/.
For an existing function app
To add a GitHub Actions workflow to an existing function app:
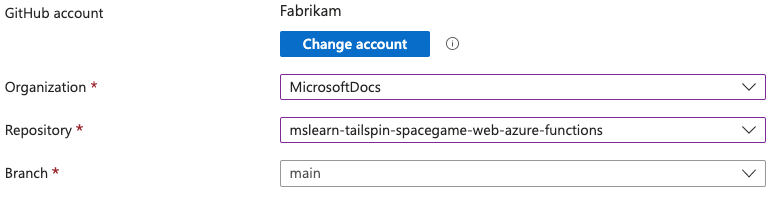
Navigate to your function app in the Azure portal and select Deployment Center.
For Source select GitHub. If you don't see the default message Building with GitHub Actions, select Change provider choose GitHub Actions and select OK.
If you haven't already authorized GitHub access, select Authorize. Provide your GitHub credentials and select Sign in. To authorize a different GitHub account, select Change Account and sign in with another account.
Select your GitHub Organization, Repository, and Branch. To deploy with GitHub Actions, you must have write access to this repository.
In Authentication settings, choose whether to have GitHub Actions authenticate with a User-assigned identity or using Basic authentication credentials. For basic authentication, the current credentials are used.
Select Preview file to see the workflow file that gets added to your GitHub repository in
github/workflows/.Select Save to add the workflow file to your repository.
Add workflow configuration to your repository
You can use the az functionapp deployment github-actions add command to generate a workflow configuration file from the correct template for your function app. The new YAML file is then stored in the correct location (/.github/workflows/) in the GitHub repository you provide, while the publish profile file for your app is added to GitHub secrets in the same repository.
Run this
az functionappcommand, replacing the valuesgithubUser/githubRepo,MyResourceGroup, andMyFunctionapp:az functionapp deployment github-actions add --repo "githubUser/githubRepo" -g MyResourceGroup -n MyFunctionapp --login-with-githubThis command uses an interactive method to retrieve a personal access token for your GitHub account.
In your terminal window, you should see something like the following message:
Please navigate to https://github.com/login/device and enter the user code XXXX-XXXX to activate and retrieve your GitHub personal access token.Copy the unique
XXXX-XXXXcode, browse to https://github.com/login/device, and enter the code you copied. After entering your code, you should see something like the following message:Verified GitHub repo and branch Getting workflow template using runtime: java Filling workflow template with name: func-app-123, branch: main, version: 8, slot: production, build_path: . Adding publish profile to GitHub Fetching publish profile with secrets for the app 'func-app-123' Creating new workflow file: .github/workflows/master_func-app-123.ymlGo to your GitHub repository and select Actions. Verify that your workflow ran.
Create the workflow configuration file
You can create the GitHub Actions workflow configuration file from the Azure Functions templates directly from your GitHub repository.
In GitHub, go to your repository.
Select Actions and New workflow.
Search for functions.
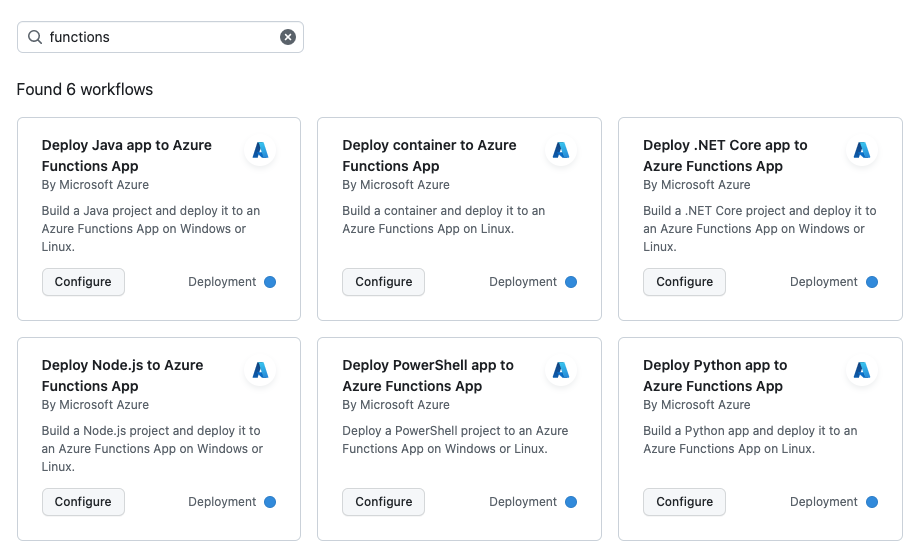
In the displayed functions app workflows authored by Microsoft Azure, find the one that matches your code language and select Configure.
In the newly created YAML file, update the
env.AZURE_FUNCTIONAPP_NAMEparameter with the name of your function app resource in Azure. You may optionally need to update the parameter that sets the language version used by your app, such asDOTNET_VERSIONfor C#.Verify that the new workflow file is being saved in
/.github/workflows/and select Commit changes....
Update a workflow configuration
If for some reason, you need to update or change an existing workflow configuration, just navigate to the /.github/workflows/ location in your repository, open the specific YAML file, make any needed changes, and then commit the updates to the repository.
Example: workflow configuration file
The following template example uses version 1 of the functions-action and a publish profile for authentication. The template depends on your chosen language and the operating system on which your function app is deployed:
name: Deploy DotNet project to Azure Function App

on:
  [push]

env:
  AZURE_FUNCTIONAPP_NAME: 'your-app-name'   # set this to your function app name on Azure
  AZURE_FUNCTIONAPP_PACKAGE_PATH: '.'       # set this to the path to your function app project, defaults to the repository root
  DOTNET_VERSION: '6.0.x'                   # set this to the dotnet version to use (e.g. '2.1.x', '3.1.x', '5.0.x')

jobs:
  build-and-deploy:
    runs-on: windows-latest
    environment: dev
    steps:
    - name: 'Checkout GitHub Action'
      uses: actions/checkout@v3

    - name: Setup DotNet ${{ env.DOTNET_VERSION }} Environment
      uses: actions/setup-dotnet@v3
      with:
        dotnet-version: ${{ env.DOTNET_VERSION }}

    - name: 'Resolve Project Dependencies Using Dotnet'
      shell: pwsh
      run: |
        pushd './${{ env.AZURE_FUNCTIONAPP_PACKAGE_PATH }}'
        dotnet build --configuration Release --output ./output
        popd

    - name: 'Run Azure Functions Action'
      uses: Azure/functions-action@v1
      id: fa
      with:
        app-name: ${{ env.AZURE_FUNCTIONAPP_NAME }}
        package: '${{ env.AZURE_FUNCTIONAPP_PACKAGE_PATH }}/output'
        publish-profile: ${{ secrets.AZURE_FUNCTIONAPP_PUBLISH_PROFILE }}
Azure Functions action
The Azure Functions action (Azure/functions-action) defines how your code is published to an existing function app in Azure, or to a specific slot in your app.
Parameters
The following parameters are required for all function app plans:
| Parameter | Explanation |
|---|---|
| app-name | The name of your function app. |
| package | This is the location in your project to be published. By default, this value is set to ., which means all files and folders in the GitHub repository will be deployed. |
The following parameters are required for the Flex Consumption plan:
| Parameter | Explanation |
|---|---|
| sku | Set this to flexconsumption when authenticating with publish-profile. When using RBAC credentials or deploying to a non-Flex Consumption plan, the Action can resolve the value, so the parameter does not need to be included. |
| remote-build | Set this to true to enable a build action from Kudu when the package is deployed to a Flex Consumption app. Oryx build is always performed during a remote build in Flex Consumption; do not set scm-do-build-during-deployment or enable-oryx-build. By default, this parameter is set to false. |
The following parameters are specific to the Consumption, Elastic Premium, and App Service (Dedicated) plans:
| Parameter | Explanation |
|---|---|
| scm-do-build-during-deployment | (Optional) Allow the Kudu site (e.g. https://<APP_NAME>.scm.azurewebsites.net/) to perform pre-deployment operations, such as remote builds. By default, this is set to false. Set this to true when you do want to control deployment behaviors using Kudu instead of resolving dependencies in your GitHub workflow. For more information, see the SCM_DO_BUILD_DURING_DEPLOYMENT setting. |
| enable-oryx-build | (Optional) Allow Kudu site to resolve your project dependencies with Oryx. By default, this is set to false. If you want to use Oryx to resolve your dependencies instead of the GitHub Workflow, set both scm-do-build-during-deployment and enable-oryx-build to true. |
Optional parameters for all function app plans:
| Parameter | Explanation |
|---|---|
| slot-name | This is the deployment slot name to be deployed to. By default, this value is empty, which means the GitHub Action will deploy to your production site. When this setting points to a non-production slot, please ensure the publish-profile parameter contains the credentials for the slot instead of the production site. Currently not supported in Flex Consumption. |
| publish-profile | The name of the GitHub secret that contains your publish profile. |
| respect-pom-xml | Used only for Java functions. Whether it's required for your app's deployment artifact to be derived from the pom.xml file. When deploying Java function apps, you should set this parameter to true and set package to .. By default, this parameter is set to false, which means that the package parameter must point to your app's artifact location, such as ./target/azure-functions/ |
| respect-funcignore | Whether GitHub Actions honors your .funcignore file to exclude files and folders defined in it. Set this value to true when your repository has a .funcignore file and you want to use it exclude paths and files, such as text editor configurations, .vscode/, or a Python virtual environment (.venv/). The default setting is false. |
Considerations
Keep the following considerations in mind when using the Azure Functions action:
When using GitHub Actions, the way that your code is deployed depends on your hosting plan, as shown in this table:
Hosting plan Deployment method Flex Consumption One deploy Elastic Premium Zip deploy to apps on the Consumption Dedicated (App Service) Zip deploy to apps on the Consumption Consumption Windows: Zip deploy
Linux: external package URL** The ability to run your apps on Linux in a Consumption plan is planned for retirement. For more information, see Azure Functions Consumption plan hosting.
The credentials required by GitHub to connection to Azure for deployment are stored as Secrets in your GitHub repository and accessed in the deployment as
secrets.<SECRET_NAME>.The easiest way for GitHub Actions to authenticate with Azure Functions for deployment is by using a publish profile. You can also authenticate using a service principal. To learn more, see this GitHub Actions repository.
The actions for setting up the environment and running a build are generated from the templates, and are language specific.
The templates use
envelements to define settings unique to your build and deployment.