Note
Access to this page requires authorization. You can try signing in or changing directories.
Access to this page requires authorization. You can try changing directories.
In this article, you learn how to use Python, PyTorch, and Azure Functions to load a pre-trained model for classifying an image based on its contents. Because you do all work locally and create no Azure resources in the cloud, there's no cost to complete this tutorial.
- Initialize a local environment for developing Azure Functions in Python.
- Import a pre-trained PyTorch machine learning model into a function app.
- Build a serverless HTTP API for classifying an image as one of 1000 ImageNet classes.
- Consume the API from a web app.
Prerequisites
- An Azure account with an active subscription. Create an account for free.
- Python 3.7.4 or above. (Python 3.8.x and Python 3.6.x are also verified with Azure Functions.)
- The Azure Functions Core Tools
- A code editor such as Visual Studio Code
Prerequisite check
- In a terminal or command window, run
func --versionto check that the Azure Functions Core Tools are version 2.7.1846 or later. - Run
python --version(Linux/macOS) orpy --version(Windows) to check your Python version reports 3.7.x.
Clone the tutorial repository
In a terminal or command window, clone the following repository using Git:
git clone https://github.com/Azure-Samples/functions-python-pytorch-tutorial.gitNavigate into the folder and examine its contents.
cd functions-python-pytorch-tutorial- start is your working folder for the tutorial.
- end is the final result and full implementation for your reference.
- resources contains the machine learning model and helper libraries.
- frontend is a website that calls the function app.
Create and activate a Python virtual environment
Navigate to the start folder and run the following commands to create and activate a virtual environment named .venv.
cd start
python -m venv .venv
source .venv/bin/activate
If Python didn't install the venv package on your Linux distribution, run the following command:
sudo apt-get install python3-venv
You run all subsequent commands in this activated virtual environment. (To exit the virtual environment, run deactivate.)
Create a local functions project
In Azure Functions, a function project is a container for one or more individual functions that each responds to a specific trigger. All functions in a project share the same local and hosting configurations. In this section, you create a function project that contains a single boilerplate function named classify that provides an HTTP endpoint. You add more specific code in a later section.
In the start folder, use the Azure Functions Core Tools to initialize a Python function app:
func init --worker-runtime pythonAfter initialization, the start folder contains various files for the project, including configurations files named local.settings.json and host.json. Because local.settings.json can contain secrets downloaded from Azure, the file is excluded from source control by default in the .gitignore file.
Tip
Because a function project is tied to a specific runtime, all the functions in the project must be written with the same language.
Add a function to your project by using the following command, where the
--nameargument is the unique name of your function and the--templateargument specifies the function's trigger.func newcreate a subfolder matching the function name that contains a code file appropriate to the project's chosen language and a configuration file named function.json.func new --name classify --template "HTTP trigger"This command creates a folder matching the name of the function, classify. In that folder are two files: __init__.py, which contains the function code, and function.json, which describes the function's trigger and its input and output bindings. For details on the contents of these files, see Programming model in the Python developer guide.
Run the function locally
Start the function by starting the local Azure Functions runtime host in the start folder:
func startOnce you see the
classifyendpoint appear in the output, navigate to the URL,http://localhost:7071/api/classify?name=Azure. The message "Hello Azure!" should appear in the output.Use Ctrl-C to stop the host.
Import the PyTorch model and add helper code
To modify the classify function to classify an image based on its contents, you use a pre-trained ResNet model. The pre-trained model, which comes from PyTorch, classifies an image into 1 of 1000 ImageNet classes. You then add some helper code and dependencies to your project.
In the start folder, run the following command to copy the prediction code and labels into the classify folder.
cp ../resources/predict.py classify cp ../resources/labels.txt classifyVerify that the classify folder contains files named predict.py and labels.txt. If not, check that you ran the command in the start folder.
Open start/requirements.txt in a text editor and add the dependencies required by the helper code, which should look like:
azure-functions
requests
-f https://download.pytorch.org/whl/torch_stable.html
torch==1.13.0+cpu
torchvision==0.14.0+cpu
Tip
The versions of torch and torchvision must match values listed in the version table of the PyTorch vision repo.
Save requirements.txt, then run the following command from the start folder to install the dependencies.
pip install --no-cache-dir -r requirements.txt
Installation may take a few minutes, during which time you can proceed with modifying the function in the next section.
Tip
On Windows, you may encounter the error, "Could not install packages due to an EnvironmentError: [Errno 2] No such file or directory:" followed by a long pathname to a file like sharded_mutable_dense_hashtable.cpython-37.pyc. Typically, this error happens because the depth of the folder path becomes too long. In this case, set the registry key
HKEY_LOCAL_MACHINE\SYSTEM\CurrentControlSet\Control\FileSystem@LongPathsEnabledto1to enable long paths. Alternately, check where your Python interpreter is installed. If that location has a long path, try reinstalling in a folder with a shorter path.
Update the function to run predictions
Open classify/__init__.py in a text editor and add the following lines after the existing
importstatements to import the standard JSON library and the predict helpers:import logging import azure.functions as func import json # Import helper script from .predict import predict_image_from_urlReplace the entire contents of the
mainfunction with the following code:def main(req: func.HttpRequest) -> func.HttpResponse: image_url = req.params.get('img') logging.info('Image URL received: ' + image_url) results = predict_image_from_url(image_url) headers = { "Content-type": "application/json", "Access-Control-Allow-Origin": "*" } return func.HttpResponse(json.dumps(results), headers = headers)This function receives an image URL in a query string parameter named
img. It then callspredict_image_from_urlfrom the helper library to download and classify the image using the PyTorch model. The function then returns an HTTP response with the results.Important
Because this HTTP endpoint is called by a web page hosted on another domain, the response includes an
Access-Control-Allow-Originheader to satisfy the browser's Cross-Origin Resource Sharing (CORS) requirements.In a production application, change
*to the web page's specific origin for added security.Save your changes, then assuming that dependencies have finished installing, start the local function host again with
func start. Be sure to run the host in the start folder with the virtual environment activated. Otherwise the host will start, but you'll see errors when invoking the function.func startIn a browser, open the following URL to invoke the function with the URL of a Bernese Mountain Dog image and confirm that the returned JSON classifies the image as a Bernese Mountain Dog.
http://localhost:7071/api/classify?img=https://raw.githubusercontent.com/Azure-Samples/functions-python-pytorch-tutorial/master/resources/assets/Bernese-Mountain-Dog-Temperament-long.jpgKeep the host running because you use it in the next step.
Run the local web app front end to test the function
To test invoking the function endpoint from another web app, there's a simple app in the repository's frontend folder.
Open a new terminal or command prompt and activate the virtual environment (as described earlier under Create and activate a Python virtual environment).
Navigate to the repository's frontend folder.
Start an HTTP server with Python:
python -m http.serverIn a browser, navigate to
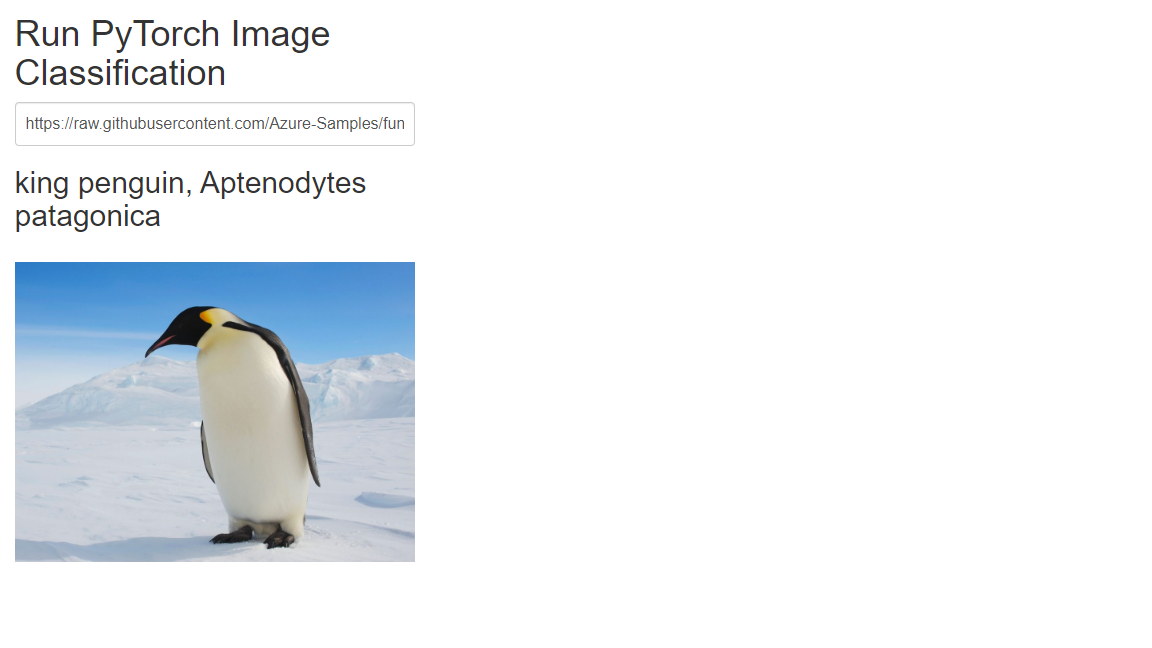
localhost:8000, then enter one of the following photo URLs into the textbox, or use the URL of any publicly accessible image.https://raw.githubusercontent.com/Azure-Samples/functions-python-pytorch-tutorial/master/resources/assets/Bernese-Mountain-Dog-Temperament-long.jpghttps://github.com/Azure-Samples/functions-python-pytorch-tutorial/blob/master/resources/assets/bald-eagle.jpg?raw=truehttps://raw.githubusercontent.com/Azure-Samples/functions-python-pytorch-tutorial/master/resources/assets/penguin.jpg
Select Submit to invoke the function endpoint to classify the image.
If the browser reports an error when you submit the image URL, check the terminal in which you're running the function app. If you see an error like "No module found 'PIL'", you may have started the function app in the start folder without first activating the virtual environment you created earlier. If you still see errors, run
pip install -r requirements.txtagain with the virtual environment activated and look for errors.
Clean up resources
Because the entirety of this tutorial runs locally on your machine, there are no Azure resources or services to clean up.
Next steps
In this tutorial, you learned how to build and customize an HTTP API endpoint with Azure Functions to classify images using a PyTorch model. You also learned how to call the API from a web app. You can use the techniques in this tutorial to build out APIs of any complexity, all while running on the serverless compute model provided by Azure Functions.
See also: