Note
Access to this page requires authorization. You can try signing in or changing directories.
Access to this page requires authorization. You can try changing directories.
Applies to: Hyperconverged deployments of Azure Local
This article describes how to register your Azure Local machines with Azure Arc gateway by using a private path with an Azure Firewall explicit proxy configured. This deployment model is ideal if you want to keep all your traffic on a private path without going over the internet.
To learn about the private path architecture and traffic flow, see Private path network overview.
Prerequisites and requirements
This section lists the prerequisites and requirements for deploying Azure Local with Azure Arc gateway and private path with proxy.
Azure Local version requirements
To use this feature, your Azure Local must be running software version 2608 or later. Releases prior to 2608 don't support private path architecture.
Network requirements
Make sure you have the following prerequisites in place before you start the deployment:
- An existing Azure virtual network with Azure Arc Private Link Scope disabled.
- If your workloads require Azure Arc for servers Private Link Scope, use a separate virtual network with Azure Arc Private Link Scope configured.
- Azure Local doesn't support Azure Arc Private Link Scope on the virtual network where Azure Firewall runs as explicit proxy.
- At least one workload subnet and one Azure Firewall subnet in the Azure virtual network.
- An existing Azure ExpressRoute or site-to-site virtual private network (VPN) connection from the on-premises environment to the Azure virtual network.
- An Azure Firewall instance configured on the virtual network with Azure Arc Private Link scope disabled.
- Network routing configured to allow Azure Local machines to connect to the Azure virtual network and subnets over ExpressRoute or site-to-site VPN.
- Before Arc registration, all machines must be able to reach the Azure Firewall private IP, which serves as the proxy endpoint for HTTP and HTTPS traffic.
- An Azure Arc gateway resource in the same subscription where Azure Local machines are registered.
Required components
Make sure that you have the Required components in place before you start the deployment.
Step 1: Create the Arc gateway resource
Use Azure portal, Azure CLI, or Azure PowerShell to create the Arc gateway resource. For instructions, see Overview of Azure Arc gateway for Azure Local.
Note
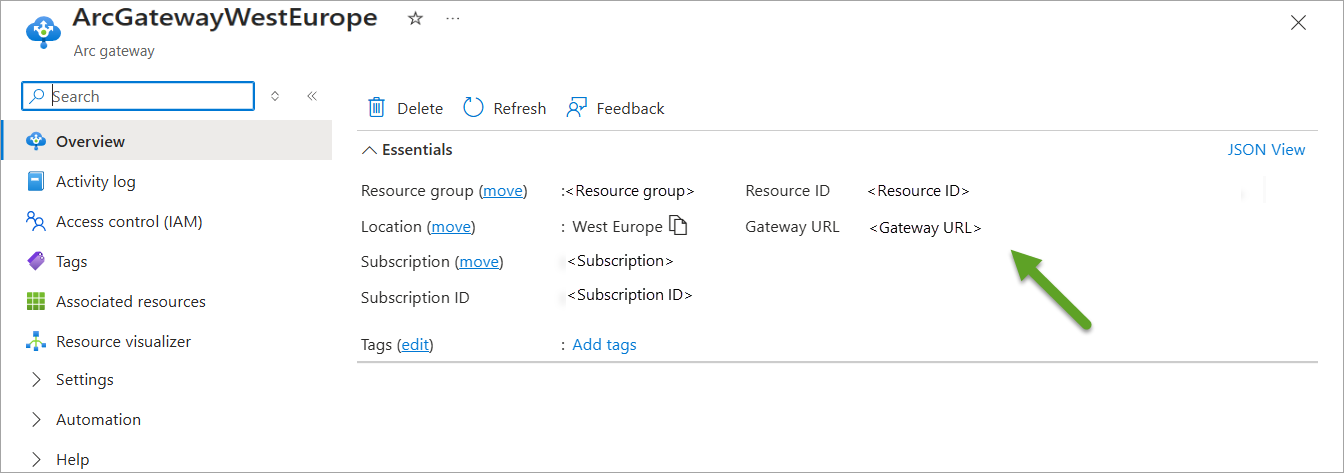
The gateway creation process takes 20 to 50 minutes to complete. When the Arc gateway is created, it assigns a Gateway URL.
Make a note of the Gateway URL. You need to allow HTTPS traffic to this endpoint in your Azure Firewall application rules.
Step 2: Create the Azure Firewall with Azure Arc Private Link Scope disabled
Create the subnet
To create and deploy an Azure Firewall instance in an existing Azure virtual network, you first need a subnet named AzureFirewallSubnet.
- In the Azure portal, go to the virtual network where you plan to deploy your Azure Firewall instance.
- From the left navigation, select Subnets > + Subnet.
- In Name, enter AzureFirewallSubnet.
- For Subnet address range, accept the default or specify a range that's at least
/26in size. - Select Save.
Deploy the Azure Firewall instance and get private IP
From the Azure portal home page, select Create a resource.
Enter firewall in the search box and select Enter.
Select Firewall and then select Create.
On the Create a Firewall page, under the Basic tab, configure the firewall as shown in the following table:
Setting Value Resource Group Same resource group as your selected virtual network. Name Name of your choice. Region Same region as the selected virtual network. Availability zone Select your availability zone option. Virtual network Select the integrated virtual network. Public IP Address Select an existing address or create one by selecting Add new. Firewall tier Select Standard or Premium tier to support explicit proxy feature. Firewall management Select Use a Firewall Policy to manage this firewall. Firewall policy Create one by selecting Add new. Firewall management NIC Don't select this option. 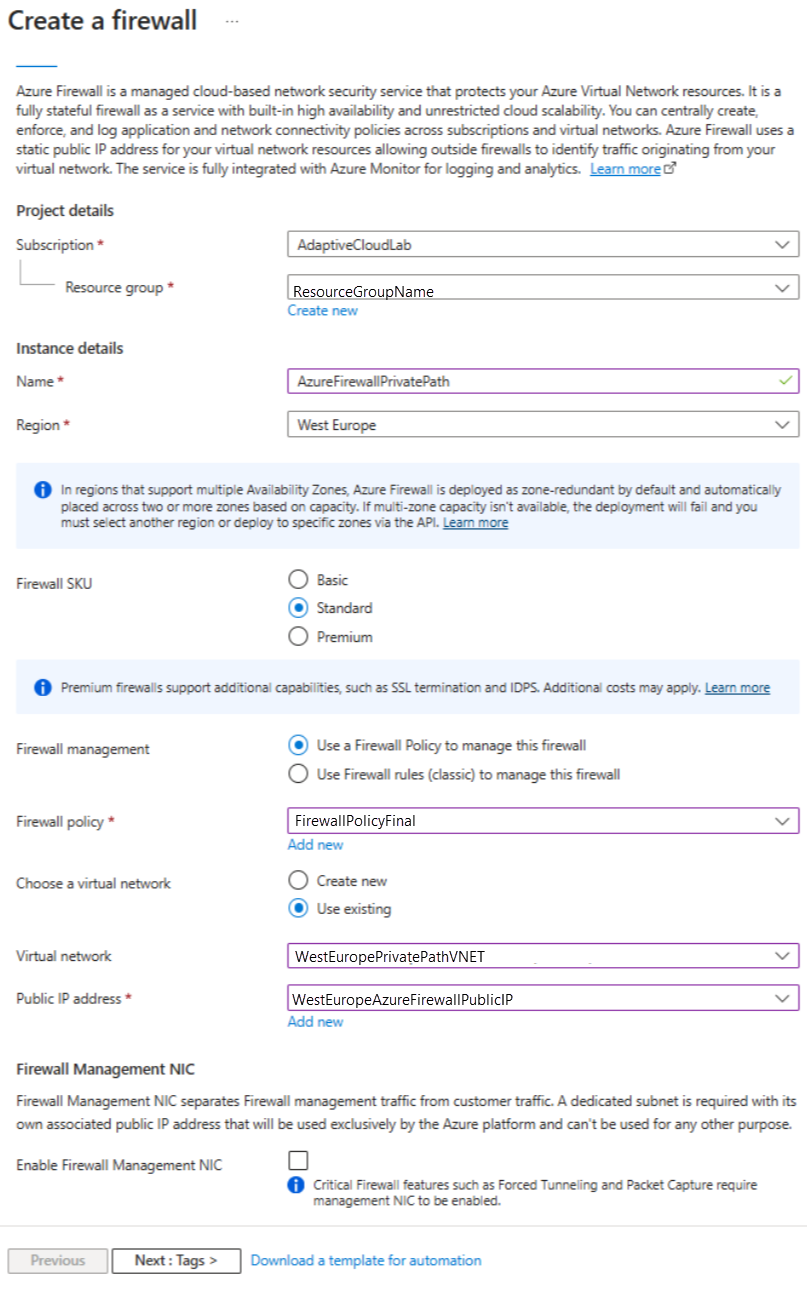
Select Review + create.
Select Create again. It takes a few minutes to deploy.
After deployment completes, go to your resource group, and select the firewall.
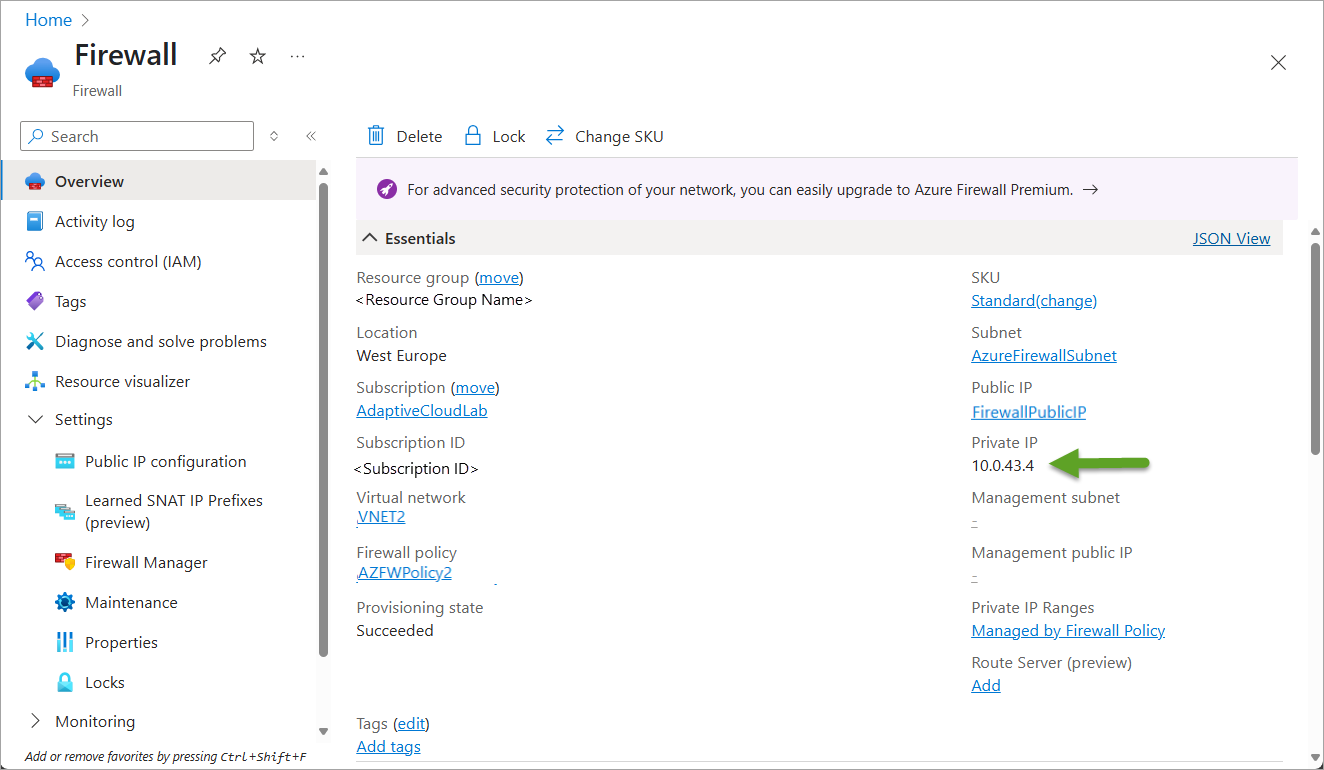
On the Firewall Overview page, copy the Private IP address. The private IP address serves as the next hop address in the routing rule for the virtual network and as the Azure Local machine proxy.
Step 3: Enable explicit proxy
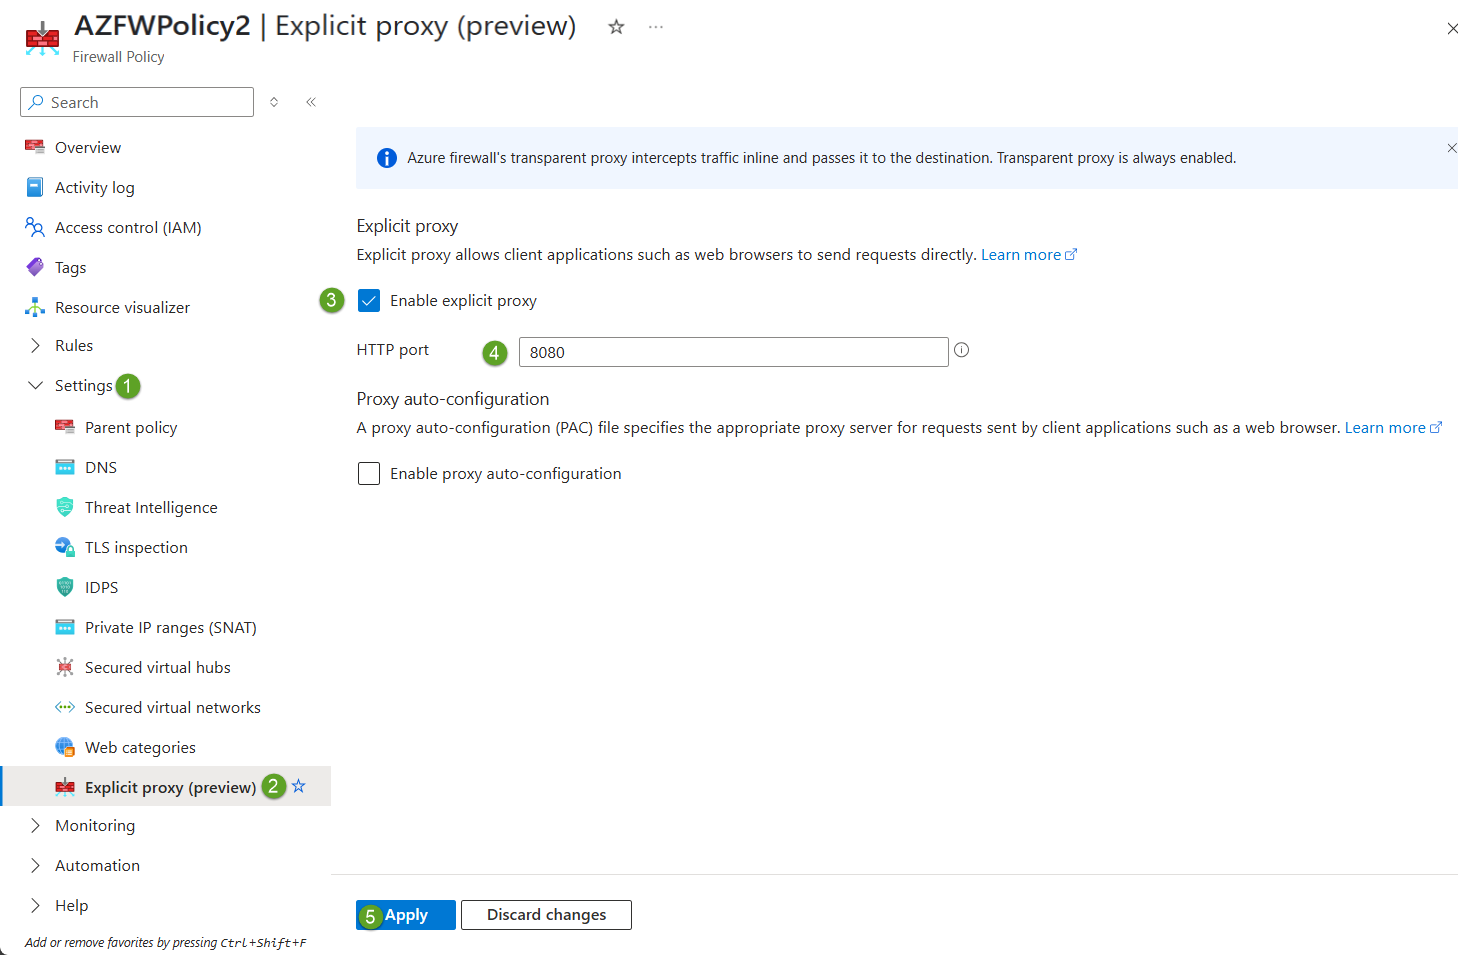
Go to your Azure Firewall resource, and then go to Firewall Policy.
In Settings, go to the explicit proxy (preview) pane.
Select Enable explicit proxy.
Enter your TCP port for the explicit proxy. This port proxies traffic for both HTTP and HTTPS.
Select Apply to save the changes.
Configure Azure Firewall policies
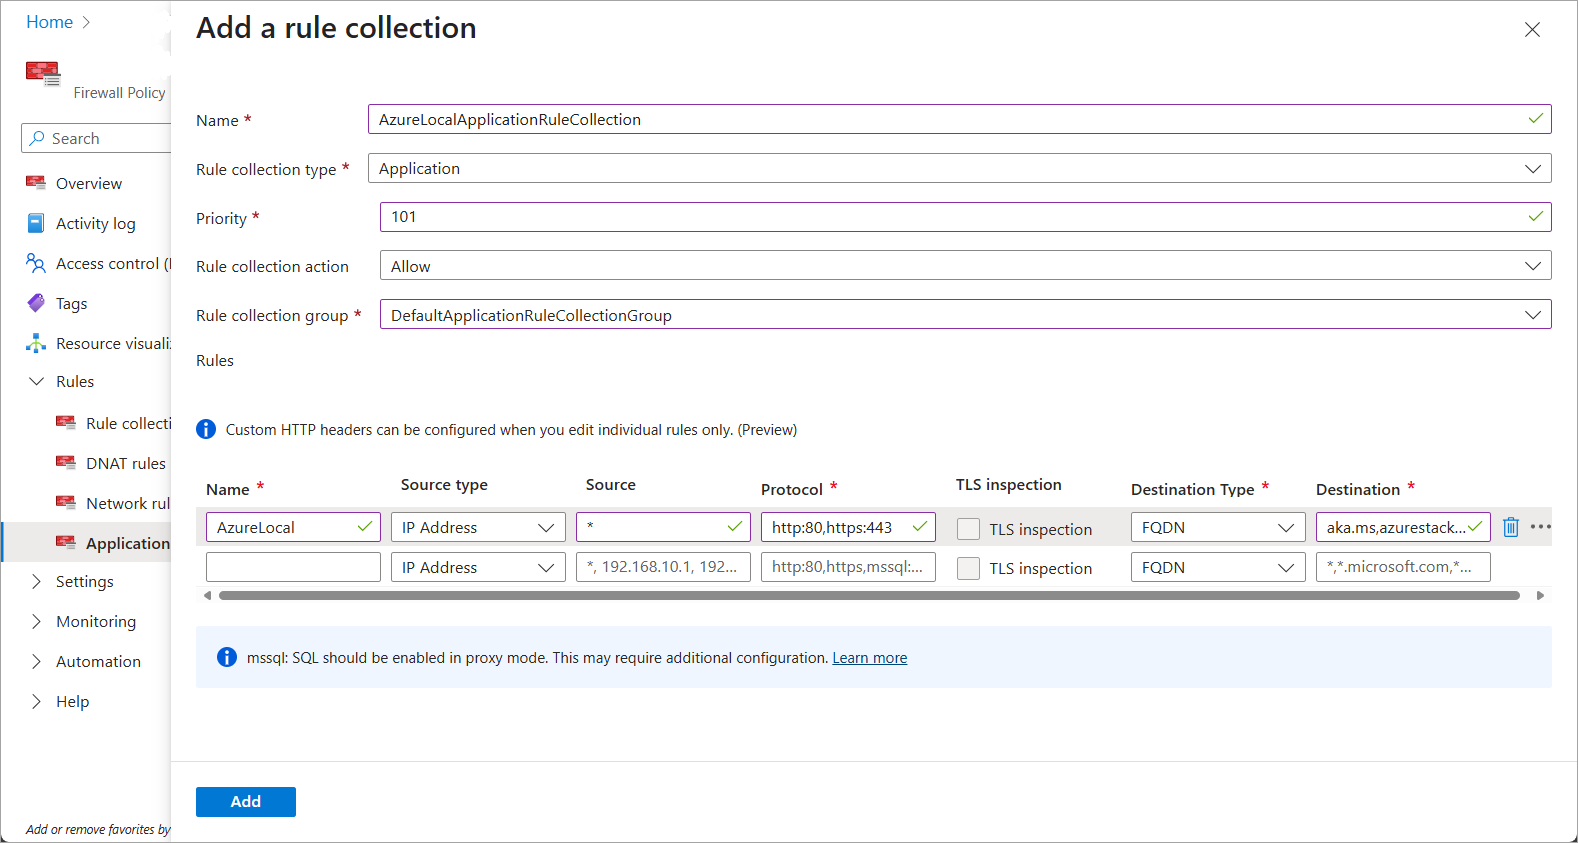
Outbound traffic from your on-premises network routes through the integrated virtual network to the firewall. To control outbound traffic, add an application rule to the firewall policy.
- Go to the applicable firewall policy.
- In Settings, go to the Application Rules pane.
- Select Add a rule collection.
- Enter a Name for the rule collection.
- Set the Rule collection type to Application.
- Set the rule Priority based on other rules you might have.
- Set the Rule collection action to Allow.
- Select the Rule collection group where you want to include your rules.
- Set the Name of your rule.
- For the Source, enter
*, or any source IPs you have. - Set Protocol as
http:80,https:443. - Set Destination Type to FQDN.
- Set Destination as a comma-separated list of URLs that your scenario requires.
- Select Add to save the rule collection and rule.
Required URLs to allow on Azure Firewall application rules
For details on required URLs, see Azure Local Arc gateway required endpoints.
Step 4: Private path Azure Arc registration
Before you register your machines, make sure you completed the following tasks:
- Create the Arc gateway.
- Configure Azure Firewall explicit proxy.
- Complete Azure ExpressRoute routing on the Azure side.
- Set up your Azure Local machines to use this private path.
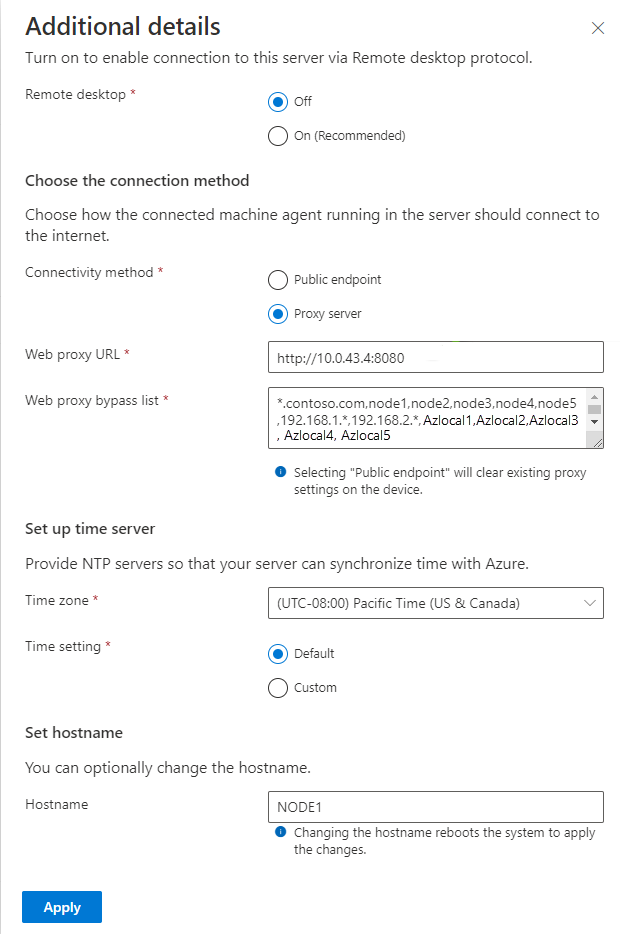
You can register each machine by using the Arc initialization script or the Configurator app. With either method, provide the following values:
- The Arc gateway ID.
- The Azure Firewall internal IP and port as the proxy server.
- The proxy bypass list for traffic you don't want to send over the proxy.
Proxy bypass list string considerations
- Use
localhostinstead of/<local/>. - Use specific IPs such as
127.0.0.1without a mask. - Use
*for subnets allowlisting. Use192.168.1.*for /24 exclusions. Use192.168.*.*for /16 exclusions. - Append
*before domain names like*.contoso.comto bypass an entire domain. - Don't include
.svcin the list. The registration script handles environment variables configuration.
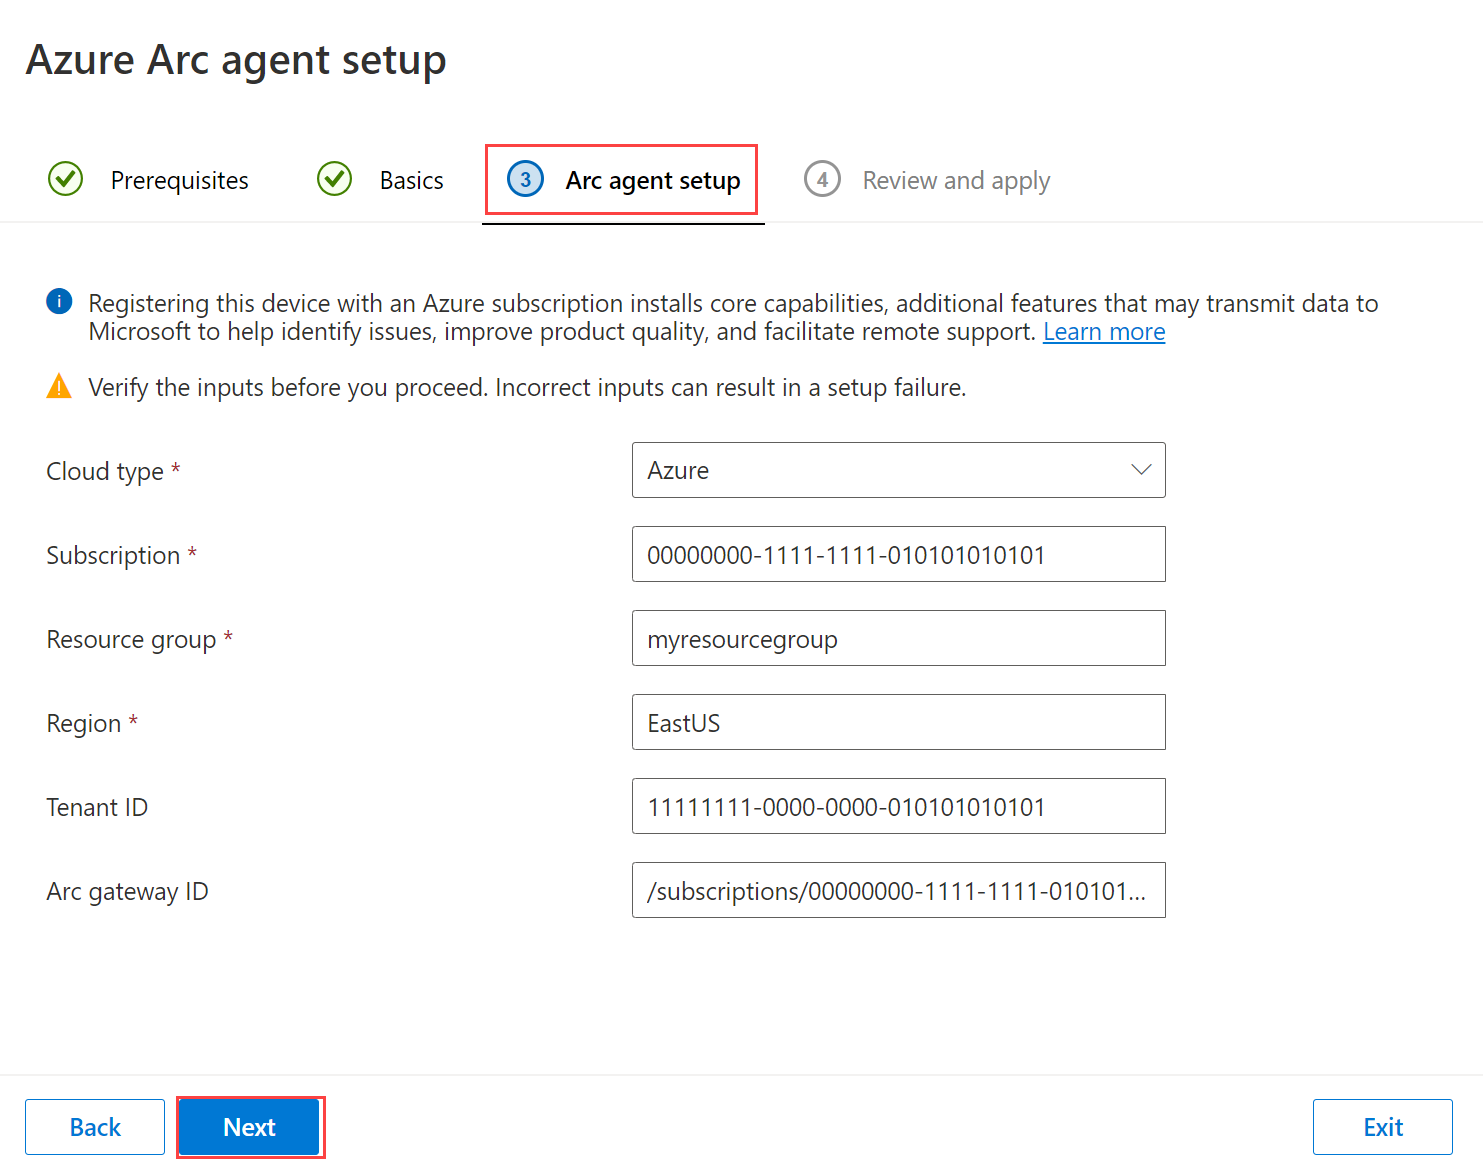
Important
Make sure you add the Arc gateway ID information as part of the Azure Arc agent setup.
The following example shows an Azure Local private path registration by using the Azure Arc initialization script during bootstrap:
# Define the subscription where you want to register your server as an Arc device
$Subscription = "yoursubscriptionid"

# Define the resource group where you want to register your server as an Arc device
$RG = "yourresourcegroup"

# Define the tenant ID used to register your server as an Arc device
$Tenant = "yourtenantid"

# Define your proxy server if required (Azure Firewall internal IP and port)
$ProxyServer = "http://azurefirewallinternalIP:port"

# Define the Arc gateway resource ID from Azure
$ArcgwId = "yourArcgwid"

# Define the bypass list for the proxy. Use a comma to separate each item from the list
$ProxyBypassList = "*.contoso.com,node1,node2,node3,node4,node5,192.168.1.*,192.168.2.*,AzLocal1,AzLocal2,AzLocal3,AzLocal4,AzLocal5"

# Invoke Arc initialization for Azure Local nodes
Invoke-AzStackHciArcInitialization -SubscriptionID $Subscription -ResourceGroup $RG -TenantID $Tenant -Region "<yourregion>" -Cloud "AzureCloud" -Proxy $ProxyServer -ProxyBypass $ProxyBypassList -ArcGatewayID $ArcgwId
Step 5: Validate proxy configuration
To ensure that private path traffic from your on-premises Azure Local machines to Azure Firewall and Arc gateway is properly configured, ensure that WinInet, WinHTTP, environment variables, and the Arc agent have the correct proxy configuration.
Validate WinHTTP proxy configuration
To validate the WinHTTP proxy configuration, run the following command on your Azure Local machine:
PS C:\> Get-WinhttpProxy -Default

Current WinHTTP proxy settings:

Proxy Server(s) : http=http://10.0.43.4:8080;https=http://localhost:40343

Bypass List     : localhost;127.0.0.1;*.contoso.com;node1;node2;node3;node4;node5;192.168.1.*;192.168.2.*AzLocal1;AzLocal2;AzLocal3;AzLocal4;AzLocal5
- Ensure the proxy server configuration for the HTTP proxy is set to your Azure Firewall HTTP endpoint.
- Make sure that the proxy servers configuration for the HTTPS proxy is set to use
http://localhost:40343. This value is the Arc proxy service from the Arc agent responsible for creating the tunneling with Arc gateway in Azure. - Review that the
ProxyBypassstring is properly configured, where each parameter must be separated by a semicolon, subnet exclusions use*as a wildcard, and domain names use*at the beginning of the name.
Validate WinINET proxy configuration
To validate the WinINET proxy configuration, run the following command on your Azure Local machine:
PS C:\> Get-WinhttpProxy -Advanced

Current WinHTTP advanced proxy settings:

Proxy: http=http://10.0.43.4:8080;https=http://localhost:40343

ProxyBypass: localhost;127.0.0.1;*.contoso.com;node1;node2;node3;node4;node5;192.168.1.*;192.168.2.*;AzLocal1;AzLocal2;AzLocal3;AzLocal4;AzLocal5

AutoDetect: False
- Make sure that the proxy servers configuration for the HTTP proxy is set to your Azure Firewall HTTP endpoint. For example,
http://10.0.43.4:8080. - Make sure that the proxy servers configuration for the HTTPS proxy is set to use
http://localhost:40343. This value is the Arc proxy service from the Arc agent responsible for creating the tunneling with Arc gateway in Azure. - Review that the
ProxyBypassstring is properly configured, where each parameter is separated with a semicolon, subnet exclusions use*as wildcard, and domain names use*at the beginning of the name. - Check that theProxyBypassstring is properly configured, where each parameter is separated with a semicolon, subnet exclusions use*as wildcard, and domain names use*at the beginning of the name. This notation is specific for WinHTTP and WinINET proxy bypass string configuration.
Validate environment variables proxy configuration
To validate the environment variables proxy configuration, run the following command on your Azure Local machine:
PS C:\> echo "https :" $env:https_proxy "http :" $env:http_proxy "bypasslist :" $env:no_proxy

https : http://localhost:40343
http : http://10.0.43.4:8080
bypasslist : localhost,127.0.0.1,.contoso.com,node1,node2,node3,node4,node5,192.168.1.0/24,192.168.2.0/24,AzLocal1,AzLocal2,AzLocal3,AzLocal4,AzLocal5
- Make sure that the HTTP variable proxy is set to your Azure Firewall HTTP endpoint.
- Make sure that the HTTPS variable proxy is set to use
http://localhost:40343. This value is the Arc proxy service from the Arc agent responsible for creating the tunneling with Arc gateway in Azure. - Check that the
ProxyBypassstring is properly configured. For environment variables, ensure that the values are comma-separated, and wildcards are defined as.preceding the value. For example,.contoso.comor.svc. Subnet exclusions must use Classless Inter-Domain Routing (CIDR) notation instead of using*as wildcard.
Validate Azure Arc agent proxy configuration
To validate the Azure Arc agent proxy configuration, run the following command on your Azure Local machine:
PS C:\> cd `.\Program Files\AzureConnectedMachineAgent\`
PS C:\Program Files\AzureConnectedMachineAgent> .\azcmagent.exe show
Resource Name                              : Node1
Resource Group Name                        : <Resource Group Name>
Resource Namespace                         : Microsoft.HybridCompute
Resource Id                                : <Resource ID>

Subscription ID                            : <Subscription ID>
Tenant ID                                  : <Tenant ID>
VM ID                                      : <VM ID>
Correlation ID                             : <Correlation ID>
VM UUID                                    : <VM UUID>
Location                                   : west europe
Cloud                                      : AzureCloud
Agent Version                              : 1.46.02809.1841
Agent Logfile                              : C:\ProgramData\AzureConnectedMachineAgent\Log\himds.log
Agent Status                               : Connected
Agent Last Heartbeat                       : 2025-02-13T11:09:09-08:00
Agent Error Code                           :
Agent Error Details                        :
Agent Error Timestamp                      :
Using HTTPS Proxy                          : http://localhost:40343
Proxy Bypass List                          :
Upstream Proxy                             : http://10.0.43.4:8443
Gateway URL                                : https :/<Gateway URL>.gw.arc.azure.com
Cloud Provider                             : AzSHCI
Cloud Metadata
Manufacturer                               : Microsoft Corporation
Model                                      : Virtual Machine
MSSQL Server Detected                      : false
Dependent Service Status
  Agent Service (himds)                    : running
  Azure Arc Proxy (arcproxy)               : running
  Extension Service (extensionservice)     : running
  GC Service (gcarcservice)                : running
Portal Page                                : <Portal pages>


Disabled Features            : atsauth
- Make sure that the
Using HTTPS Proxyvalue is set to the Arc proxy endpointhttp://localhost:40343. This value is the Arc proxy service from the Arc agent responsible for creating the tunneling with Arc gateway in Azure. - Make sure that the
Upstream Proxyvalue is set to use your Azure Firewall HTTPS proxy endpoint. For example,http://10.0.43.4:8443.
Monitor outbound traffic on Azure Firewall
If you already have a Log Analytics workspace in your subscription where Azure Firewall is running, you can enable specific monitoring to track the explicit proxy application rules.
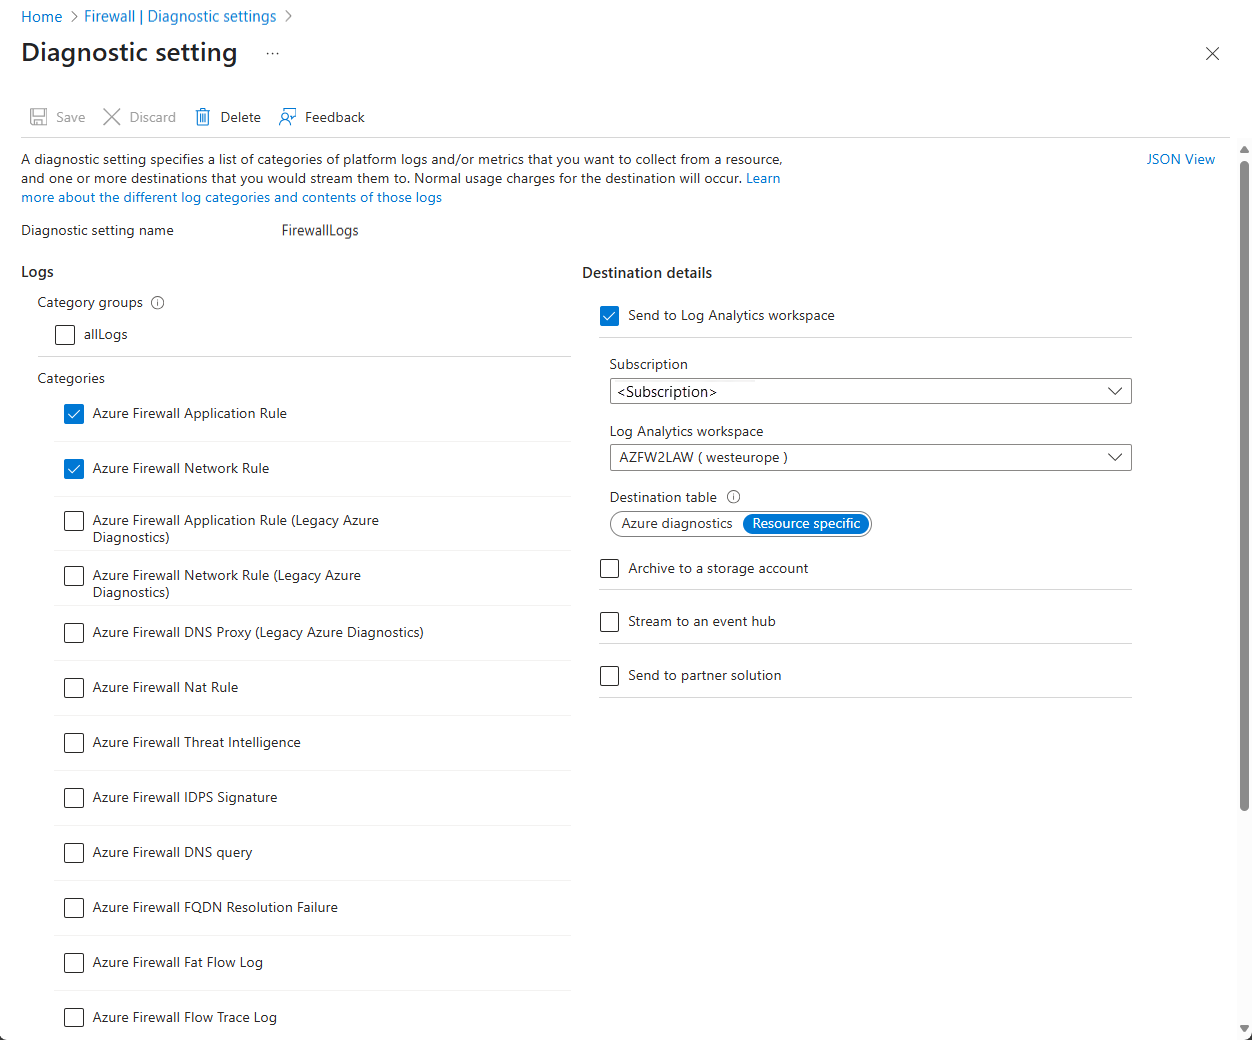
Go to your Azure Firewall resource and under Monitoring, open Diagnostic settings.
Select + Add diagnostic setting.
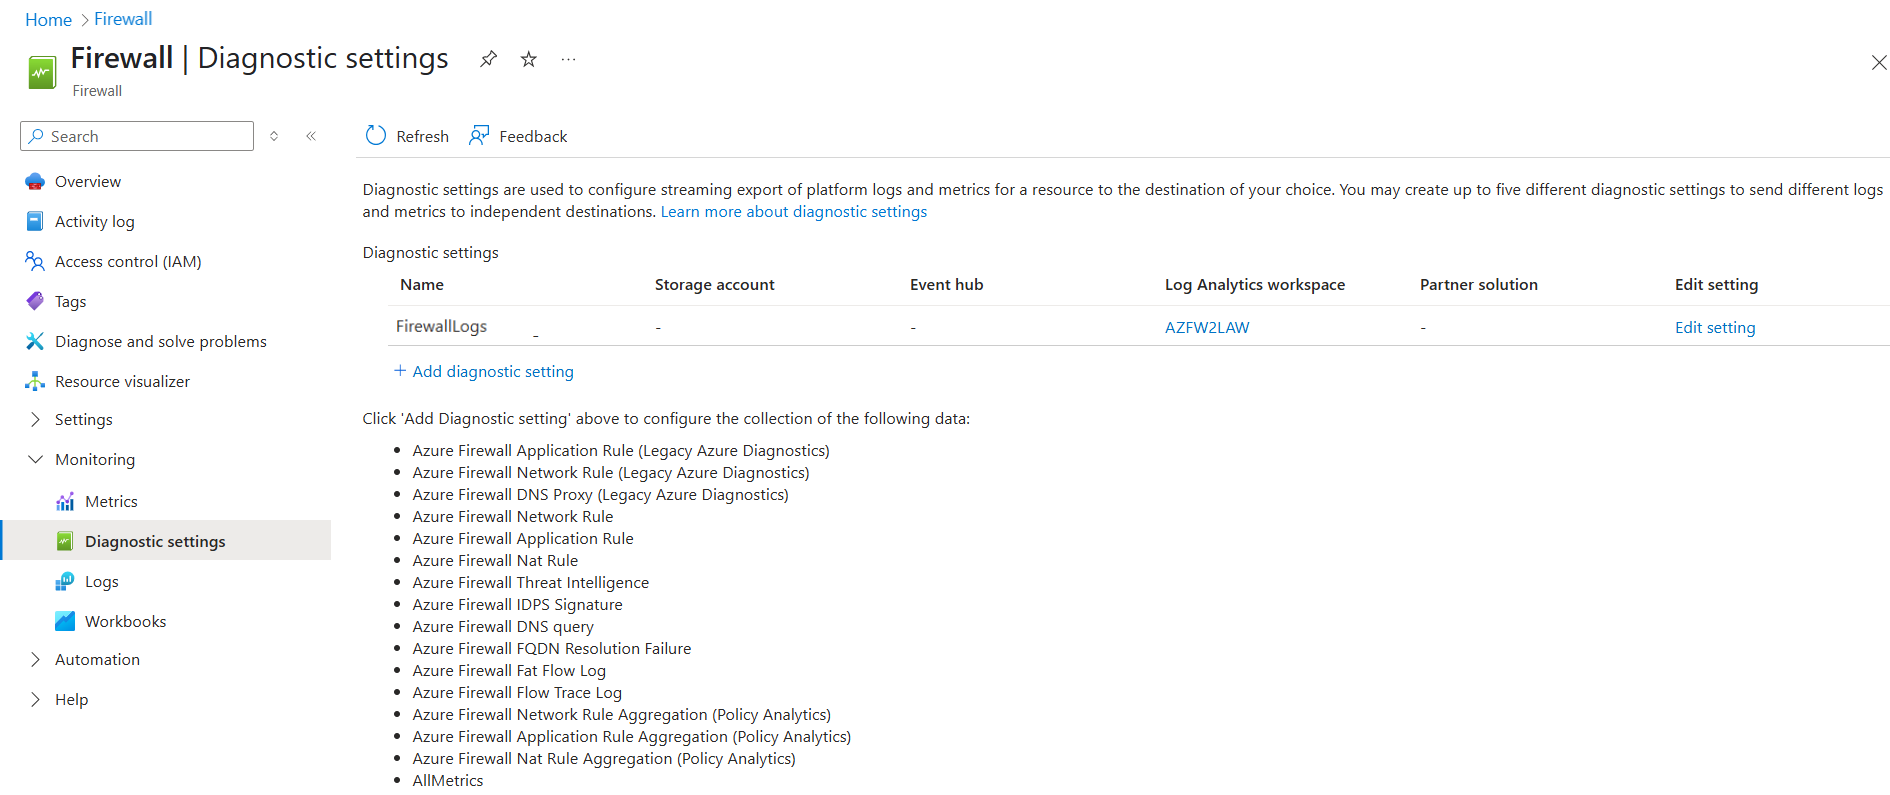
On the diagnostic setting configuration page, select the Azure Firewall Application Rule log.
- Also select the Azure Firewall Network Rule and the Azure Firewall Flow trace log in case they're required for deeper monitoring and troubleshooting.
- On the Destination details, select Send to Log Analytics workspace and select your subscription and your Log Analytics workspace.
Select the Resource-specific option for the Destination table and select Save.
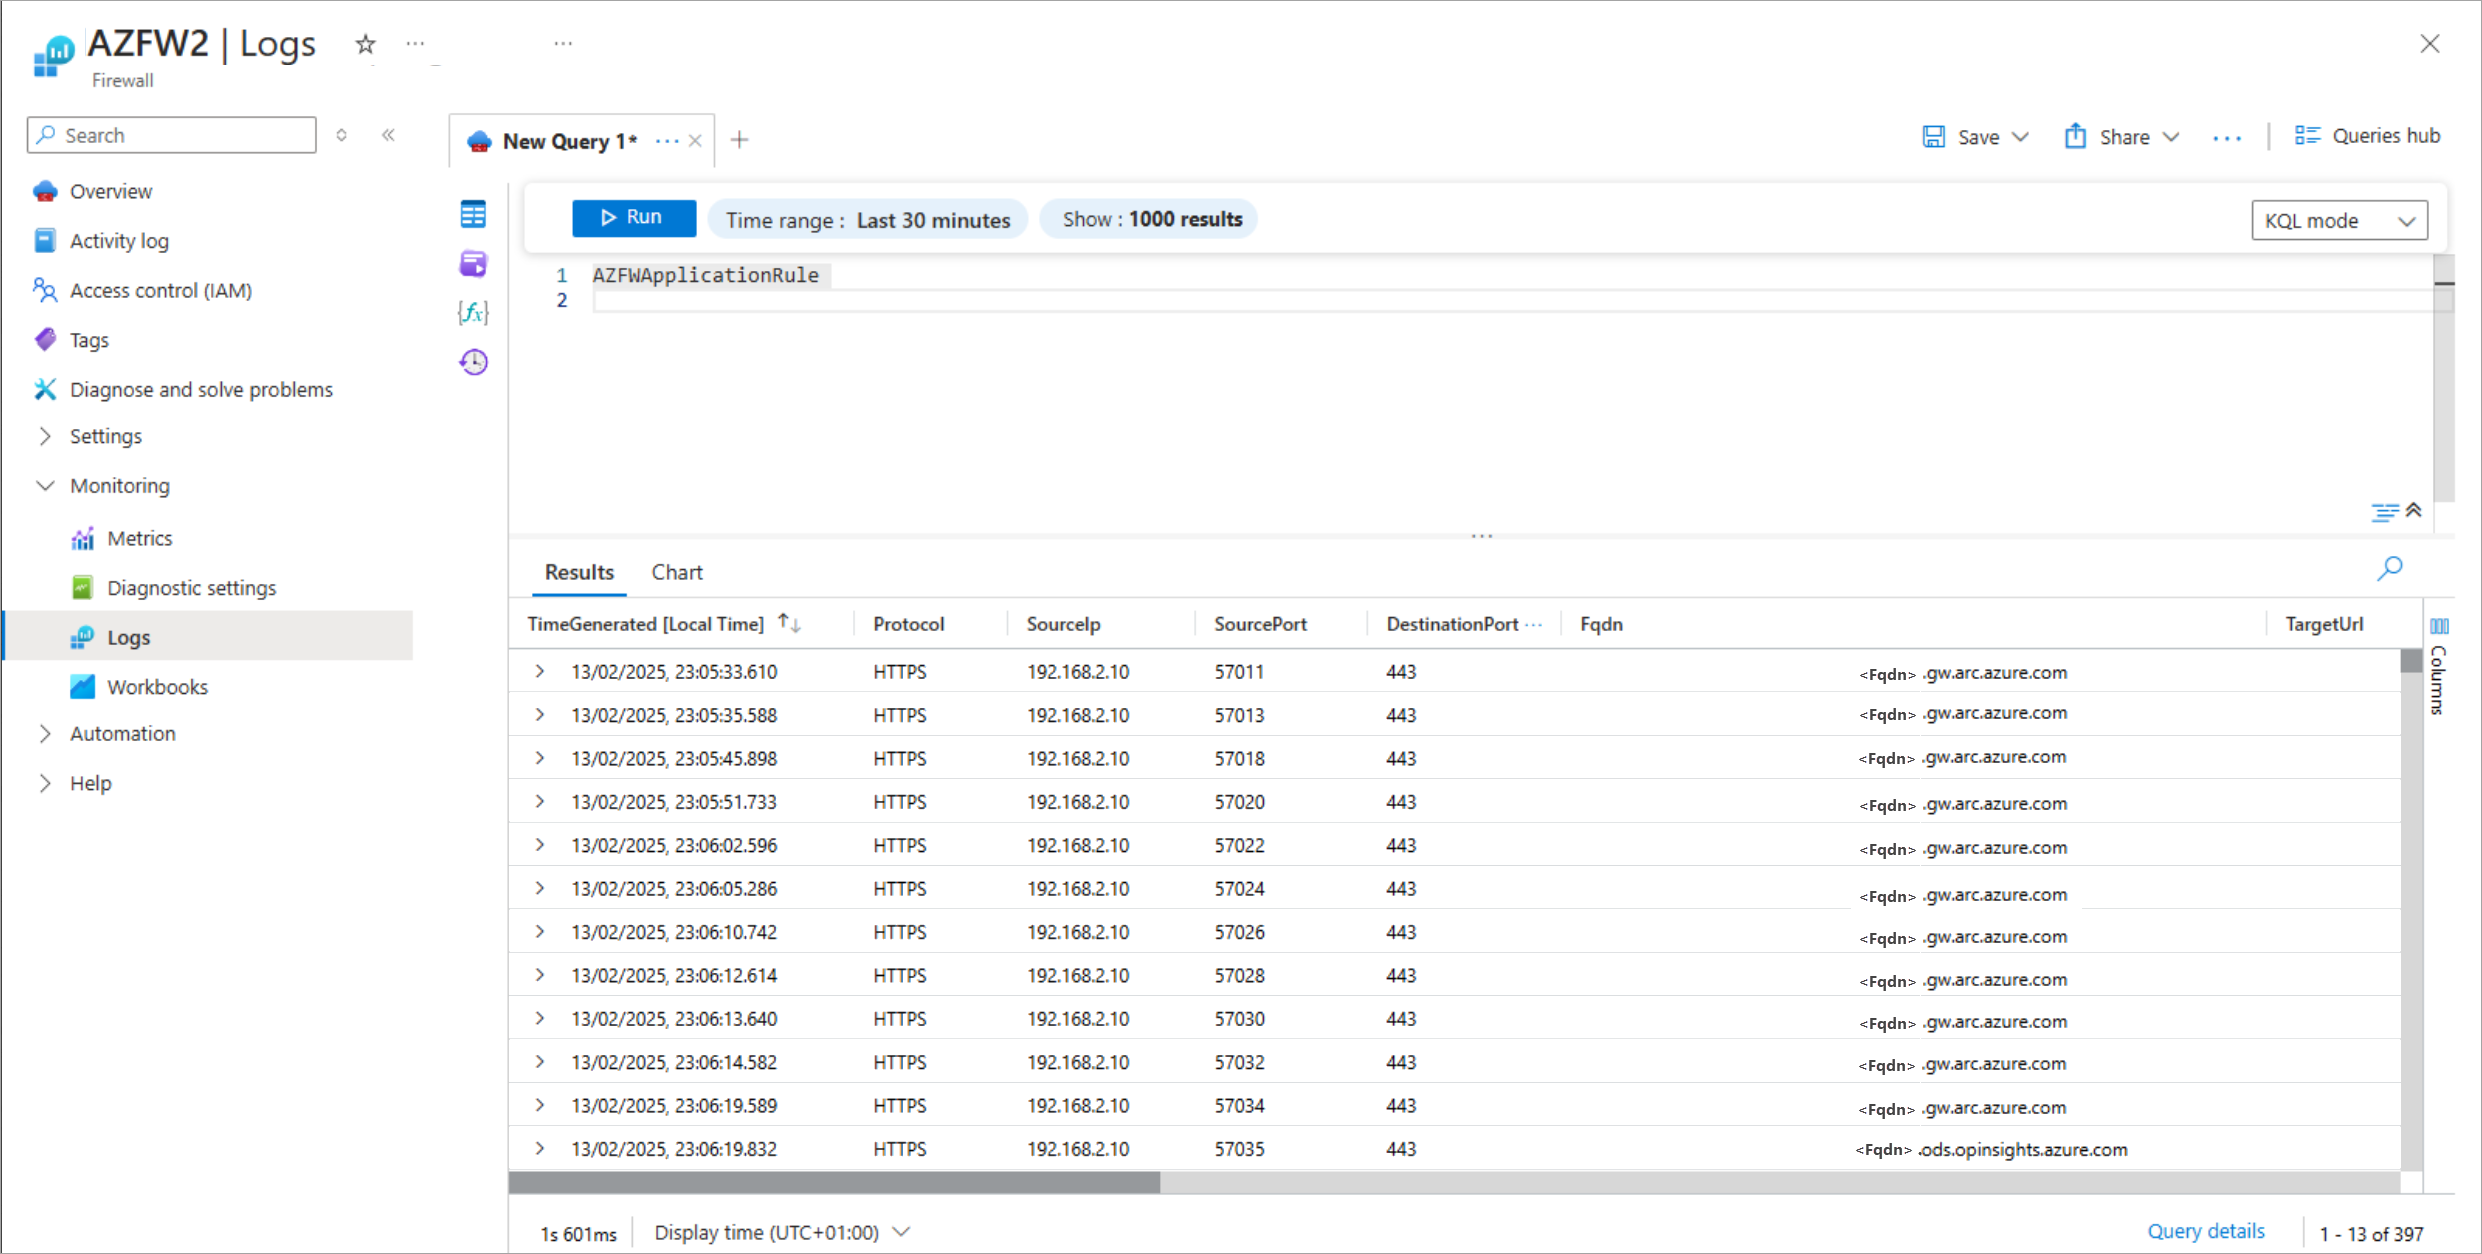
After you configure the diagnostic settings and wait a few minutes, you can start monitoring your Azure Firewall explicit proxy traffic under the Logs section by using the AZFWApplicationRule query.
Note
Most of your outbound traffic must use your Arc gateway endpoint as Fqdn.
Next steps
To start deployment over the private path, choose one of the following options: