Configure network features for an Azure NetApp Files volume
The Network Features functionality enables you to indicate whether you want to use VNet features for an Azure NetApp Files volume. With this functionality, you can set the option to Standard or Basic. You can specify the setting when you create a new NFS, SMB, or dual-protocol volume. You can also modify the network features option on existing volumes. See Guidelines for Azure NetApp Files network planning for details about network features.
This article helps you understand the options and shows you how to configure network features.
Options for network features
Two settings are available for network features:
Standard
This setting enables VNet features for the volume.If you need higher IP limits or VNet features such as network security groups, user-defined routes, or additional connectivity patterns, you should set Network Features to Standard.
Basic
This setting provides reduced IP limits (<1000) and no additional VNet features for the volumes.You should set Network Features to Basic if you don't require VNet features.
Considerations
Regardless of the network features option you set (Standard or Basic), an Azure VNet can only have one subnet delegated to Azure NetApp files. See Delegate a subnet to Azure NetApp Files.
- If the Standard volume capability is supported for the region, the Network Features field of the Create a Volume page defaults to Standard. You can change this setting to Basic.
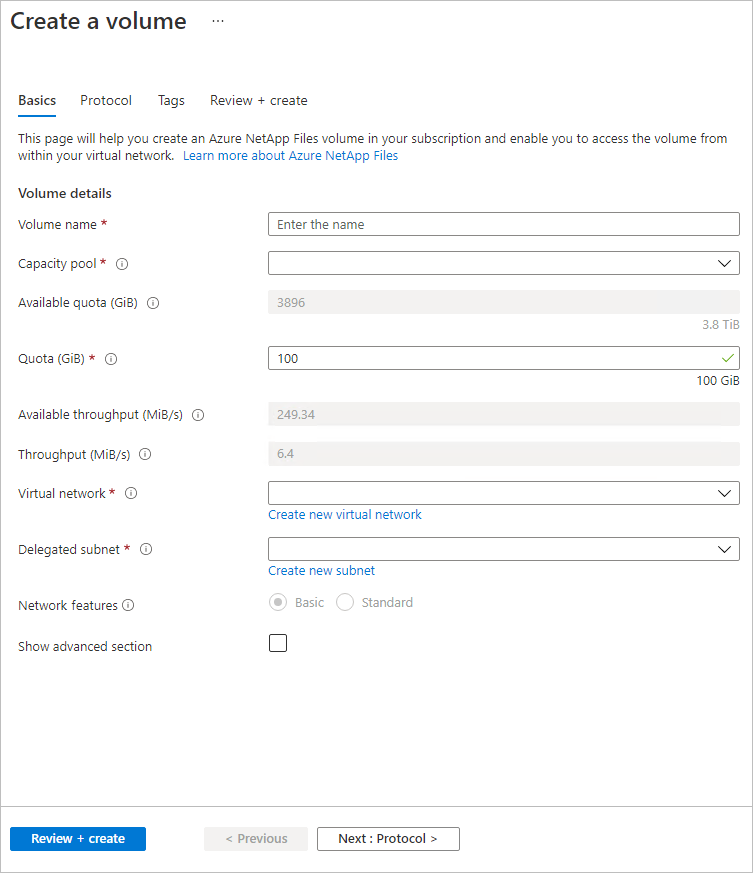
- If the Standard volume capability isn't available for the region, the Network Features field of the Create a Volume page defaults to Basic, and you can't modify the setting.
The ability to locate storage compatible with the desired type of network features depends on the VNet specified. If you can't create a volume because of insufficient resources, you can try a different VNet for which compatible storage is available.
You can create Basic volumes from Basic volume snapshots and Standard volumes from Standard volume snapshots. Creating a Basic volume from a Standard volume snapshot isn't supported. Creating a Standard volume from a Basic volume snapshot isn't supported.
When you restore a backup to a new volume, you can configure the new volume with Basic or Standard network features.
When you change the network features option of existing volumes from Basic to Standard network features, access to existing Basic networking volumes might be lost if your UDR or NSG implementations prevent the Basic networking volumes from connecting to DNS and domain controllers. You might also lose the ability to update information, such as the site name, in the Active Directory connector if all volumes can’t communicate with DNS and domain controllers. For guidance about UDRs and NSGs, see Configure network features for an Azure NetApp Files volume.
Note
The networking features of the DP volume are not affected by changing the source volume from Basic to Standard network features.
Set network features option during volume creation
This section shows you how to set the network features option when you create a new volume.
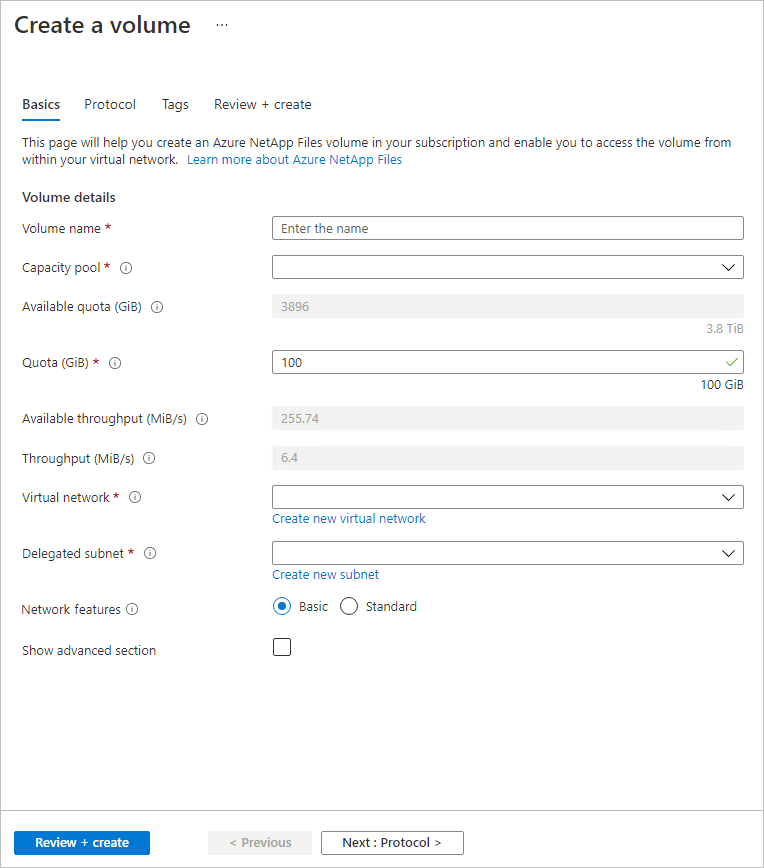
During the process of creating a new NFS, SMB, or dual-protocol volume, you can set the Network Features option to Basic or Standard under the Basic tab of the Create a Volume screen.
The following screenshot shows a volume creation example for a region that supports the Standard network features capabilities:
The following screenshot shows a volume creation example for a region that does not support the Standard network features capabilities:
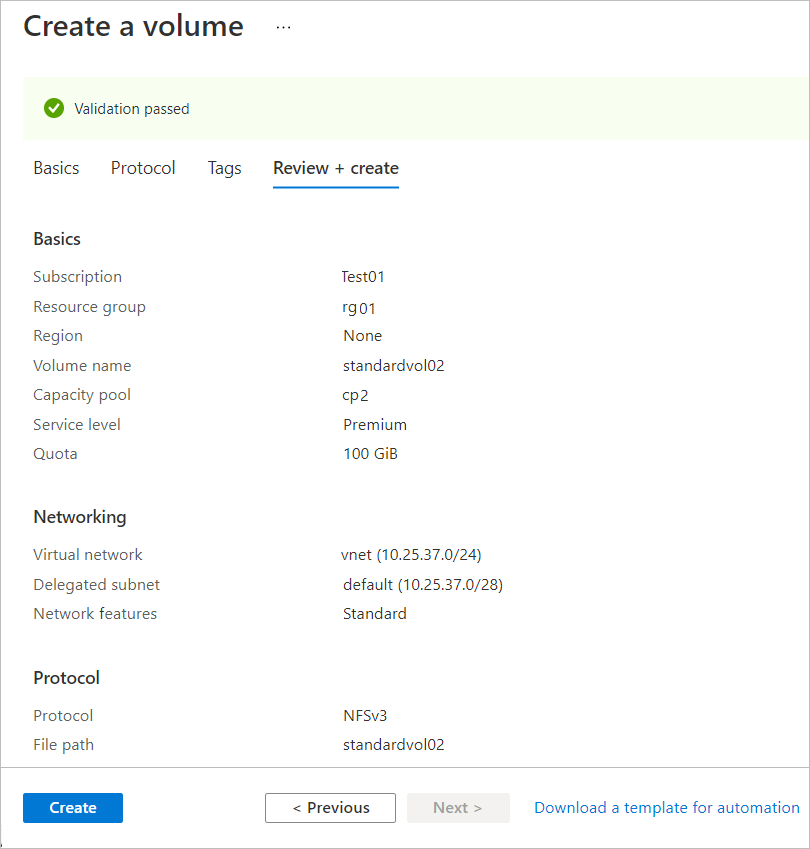
Before completing the volume creation process, you can display the specified network features setting in the Review + Create tab of the Create a Volume screen. Select Create to complete the volume creation.
You can select Volumes to display the network features setting for each volume:
Edit network features option for existing volumes
You can edit the network features option of existing volumes from Basic to Standard network features. The change you make applies to all volumes in the same network sibling set (or siblings). Siblings are determined by their network IP address relationship. They share the same network interface card (NIC) for mounting the volume to the client or connecting to the remote share of the volume. At the creation of a volume, its siblings are determined by a placement algorithm that aims for reusing the IP address where possible.
Important
It's not recommended that you use the edit network features option with Terraform-managed volumes due to risks. You must follow separate instructions if you use Terraform-managed volumes. For more information see, Update Terraform-managed Azure NetApp Files volume from Basic to Standard.
Considerations when editing networking features
- You should only use the edit network features option for an application volume group for SAP HANA if you have enrolled in the extension one preview, which adds support for Standard network features.
- If you enabled both the
ANFStdToBasicNetworkFeaturesRevertandANFBasicToStdNetworkFeaturesUpgradeAFECs and are using 1 or 2-TiB capacity pools, see Resize a capacity pool or a volume for information about sizing your capacity pools. - Azure NetApp Files supports a non-disruptive upgrade to Standard network features and a revert to Basic network features. This operation is expected to take at least 25 minutes. You can't create a regular or data protection volume or application volume group while the edit network feature operation is underway. This feature is currently in preview in the Australia East, Central India, East Asia, North Central US, and Switzerland North regions. In all other regions, updating network features can cause a network disruption on the volumes for up to 5 minutes.
Note
You need to submit a waitlist request for accessing the feature through the Azure NetApp Files standard networking features (edit volumes) Request Form. The feature can take approximately one week to be enabled after you submit the waitlist request. You can check the status of feature registration by using the following command:
Get-AzProviderFeature -ProviderNamespace Microsoft.NetApp -FeatureName ANFBasicToStdNetworkFeaturesUpgrade

FeatureName                         ProviderName     RegistrationState
-----------                         ------------     -----------------
ANFBasicToStdNetworkFeaturesUpgrade Microsoft.NetApp Registered
Note
You can also revert the option from Standard back to Basic network features. Before performing the revert operation, you must submit a waitlist request through the Azure NetApp Files standard networking features (edit volumes) Request Form. The revert capability can take approximately one week to be enabled after you submit the waitlist request. You can check the status of the registration by using the following command:
Get-AzProviderFeature -ProviderNamespace Microsoft.NetApp -FeatureName ANFStdToBasicNetworkFeaturesRevert

FeatureName                         ProviderName     RegistrationState
-----------                         ------------     -----------------
ANFStdToBasicNetworkFeaturesRevert Microsoft.NetApp Registered
If you revert, considerations apply and require careful planning. See Guidelines for Azure NetApp Files network planning for constraints and supported network topologies about Standard and Basic network features.
Edit network features
Navigate to the volume for which you want to change the network features option.
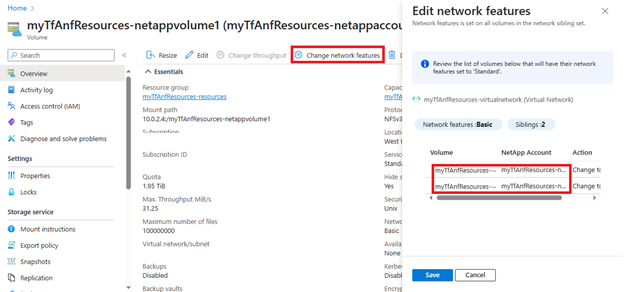
Select Change network features.
The Edit network features window displays the volumes that are in the same network sibling set. Confirm whether you want to modify the network features option.
Update Terraform-managed Azure NetApp Files volume from Basic to Standard
If your Azure NetApp Files volume is managed using Terraform, editing the network features requires additional steps. Terraform-managed Azure resources store their state in a local file, which is in your Terraform module or in Terraform Cloud.
Updating the network features of your volume alters the underlying network sibling set of the NIC utilized by that volume. This NIC can be utilized by other volumes you own, and other NICs can share the same network sibling set. If not performed correctly, updating the network features of one Terraform-managed volume can inadvertently update the network features of several other volumes.
Important
A discontinuity between state data and remote Azure resource configurations--notably, in the network_features argument--can result in the destruction of one or more volumes and possible data loss upon running terraform apply. Carefully follow the workaround outlined here to safely update the network features from Basic to Standard of Terraform-managed volumes.
Note
A Terraform module usually consists solely of all top level *.tf and/or *.tf.json configuration files in a directory, but a Terraform module can make use of module calls to explicitly include other modules into the configuration. You can learn more about possible module structures. To update all configuration file in your module that reference Azure NetApp Files volumes, be sure to look at all possible sources where your module can reference configuration files.
The name of the state file in your Terraform module is terraform.tfstate. It contains the arguments and their values of all deployed resources in the module. Below is highlighted the network_features argument with value “Basic” for an Azure NetApp Files Volume in a terraform.tfstate example file:
Do not manually update the terraform.tfstate file. Likewise, the network_features argument in the *.tf and *.tf.json configuration files should also not be updated until you follow the steps outlined here as this would cause a mismatch in the arguments of the remote volume and the local configuration file representing that remote volume. When Terraform detects a mismatch between the arguments of remote resources and local configuration files representing those remote resources, Terraform can destroy the remote resources and reprovision them with the arguments in the local configuration files. This can cause data loss in a volume.
By following the steps outlined here, the network_features argument in the terraform.tfstate file is automatically updated by Terraform to have the value of "Standard" without destroying the remote volume, thus indicating the network features has been successfully updated to Standard.
Note
It's recommended to always use the latest Terraform version and the latest version of the azurerm Terraform module.
Determine affected volumes
Changing the network features for an Azure NetApp Files Volume can impact the network features of other Azure NetApp Files Volumes. Volumes in the same network sibling set must have the same network features setting. Therefore, before you change the network features of one volume, you must determine all volumes affected by the change using the Azure portal.
- Log in to the Azure portal.
- Navigate to the volume for which you want to change the network features option.
- Select the Change network features. Do not select Save.
- Record the paths of the affected volumes then select Cancel.
All Terraform configuration files that define these volumes need to be updated, meaning you need to find the Terraform configuration files that define these volumes. The configuration files representing the affected volumes might not be in the same Terraform module.
Important
With the exception of the single volume you know is managed by Terraform, additional affected volumes might not be managed by Terraform. An additional volume that is listed as being in the same network sibling set does not mean that this additional volume is managed by Terraform.
Modify the affected volumes’ configuration files
You must modify the configuration files for each affected volume managed by Terraform that you discovered. Failing to update the configuration file can destroy the volume or result in data loss.
Important
Depending on your volume’s lifecycle configuration block settings in your Terraform configuration file, your volume can be destroyed, including possible data loss upon running terraform apply. Ensure you know which affected volumes are managed by Terraform and which are not.
Locate the affected Terraform-managed volumes configuration files.
Add the
ignore_changes = [network_features]to the volume'slifecycleconfiguration block. If thelifecycleblock does not exist in that volume’s configuration, add it.Repeat for each affected Terraform-managed volume.
The ignore_changes feature is intended to be used when a resource’s reference to data might change after the resource is created. Adding the ignore_changes feature to the lifecycle block allows the network features of the volumes to be changed in the Azure portal without Terraform trying to fix this argument of the volume on the next run of terraform apply. You can learn more about the ignore_changes feature.
Update the volumes' network features
In the Azure portal, navigate to the Azure NetApp Files volume for which you want to change network features.
Select the Change network features.
In the Action field, confirm that it reads Change to Standard.
Select Save.
Wait until you receive a notification that the network features update has completed. In your Notifications, the message reads "Successfully updated network features. Network features for network sibling set have successfully updated to ‘Standard’."
In the terminal, run
terraform planto view any potential changes. The output should indicate that the infrastructure matches the configuration with a message reading "No changes. Your infrastructure matches the configuration."Important
As a safety precaution, execute
terraform planbefore executingterraform apply. The commandterraform planallows you to create a “plan” file, which contains the changes to your remote resources. This plan allows you to know if any of your affected volumes will be destroyed by runningterraform apply.Run
terraform applyto update theterraform.tfstatefile.Repeat for all modules containing affected volumes.
Observe the change in the value of the
network_featuresargument in theterraform.tfstatefiles, which changed from "Basic" to "Standard":
Update Terraform-managed Azure NetApp Files volumes’ configuration file for configuration parity
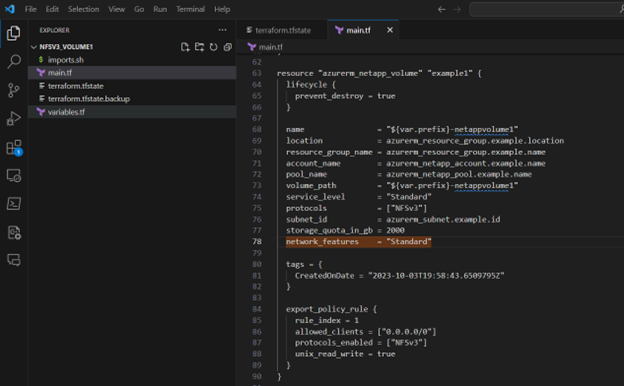
Once you've update the volumes' network features, you must also modify the network_features arguments and lifecycle blocks in all configuration files of affected Terraform-managed volumes. This update ensures that if you have to recreate or update the volume, it maintains its Standard network features setting.
In the configuration file, set
network_featuresto "Standard" and remove theignore_changes = [network_features]line from thelifecycleblock.Repeat for each affected Terraform-managed volume.
Verify that the updated configuration files accurately represent the configuration of the remote resources by running
terraform plan. Confirm the output reads "No changes."Run
terraform applyto complete the update.


