Quickstart: Use the Azure portal query editor to query Azure SQL Database
Applies to: ![]() Azure SQL Database
Azure SQL Database
The Azure SQL Database query editor (preview) is a tool to run SQL queries against Azure SQL Database in the Azure portal. In this quickstart, you connect to an Azure SQL database in the Azure portal and use query editor to run Transact-SQL (T-SQL) queries.
- If you don't already have an Azure SQL Database created, visit Quickstart: Create a single database. Look for the option to use your offer to try Azure SQL Database for free (preview).
Prerequisites
Authentication
You need an account with permissions to connect to the database and query editor. You can use SQL authentication or Microsoft Entra ID) authentication (recommended). For more information on creating and managing logins in Azure SQL database, visit Authorize database access.
For more information about public network access, TLS version settings, and connection policy, see Azure SQL connectivity settings.
Firewall rule
For public connections to the query editor, you need to add your outbound IP address to the server's allowed firewall rules to access your databases.
If you receive this error, use the following steps to resolve:
Cannot open server 'server-name' requested by the login. Client with IP address 'xx.xx.xx.xx' is not allowed to access the server. To enable access, use the Azure Management Portal or run sp_set_firewall_rule on the master database to create a firewall rule for this IP address or address range. It may take up to five minutes for this change to take effect.
Follow the quick steps below, or for more information, see add your outbound IP address to the server's allowed firewall rules.
- Return to the Overview page of your SQL database.
- Select the link for the Azure SQL logical server next to Server name.
- In the Resource menu, under Security, select Networking.
- Ensure that under Public network access, the Selected networks option is selected.
- If this is a test or temporary environment, set the option to Selected networks.
- If not, access must be granted through other means than covered in this quickstart, likely via private endpoints (by using Azure Private Link) as outlined in the network access overview.
- Under Firewall rules, select Add your client IPv4 address.
- If necessary, identify your IPv4 address and provide it in the Start and End fields.
- Select Save.
For troubleshooting, see Connection error troubleshooting.
Connect to the query editor
Connect to your database within the query editor.
Navigate to your SQL database in the Azure portal. For example, visit your Azure SQL dashboard.
On your SQL database Overview page, select Query editor (preview) from the resource menu.

On the sign-in screen, provide credentials to connect to the database.
You can connect using SQL or Microsoft Entra authentication.
To connect with SQL authentication, under SQL server authentication, enter a Login and Password for a user that has access to the database, and then select OK. You can always use the login and password for the server admin.
To connect using Microsoft Entra ID, if you're the Microsoft Entra server admin, select Continue as <user@domain>. If sign-in is unsuccessful, try refreshing the page.


Connection with other tools
You can also connect to your Azure SQL database using other tools, including:
- Quickstart: Use Azure Data Studio to connect and query Azure SQL Database
- Quickstart: Use SSMS to connect to and query Azure SQL Database or Azure SQL Managed Instance
- Quickstart: Use Visual Studio Code to connect and query
Query the database
On any database, execute the following query in the Query editor to return the time in UTC, the database name, and your authenticated login name.
SELECT SYSDATETIMEOFFSET(), DB_NAME(), ORIGINAL_LOGIN();
Query the AdventureWorksLT sample database
This portion of quickstart uses the AdventureWorksLT sample database in an Azure SQL database. If you don't have one already, you can create a database using sample data in Azure SQL Database. Look for the option to use your offer to try Azure SQL Database for free (preview).
On the Query editor (preview) page, run the following example queries against your AdventureWorksLT sample database.
Tip
New to Azure SQL Database? Get up to speed with in-depth free training content: Azure SQL Fundamentals or review the Azure SQL glossary of terms.
For more information about T-SQL in Azure SQL Database, visit T-SQL differences between SQL Server and Azure SQL Database.
Run a SELECT query
To query for the top 20 products in the database, paste the following SELECT query into the query editor:
 SELECT TOP 20 pc.Name as CategoryName, p.name as ProductName
 FROM SalesLT.ProductCategory pc
 JOIN SalesLT.Product p
 ON pc.productcategoryid = p.productcategoryid;
Select Run, and then review the output in the Results pane.
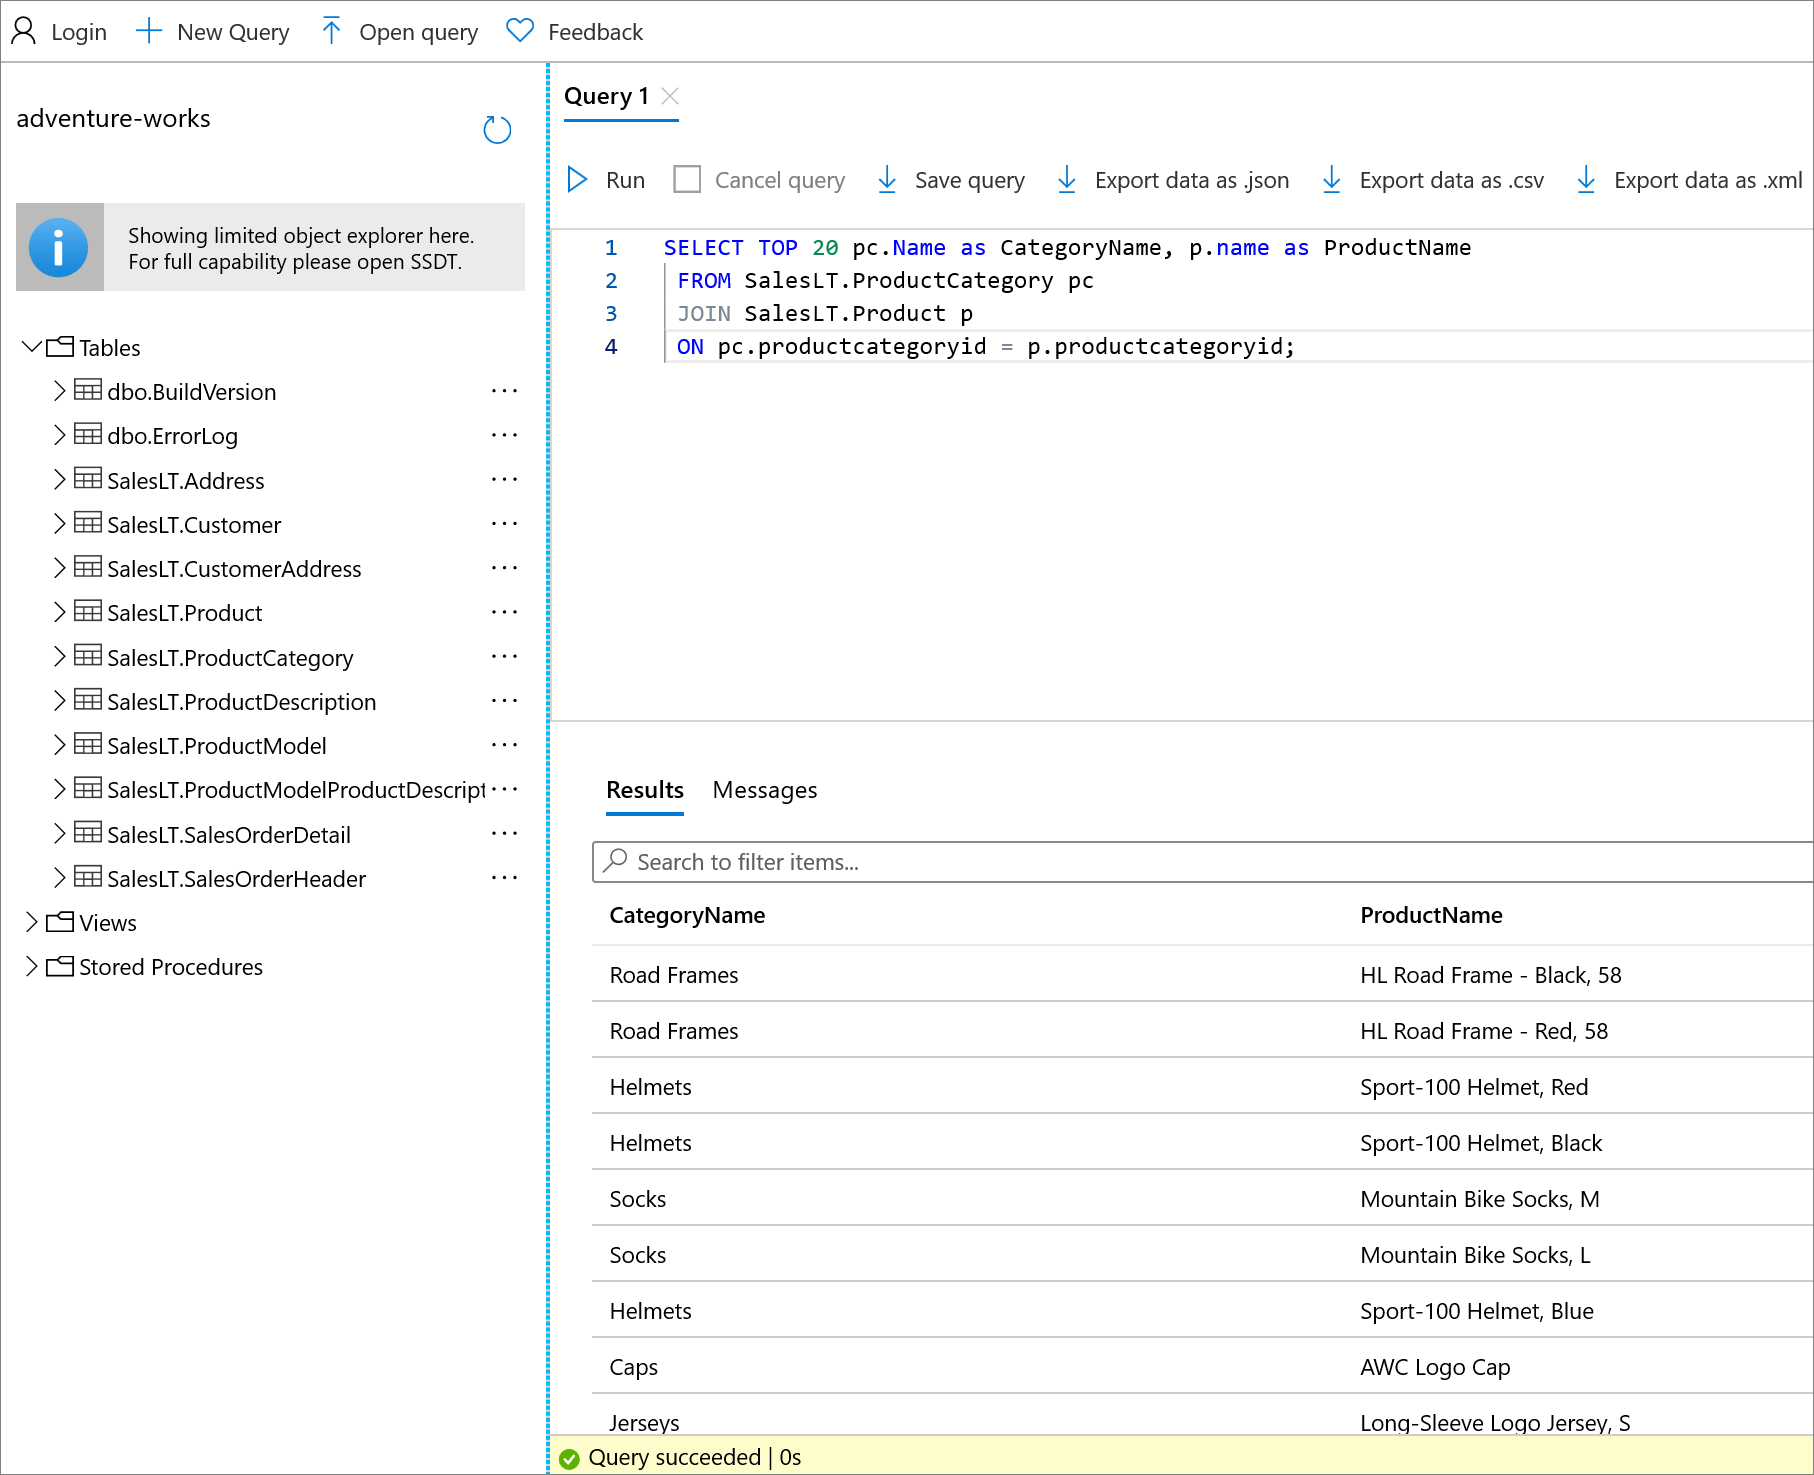
Optionally, you can select Save query to save the query as an .sql file, or select Export data as to export the results as a .json, .csv, or .xml file.

Run an INSERT query
To add a new product to the SalesLT.Product table, run the following INSERT T-SQL statement.
In the query editor, replace the previous query with the following query:
INSERT INTO [SalesLT].[Product]
       ( [Name]
       , [ProductNumber]
       , [Color]
       , [ProductCategoryID]
       , [StandardCost]
       , [ListPrice]
       , [SellStartDate]
       )
VALUES
       ('myNewProduct'
       ,123456789
       ,'NewColor'
       ,1
       ,100
       ,100
       ,GETDATE() );
Select Run to add the new product. After the query runs, the Messages pane displays Query succeeded: Affected rows: 1.
Run an UPDATE query
Run the following UPDATE T-SQL statement to update the price of your new product.
In the query editor, replace the previous query with the following query:
UPDATE [SalesLT].[Product]
SET [ListPrice] = 125
WHERE Name = 'myNewProduct';
Select Run to update the specified row in the
Producttable. The Messages pane displays Query succeeded: Affected rows: 1.
Run a DELETE query
Run the following DELETE T-SQL statement to remove your new product.
In the query editor, replace the previous query with the following query:
DELETE FROM [SalesLT].[Product]
WHERE Name = 'myNewProduct';
Select Run to delete the specified row in the
Producttable. The Messages pane displays Query succeeded: Affected rows: 1.
Related content
Feedback
Coming soon: Throughout 2024 we will be phasing out GitHub Issues as the feedback mechanism for content and replacing it with a new feedback system. For more information see: https://aka.ms/ContentUserFeedback.
Submit and view feedback for