To create a single database in the Azure portal, this quickstart starts at the Azure SQL page.
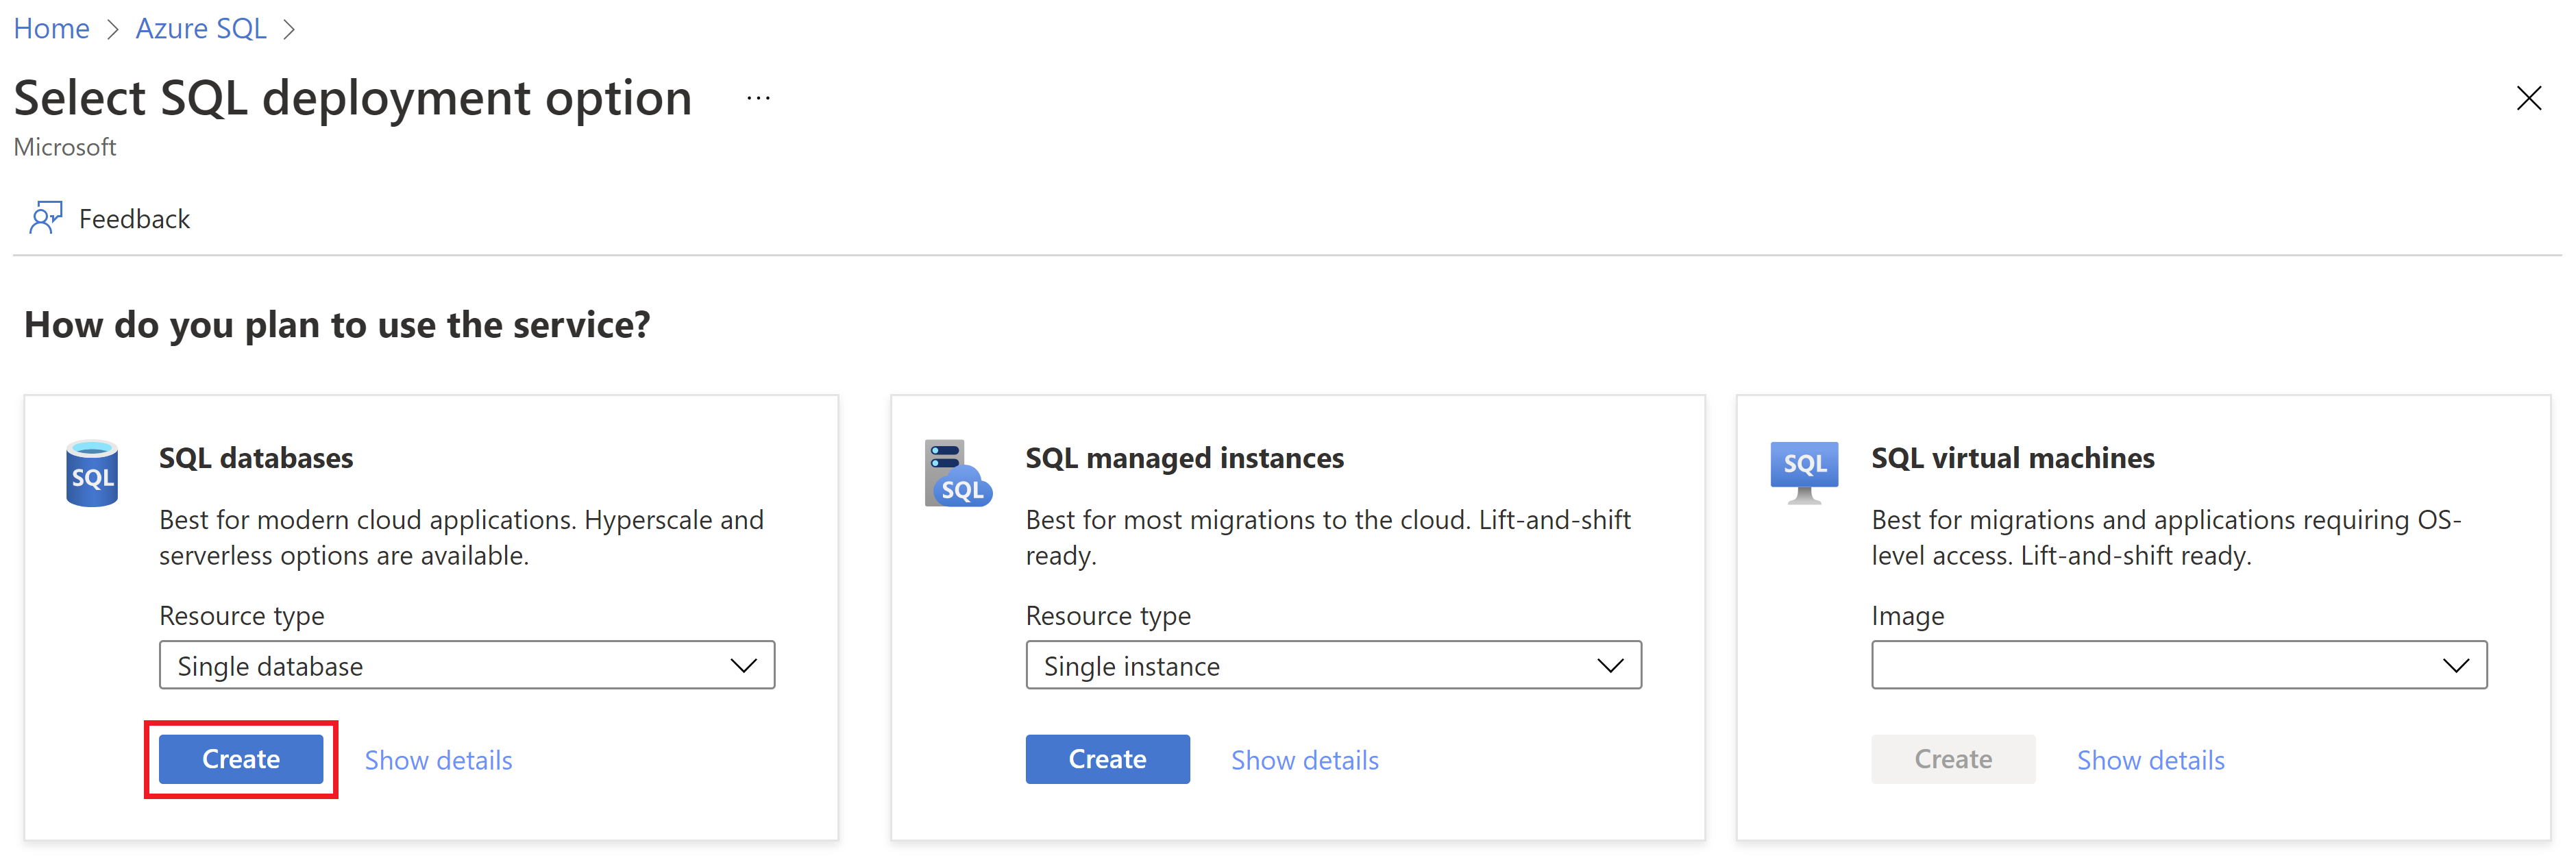
Browse to the Select SQL Deployment option page.
Under SQL databases, leave Resource type set to Single database, and select Create.
On the Basics tab of the Create SQL Database form, under Project details, select the Azure subscription you want to use.
For Resource group, select Create new, enter myResourceGroup, and select OK.
For Database name, enter demo.
For Server, select Create new. Fill out the New server form with the following values:
- Server name: Enter mysqlserver, and add some characters for uniqueness. We can't provide an exact server name to use because server names must be globally unique for all servers in Azure, not just unique within a subscription. Enter something like mysqlserver12345, and the portal lets you know if it's available or not.
- Server admin login: Enter azureuser.
- Password: Enter a password that meets requirements. Enter it again in the Confirm password box.
- Location: Select a location from the dropdown list.
- Allow Azure services to access this server: Select this option to enable access to digest storage.
Select OK.
Leave Want to use SQL elastic pool set to No.
Under Compute + storage, select Configure database.
This quickstart uses a serverless database, so select Serverless, and then select Apply.
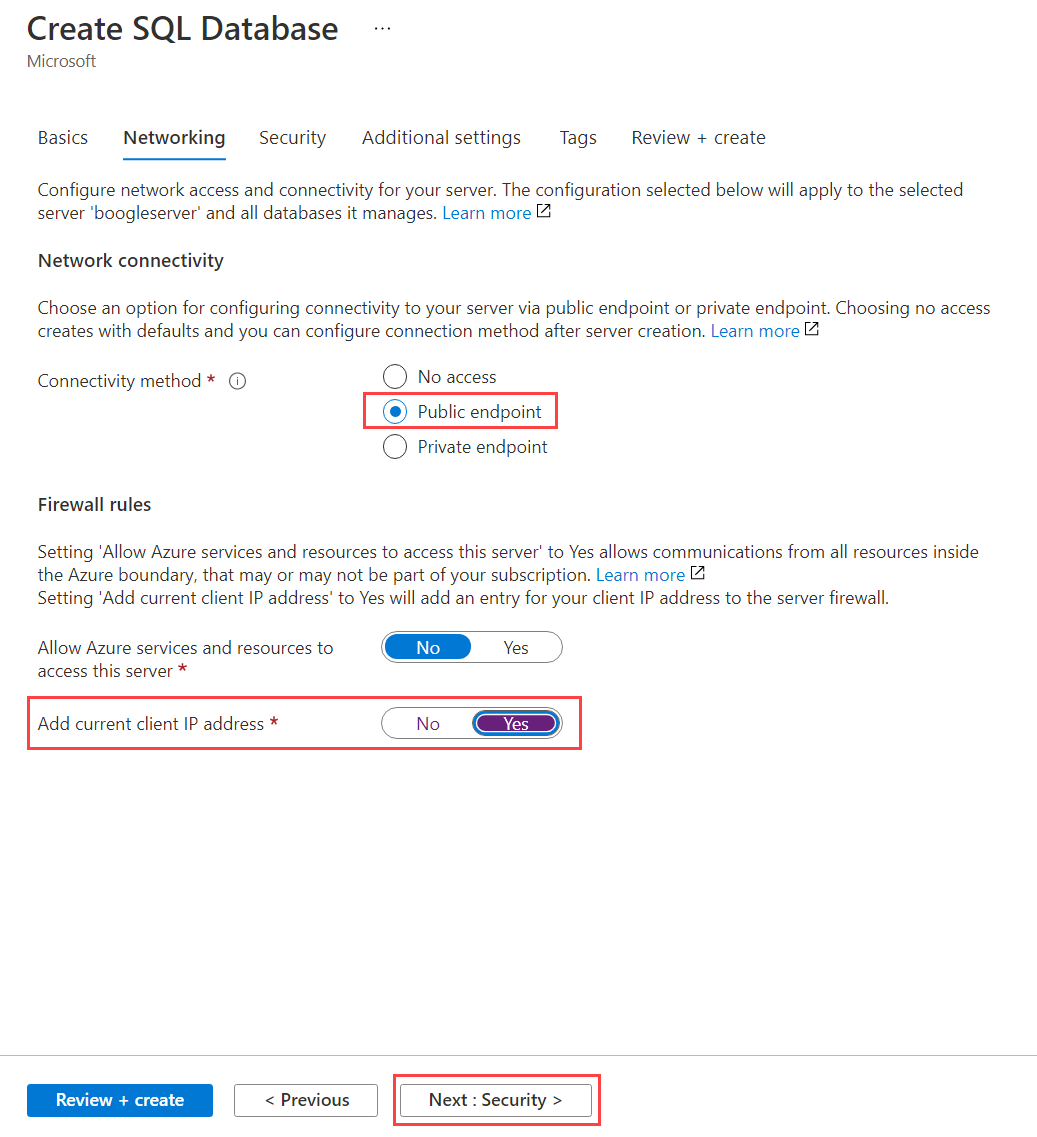
On the Networking tab, for Connectivity method, select Public endpoint.
For Firewall rules, set Add current client IP address to Yes. Leave Allow Azure services and resources to access this server set to No.
Select Next: Security at the bottom of the page.
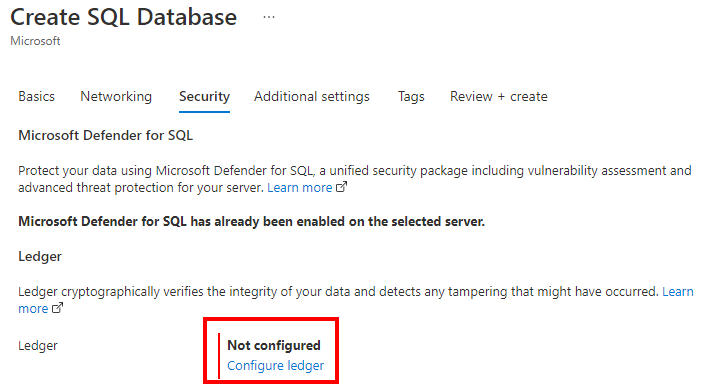
On the Security tab, in the Ledger section, select the Configure ledger option.
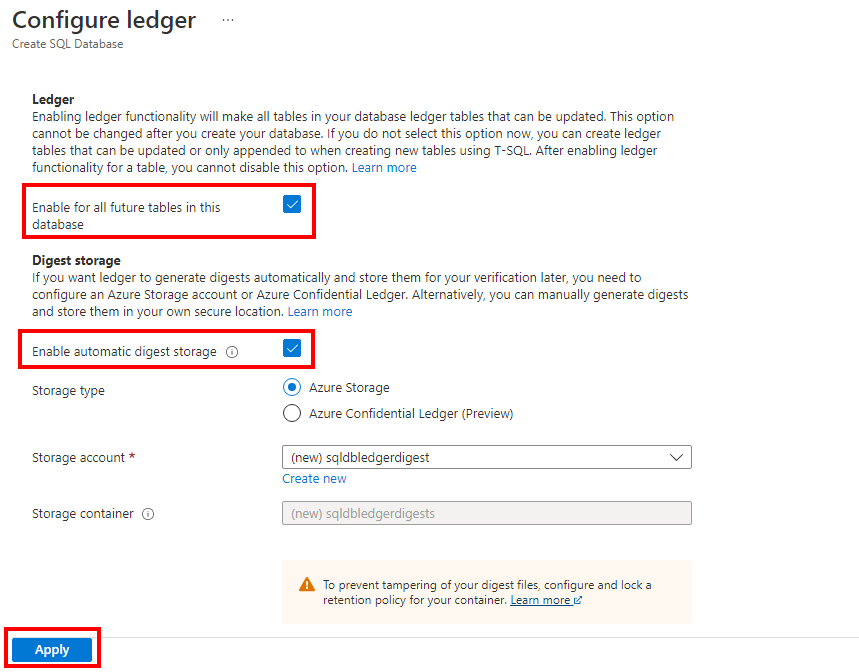
On the Configure ledger pane, in the Ledger section, select the Enable for all future tables in this database checkbox. This setting ensures that all future tables in the database will be ledger tables. For this reason, all data in the database will show any evidence of tampering. By default, new tables will be created as updatable ledger tables, even if you don't specify LEDGER = ON in CREATE TABLE. You can also leave this option unselected. You're then required to enable ledger functionality on a per-table basis when you create new tables by using Transact-SQL.
In the Digest Storage section, Enable automatic digest storage is automatically selected. Then, a new Azure Storage account and container where your digests are stored is created.
Select Apply.
Select Review + create at the bottom of the page.
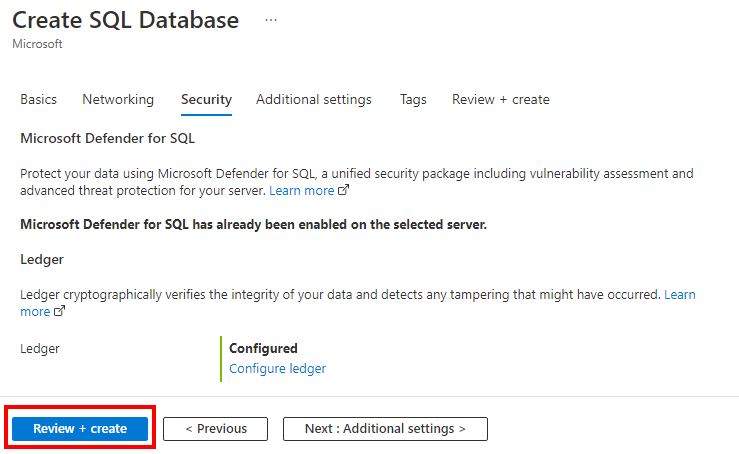
On the Review + create page, after you review, select Create.
You'll create a resource group, a logical database server, a single ledger database, and configure uploading ledger digests using The Azure CLI.
Launch Azure Cloud Shell
The Azure Cloud Shell is a free interactive shell that you can use to run the steps in this article. It has common Azure tools preinstalled and configured to use with your account.
To open the Cloud Shell, select Try it from the upper right corner of a code block. You can also launch Cloud Shell in a separate browser tab by going to https://shell.azure.com. Select Copy to copy the blocks of code, paste it into the Cloud Shell, and press Enter to run it.
Set parameter values
The following values are used in subsequent commands to create the database and required resources. Server names and storage account names need to be globally unique across all of Azure so the $RANDOM function is used to create the server name and the storage account name.
The resource name must be unique in your subscription. Replace <your resource group name> with a unique name, and <your subscription ID> with your Subscription ID.
Replace the 0.0.0.0 values in the ip address range to match your specific environment.
Replace westeurope with your preferred Azure region name.
resourceGroupName="<your resource group name>"
location="westeurope"
serverName="mysqlserver"-$RANDOM
databaseName="myLedgerDatabase"
storageAccountName="mystorage"$RANDOM
subscription="<your subscription ID>"
adminLogin=azureuser
adminPassword=Azure1234567!
serverResourceId="/subscriptions/$subscription/resourceGroups/$resourceGroupName/providers/Microsoft.Sql/servers/$serverName"

# The ip address range that you want to allow to access your server
startIP=0.0.0.0
endIP=0.0.0.0

# Set variables for your digest storage location
storageAccountName="mystorage"$RANDOM
storageAccountURL1="https://"
storageAccountURL3=".blob.core.windows.net"
storageAccountURL=$storageAccountURL1$storageAccountName$storageAccountURL3
storageAccountResourceId="/subscriptions/$subscription/resourceGroups/$resourceGroupName/providers/Microsoft.Storage/storageAccounts/$storageAccountName"

# Show resource names
echo "Resource group name is" $resourceGroupName
echo "Server name is" $serverName
echo "Database name is" $databaseName
echo "Storage account name is" $storageAccountName
Create a resource group
Create a resource group with the az group create command. An Azure resource group is a logical container into which Azure resources are deployed and managed.
az group create --name $resourceGroupName --location $location
Create a server with a managed identity
Create a server with the az sql server create command. The command creates the server with a managed identity assigned.
az sql server create \
    --name $serverName \
    --resource-group $resourceGroupName \
    --location $location \
    --admin-user $adminLogin \
    --admin-password $adminPassword \
    --assign-identity
This command stores the ID in a variable, which will later be used to grant the server permissions to upload ledger digests.
# Retrieves the assigned identity to be used when granting the server access to the storage account
principalId=`az sql server show \
    --name $serverName \
    --resource-group $resourceGroupName \
    --query identity.principalId \
    --output tsv`
Create a firewall rule with the az sql server firewall-rule create command.
az sql server firewall-rule create \
    --resource-group $resourceGroupName \
    --server $serverName \
    -n AllowYourIp \
    --start-ip-address $startIP \
    --end-ip-address $endIP
Create a single ledger database
Create a ledger database with the az sql db create command. The following command creates a serverless database with ledger enabled.
az sql db create \
    --resource-group $resourceGroupName \
    --server $serverName \
    --name $databaseName \
    --edition GeneralPurpose \
    --family Gen5 \
    --capacity 2 \
    --compute-model Serverless \
    --ledger-on
Create a storage account
Create a storage account to store ledger digests with the az storage account create command.
az storage account create \
    --name $storageAccountName \
    --resource-group $resourceGroupName \
    --location $location \
    --sku Standard_GRS \
    --kind StorageV2
Grant the server permissions to write ledger digests
Assign the managed identity of the server to the Storage Blob Data Contributor role with the az role assignment create command. This gives the SQL server the appropriate permissions to publish database digests to the storage account.
az role assignment create \
    --assignee-object-id $principalId \
    --assignee-principal-type "ServicePrincipal" \
    --role "Storage Blob Data Contributor" \
    --scope $storageAccountResourceId
Enable database digest uploads
Update the database to start uploading ledger digests to the storage account by using the az sql db ledger-digest-uploads enable command.
az sql db ledger-digest-uploads enable \
    --name $databaseName \
    --resource-group $resourceGroupName \
    --server $serverName \
    --endpoint $storageAccountURL
To protect the digests from being deleted or updated, it is recommended you configure a time-based retention policy on the sqldbledgerdigests container by using the az storage container immutability-policy create and az storage container immutability-policy lock commands. The policy must allow protected append blobs writes. This ensures the database server can add blocks containing new digests to an existing blob, while deleting or updating the digests is disabled for the specified immutability period.
Important
The below example uses the immutability period value of 1 day. In a production environment, you should use a much larger value.
Note
Once database digests begin to be uploaded to the storage account, you will not be able to delete the storage account until the immutability policy expires. Setting the immutability policy can be skipped if you plan to clean-up resources immediately after this QuickStart.
For more information about time-based retention policy for containers, see Configure immutability policies for containers.
az storage container immutability-policy create \
    --resource-group $resourceGroupName \
    --account-name $storageAccountName \
    --container-name sqldbledgerdigests \
    --period 1 \
    --allow-protected-append-writes true
# Retrieves the etag value of the policy to be used when the policy is locked
etag=`az storage container immutability-policy show \
    --account-name $storageAccountName \
    --container-name sqldbledgerdigests \
    --query etag \
    --output tsv`
etag="${etag/$'\r'/}"
az storage container immutability-policy lock \
    --resource-group $resourceGroupName \
    --account-name $storageAccountName \
    --container-name sqldbledgerdigests \
    --if-match $etag
You'll create a resource group, a logical database server, a single ledger database, and configure uploading ledger digests using Windows PowerShell.
Launch Azure Cloud Shell
The Azure Cloud Shell is a free interactive shell that you can use to run the steps in this article. It has common Azure tools preinstalled and configured to use with your account.
To open the Cloud Shell, select Try it from the upper right corner of a code block. You can also launch Cloud Shell in a separate browser tab by going to https://shell.azure.com. Select Copy to copy the blocks of code, paste it into the Cloud Shell, and press Enter to run it.
Set parameter values
The following values are used in subsequent commands to create the database and required resources. Server names and storage account names need to be globally unique across all of Azure so the Get-Random cmdlet is used to create the server name and the storage account name.
The resource name must be unique in your subscription. Replace <your resource group name> with a unique name.
Replace the 0.0.0.0 values in the ip address range to match your specific environment.
Replace westeurope with your preferred Azure region name.
# Set variables for your server and database
$resourceGroupName = "<your resource group name>"
$location = "westeurope"
$serverName = "mysqlserver-$(Get-Random)"
$databaseName = "myLedgerDatabase"
$storageAccountName = "mystorage$(Get-Random)"

# The ip address range that you want to allow to access your server
$startIP = "0.0.0.0"
$endIP = "0.0.0.0"

# Show resource names
Write-host "Resource group name is" $resourceGroupName
Write-host "Server name is" $serverName
Write-host "Storage account name is" $storageAccountName
Create a resource group
Create an Azure resource group with New-AzResourceGroup. A resource group is a logical container into which Azure resources are deployed and managed.
Write-host "Creating resource group..."
$resourceGroup = New-AzResourceGroup `
    -Name $resourceGroupName `
    -Location $location
$resourceGroup
Create a server
Create a server with the New-AzSqlServer cmdlet.
The cmdlet creates the server with a managed identity assigned, which you will need later to grant the server permissions to upload ledger digests.
When prompted, enter your SQL administrator username and a password.
Write-host "Creating primary server..."
$server = New-AzSqlServer `
    -ResourceGroupName $resourceGroupName `
    -ServerName $serverName `
    -Location $location `
    -AssignIdentity `
    -SqlAdministratorCredentials (Get-Credential)
$server
Create a firewall rule
Create a server firewall rule with the New-AzSqlServerFirewallRule cmdlet.
Write-host "Configuring server firewall rule..."
$serverFirewallRule = New-AzSqlServerFirewallRule -ResourceGroupName $resourceGroupName `
    -ServerName $serverName `
    -FirewallRuleName "AllowedIPs" -StartIpAddress $startIP -EndIpAddress $endIP
$serverFirewallRule
Create a single ledger database
Create a single ledger database with the New-AzSqlDatabase cmdlet.
The below example creates a serverless database.
Write-host "Creating a gen5 2 vCore serverless ledger database..."
$database = New-AzSqlDatabase  -ResourceGroupName $resourceGroupName `
    -ServerName $serverName `
    -DatabaseName $databaseName `
    -Edition GeneralPurpose `
    -ComputeModel Serverless `
    -ComputeGeneration Gen5 `
    -VCore 2 `
    -MinimumCapacity 2 `
    -EnableLedger
$database
Create a storage account
Create a storage account to store ledger digests with the New-AzStorageAccount cmdlet.
Write-host "Creating a storage account for ledger digests..."
$storage = New-AzStorageAccount -ResourceGroupName $resourceGroupName `
   -Name $storageAccountName `
   -Location $location `
   -SkuName Standard_RAGRS `
   -Kind StorageV2 `
   -AccessTier Hot
$storage
Grant the server permissions to write ledger digests
Assign the managed identity of the server to the Storage Blob Data Contributor role with the New-AzRoleAssignment cmdlet. This gives the SQL server the appropriate permissions to publish database digests to the storage account.
Write-host "Granting the server access to the storage account..."
$assignment = New-AzRoleAssignment `
    -ObjectId $server.Identity.PrincipalId `
    -RoleDefinitionName "Storage Blob Data Contributor" `
    -ResourceGroupName $resourceGroupName `
    -ResourceType "Microsoft.Storage/storageAccounts" `
    -ResourceName $storageAccountName
$assignment
Enable database digest uploads
Update the database to start uploading ledger digests to the storage account, by using the Enable-AzSqlDatabaseLedgerDigestUpload cmdlet. The database server will create a new container, named sqldbledgerdigests, within the storage account and it will start writing ledger digests to the container.
Write-host "Enabling ledger digest upload..."
$ledgerDigestUploadConfig = Enable-AzSqlDatabaseLedgerDigestUpload `
     -ResourceGroupName $resourceGroupName `
     -ServerName $serverName `
     -DatabaseName $databaseName `
     -Endpoint $storage.PrimaryEndpoints.Blob
$ledgerDigestUploadConfig
To protect the digests from being deleted or updated, it is recommended you configure a time-based retention policy on the sqldbledgerdigests container by using the Set-AzRmStorageContainerImmutabilityPolicy and Lock-AzRmStorageContainerImmutabilityPolicy cmdlets. The policy must allow protected append blobs writes. This ensures the database server can add blocks containing new digests to an existing blob, while deleting or updating the digests is disabled for the specified immutability period.
Important
The below example uses the immutability period value of 1 day. In a production environment, you should use a much larger value.
Note
You will not be able to delete the container or the storage account during the specified immutability period.
For more information about time-based retention policy for containers, see Configure immutability policies for containers.
Write-host "Configuring a time-based retention policy..."
$immutabilityPerdiod = 1
$containerName = "sqldbledgerdigests"
$policy = Set-AzRmStorageContainerImmutabilityPolicy `
   -ResourceGroupName $resourceGroupName `
    -StorageAccountName $storageAccountName `
    -ContainerName $containerName `
    -AllowProtectedAppendWrite $true `
    -ImmutabilityPeriod $immutabilityPerdiod

Lock-AzRmStorageContainerImmutabilityPolicy `
   -ResourceGroupName $resourceGroupName `
    -StorageAccountName $storageAccountName `
    -ContainerName $containerName `
    -Etag $policy.Etag
Keep the resource group, server, and single database for the next steps. You'll learn how to use the ledger feature of your database with different methods.
When you're finished using these resources, delete the resource group you created. This action also deletes the server and single database within it, and the storage account.