Configure on-premises VMware HCX Connector
After you install the VMware HCX add-on, configure the on-premises VMware HCX Connector for your Azure VMware Solution private cloud.
In this article, learn how to:
- Pair your on-premises VMware HCX Connector with your Azure VMware > Solution HCX Cloud Manager
- Configure the network profile, compute profile, and service mesh
- Check the appliance status and validate that migration is possible
After you complete these steps, you'll have a production-ready environment for creating virtual machines (VMs) and migration.
Prerequisites
Install VMware HCX Connector.
VMware HCX Enterprise is now available and supported on Azure VMware Solution at no extra cost. HCX Enterprise is automatically installed for all new HCX add-on requests, and existing HCX Advanced customers can upgrade to HCX Enterprise using the Azure portal.
If you plan to enable VMware HCX MON, make sure you have:
VMware NSX or vSphere Distributed Switch (vDS) on-premises for HCX Network Extension (vSphere Standard Switch not supported).
One or more active stretched network segments.
Meet the VMware software version requirements.
Your on-premises vSphere environment (source environment) meets the minimum requirements.
Azure ExpressRoute Global Reach is configured between on-premises and Azure VMware Solution private cloud ExpressRoute circuits.
All required ports are open for communication between on-premises components and Azure VMware Solution private.
Define VMware HCX network segments. The primary use cases for VMware HCX are workload migrations and disaster recovery.
Review the VMware HCX Documentation for information on using HCX.
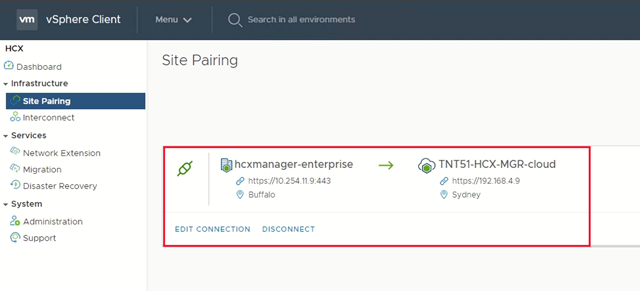
Add a site pairing
In your data center, connect or pair the VMware HCX Cloud Manager in Azure VMware Solution with the VMware HCX Connector.
Important
According to the Azure VMware Solution limits, a single HCX manager system can have a maximum of 25 site pairs and 10 service meshes, including inbound and outbound site pairings.
Sign in to your on-premises vCenter Server, and under Home, select HCX.
Under Infrastructure, select Site Pairing and choose the Connect to Remote Site option (in the middle of the screen).
Enter the Azure VMware Solution HCX Cloud Manager URL or IP address that you noted earlier
https://x.x.x.9and the credentials for a user with the CloudAdmin role in your private cloud. Then select Connect.Note
To successfully establish a site pair:
Your VMware HCX Connector must be able to route to your HCX Cloud Manager IP over port 443.
A service account from your external identity source, such as Active Directory, is recommended for site pairing connections. For more information about setting up separate accounts for connected services, see Access and identity architecture.
A screen displays the connection (pairing) between your VMware HCX Cloud Manager in Azure VMware Solution and your on-premises VMware HCX Connector.
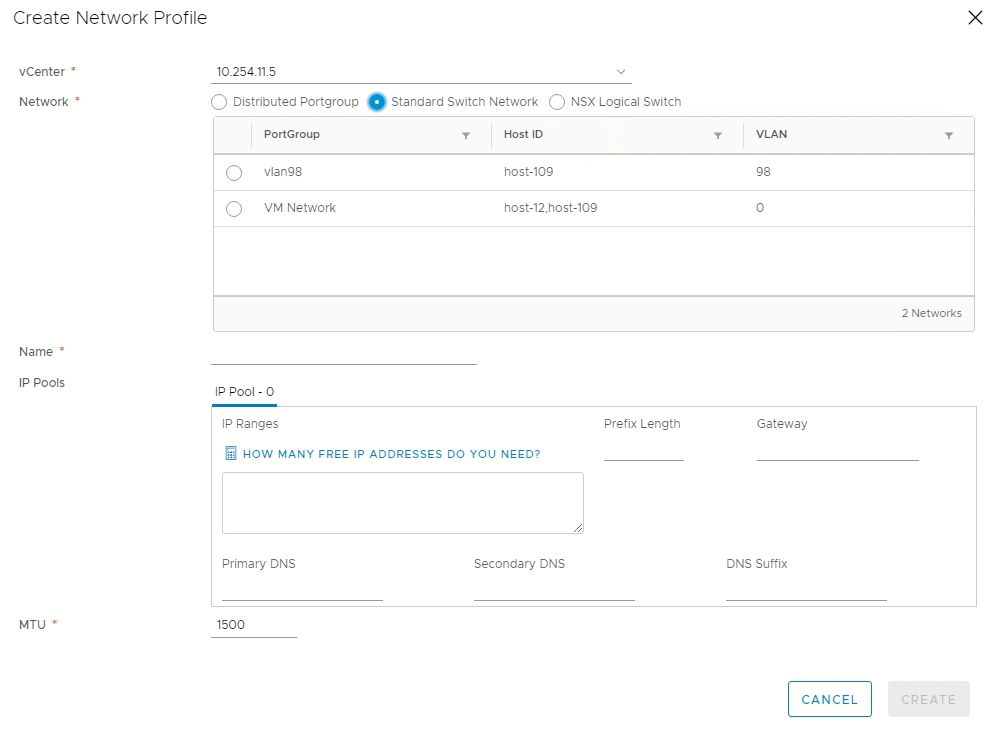
Create network profiles
VMware HCX Connector deploys a subset of virtual appliances (automated) that require multiple IP segments. Create your network profiles using the IP segments identified during the planning phase. Create four network profiles:
- Management
- vMotion
- Replication
- Uplink
Note
- For Azure VMware Solution connected via VPN, set Uplink Network Profile MTU's to 1350 to account for IPSec overhead.
- Azure VMware Solution defaults to 1500 MTU, which is sufficient for most ExpressRoute implementations.
- If your ExpressRoute provider does not support jumbo frames, you may need to lower the MTU in ExpressRoute setups as well.
- Adjust MTU settings on both HCX Connector (on-premises) and HCX Cloud Manager (Azure VMware Solution) network profiles.
Under Infrastructure, select Interconnect > Multi-Site Service Mesh > Network Profiles > Create Network Profile.

For each network profile, select the network and port group, provide a name, and create the segment's IP pool. Then select Create.


For an end-to-end overview of this procedure, watch the Azure VMware Solution: HCX Network Profile video.
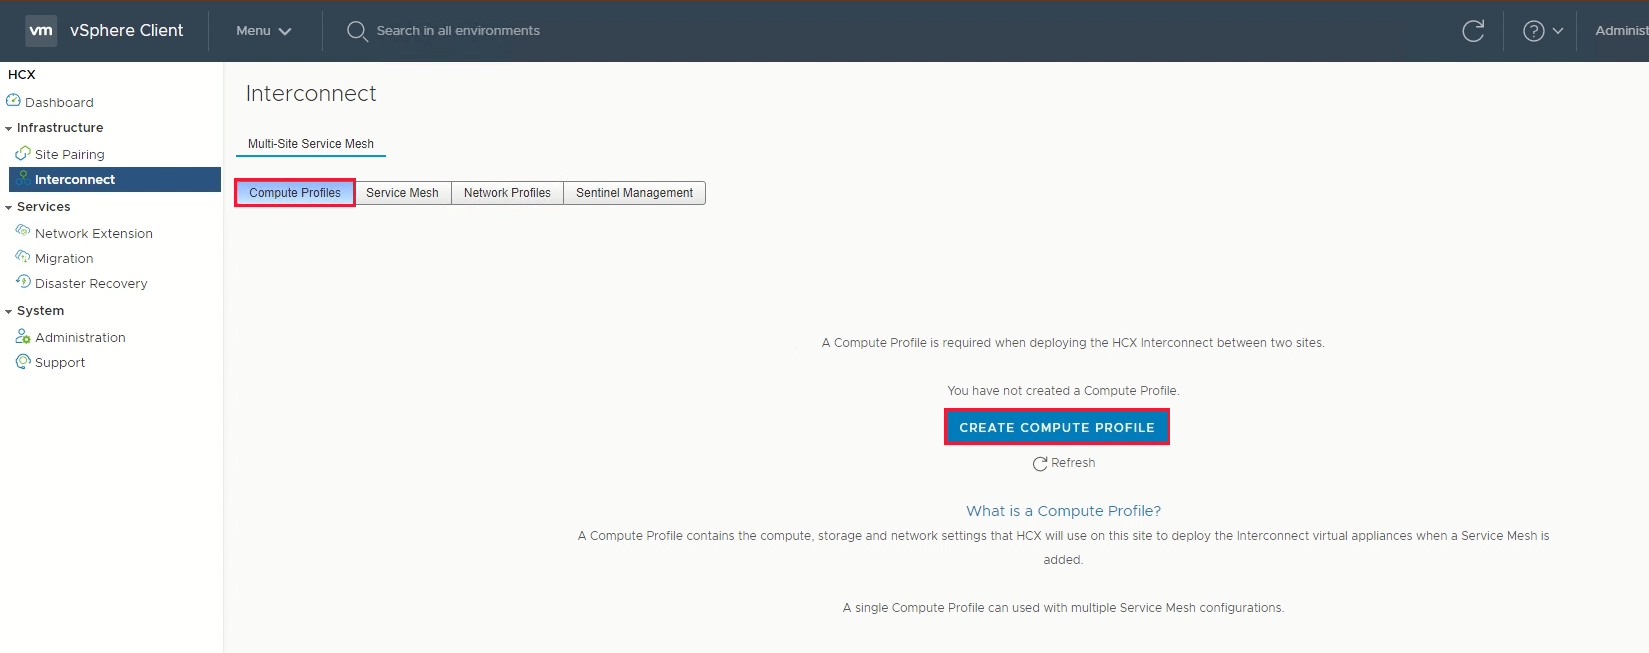
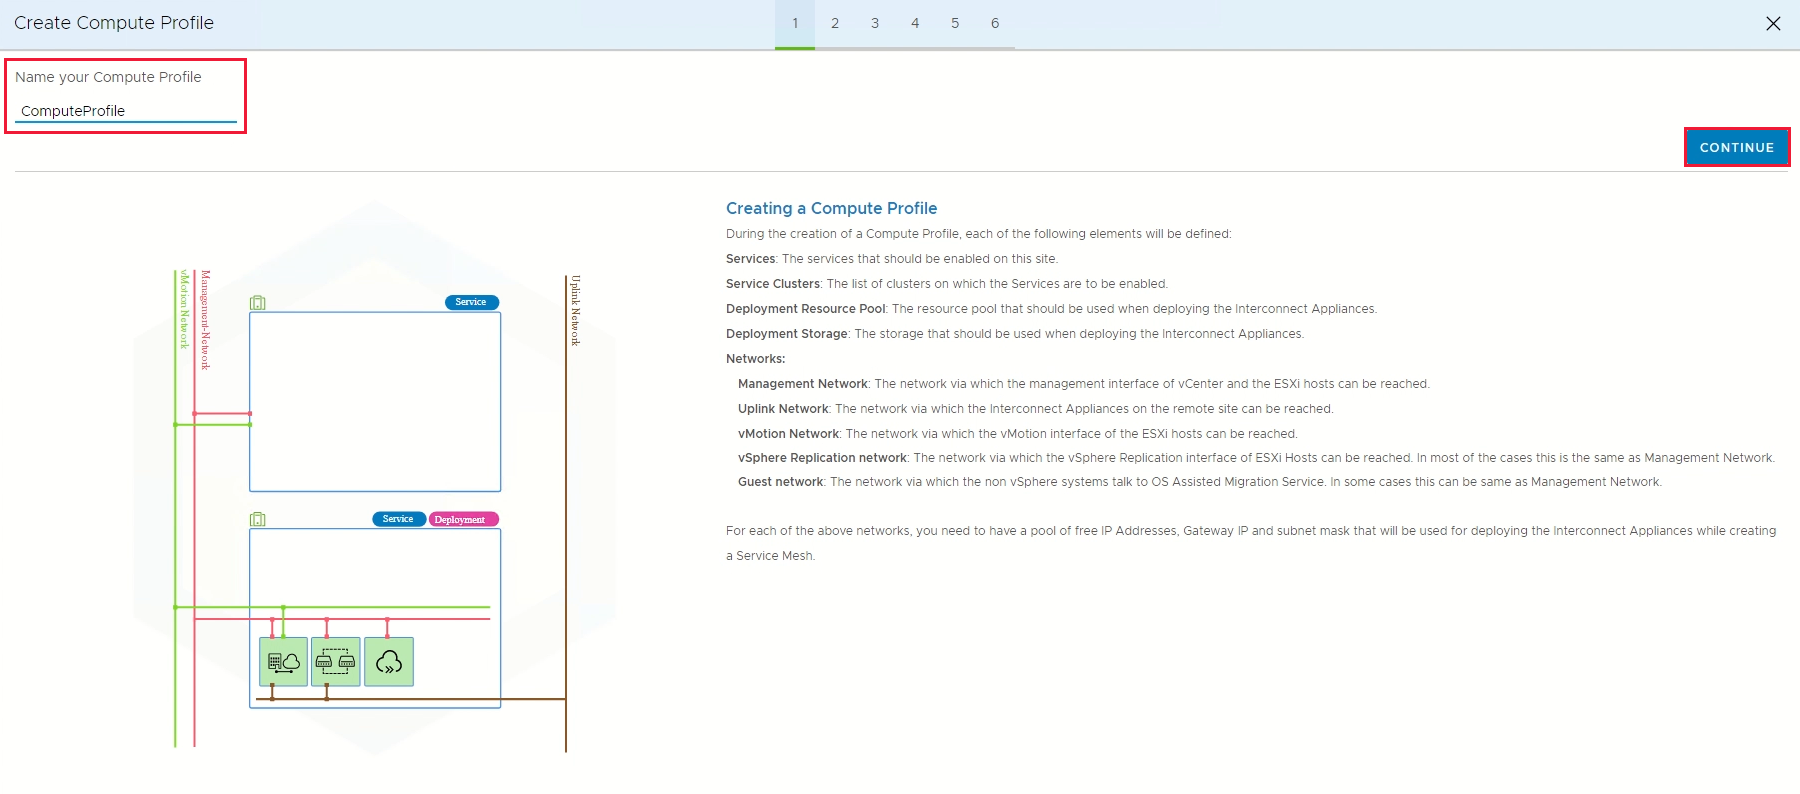
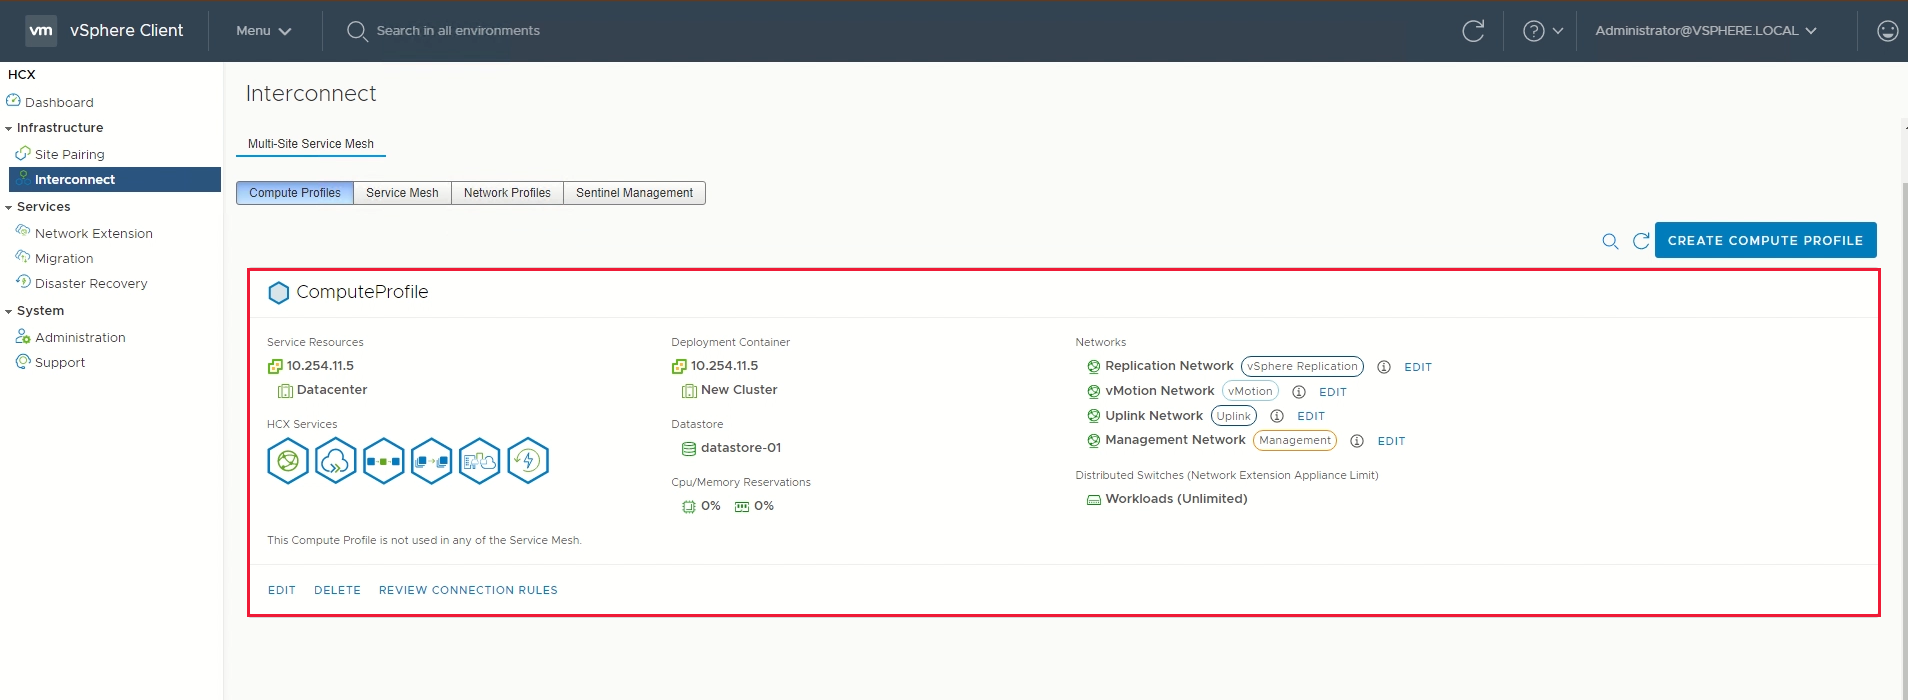
Create a compute profile
Under Infrastructure, select Interconnect > Compute Profiles > Create Compute Profile.
Enter a name for the profile and select Continue.
Select the services to enable, such as migration, network extension, or disaster recovery, and then select Continue.
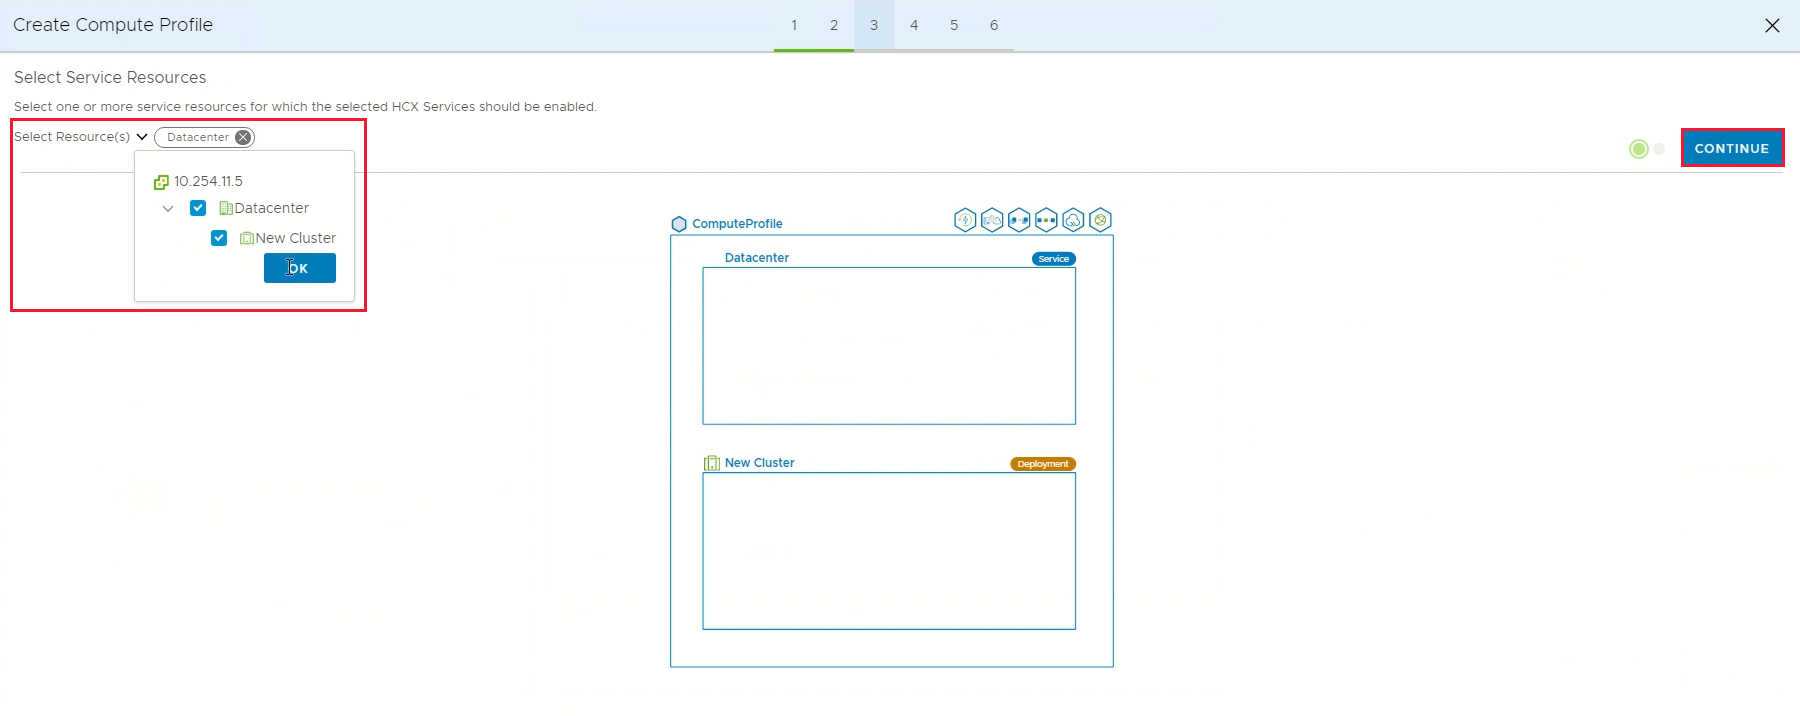
In Select Service Resources, select one or more service resources (clusters) to enable the selected VMware HCX services.
When you see the clusters in your on-premises datacenter, select Continue.
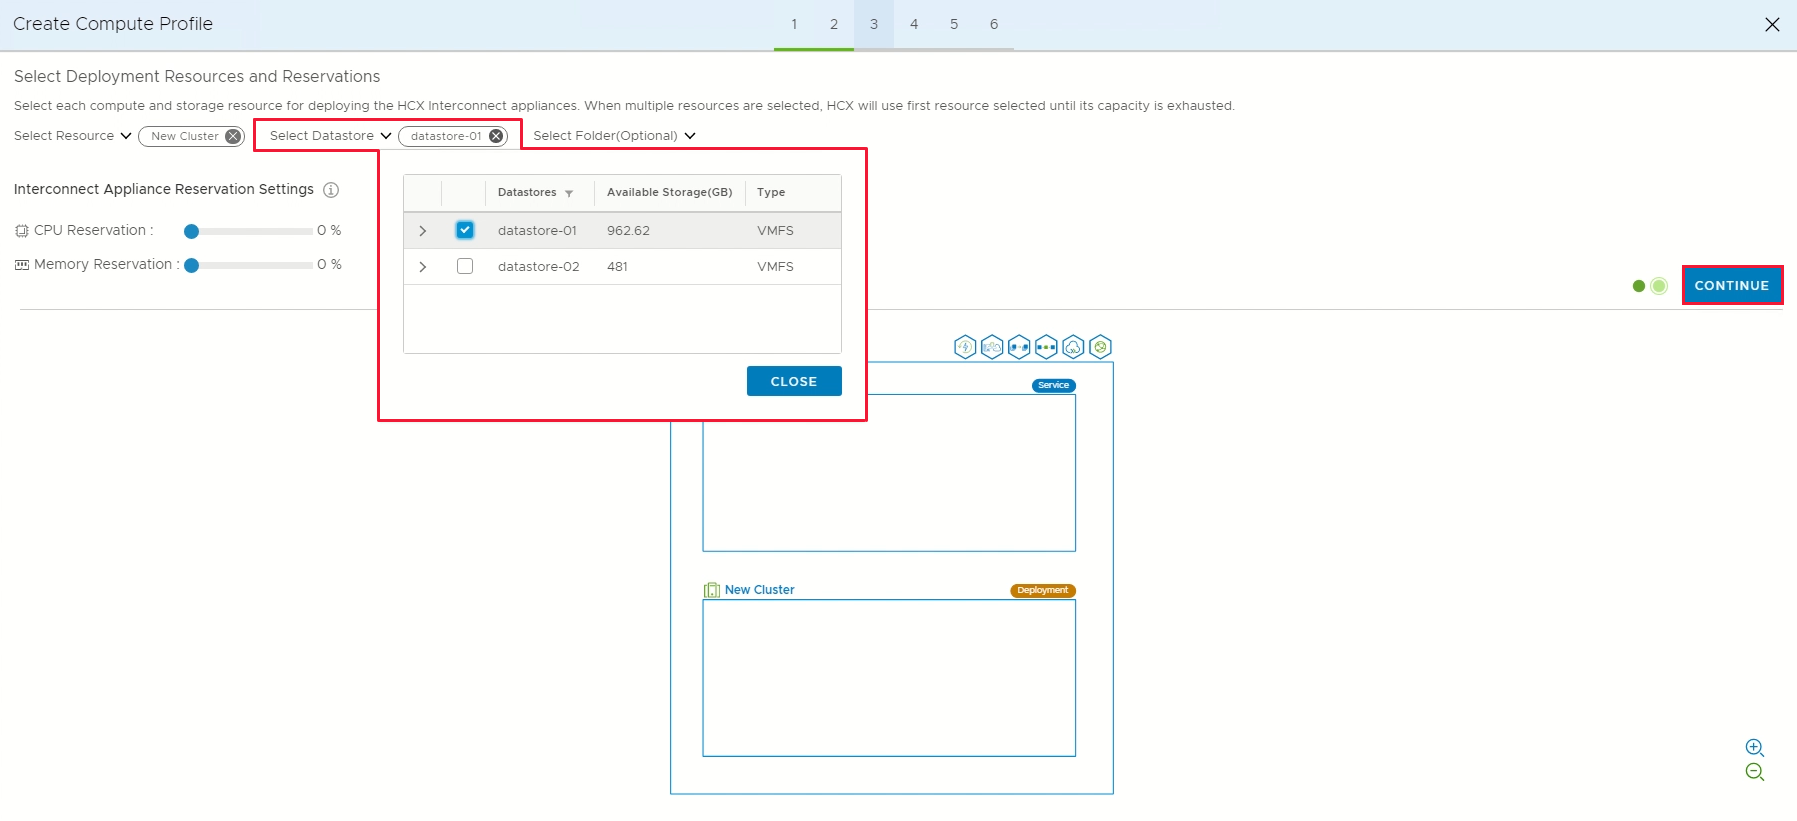
From Select Datastore, select the datastore storage resource for deploying the VMware HCX Interconnect appliances. Then select Continue.
When multiple resources are selected, VMware HCX uses the first resource selected until its capacity is exhausted.
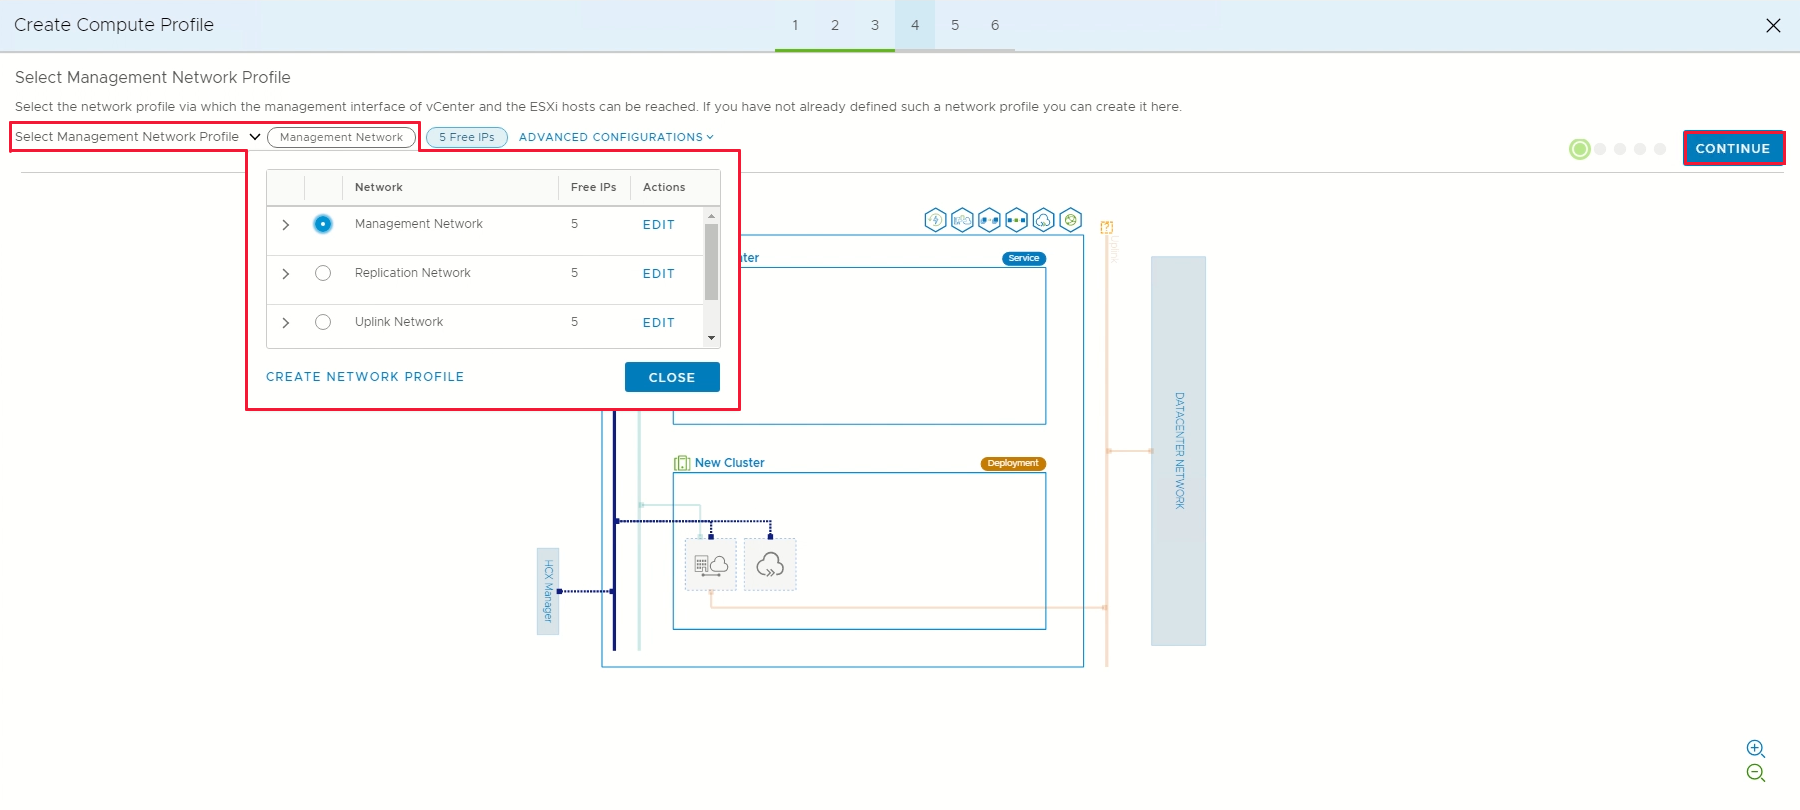
From Select Management Network Profile, select the management network profile that you created in previous steps. Then select Continue.
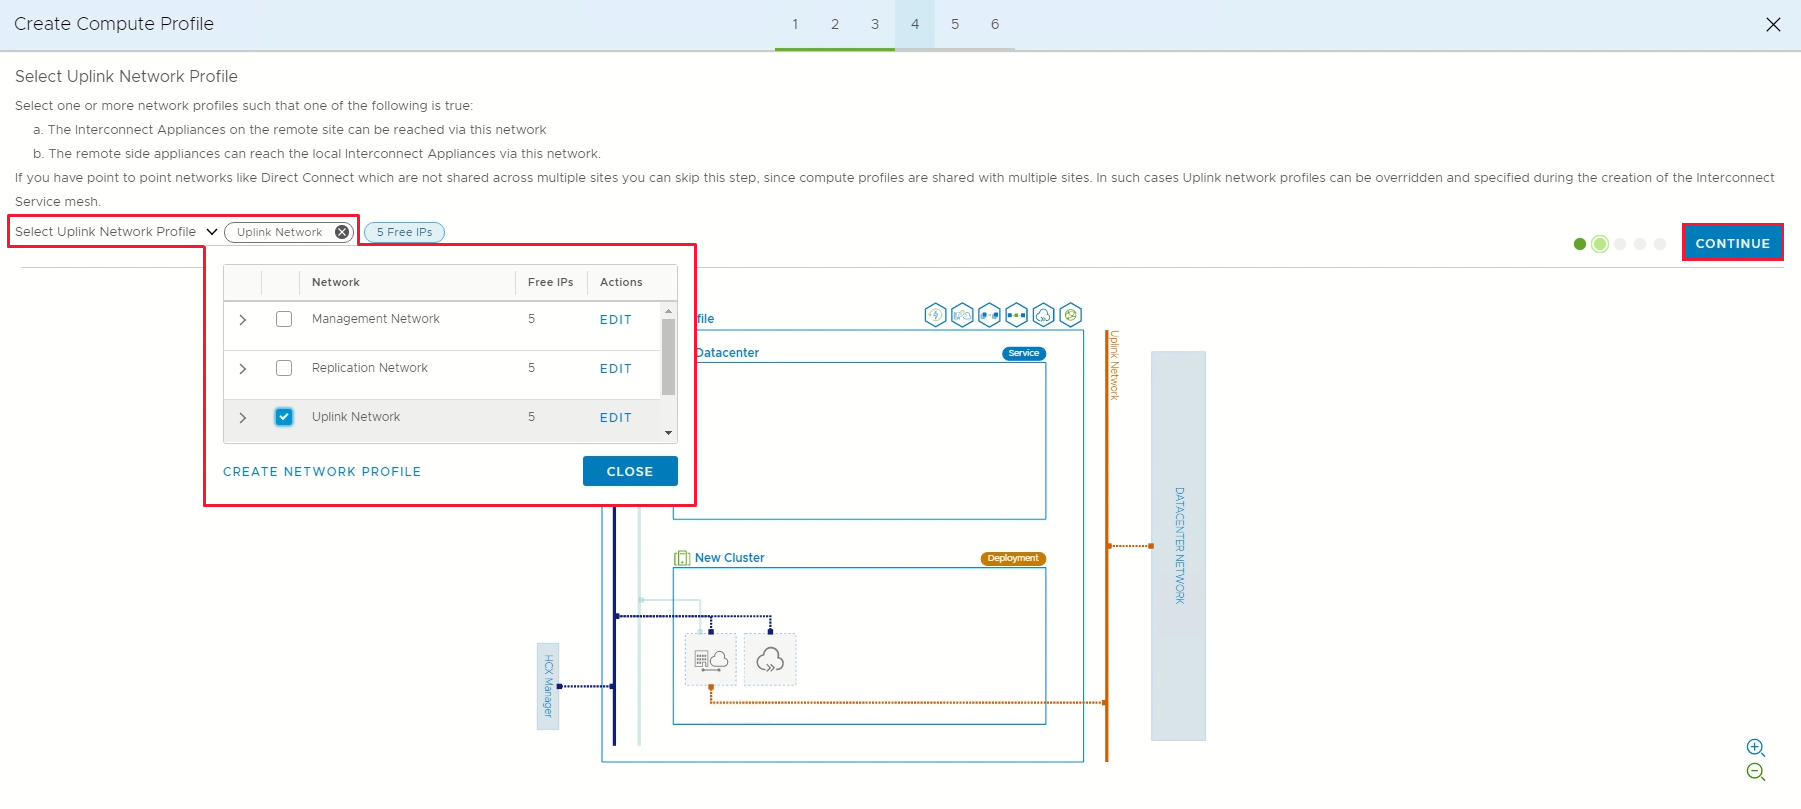
From Select Uplink Network Profile, select the uplink network profile you created in the previous procedure. Then select Continue.
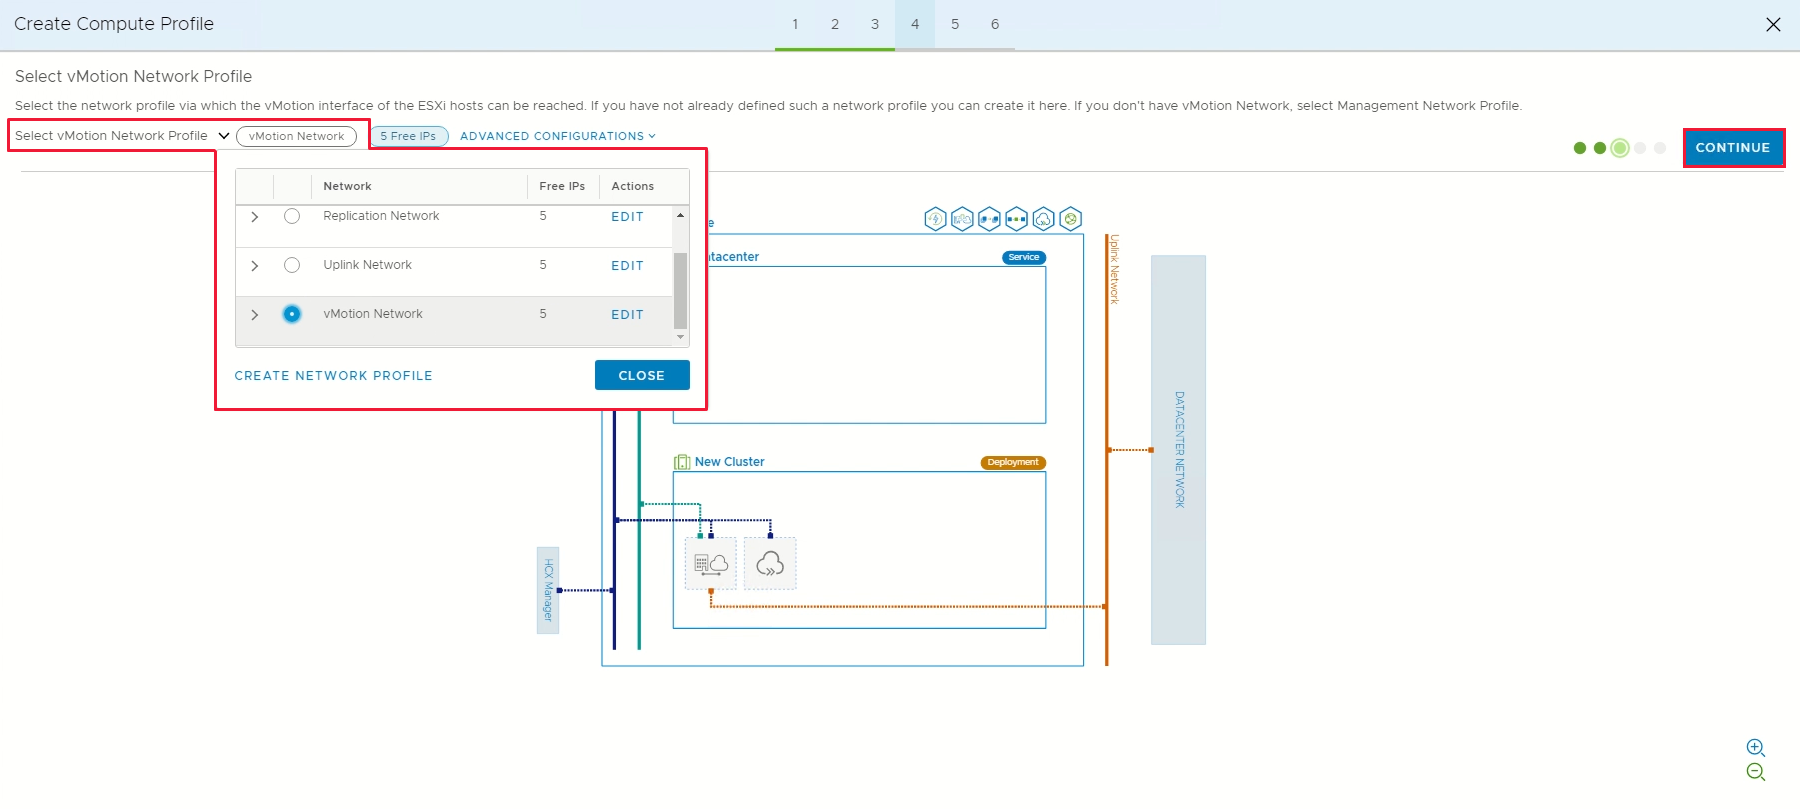
From Select vMotion Network Profile, select the vMotion network profile that you created in previous steps. Then select Continue.
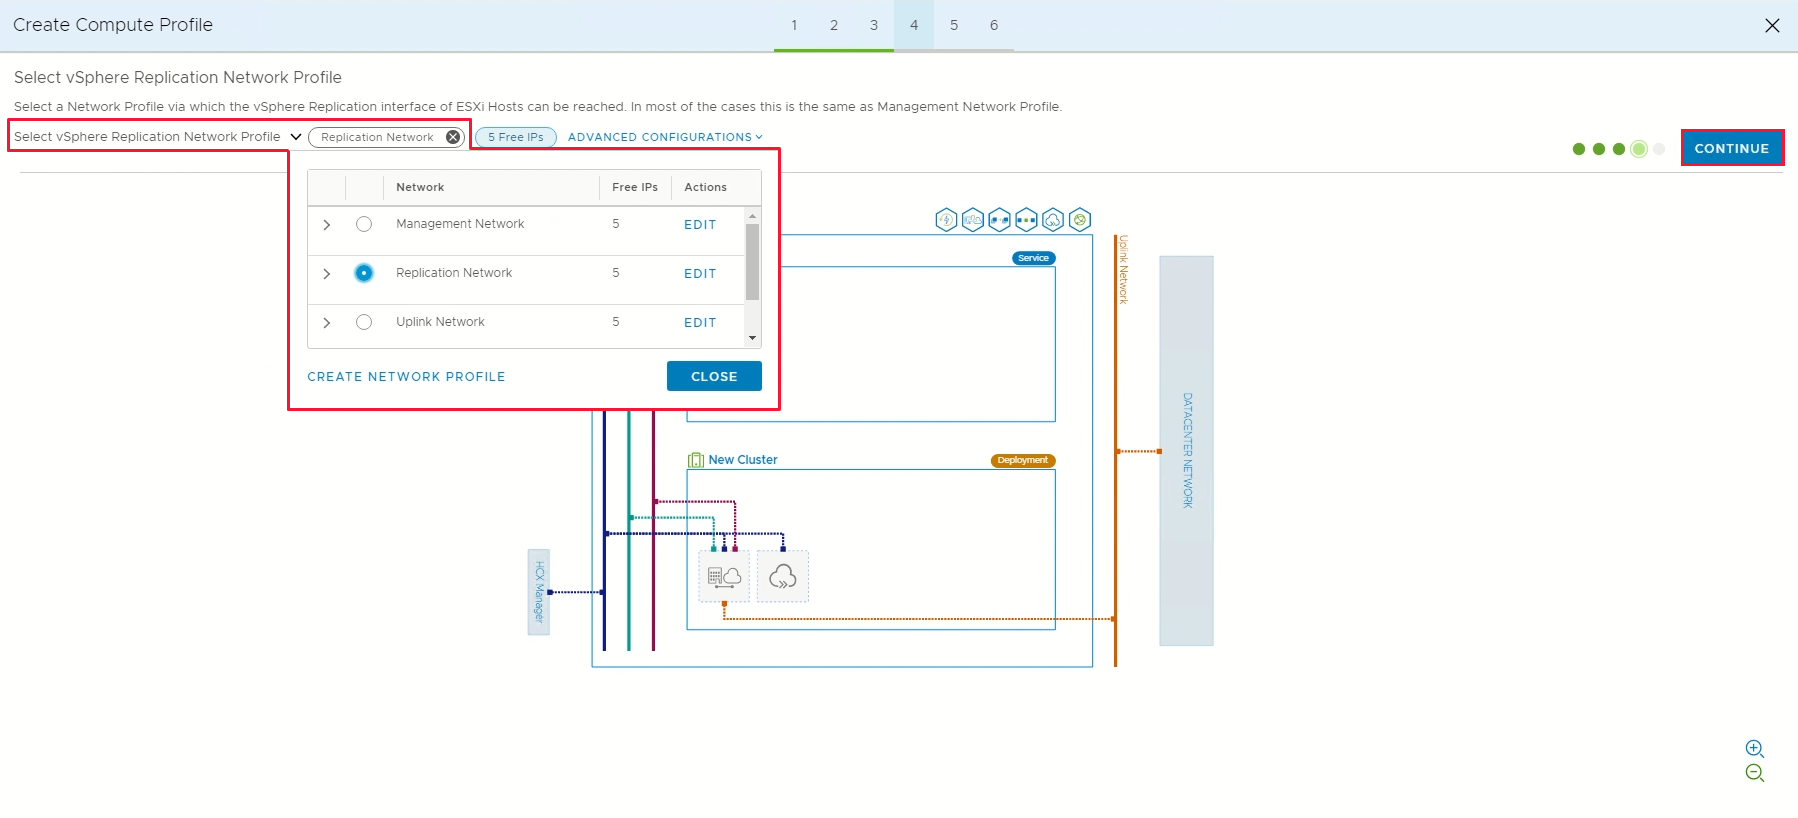
From Select vSphere Replication Network Profile, select the replication network profile that you created in previous steps. Then select Continue.
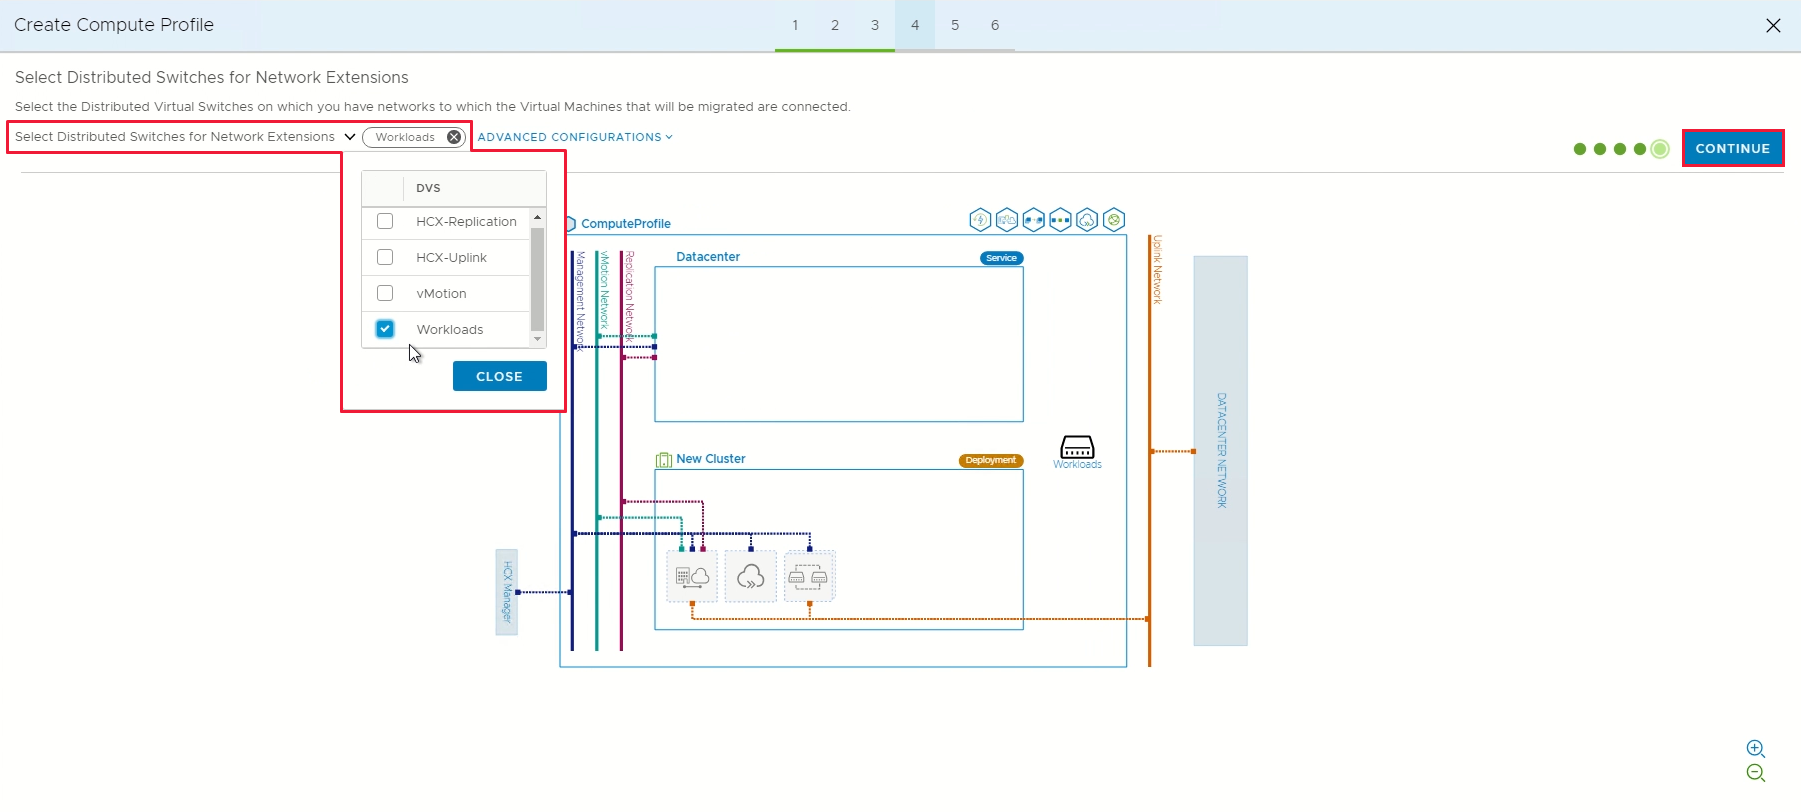
From Select Distributed Switches for Network Extensions, select the switches containing the virtual machines to be migrated to Azure VMware Solution on a layer-2 extended network. Then select Continue.
Note
If you're not migrating virtual machines on layer-2 (L2) extended networks, skip this step.
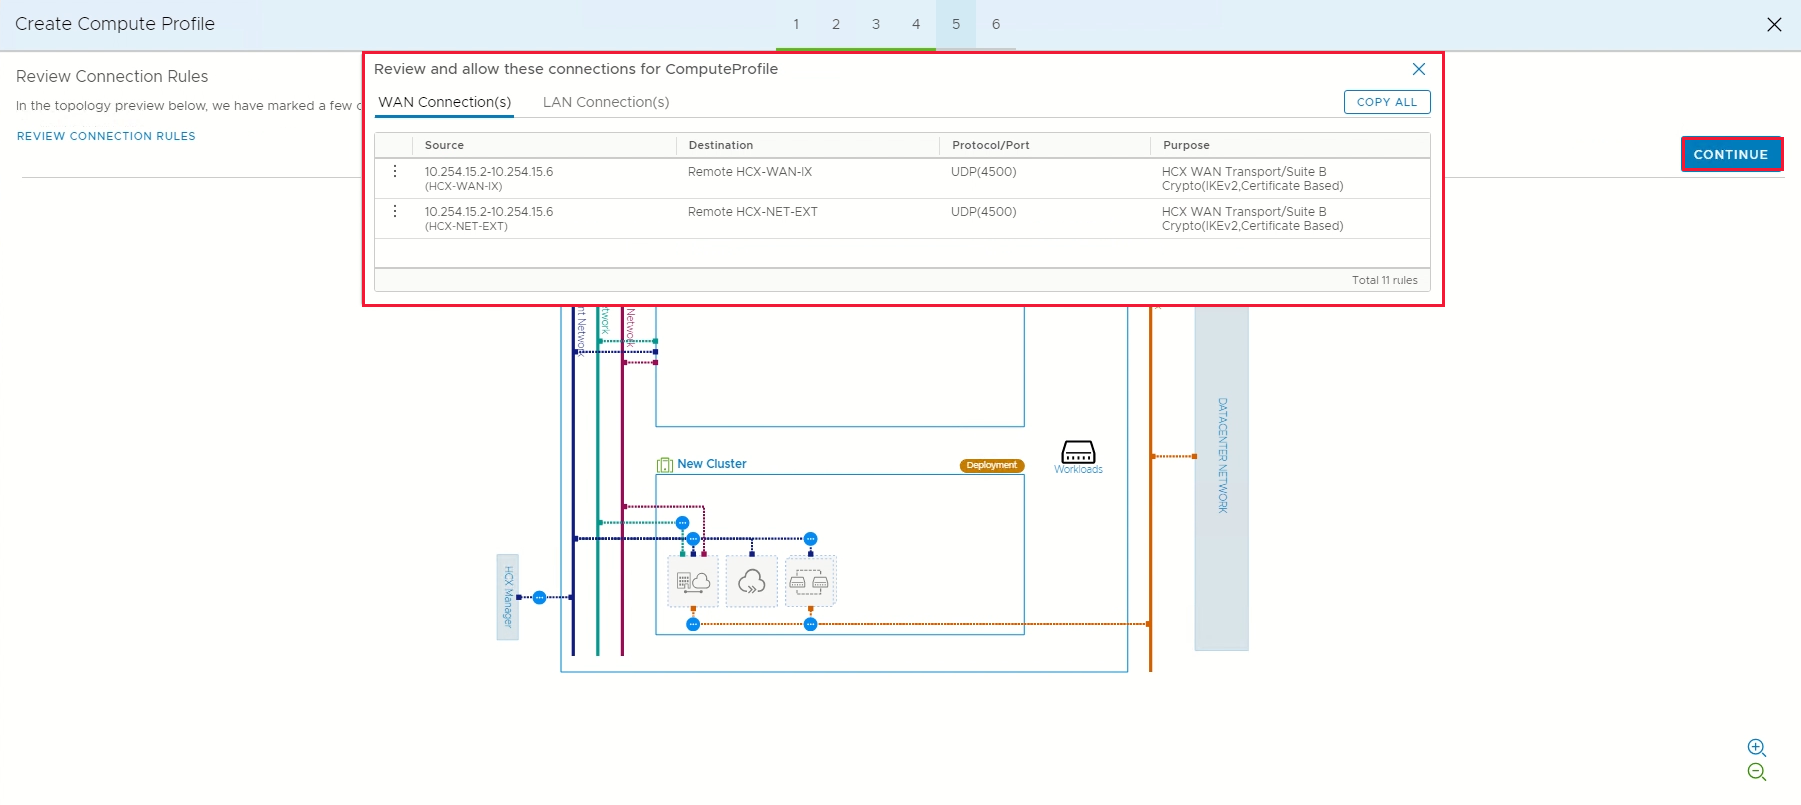
Review the connection rules and select Continue.
Select Finish to create the compute profile.


For an end-to-end overview of this procedure, view the Azure VMware Solution: Compute Profile video.
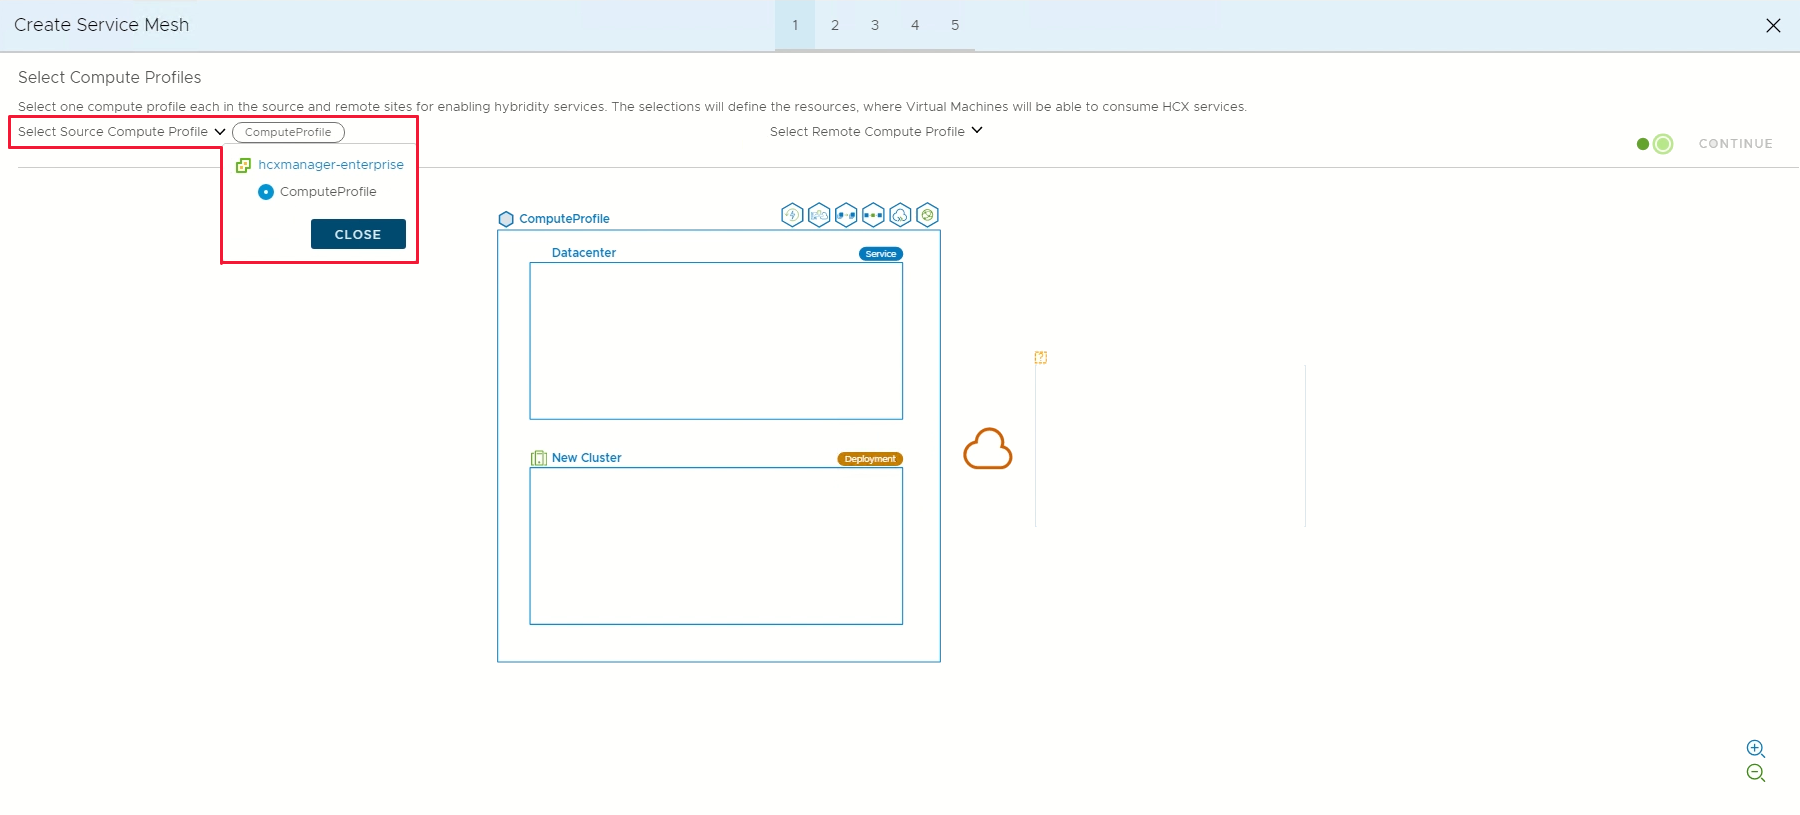
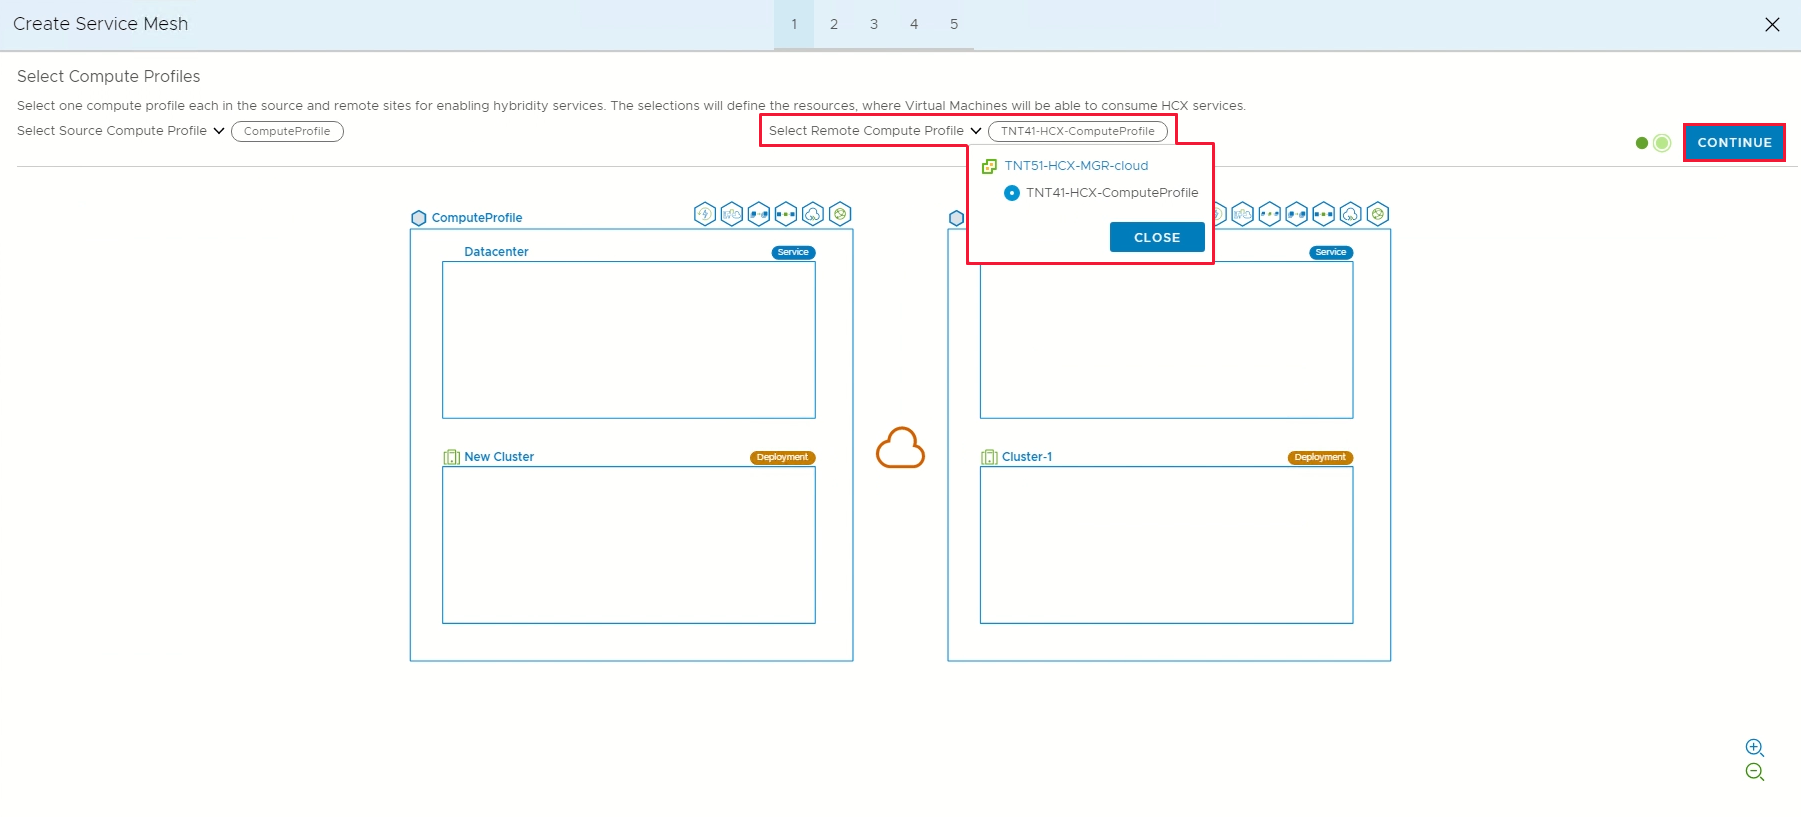
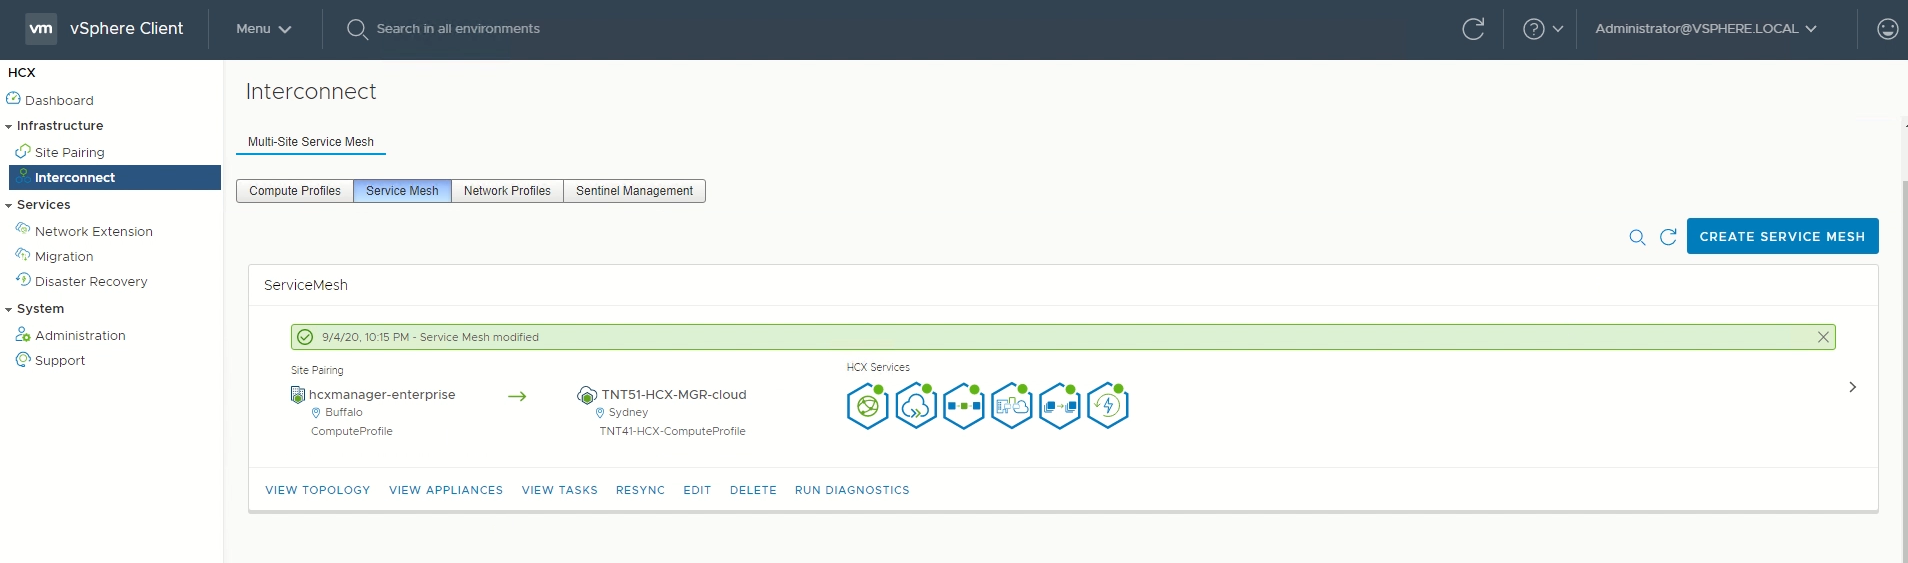
Create a service mesh
Important
Make sure port UDP 4500 is open between your on-premises VMware HCX Connector 'uplink' network profile addresses and the Azure VMware Solution HCX Cloud 'uplink' network profile addresses. (UDP 500 was required in legacy versions of HCX. See https://ports.vmware.com for the latest information.)
Under Infrastructure, select Interconnect > Service Mesh > Create Service Mesh.

Review the prepopulated sites, and then select Continue.
Note
If this is your first service mesh configuration, you won't need to modify this screen.
Select the source and remote compute profiles from the drop-down lists, and then select Continue.
The selections define the resources where VMs can consume VMware HCX services.
Note
In a mixed-mode SDDC with an AV64 cluster, deploying service mesh appliances on the AV64 cluster is not viable or supported. Nevertheless, this doesn't impede you from conducting HCX migration or network extension directly onto AV64 clusters. The deployment container can be cluster-1, hosting the HCX appliances.
Review services to be enabled, and then select Continue.
In Advanced Configuration - Override Uplink Network profiles, select Continue.
Uplink network profiles connect to the network through which the remote site's interconnect appliances can be reached.
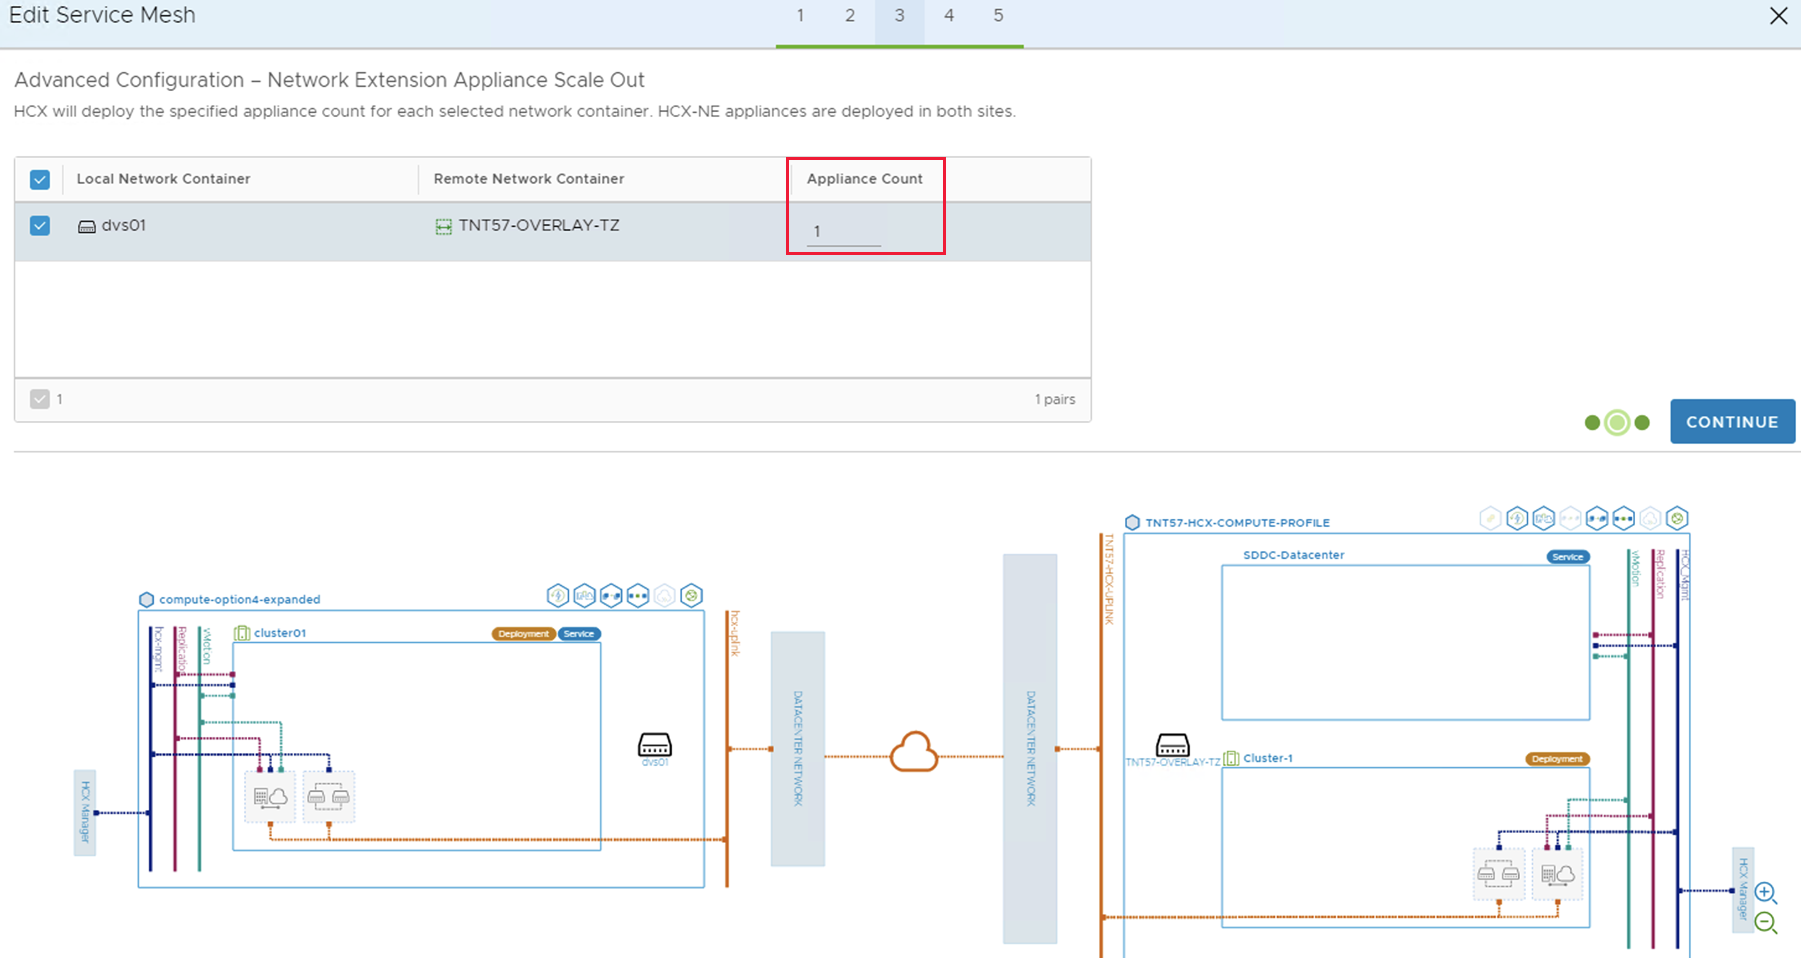
In Advanced Configuration - Network Extension Appliance Scale Out, review and select Continue.
You can have up to eight VLANs per appliance, but you can deploy another appliance to add another eight VLANs. You must also have IP space to account for the more appliances, and it's one IP per appliance. For more information, see VMware HCX Configuration Limits.
In Advanced Configuration - Traffic Engineering, review and make any modifications that you feel are necessary, and then select Continue.
Review the topology preview and select Continue.
Enter a user-friendly name for this service mesh and select Finish to complete.
Select View Tasks to monitor the deployment.
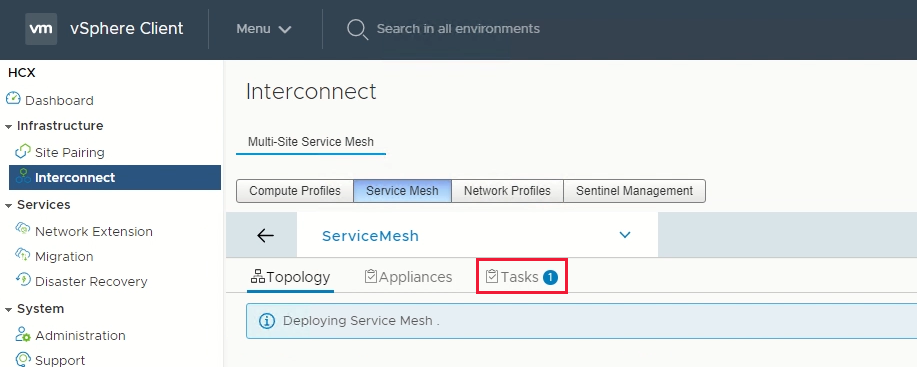
When the service mesh deployment finishes successfully, the services show as green.
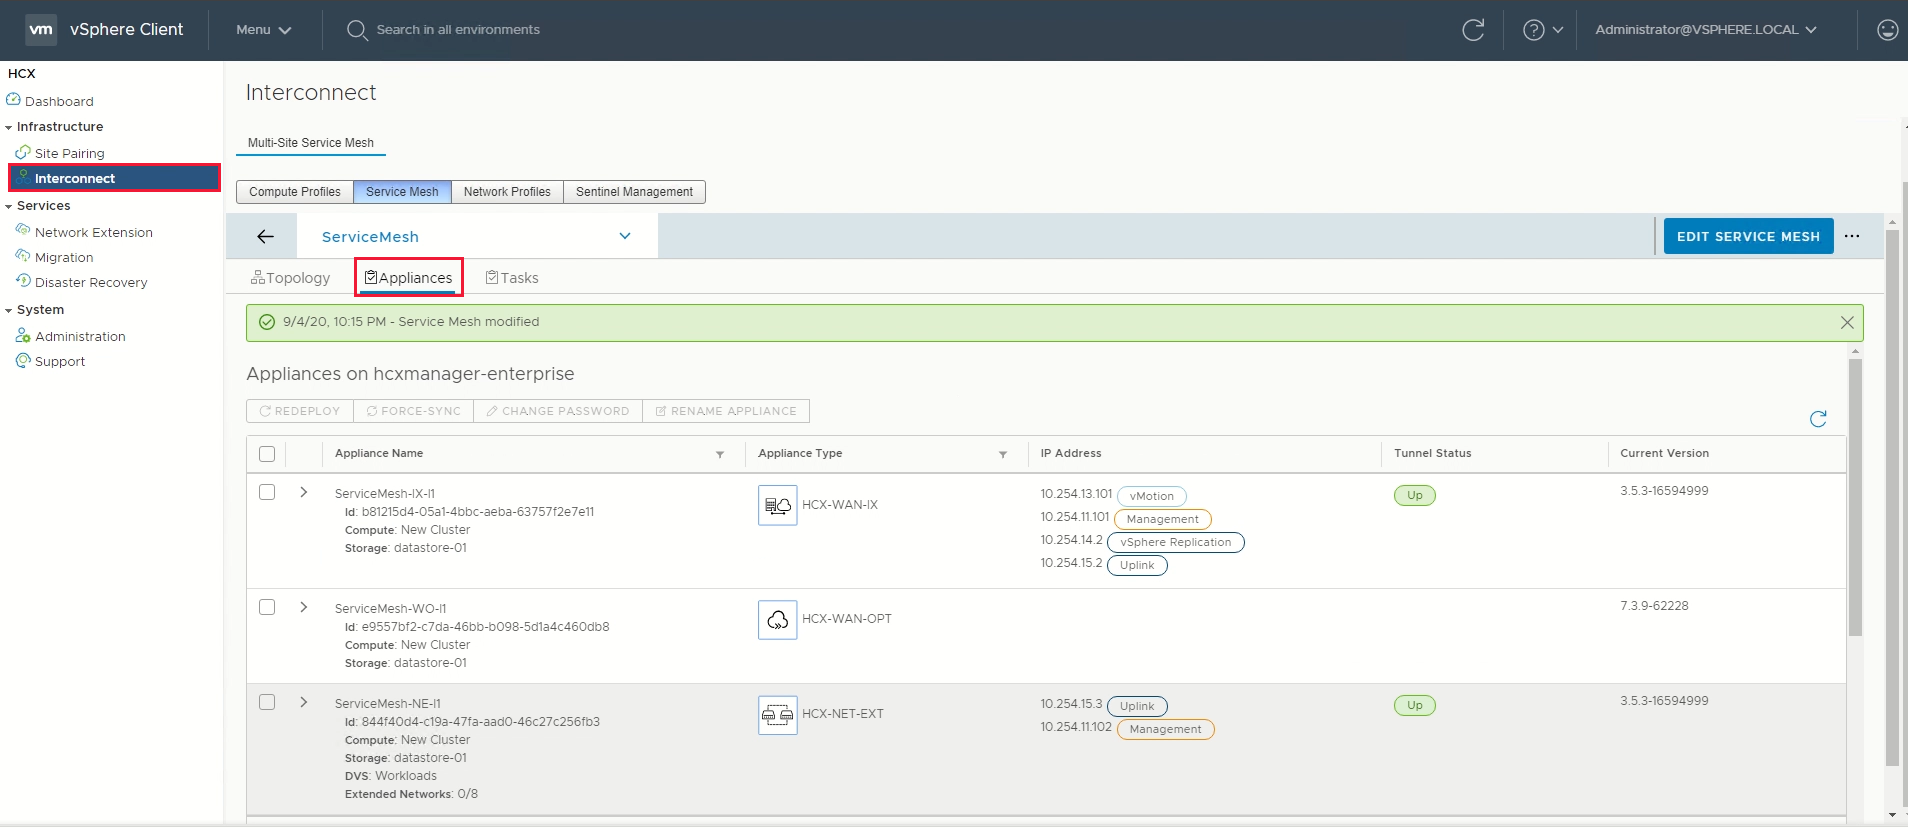
Verify the service mesh's health by checking the appliance status.
Select Interconnect > Appliances.
Note
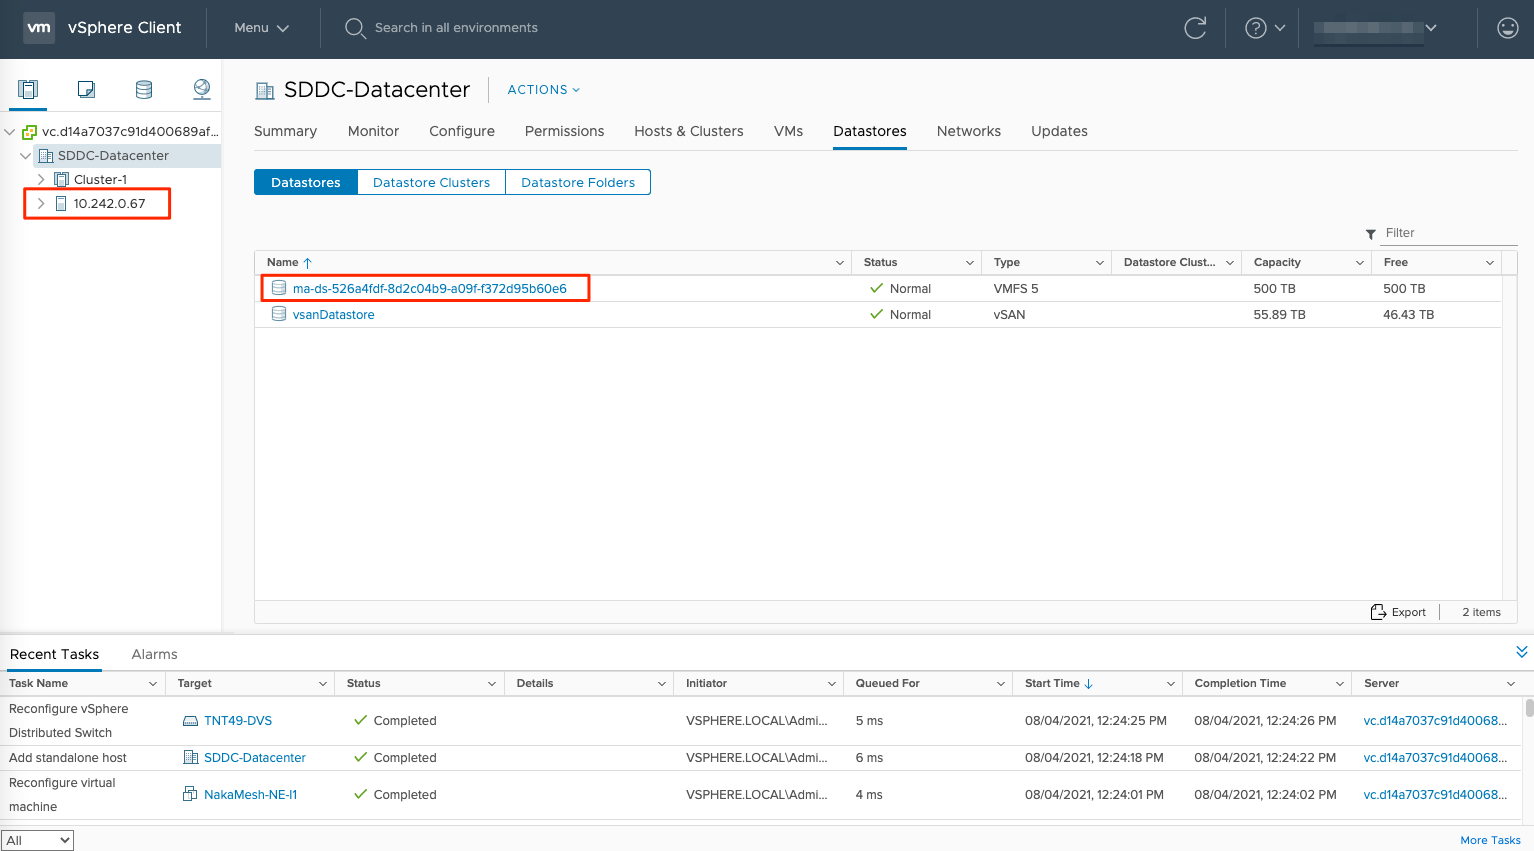
After establishing the service mesh, you may notice a new datastore and a new host in your private cloud. This is normal behavior after establishing a service mesh.


The HCX interconnect tunnel status should display UP in green. Now you're ready to migrate and protect Azure VMware Solution VMs using VMware HCX. Azure VMware Solution supports workload migrations with or without a network extension that allow you to migrate workloads in your vSphere environment, create networks on-premises, and deploy VMs onto those networks. For more information, see the VMware HCX Documentation.
For an end-to-end overview of this procedure, watch the Azure VMware Solution: Service Mesh video.
Next steps
Now that you configured the HCX Connector, explore the following articles: