Securing Azure Content Delivery Network assets with token authentication
Important
This is a feature of Azure CDN Premium from Edgio only, to configure rules on Azure CDN from Microsoft please use the Standard rules engine. Advanced rules are not available for Azure CDN from Akamai. For a full comparison of CDN features, see Azure CDN product features.
Overview
Token authentication is a mechanism that allows you to prevent the Azure content delivery network from serving assets to unauthorized clients. Token authentication is typically done to prevent hotlinking of content, in which a different website, such as a message board, uses your assets without permission. Hotlinking can have an effect on your content delivery costs. When you enable token authentication on content delivery network, requests get authenticated by content delivery network edge server before the content delivery network delivers the content.
How it works
Token authentication verifies that requests get generated by a trusted site by requiring requests to contain a token value that holds encoded information about the requester. Content is served to a requester only if the encoded information meets the requirements; otherwise, requests are denied. You can set up the requirements by using one or more of the following parameters:
- Country/Region: Allow or deny requests that originate from the countries/regions specified by their country/region code.
- URL: Allow only requests that match the specified asset or path.
- Host: Allow or deny requests that use the specified hosts in the request header.
- Referrer: Allow or deny request from the specified referrer.
- IP address: Allow only requests that originated from specific IP address or IP subnet.
- Protocol: Allow or deny requests based on the protocol used to request the content.
- Expiration time: Assign a date and time period to ensure that a link remains valid only for a limited time period.
For more information, see the detailed configuration examples for each parameter in Setting up token authentication.
Important
If token authorization is enabled for any path on this account, standard-cache mode is the only mode that can be used for query string caching. For more information, see Control Azure Content Delivery Network caching behavior with query strings.
Reference architecture
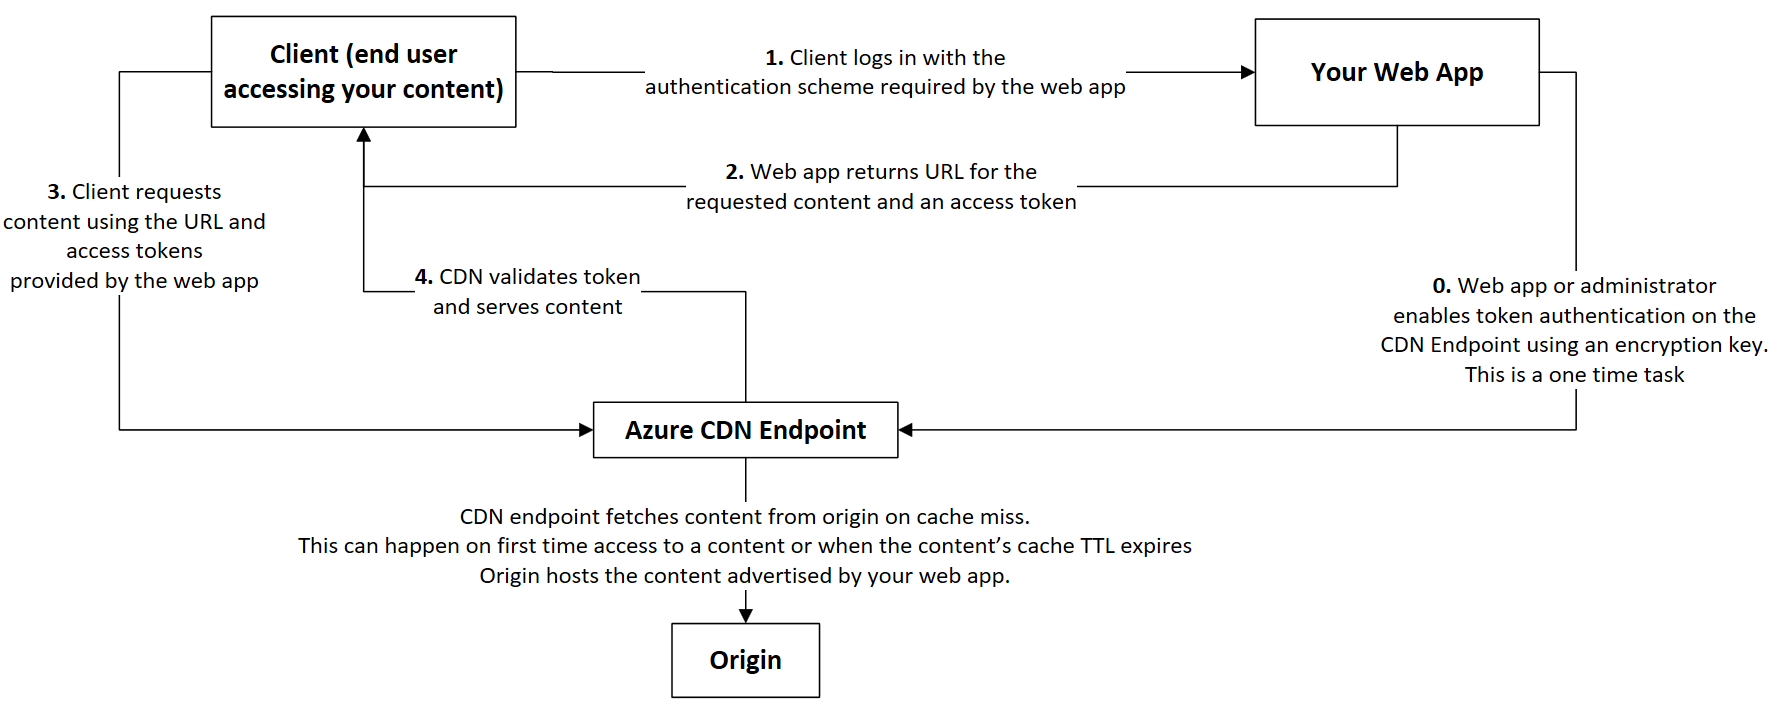
The following workflow diagram describes how the content delivery network uses token authentication to work with your web app.
Token validation logic on content delivery network endpoint
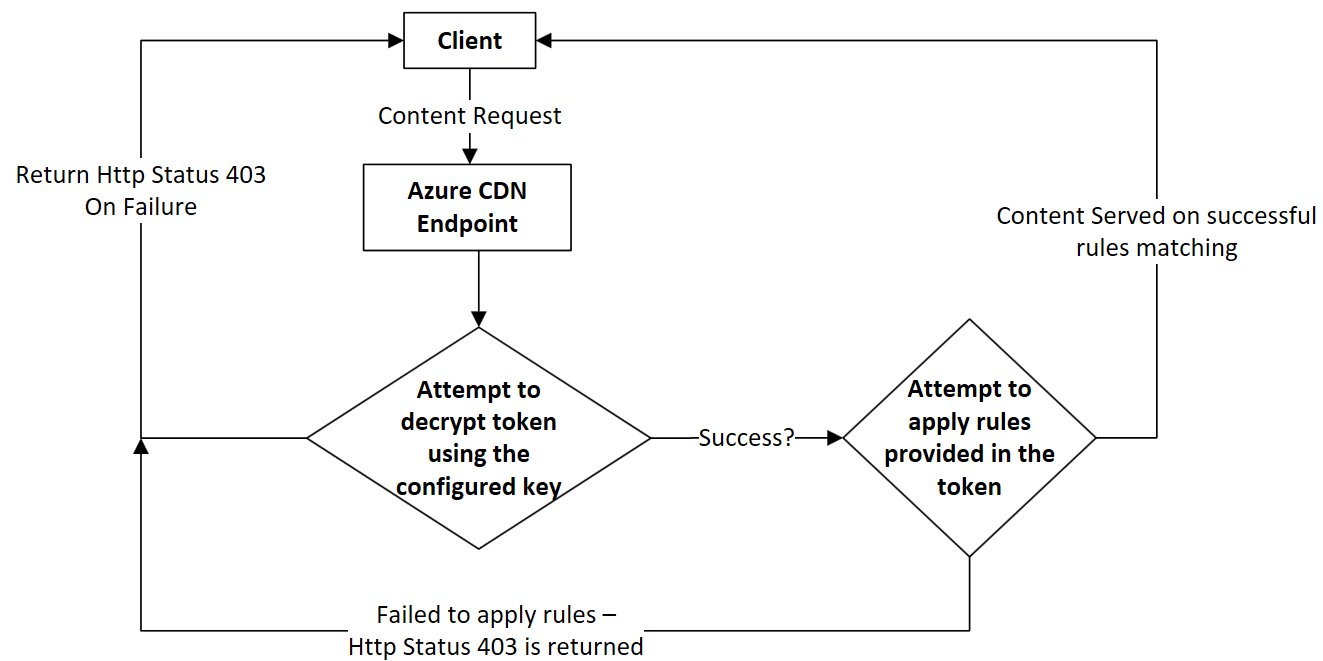
The following flowchart describes how Azure Content Delivery Network validates a client request when token authentication is configured on content delivery network endpoint.
Setting up token authentication
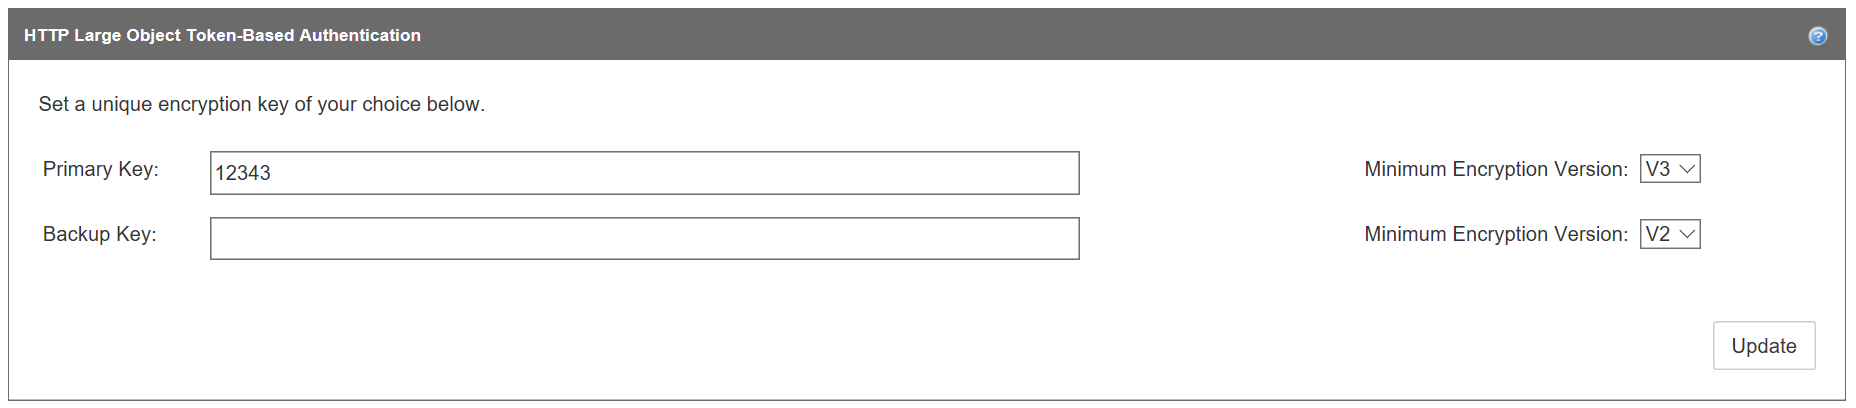
From the Azure portal, browse to your content delivery network profile, then select Manage to launch the supplemental portal.

Hover over HTTP Large, then select Token Auth in the flyout. You can then set up the encryption key and encryption parameters as follows:
Create one or more encryption keys. An encryption key is case-sensitive and can contain any combination of alphanumeric characters. Any other types of characters, including spaces, aren't allowed. The maximum length is 250 characters. To ensure that your encryption keys are random, it's recommended that you create them by using the OpenSSL tool.
The OpenSSL tool has the following syntax:
rand -hex <key length>For example:
OpenSSL> rand -hex 32To avoid downtime, create both a primary and a backup key. A backup key provides uninterrupted access to your content when your primary key is being updated.
Enter a unique encryption key in the Primary Key box and optionally enter a backup key in the Backup Key box.
Select the minimum encryption version for each key from its Minimum Encryption Version list, then select Update:
- V2: Indicates that the key can be used to generate version 2.0 and 3.0 tokens. Use this option only if you're transitioning from a legacy version 2.0 encryption key to a version 3.0 key.
- V3: (Recommended) Indicates that the key can only be used to generate version 3.0 tokens.
Use the encrypt tool to set up encryption parameters and generate a token. With the encrypt tool, you can allow or deny requests based on expiration time, country/region, referrer, protocol, and client IP (in any combination). Although there's no limit to the number and combination of parameters that can be combined to form a token, the total length of a token is limited to 512 characters.
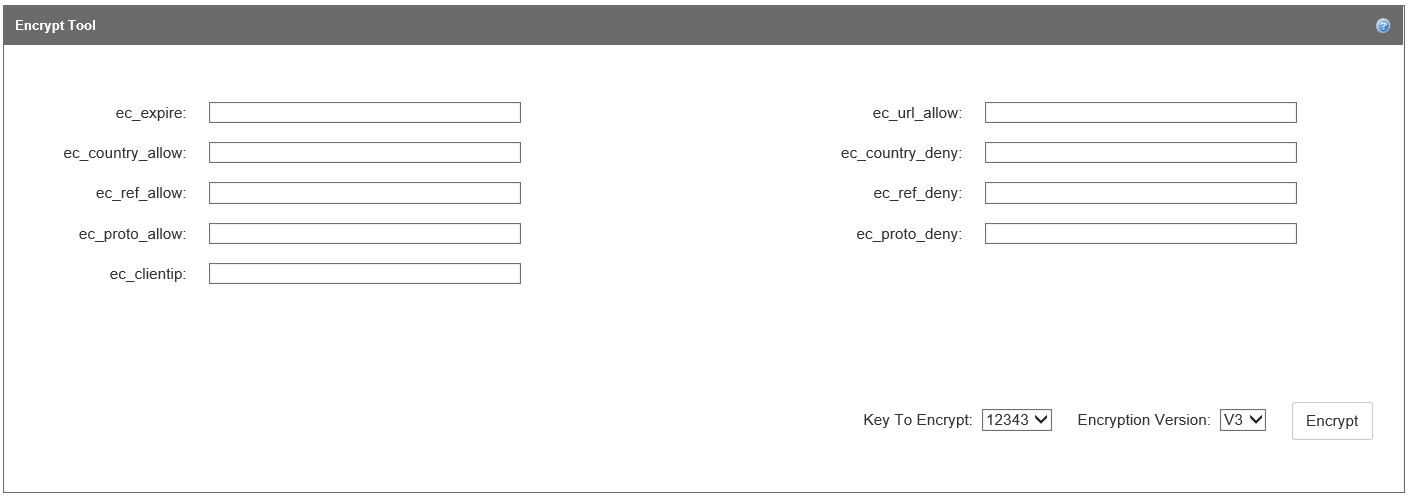
Enter values for one or more of the following encryption parameters in the Encrypt Tool section:
Parameter name Description ec_expire Assigns an expiration time to a token, after which the token expires. Requests submitted after the expiration time are denied. This parameter uses a Unix timestamp, which is based on the number of seconds since the standard Unix epoch of `1/1/1970 00:00:00 GMT`. (You can use online tools to convert between standard time and Unix time.) For example, if you want the token to expire at
12/31/2016 12:00:00 GMT, enter the Unix timestamp value,1483185600.ec_url_allow Allows you to tailor tokens to a particular asset or path. It restricts access to requests whose URL start with a specific relative path. URLs are case-sensitive. Input multiple paths by separating each path with a comma; do not add spaces. Depending on your requirements, you can set up different values to provide different level of access. For example, for the URL
http://www.mydomain.com/pictures/city/strasbourg.png, these requests are allowed for the following input values:- Input value `/`: All requests are allowed.
- Input value `/pictures`, the following requests are allowed:
- `http://www.mydomain.com/pictures.png`
- `http://www.mydomain.com/pictures/city/strasbourg.png`
- `http://www.mydomain.com/picturesnew/city/strasbourgh.png`
- Input value `/pictures/`: Only requests containing the `/pictures/` path are allowed. For example, `http://www.mydomain.com/pictures/city/strasbourg.png`.
- Input value `/pictures/city/strasbourg.png`: Only requests for this specific path and asset are allowed.
ec_country_allow Only allows requests that originate from one or more specified countries/regions. Requests that originate from all other countries/regions are denied. Use a two-letter [ISO 3166 country/region code](/previous-versions/azure/mt761717(v=azure.100)) for each country/region and separate each one with a comma; do not add a space. For example, if you want to allow access from only the United States and France, enter `US,FR`. ec_country_deny Denies requests that originate from one or more specified countries/regions. Requests that originate from all other countries/regions are allowed. The implementation is the same as the ec_country_allow parameter. If a country/region code is present in both the ec_country_allow and ec_country_deny parameters, the ec_country_allow parameter takes precedence. ec_ref_allow Only allows requests from the specified referrer. A referrer identifies the URL of the web page that is linked to the resource being requested. Do not include the protocol in the parameter value. The following types of input are allowed:
- A hostname or a hostname and a path.
- Multiple referrers. To add multiple referrers, separate each referrer with a comma; do not add a space. If you specify a referrer value, but the referrer information is not sent in the request due to the browser configuration, the request is denied by default.
- Requests with missing or blank referrer information. By default, the ec_ref_allow parameter blocks these types of requests. To allow these requests, enter either the text, "missing", or enter a blank value (by using a trailing comma).
- Subdomains. To allow subdomains, enter an asterisk (\*). For example, to allow all subdomains of `contoso.com`, enter `*.contoso.com`.
For example, to allow access for requests from
www.contoso.com, all subdomains undercontoso2.com, and requests with blank or missing referrers, enterwww.contoso.com,*.contoso.com,missing.ec_ref_deny Denies requests from the specified referrer. The implementation is the same as the ec_ref_allow parameter. If a referrer is present in both the ec_ref_allow and ec_ref_deny parameters, the ec_ref_allow parameter takes precedence. ec_proto_allow Only allows requests from the specified protocol. Valid values are `http`, `https`, or `http,https`. ec_proto_deny Denies requests from the specified protocol. The implementation is the same as the ec_proto_allow parameter. If a protocol is present in both the ec_proto_allow and ec_proto_deny parameters, the ec_proto_allow parameter takes precedence. ec_clientip Restricts access to the specified requester's IP address. Both Internet Protocol version 4 (IPv4) and Internet Protocol version 6 (IPv6) are supported. You can specify either a single request IP address or IP addresses associated with a specific subnet. For example, `11.22.33.0/22` allows requests from IP addresses 11.22.32.1 to 11.22.35.254. After you have finished entering encryption parameter values, select a key to encrypt (if you've created both a primary and a backup key) from the Key To Encrypt list.
Select an encryption version from the Encryption Version list: V2 for version 2 or V3 for version 3 (recommended).
Select Encrypt to generate the token.
After the token is generated, it's displayed in the Generated Token box. To use the token, append it as a query string to the end of the file in your URL path. For example,
http://www.domain.com/content.mov?a4fbc3710fd3449a7c99986b.Optionally, test your token with the decrypt tool so that you can view your token's parameters. Paste the token value in the Token to Decrypt box. Select the encryption key to use from the Key To Decrypt list, then select Decrypt.
After the token is decrypted, its parameters are displayed in the Original Parameters box.
Optionally, customize the type of response code that is returned when a request is denied. Select Enabled, then select the response code from the Response Code list. Header Name is automatically set to Location. Select Save to implement the new response code. For certain response codes, you must also enter the URL of your error page in the Header Value box. The 403 response code (Forbidden) is selected by default.
Under HTTP Large, select Rules Engine. You use the rules engine to define paths to apply the feature, enable the token authentication feature, and enable extra token authentication-related capabilities. For more information, see Rules engine reference.
Select an existing rule or create a new rule to define the asset or path for which you want to apply token authentication.
To enable token authentication on a rule, select Token Auth from the Features list, then select Enabled. Select Update if you're updating a rule or Add if you're creating a rule.

In the rules engine, you can also enable more token authentication-related features. To enable any of the following features, select it from the Features list, then select Enabled.
Token Auth Denial Code: Determines the type of response that is returned to a user when a request is denied. Rules set here override the response code set in the Custom Denial Handling section on the token-based authentication page.
Token Auth Ignore URL Case: Determines whether the URL used to validate the token is case-sensitive.
Token Auth Parameter: Renames the token auth query string parameter that appears in the requested URL.

You can customize your token by accessing source code in GitHub. Available languages include:
- C
- C#
- PHP
- Perl
- Java
- Python
Azure Content Delivery Network features and provider pricing
For information about features, see Azure Content Delivery Network product features. For information about pricing, see Content Delivery Network pricing.
Feedback
Coming soon: Throughout 2024 we will be phasing out GitHub Issues as the feedback mechanism for content and replacing it with a new feedback system. For more information see: https://aka.ms/ContentUserFeedback.
Submit and view feedback for