Tutorial: Deploy a Dapr application to Azure Container Apps using the Azure CLI
Dapr (Distributed Application Runtime) helps developers build resilient, reliable microservices. In this tutorial, a sample Dapr application is deployed to Azure Container Apps.
You learn how to:
- Create a Container Apps environment for your container apps
- Create an Azure Blob Storage state store for the container app
- Deploy two apps that produce and consume messages and persist them in the state store
- Verify the interaction between the two microservices.
With Azure Container Apps, you get a fully managed version of the Dapr APIs when building microservices. When you use Dapr in Azure Container Apps, you can enable sidecars to run next to your microservices that provide a rich set of capabilities. Available Dapr APIs include Service to Service calls, Pub/Sub, Event Bindings, State Stores, and Actors.
In this tutorial, you deploy the same applications from the Dapr Hello World quickstart.
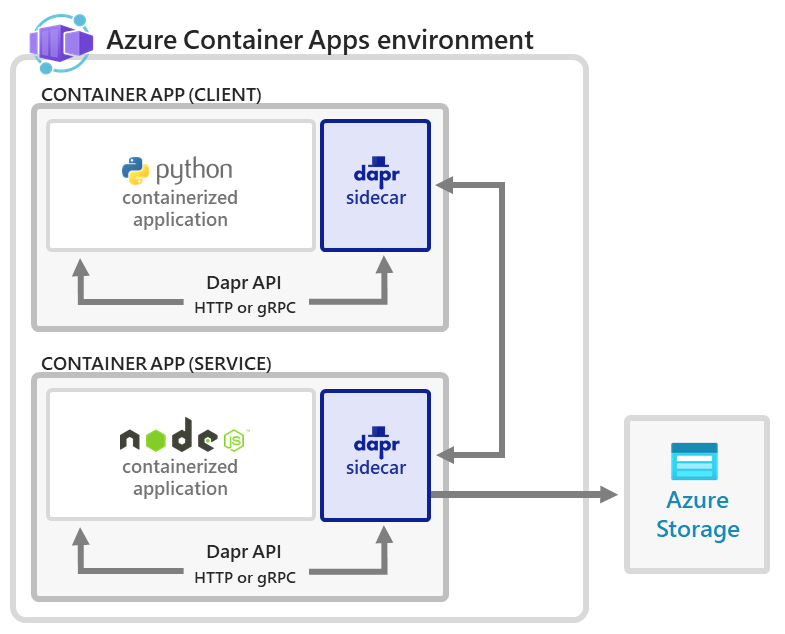
The application consists of:
- A client (Python) container app to generate messages.
- A service (Node) container app to consume and persist those messages in a state store
The following architecture diagram illustrates the components that make up this tutorial:
Setup
To sign in to Azure from the CLI, run the following command and follow the prompts to complete the authentication process.
az login
To ensure you're running the latest version of the CLI, run the upgrade command.
az upgrade
Next, install or update the Azure Container Apps extension for the CLI.
If you receive errors about missing parameters when you run az containerapp commands in Azure CLI or cmdlets from the Az.App module in Azure PowerShell, be sure you have the latest version of the Azure Container Apps extension installed.
az extension add --name containerapp --upgrade
Note
Starting in May 2024, Azure CLI extensions no longer enable preview features by default. To access Container Apps preview features, install the Container Apps extension with --allow-preview true.
az extension add --name containerapp --upgrade --allow-preview true
Now that the current extension or module is installed, register the Microsoft.App and Microsoft.OperationalInsights namespaces.
Note
Azure Container Apps resources have migrated from the Microsoft.Web namespace to the Microsoft.App namespace. Refer to Namespace migration from Microsoft.Web to Microsoft.App in March 2022 for more details.
az provider register --namespace Microsoft.App
az provider register --namespace Microsoft.OperationalInsights
Set environment variables
Set the following environment variables. Replace <PLACEHOLDERS> with your values:
RESOURCE_GROUP="<RESOURCE_GROUP>"
LOCATION="<LOCATION>"
CONTAINERAPPS_ENVIRONMENT="<CONTAINERAPPS_ENVIRONMENT>"
Create an Azure resource group
Create a resource group to organize the services related to your container app deployment.
az group create \
  --name $RESOURCE_GROUP \
  --location "$LOCATION"
Create an environment
An environment in Azure Container Apps creates a secure boundary around a group of container apps. Container Apps deployed to the same environment are deployed in the same virtual network and write logs to the same Log Analytics workspace.
To create the environment, run the following command:
az containerapp env create \
  --name $CONTAINERAPPS_ENVIRONMENT \
  --resource-group $RESOURCE_GROUP \
  --location "$LOCATION"
Set up a state store
Create an Azure Blob Storage account
With the environment deployed, the next step is to deploy an Azure Blob Storage account that is used by one of the microservices to store data. Before deploying the service, you need to choose a name for the storage account. Storage account names must be unique within Azure, from 3 to 24 characters in length and must contain numbers and lowercase letters only.
STORAGE_ACCOUNT_NAME="<storage account name>"
Use the following command to create the Azure Storage account.
az storage account create \
  --name $STORAGE_ACCOUNT_NAME \
  --resource-group $RESOURCE_GROUP \
  --location "$LOCATION" \
  --sku Standard_RAGRS \
  --kind StorageV2
Configure a user-assigned identity for the node app
While Container Apps supports both user-assigned and system-assigned managed identity, a user-assigned identity provides the Dapr-enabled node app with permissions to access the blob storage account.
- Create a user-assigned identity.
az identity create --resource-group $RESOURCE_GROUP --name "nodeAppIdentity" --output json
Retrieve the principalId and id properties and store in variables.
PRINCIPAL_ID=$(az identity show -n "nodeAppIdentity" --resource-group $RESOURCE_GROUP --query principalId | tr -d \")
IDENTITY_ID=$(az identity show -n "nodeAppIdentity" --resource-group $RESOURCE_GROUP --query id | tr -d \")
CLIENT_ID=$(az identity show -n "nodeAppIdentity" --resource-group $RESOURCE_GROUP --query clientId | tr -d \")
- Assign the
Storage Blob Data Contributorrole to the user-assigned identity
Retrieve the subscription ID for your current subscription.
SUBSCRIPTION_ID=$(az account show --query id --output tsv)
az role assignment create --assignee $PRINCIPAL_ID  \
--role "Storage Blob Data Contributor" \
--scope "/subscriptions/$SUBSCRIPTION_ID/resourceGroups/$RESOURCE_GROUP/providers/Microsoft.Storage/storageAccounts/$STORAGE_ACCOUNT_NAME"
Configure the state store component
There are multiple ways to authenticate to external resources via Dapr. This example doesn't use the Dapr Secrets API at runtime, but uses an Azure-based state store. Therefore, you can forgo creating a secret store component and instead provide direct access from the node app to the blob store using Managed Identity. If you want to use a non-Azure state store or the Dapr Secrets API at runtime, you could create a secret store component. This component would load runtime secrets so you can reference them at runtime.
Open a text editor and create a config file named statestore.yaml with the properties that you sourced from the previous steps. This file helps enable your Dapr app to access your state store. The following example shows how your statestore.yaml file should look when configured for your Azure Blob Storage account:
# statestore.yaml for Azure Blob storage component
componentType: state.azure.blobstorage
version: v1
metadata:
  - name: accountName
    value: "<STORAGE_ACCOUNT_NAME>"
  - name: containerName
    value: mycontainer
  - name: azureClientId
    value: "<MANAGED_IDENTITY_CLIENT_ID>"
scopes:
  - nodeapp
To use this file, update the placeholders:
- Replace
<STORAGE_ACCOUNT_NAME>with the value of theSTORAGE_ACCOUNT_NAMEvariable you defined. To obtain its value, run the following command:
echo $STORAGE_ACCOUNT_NAME
- Replace
<MANAGED_IDENTITY_CLIENT_ID>with the value of theCLIENT_IDvariable you defined. To obtain its value, run the following command:
echo $CLIENT_ID
Navigate to the directory in which you stored the component yaml file and run the following command to configure the Dapr component in the Container Apps environment. For more information about configuring Dapr components, see Configure Dapr components.
az containerapp env dapr-component set \
    --name $CONTAINERAPPS_ENVIRONMENT --resource-group $RESOURCE_GROUP \
    --dapr-component-name statestore \
    --yaml statestore.yaml
Deploy the service application (HTTP web server)
az containerapp create \
  --name nodeapp \
  --resource-group $RESOURCE_GROUP \
  --user-assigned $IDENTITY_ID \
  --environment $CONTAINERAPPS_ENVIRONMENT \
  --image dapriosamples/hello-k8s-node:latest \
  --min-replicas 1 \
  --max-replicas 1 \
  --enable-dapr \
  --dapr-app-id nodeapp \
  --dapr-app-port 3000 \
  --env-vars 'APP_PORT=3000'
By default, the image is pulled from Docker Hub.
Deploy the client application (headless client)
Run the following command to deploy the client container app.
az containerapp create \
  --name pythonapp \
  --resource-group $RESOURCE_GROUP \
  --environment $CONTAINERAPPS_ENVIRONMENT \
  --image dapriosamples/hello-k8s-python:latest \
  --min-replicas 1 \
  --max-replicas 1 \
  --enable-dapr \
  --dapr-app-id pythonapp
Verify the results
Confirm successful state persistence
You can confirm that the services are working correctly by viewing data in your Azure Storage account.
Open the Azure portal in your browser and navigate to your storage account.
Select Containers left side menu.
Select mycontainer.
Verify that you can see the file named
orderin the container.Select the file.
Select the Edit tab.
Select the Refresh button to observe how the data automatically updates.
View Logs
Logs from container apps are stored in the ContainerAppConsoleLogs_CL custom table in the Log Analytics workspace. You can view logs through the Azure portal or via the CLI. There may be a small delay initially for the table to appear in the workspace.
Use the following CLI command to view logs using the command line.
LOG_ANALYTICS_WORKSPACE_CLIENT_ID=`az containerapp env show --name $CONTAINERAPPS_ENVIRONMENT --resource-group $RESOURCE_GROUP --query properties.appLogsConfiguration.logAnalyticsConfiguration.customerId --out tsv`

az monitor log-analytics query \
  --workspace $LOG_ANALYTICS_WORKSPACE_CLIENT_ID \
  --analytics-query "ContainerAppConsoleLogs_CL | where ContainerAppName_s == 'nodeapp' and (Log_s contains 'persisted' or Log_s contains 'order') | project ContainerAppName_s, Log_s, TimeGenerated | sort by TimeGenerated | take 5" \
  --out table
The following output demonstrates the type of response to expect from the CLI command.
ContainerAppName_s    Log_s                            TableName      TimeGenerated
--------------------  -------------------------------  -------------  ------------------------
nodeapp               Got a new order! Order ID: 61    PrimaryResult  2021-10-22T21:31:46.184Z
nodeapp               Successfully persisted state.    PrimaryResult  2021-10-22T21:31:46.184Z
nodeapp               Got a new order! Order ID: 62    PrimaryResult  2021-10-22T22:01:57.174Z
nodeapp               Successfully persisted state.    PrimaryResult  2021-10-22T22:01:57.174Z
nodeapp               Got a new order! Order ID: 63    PrimaryResult  2021-10-22T22:45:44.618Z
Clean up resources
Congratulations! You've completed this tutorial. If you'd like to delete the resources created as a part of this walkthrough, run the following command.
Caution
This command deletes the specified resource group and all resources contained within it. If resources outside the scope of this tutorial exist in the specified resource group, they will also be deleted.
az group delete --resource-group $RESOURCE_GROUP
Note
Since pythonapp continuously makes calls to nodeapp with messages that get persisted into your configured state store, it is important to complete these cleanup steps to avoid ongoing billable operations.
Tip
Having issues? Let us know on GitHub by opening an issue in the Azure Container Apps repo.
Next steps
Feedback
Coming soon: Throughout 2024 we will be phasing out GitHub Issues as the feedback mechanism for content and replacing it with a new feedback system. For more information see: https://aka.ms/ContentUserFeedback.
Submit and view feedback for