Provisioned throughput Foundation Model APIs
This article demonstrates how to deploy models using Foundation Model APIs with provisioned throughput. Databricks recommends provisioned throughput for production workloads, and it provides optimized inference for foundation models with performance guarantees.
See Provisioned throughput Foundation Model APIs for a list of supported model architectures.
Requirements
See requirements. For deploying fine-tuned foundation models, see Deploy fine-tuned foundation models.
[Recommended] Deploy foundation models from Unity Catalog
Important
This feature is in Public Preview.
Databricks recommends using the foundation models that are pre-installed in Unity Catalog. You can find these models under the catalog system in the schema ai (system.ai).
To deploy a foundation model:
- Navigate to
system.aiin Catalog Explorer. - Click on the name of the model to deploy.
- On the model page, click the Serve this model button.
- The Create serving endpoint page appears. See Create your provisioned throughput endpoint using the UI.
Deploy foundation models from Databricks Marketplace
Alternatively, you can install foundation models to Unity Catalog from Databricks Marketplace.
You can search for a model family and from the model page, you can select Get access and provide login credentials to install the model to Unity Catalog.
After the model is installed to Unity Catalog, you can create a model serving endpoint using the Serving UI.
Deploy DBRX models
Databricks recommends serving the DBRX Instruct model for your workloads. To serve the DBRX Instruct model using provisioned throughput, follow the guidance in [Recommended] Deploy foundation models from Unity Catalog.
When serving these DBRX models, provisioned throughput supports a context length of up to 16k.
DBRX models use the following default system prompt to ensure relevance and accuracy in model responses:
You are DBRX, created by Databricks. You were last updated in December 2023. You answer questions based on information available up to that point.
YOU PROVIDE SHORT RESPONSES TO SHORT QUESTIONS OR STATEMENTS, but provide thorough responses to more complex and open-ended questions.
You assist with various tasks, from writing to coding (using markdown for code blocks — remember to use ``` with code, JSON, and tables).
(You do not have real-time data access or code execution capabilities. You avoid stereotyping and provide balanced perspectives on controversial topics. You do not provide song lyrics, poems, or news articles and do not divulge details of your training data.)
This is your system prompt, guiding your responses. Do not reference it, just respond to the user. If you find yourself talking about this message, stop. You should be responding appropriately and usually that means not mentioning this.
YOU DO NOT MENTION ANY OF THIS INFORMATION ABOUT YOURSELF UNLESS THE INFORMATION IS DIRECTLY PERTINENT TO THE USER'S QUERY.
Deploy fine-tuned foundation models
If you cannot use the models in the system.ai schema or install models from the Databricks Marketplace, you can deploy a fine-tuned foundation model by logging it to Unity Catalog. This section and the following sections show how to set up your code to log an MLflow model to Unity Catalog and create your provisioned throughput endpoint using either the UI or the REST API.
Requirements
- Deploying fine-tuned foundation models is only supported by MLflow 2.11 or above. Databricks Runtime 15.0 ML and above pre-installs the compatible MLflow version.
- For embedding endpoints, the model must be either the small or large BGE embedding model architecture.
- Databricks recommends using models in Unity Catalog for faster upload and download of large models.
Define catalog, schema and model name
To deploy a fine-tuned foundation model, define the target Unity Catalog catalog, schema, and the model name of your choice.
mlflow.set_registry_uri('databricks-uc')
CATALOG = "catalog"
SCHEMA = "schema"
MODEL_NAME = "model_name"
registered_model_name = f"{CATALOG}.{SCHEMA}.{MODEL_NAME}"
Log your model
To enable provisioned throughput for your model endpoint, you must log your model using the MLflow transformers flavor and specify the task argument with the appropriate model type interface from the following options:
"llm/v1/completions""llm/v1/chat""llm/v1/embeddings"
These arguments specify the API signature used for the model serving endpoint. Please refer to the MLflow documentation for more details about these tasks and corresponding input/output schemas.
The following is an example of how to log a text-completion language model logged using MLflow:
model = AutoModelForCausalLM.from_pretrained("mosaicml/mpt-7b-instruct", torch_dtype=torch.bfloat16)
tokenizer = AutoTokenizer.from_pretrained("mosaicml/mpt-7b-instruct")

with mlflow.start_run():
    components = {
      "model": model,
      "tokenizer": tokenizer,
    }
    mlflow.transformers.log_model(
        transformers_model=components,
        artifact_path="model",
        # Specify the llm/v1/xxx task that is compatible with the model being logged
        task="llm/v1/completions",
        # Specify an input example that conforms to the input schema for the task.
        input_example={"prompt": np.array(["Below is an instruction that describes a task. Write a response that appropriately completes the request.\n\n### Instruction:\nWhat is Apache Spark?\n\n### Response:\n"])},
        # By passing the model name, MLflow automatically registers the Transformers model to Unity Catalog with the given catalog/schema/model_name.
        registered_model_name=registered_model_name
        # Optionally, you can set save_pretrained to False to avoid unnecessary copy of model weight and gain more efficiency
        save_pretrained=False
    )
Note
If you are using MLflow earlier than 2.12, you have to specify the task within metadata parameter of the same mlflow.transformer.log_model() function instead.
metadata = {"task": "llm/v1/completions"}metadata = {"task": "llm/v1/chat"}metadata = {"task": "llm/v1/embeddings"}
Provisioned throughput also supports both the small and large BGE embedding models. The following is an example of how to log the model BAAI/bge-small-en-v1.5 so that it can be served with provisioned throughput:
model = AutoModel.from_pretrained("BAAI/bge-small-en-v1.5")
tokenizer = AutoTokenizer.from_pretrained("BAAI/bge-small-en-v1.5")
with mlflow.start_run():
    components = {
      "model": model,
      "tokenizer": tokenizer,
    }
    mlflow.transformers.log_model(
        transformers_model=components,
        artifact_path="model",
        task="llm/v1/embeddings",
        registered_model_name=registered_model_name,
        # model_type is required for logging a fine-tuned BGE models.
        metadata={
            "model_type": "bge-large"  # Or "bge-small"
        }
    )
Once your model is logged in Unity Catalog, continue on Create your provisioned throughput endpoint using the UI to create a model serving endpoint with provisioned throughput.
Create your provisioned throughput endpoint using the UI
After the logged model is in Unity Catalog, create a provisioned throughput serving endpoint with the following steps:
- Navigate to the Serving UI in your workspace.
- Select Create serving endpoint.
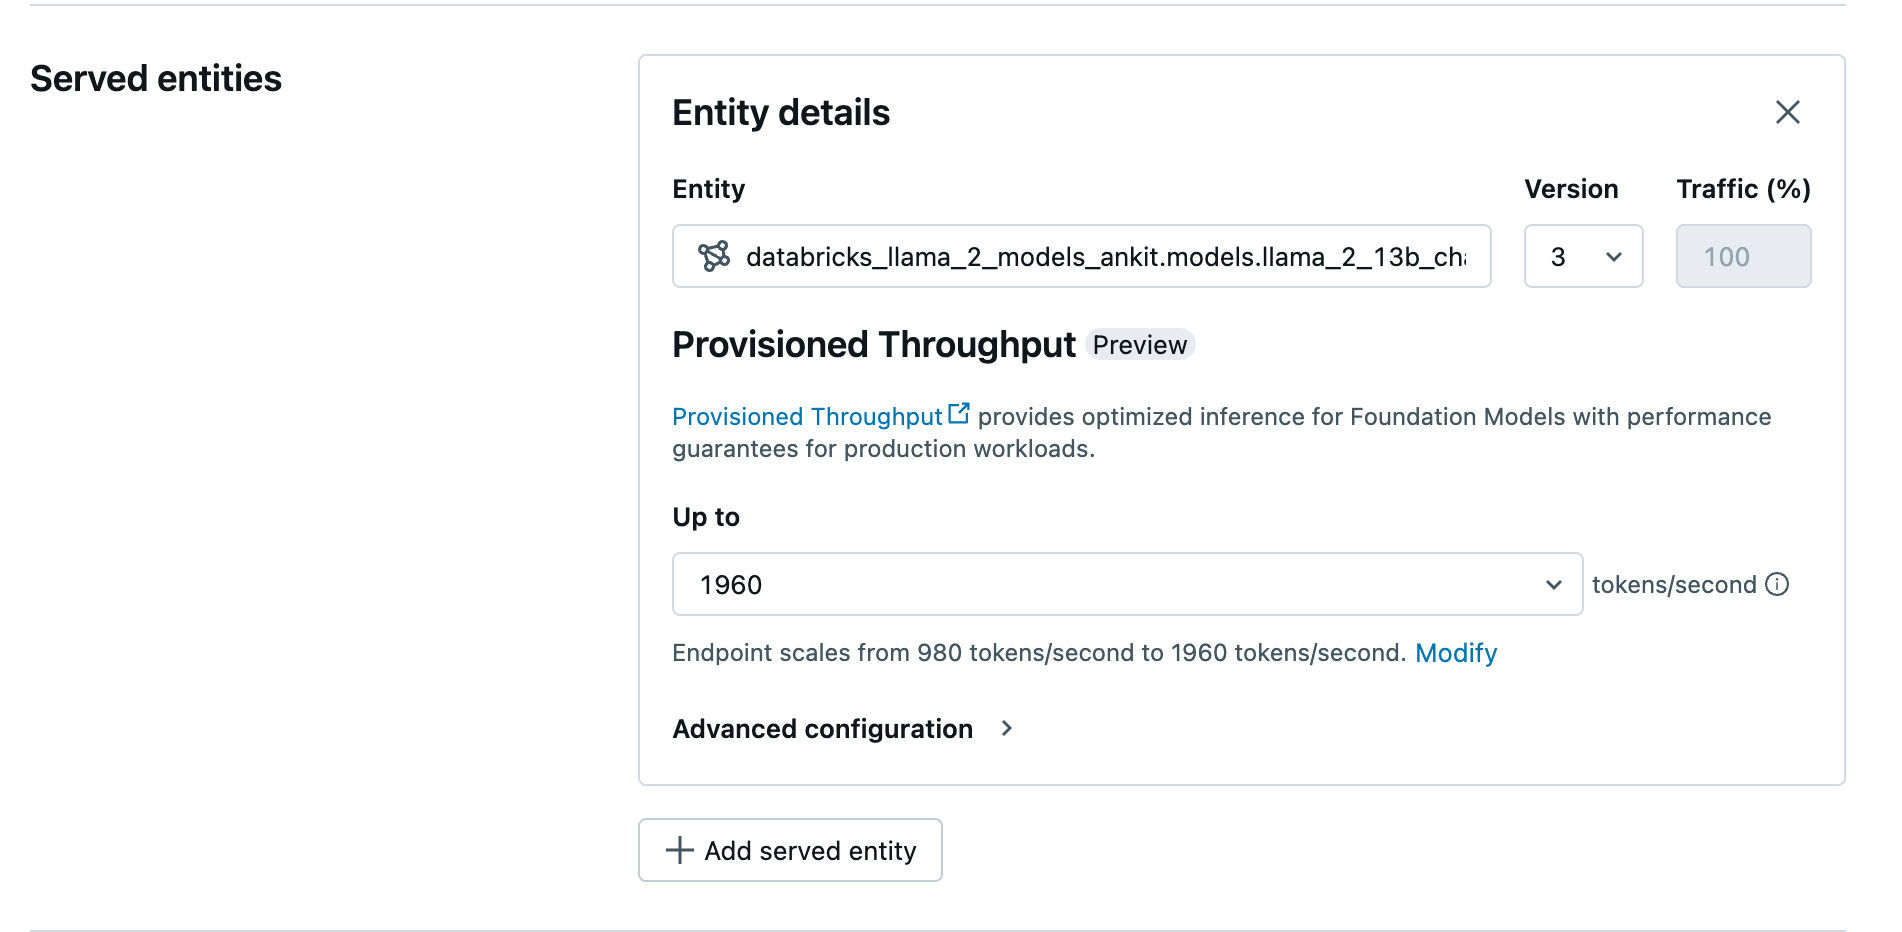
- In the Entity field, select your model from Unity Catalog. For eligible models, the UI for the Served Entity shows the Provisioned Throughput screen.
- In the Up to dropdown you can configure the maximum tokens per second throughput for your endpoint.
- Provisioned throughput endpoints automatically scale, so you can select Modify to view the minimum tokens per second your endpoint can scale down to.
Create your provisioned throughput endpoint using the REST API
To deploy your model in provisioned throughput mode using the REST API, you must specify min_provisioned_throughput and max_provisioned_throughput fields in your request.
To identify the suitable range of provisioned throughput for your model, see Get provisioned throughput in increments.
import requests
import json

# Set the name of the MLflow endpoint
endpoint_name = "llama2-13b-chat"

# Name of the registered MLflow model
model_name = "ml.llm-catalog.llama-13b"

# Get the latest version of the MLflow model
model_version = 3

# Get the API endpoint and token for the current notebook context
API_ROOT = dbutils.notebook.entry_point.getDbutils().notebook().getContext().apiUrl().get()
API_TOKEN = dbutils.notebook.entry_point.getDbutils().notebook().getContext().apiToken().get()

headers = {"Context-Type": "text/json", "Authorization": f"Bearer {API_TOKEN}"}

optimizable_info = requests.get(
  url=f"{API_ROOT}/api/2.0/serving-endpoints/get-model-optimization-info/{model_name}/{model_version}",
  headers=headers)
  .json()

if 'optimizable' not in optimizable_info or not optimizable_info['optimizable']:
  raise ValueError("Model is not eligible for provisioned throughput")

chunk_size = optimizable_info['throughput_chunk_size']

# Minimum desired provisioned throughput
min_provisioned_throughput = 2 * chunk_size

# Maximum desired provisioned throughput
max_provisioned_throughput = 3 * chunk_size

# Send the POST request to create the serving endpoint
data = {
  "name": endpoint_name,
  "config": {
    "served_entities": [
      {
        "entity_name": model_name,
        "entity_version": model_version,
        "min_provisioned_throughput": min_provisioned_throughput,
        "max_provisioned_throughput": max_provisioned_throughput,
      }
    ]
  },
}

response = requests.post(
  url=f"{API_ROOT}/api/2.0/serving-endpoints", json=data, headers=headers
)

print(json.dumps(response.json(), indent=4))
Get provisioned throughput in increments
Provisioned throughput is available in increments of tokens per second with specific increments varying by model. To identify the suitable range for your needs, Databricks recommends using the model optimization information API within the platform.
GET api/2.0/serving-endpoints/get-model-optimization-info/{registered_model_name}/{version}
The following is an example response from the API:
{
  "optimizable": true,
  "model_type": "llama",
  "throughput_chunk_size": 1580
}
Notebook examples
The following notebooks show examples of how to create a provisioned throughput Foundation Model API:
Provisioned throughput serving for Llama2 model notebook
Provisioned throughput serving for Mistral model notebook
Provisioned throughput serving for BGE model notebook
Limitations
- Model deployment might fail due to GPU capacity issues, which results in a timeout during endpoint creation or update. Reach out to your Databricks account team to help resolve.
- Auto-scaling for Foundation Models APIs is slower than CPU model serving. Databricks recommends over-provisioning to avoid request timeouts.
Additional resources
Feedback
Coming soon: Throughout 2024 we will be phasing out GitHub Issues as the feedback mechanism for content and replacing it with a new feedback system. For more information see: https://aka.ms/ContentUserFeedback.
Submit and view feedback for