Connect your non-Azure machines to Microsoft Defender for Cloud
Microsoft Defender for Cloud can monitor the security posture of your non-Azure machines, but first you need to connect them to Azure.
You can connect your non-Azure computers in any of the following ways:
- Onboarding with Azure Arc:
- By using Azure Arc-enabled servers (recommended)
- By using the Azure portal
- Onboarding directly with Microsoft Defender for Endpoint
This article describes the methods for onboarding with Azure Arc.
If you're connecting machines from other cloud providers, see Connect your AWS account or Connect your GCP project. The multicloud connectors for Amazon Web Services (AWS) and Google Cloud Platform (GCP) in Defender for Cloud transparently handle the Azure Arc deployment for you.
Prerequisites
To complete the procedures in this article, you need:
A Microsoft Azure subscription. If you don't have an Azure subscription, you can sign up for a free one.
Microsoft Defender for Cloud set up on your Azure subscription.
Access to an on-premises machine.
Connect on-premises machines by using Azure Arc
A machine that has Azure Arc-enabled servers becomes an Azure resource. When you install the Log Analytics agent on it, it appears in Defender for Cloud with recommendations, like your other Azure resources.
Azure Arc-enabled servers provide enhanced capabilities, such as enabling guest configuration policies on the machine and simplifying deployment with other Azure services. For an overview of the benefits of Azure Arc-enabled servers, see Supported cloud operations.
To deploy Azure Arc on one machine, follow the instructions in Quickstart: Connect hybrid machines with Azure Arc-enabled servers.
To deploy Azure Arc on multiple machines at scale, follow the instructions in Connect hybrid machines to Azure at scale.
Defender for Cloud tools for automatically deploying the Log Analytics agent work with machines running Azure Arc. However, this capability is currently in preview. When you connect your machines by using Azure Arc, use the relevant Defender for Cloud recommendation to deploy the agent and benefit from the full range of protections that Defender for Cloud offers:
- Log Analytics agent should be installed on your Linux-based Azure Arc machines
- Log Analytics agent should be installed on your Windows-based Azure Arc machines
Connect on-premises machines by using the Azure portal
After you connect Defender for Cloud to your Azure subscription, you can start connecting your on-premises machines from the Getting started page in Defender for Cloud.
Sign in to the Azure portal.
Search for and select Microsoft Defender for Cloud.
On the Defender for Cloud menu, select Getting started.
Select the Get started tab.
Find Add non-Azure servers and select Configure.

A list of your Log Analytics workspaces appears.
(Optional) If you don't already have a Log Analytics workspace in which to store the data, select Create new workspace, and follow the on-screen guidance.
From the list of workspaces, select Upgrade for the relevant workspace to turn on Defender for Cloud paid plans for 30 free days.
From the list of workspaces, select Add Servers for the relevant workspace.
On the Agents management page, choose one of the following procedures, depending on the type of machines you're onboarding:

Onboard your Windows server
When you add a Windows server, you need to get the information on the Agents management page and download the appropriate agent file (32 bit or 64 bit).
To onboard a Windows server:
Select Windows servers.
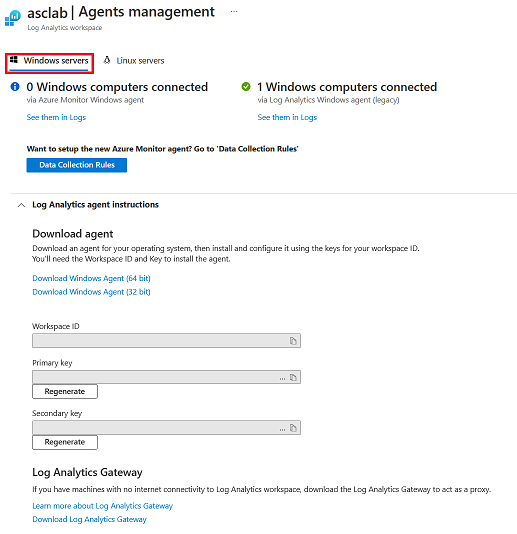
Select the Download Windows Agent link that's applicable to your computer processor type to download the setup file.
From the Agents management page, copy the Workspace ID and Primary Key values into Notepad.
Copy the downloaded setup file to the target computer and run it.
Follow the installation wizard (select Next > I Agree > Next > Next).
On the Azure Log Analytics page, paste the Workspace ID and Primary Key values that you copied into Notepad.
If the computer should report to a Log Analytics workspace in the Azure Government cloud, select Azure US Government from the Azure Cloud dropdown list.
If the computer needs to communicate through a proxy server to the Log Analytics service, select Advanced. Then provide the URL and port number of the proxy server.
When you finish entering all of the configuration settings, select Next.
On the Ready to Install page, review the settings to be applied and select Install.
On the Configuration completed successfully page, select Finish.
When the process is complete, Microsoft Monitoring agent appears in Control Panel. You can review your configuration there and verify that the agent is connected.
For more information on installing and configuring the agent, see Connect Windows machines.
Onboard your Linux server
To add Linux machines, you need the wget command from the Agents management page.
To onboard your Linux server:
Select Linux servers.
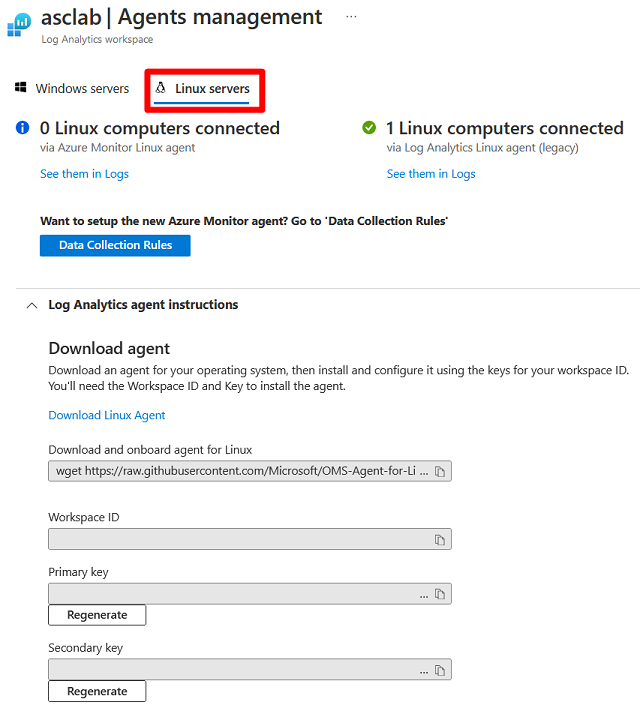
Copy the
wgetcommand into Notepad. Save this file to a location that you can access from your Linux computer.On your Linux computer, open the file that contains the
wgetcommand. Copy the entire contents and paste them into a terminal console.When the installation finishes, validate that the Operations Management Suite Agent is installed by running the
pgrepcommand. The command returns theomsagentpersistent ID.You can find the logs for the agent at
/var/opt/microsoft/omsagent/<workspace id>/log/. The new Linux machine might take up to 30 minutes to appear in Defender for Cloud.
Verify that your machines are connected
Your Azure and on-premises machines are available to view in one location.
To verify that your machines are connected:
Sign in to the Azure portal.
Search for and select Microsoft Defender for Cloud.
On the Defender for Cloud menu, select Inventory to show the asset inventory.
Filter the page to view the relevant resource types. These icons distinguish the types:
 Non-Azure machine
 Azure VM
 Azure Arc-enabled server
Integrate with Microsoft Defender XDR
When you enable Defender for Cloud, Defender for Cloud's alerts are automatically integrated into the Microsoft Defender Portal. No further steps are needed.
The integration between Microsoft Defender for Cloud and Microsoft Defender XDR brings your cloud environments into Microsoft Defender XDR. With Defender for Cloud's alerts and cloud correlations integrated into Microsoft Defender XDR, SOC teams can now access all security information from a single interface.
Learn more about Defender for Cloud's alerts in Microsoft Defender XDR.
Clean up resources
There's no need to clean up any resources for this article.
Next steps
- Protect all of your resources with Defender for Cloud.
- Set up your AWS account and GCP projects.
Feedback
Coming soon: Throughout 2024 we will be phasing out GitHub Issues as the feedback mechanism for content and replacing it with a new feedback system. For more information see: https://aka.ms/ContentUserFeedback.
Submit and view feedback for