Connect dev boxes to resources by configuring network connections
In this article, you learn how to manage network connections for a dev center in Microsoft Dev Box. Network connections enable dev boxes to connect to existing virtual networks. In addition, you can configure the network settings to enable connecting to on-premises resources from your dev box. The location, or Azure region, of the network connection determines where associated dev boxes are hosted.
You can choose to deploy dev boxes to a Microsoft-hosted network associated with a dev box pool or to a network that you manage. If you choose to deploy dev boxes to a network that you manage, you must first configure a network connection.
You need to add at least one network connection to a dev center in Microsoft Dev Box.
Prerequisites
- Sufficient permissions to enable creating and configuring network connections.
- At least one virtual network and subnet available for your dev boxes.
When you're planning network connectivity for your dev boxes, consider the following points:
- Identify the region or location that's closest to your dev box users. Deploying dev boxes into a region that's close to users gives them a better experience.
- Determine whether dev boxes should connect to your existing networks by using Microsoft Entra join or Microsoft Entra hybrid join.
Verify your permissions
To manage a network connection, confirm that you have the following permissions:
| Action | Role | Permissions required |
|---|---|---|
| Create and configure a virtual network and subnet | Network Contributor (Owner or Contributor) | Permissions on an existing virtual network or permission to create a new virtual network and subnet |
| Create or delete a network connection | Owner or Contributor | Permissions on an Azure subscription or on a specific resource group, which includes permission to create a resource group |
| Add or remove a network connection | Contributor | Permission to perform Write actions on the dev center |
Create a virtual network and subnet
To create a network connection, you need an existing virtual network and subnet. If you don't have a virtual network and subnet available, use the following steps to create them:
Sign in to the Azure portal.
In the search box, enter virtual network. In the list of results, select Virtual Network.
On the Virtual Network page, select Create.
On the Create virtual network pane, on the Basics tab, enter the following values:
Setting Value Subscription Select your subscription. Resource group Select an existing resource group, or create a new one by selecting Create new, entering a name, and then selecting OK. Name Enter a name for the virtual network. Region Select the region for the virtual network and dev boxes. 
Important
The region you select for the virtual network is where Azure deploys the dev boxes.
On the IP Addresses tab, accept the default settings.
On the Security tab, accept the default settings.
On the Review + create tab, review the settings.
Select Create.

Allow access to Microsoft Dev Box endpoints from your network
An organization can control network ingress and egress by using a firewall, network security groups, and even Microsoft Defender.
If your organization routes egress traffic through a firewall, you need to open certain ports to allow the Microsoft Dev Box service to function. For more information, see Network requirements.
Plan a network connection
The following sections show you how to create and configure a network connection in Microsoft Dev Box.
Review types of Active Directory join
Microsoft Dev Box requires a configured and working Active Directory join, which defines how dev boxes join your domain and access resources. There are two choices: Microsoft Entra join and Microsoft Entra hybrid join.
Microsoft Entra join. If your organization uses Microsoft Entra ID, you can use a Microsoft Entra join (sometimes called a native Microsoft Entra join). Dev box users sign in to Microsoft Entra joined dev boxes by using their Microsoft Entra account. They access resources based on the permissions assigned to that account. Microsoft Entra join enables access to cloud-based and on-premises apps and resources. For more information, see Plan your Microsoft Entra join deployment.
Microsoft Entra hybrid join. If your organization has an on-premises Active Directory implementation, you can still benefit from some of the functionality in Microsoft Entra ID by using Microsoft Entra hybrid joined dev boxes. These dev boxes are joined to your on-premises Active Directory instance and registered with Microsoft Entra ID. Microsoft Entra hybrid joined dev boxes require network line of sight to your on-premises domain controllers periodically. Without this connection, devices become unusable. For more information, see Plan your Microsoft Entra hybrid join deployment.
Create a network connection
Sign in to the Azure portal.
In the search box, enter network connections. In the list of results, select Network Connections.
On the Network Connections page, select Create.

On the Create a network connection pane, on the Basics tab, enter the following values:
Setting Value Domain join type Select Microsoft Entra join. Subscription Select the subscription in which you want to create the network connection. Resource group Select an existing resource group, or select Create new and then enter a name for the new resource group. Name Enter a descriptive name for the network connection. Virtual network Select the virtual network that you want the network connection to use. Subnet Select the subnet that you want the network connection to use. 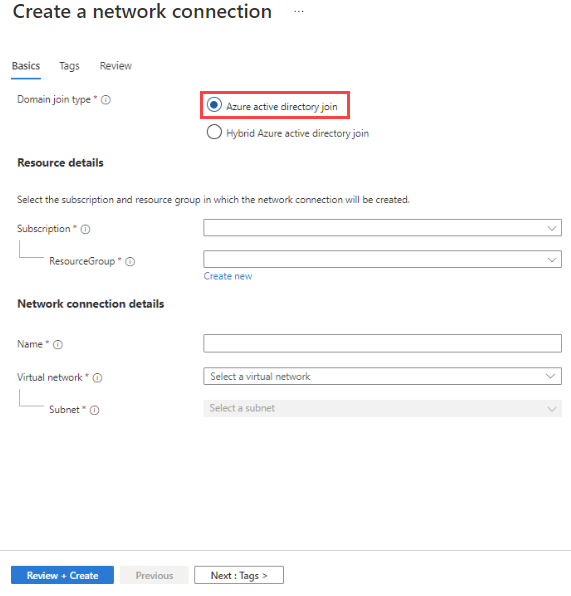
Select Review + Create.
On the Review tab, select Create.
When the deployment completes, select Go to resource. Confirm the connection appears on the Network Connections page.


Note
Microsoft Dev Box automatically creates a resource group for each network connection, which holds the network interface cards (NICs) that use the virtual network assigned to the network connection. The resource group has a fixed name based on the name and region of the network connection. You can't change the name of the resource group, or specify an existing resource group.
Attach a network connection to a dev center
You can attach existing network connections to a dev center. You must attach a network connection to a dev center before you can use it in projects to create dev box pools.
Network connections enable dev boxes to connect to existing virtual networks. The location, or Azure region, of the network connection determines where associated dev boxes are hosted.
To attach a network connection to a dev center in Microsoft Dev Box:
Sign in to the Azure portal.
In the search box, enter dev centers. In the list of results, select Dev centers.
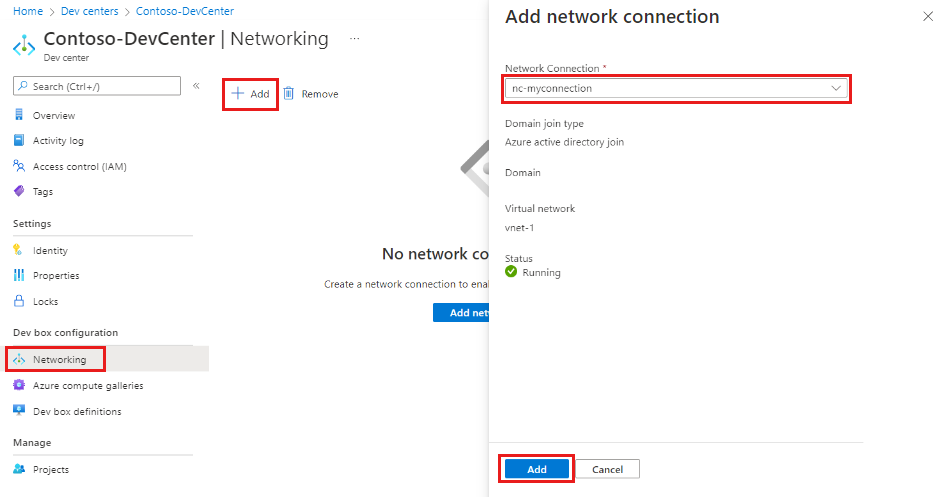
Select the dev center that you created, and then select Networking.
Select + Add.
On the Add network connection pane, select the network connection that you created earlier, and then select Add.

After you attach a network connection, the Azure portal runs several health checks on the network. You can view the status of the checks on the resource overview page.

You can add network connections that pass all health checks to a dev center and use them to create dev box pools. Dev boxes within dev box pools are created and domain joined in the location of the virtual network assigned to the network connection.
To resolve any errors, see Troubleshoot Azure network connections.
Remove a network connection from a dev center
You can remove network connections from dev centers. Network connections can't be removed if one or more dev box pools are using them.
Sign in to the Azure portal.
In the search box, enter dev centers. In the list of results, select Dev centers.
Select the dev center that you created, and then select Networking.
Select the network connection that you want to remove, and then select Remove.
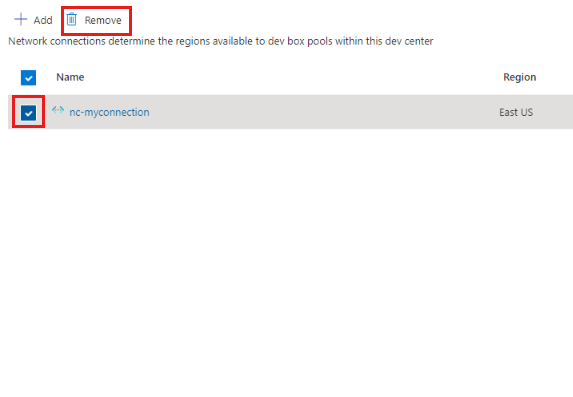
Review the warning message, and then select OK.

After you remove a network connection, it's no longer available for use in dev box pools within the dev center.