Configure a custom domain on Azure Front Door by using the Azure portal
When you use Azure Front Door for application delivery, a custom domain is necessary if you want your own domain name to be visible in your user requests. Having a visible domain name can be convenient for your customers and useful for branding purposes.
After you create an Azure Front Door Standard/Premium profile, the default front-end host has the subdomain azurefd.net. This subdomain gets included in the URL when Azure Front Door Standard/Premium delivers content from your back end by default. An example is https://contoso-frontend.azurefd.net/activeusers.htm.
For your convenience, Azure Front Door provides the option of associating a custom domain with the default host. With this option, you deliver your content with a custom domain in your URL instead of a domain name that Azure Front Door owns. An example is https://www.contoso.com/photo.png.
Prerequisites
- Before you can finish the steps in this tutorial, you must first create an Azure Front Door profile. For more information, see Quickstart: Create an Azure Front Door Standard/Premium.
- If you don't already have a custom domain, you must first purchase one with a domain provider. For example, see Buy a custom domain name.
- If you're using Azure to host your DNS domains, you must delegate the domain provider's domain name system (DNS) to Azure DNS. For more information, see Delegate a domain to Azure DNS. Otherwise, if you're using a domain provider to handle your DNS domain, you must manually validate the domain by entering prompted DNS TXT records.
Add a new custom domain
Note
If a custom domain is validated in an Azure Front Door or a Microsoft CDN profile already, then it can't be added to another profile.
A custom domain is configured on the Domains pane of the Azure Front Door profile. A custom domain can be set up and validated before endpoint association. A custom domain and its subdomains can only be associated with a single endpoint at a time. However, you can use different subdomains from the same custom domain for different Azure Front Door profiles. You can also map custom domains with different subdomains to the same Azure Front Door endpoint.
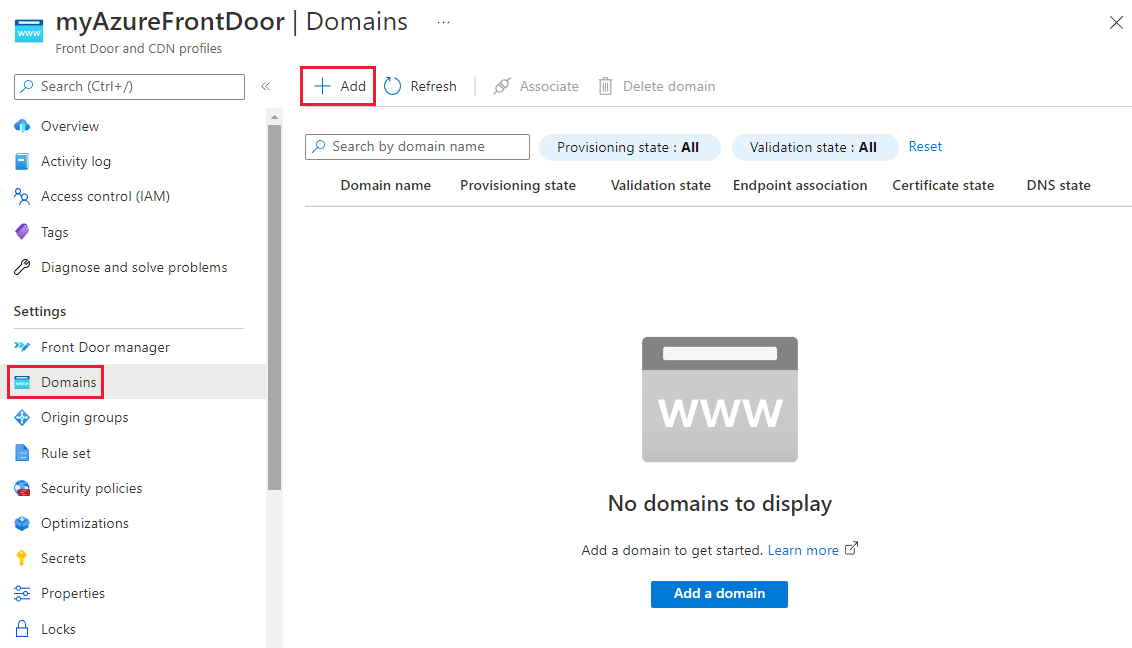
Under Settings, select Domains for your Azure Front Door profile. Then select + Add.
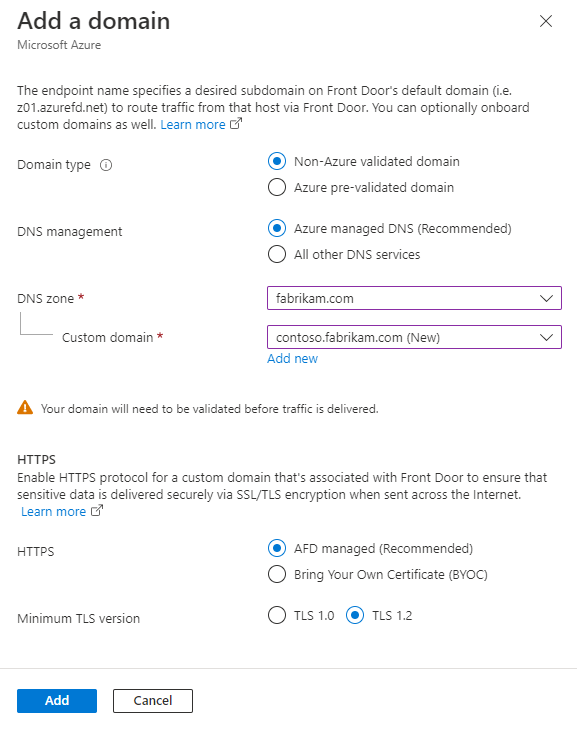
On the Add a domain pane, select the domain type. You can choose Non-Azure validated domain or Azure pre-validated domain.
Non-Azure validated domain is a domain that requires ownership validation. When you select Non-Azure validated domain, we recommend that you use the Azure-managed DNS option. You might also use your own DNS provider. If you choose an Azure-managed DNS, select an existing DNS zone. Then select an existing custom subdomain or create a new one. If you're using another DNS provider, manually enter the custom domain name. Then select Add to add your custom domain.
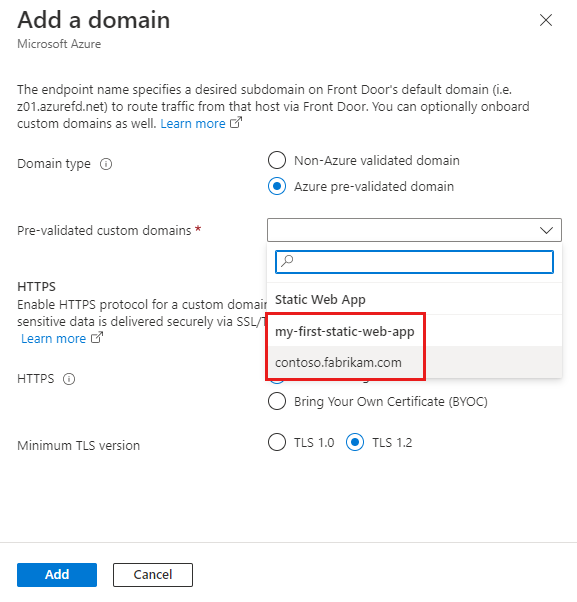
Azure pre-validated domain is a domain already validated by another Azure service. When you select this option, domain ownership validation isn't required from Azure Front Door. A dropdown list of validated domains by different Azure services appears.
Note
- Azure Front Door supports both Azure-managed certificates and Bring Your Own Certificates (BYOCs). For a non-Azure validated domain, the Azure-managed certificate is issued and managed by Azure Front Door. For an Azure prevalidated domain, the Azure-managed certificate gets issued and is managed by the Azure service that validates the domain. To use your own certificate, see Configure HTTPS on a custom domain.
- Azure Front Door supports Azure prevalidated domains and Azure DNS zones in different subscriptions.
- Currently, Azure prevalidated domains only support domains validated by Azure Static Web Apps.
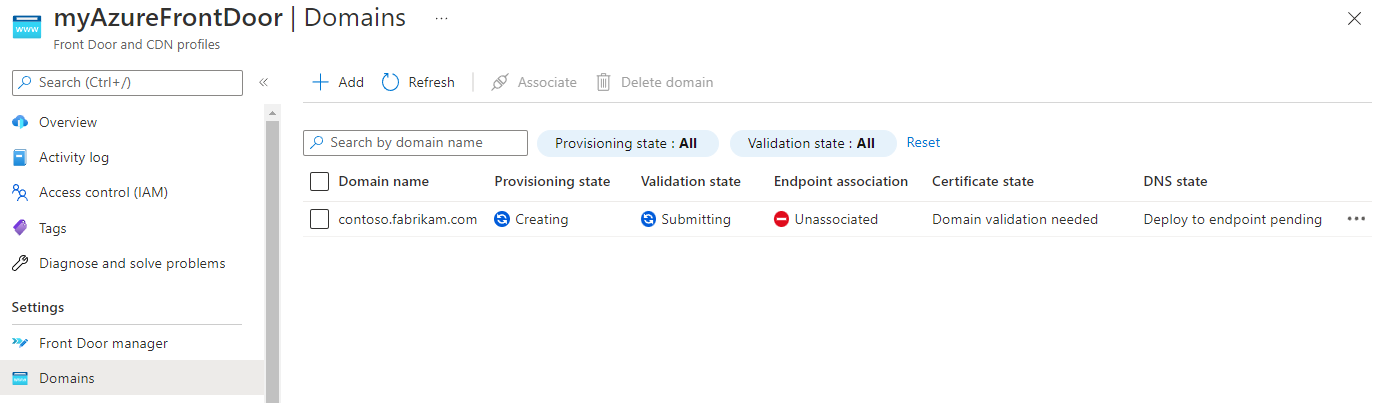
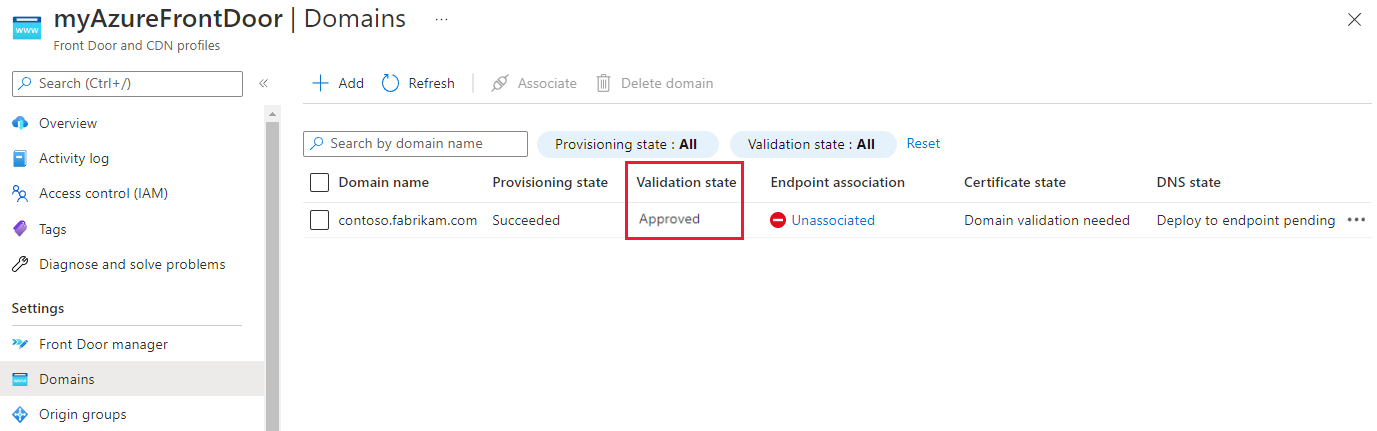
A new custom domain has a validation state of Submitting.
Note
- As of September 2023, Azure Front Door now supports BYOC-based domain ownership validation. Azure Front Door automatically approves the domain ownership if the Certificate Name (CN) or Subject Alternative Name (SAN) of the provided certificate matches the custom domain. When you select Azure managed certificate, the domain ownership continues to be validated via the DNS TXT record.
- For custom domains created before BYOC-based validation is supported and the domain validation status is anything but Approved, you need to trigger the auto-approval of the domain ownership validation by selecting Validation State > Revalidate in the portal. If you're using the command-line tool, you can trigger domain validation by sending an empty
PATCHrequest to the domain API. - An Azure prevalidated domain has a validation state of Pending. It automatically changes to Approved after a few minutes. After validation gets approved, skip to Associate the custom domain to your Front Door endpoint and finish the remaining steps.
After a few minutes, the validation state changes to Pending.

Select the Pending validation state. A new pane appears with DNS TXT record information that's needed to validate the custom domain. The TXT record is in the form of
_dnsauth.<your_subdomain>. If you're using an Azure DNS-based zone, select Add. A new TXT record with the record value that appears is created in the Azure DNS zone. If you're using another DNS provider, manually create a new TXT record named_dnsauth.<your_subdomain>, with the record value as shown on the pane.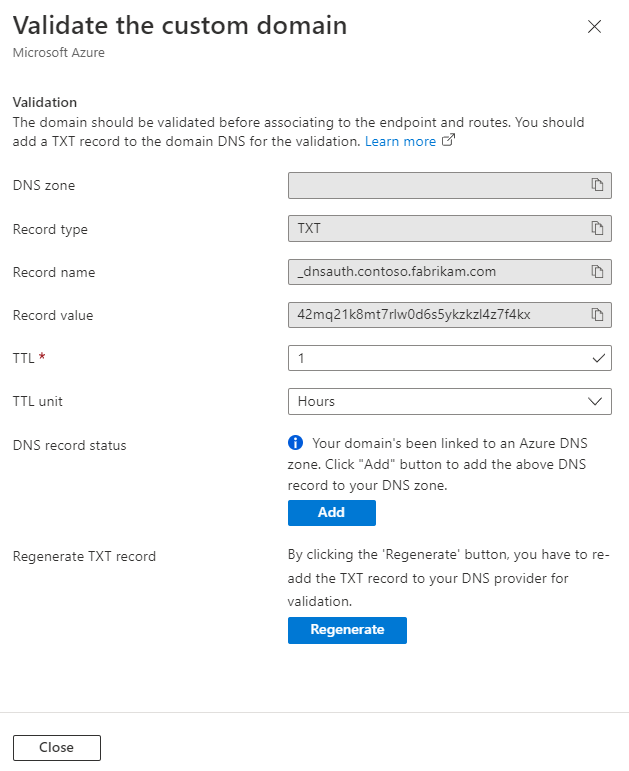
Close the pane to return to the custom domains list landing pane. The provisioning state of the custom domain should change to Provisioned. The validation state should change to Approved.
For more information about domain validation states, see Domains in Azure Front Door.
Associate the custom domain with your Azure Front Door endpoint
After you validate your custom domain, you can associate it with your Azure Front Door Standard/Premium endpoint.
Select the Unassociated link to open the Associate endpoint and routes pane. Select an endpoint and the routes with which you want to associate the domain. Then select Associate to update your configuration.
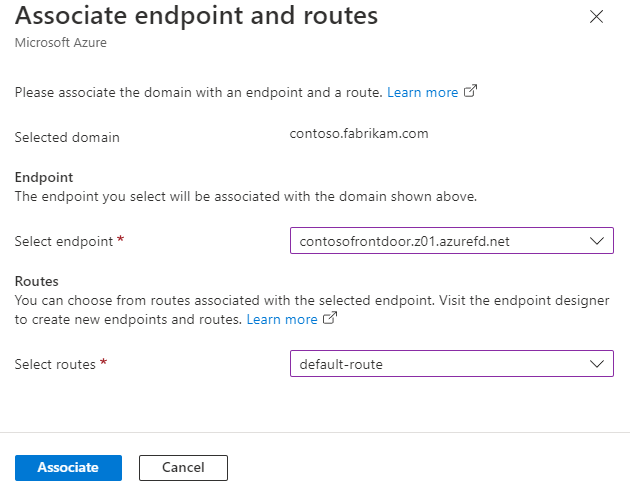
The Endpoint association status should change to reflect the endpoint to which the custom domain is currently associated.
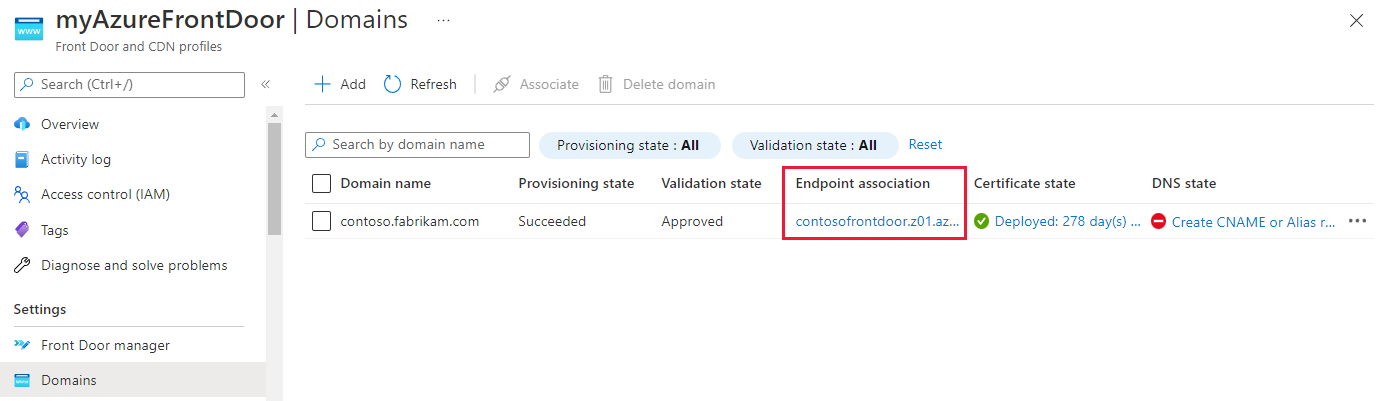
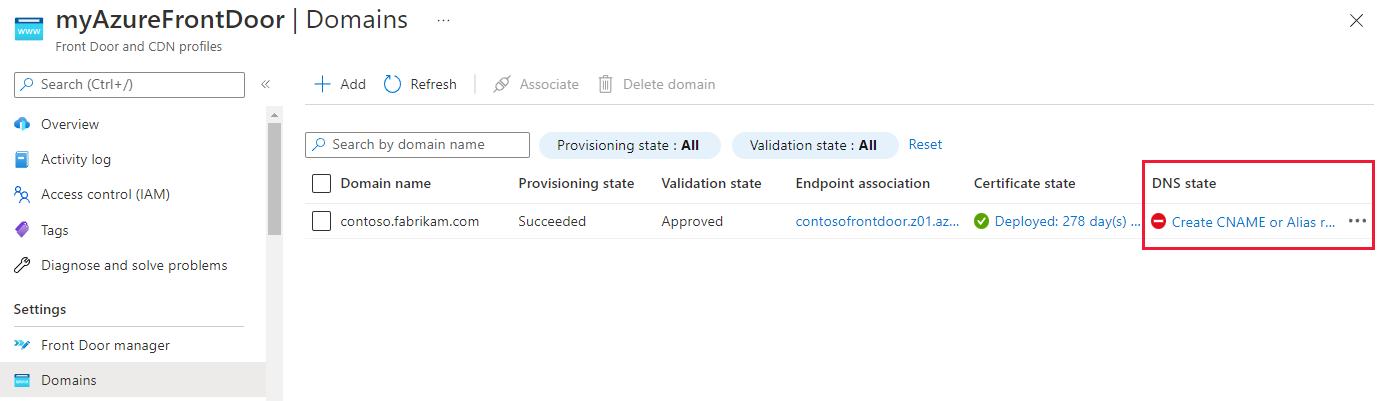
Select the DNS state link.
Note
For an Azure prevalidated domain, go to the DNS hosting service and manually update the CNAME record for this domain from the other Azure service endpoint to Azure Front Door endpoint. This step is required, regardless of whether the domain is hosted with Azure DNS or with another DNS service. The link to update the CNAME from the DNS state column isn't available for this type of domain.
The Add or update the CNAME record pane appears with the CNAME record information that must be provided before traffic can start flowing. If you're using Azure DNS hosted zones, the CNAME records can be created by selecting Add on the pane. If you're using another DNS provider, you must manually enter the CNAME record name and value as shown on the pane.
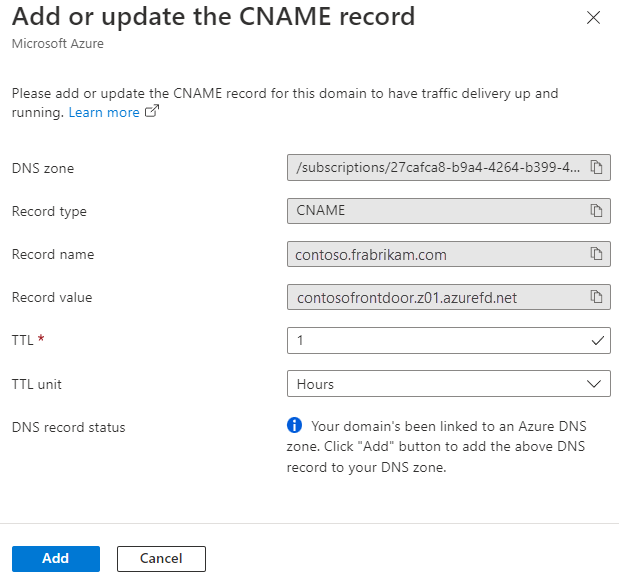
After the CNAME record is created and the custom domain is associated with the Azure Front Door endpoint, traffic starts flowing.
Note
- If HTTPS is enabled, certificate provisioning and propagation might take a few minutes because propagation is being done to all edge locations.
- If your domain CNAME is indirectly pointed to an Azure Front Door endpoint, for example, by using Azure Traffic Manager for multi-CDN failover, the DNS state column shows as CNAME/Alias record currently not detected. Azure Front Door can't guarantee 100% detection of the CNAME record in this case. If you configured an Azure Front Door endpoint to Traffic Manager and still see this message, it doesn't mean that you didn't set up correctly. No further action is necessary from your side.
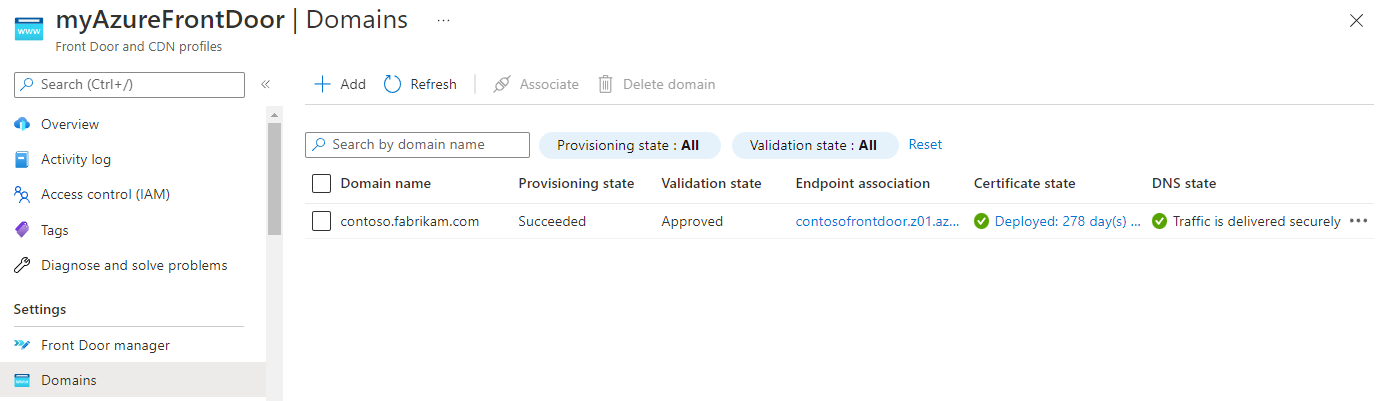
Verify the custom domain
After you validate and associate the custom domain, verify that the custom domain is correctly referenced to your endpoint.
Lastly, validate that your application content is getting served by using a browser.
Next steps
- Learn how to enable HTTPS for your custom domain.
- Learn more about custom domains in Azure Front Door.
- Learn about end-to-end TLS with Azure Front Door.
Feedback
Coming soon: Throughout 2024 we will be phasing out GitHub Issues as the feedback mechanism for content and replacing it with a new feedback system. For more information see: https://aka.ms/ContentUserFeedback.
Submit and view feedback for