How to use the IoT Central REST API to upload a file
IoT Central lets you upload media and other files from connected devices to cloud storage. You configure the file upload capability in your IoT Central application, and then implement file uploads in your device code. In this article, learn how to:
- Use the REST API to configure the file upload capability in your IoT Central application.
- Test the file upload by running some sample device code.
The IoT Central REST API lets you:
- Add a file upload storage account configuration
- Update a file upload storage account configuration
- Get the file upload storage account configuration
- Delete the file upload storage configuration
Every IoT Central REST API call requires an authorization header. To learn more, see How to authenticate and authorize IoT Central REST API calls.
For the reference documentation for the IoT Central REST API, see Azure IoT Central REST API reference.
Tip
You can use Postman to try out the REST API calls described in this article. Download the IoT Central Postman collection and import it into Postman. In the collection, you'll need to set variables such as your app subdomain and admin token.
To learn how to upload files by using the IoT Central UI, see How to configure file uploads.
Prerequisites
To test the file upload, install the following prerequisites in your local development environment:
Add a file upload storage account configuration
To add a file upload storage account configuration:
Create a storage account
To use the Azure Storage REST API, you need a bearer token for the management.azure.com resource. To get a bearer token, you can use the Azure CLI:
az account get-access-token --resource https://management.azure.com
If you don't have a storage account for your blobs, you can use the following request to create one in your subscription:
PUT https://management.azure.com/subscriptions/{subscriptionId}/resourceGroups/{resourceGroupName}/providers/Microsoft.Storage/storageAccounts/{accountName}?api-version=2021-09-01
The request headers have the following fields:
subscriptionId: The ID of the target subscription.resourceGroupName: The name of the resource group in your subscription. The name is case insensitive.accountName: The name of the storage account within the specified resource group. Storage account names must be between 3 and 24 characters in length and use numbers and lower-case letters only.
The request body has the following required fields:
kind: Type of storage accountlocation: The geo-location where the resource livessku: The SKU name.
{
 "kind": "BlockBlobStorage",
 "location": "West US",
 "sku": "Premium_LRS"
}
Create a container
Use the following request to create a container called fileuploads in your storage account for your blobs:
PUT https://management.azure.com/subscriptions/{subscriptionId}/resourceGroups/{resourceGroupName}/providers/Microsoft.Storage/storageAccounts/{accountName}/blobServices/default/containers/fileuploads?api-version=2021-09-01
containerName: Blob container names must be between 3 and 63 characters in length and use numbers, lower-case letters and dash (-) only. Every dash (-) character must be immediately preceded and followed by a letter or number.
Send an empty request body with this request that looks like the following example:
{
}
The response to this request looks like the following example:
{
  "id": "/subscriptions/your-subscription-id/resourceGroups/yourResourceGroupName/providers/Microsoft.Storage/storageAccounts/yourAccountName/blobServices/default/containers/fileuploads",
  "name": "fileuploads",
  "type": "Microsoft.Storage/storageAccounts/blobServices/containers"
}
Get the storage account keys
Use the following request to retrieve that storage account keys that you need when you configure the upload in IoT Central:
POST https://management.azure.com/subscriptions/{subscriptionId}/resourceGroups/{resourceGroupName}/providers/Microsoft.Storage/storageAccounts/{accountName}/listKeys?api-version=2021-09-01
The response to this request looks like the following example:
{
  "keys": [
    {
      "creationTime": "2022-05-19T19:22:40.9132287Z",
      "keyName": "key1",
      "value": "j3UTm**************==",
      "permissions": "FULL"
    },
    {
      "creationTime": "2022-05-19T19:22:40.9132287Z",
      "keyName": "key2",
      "value": "Nbs3W**************==",
      "permissions": "FULL"
    }
  ]
}
Create the upload configuration
Use the following request to create a file upload blob storage account configuration in your IoT Central application:
PUT https://{your-app-subdomain}.azureiotcentral.com/api/fileUploads?api-version=2022-07-31
The request body has the following fields:
account: The storage account name where to upload the file to.connectionString: The connection string to connect to the storage account. Use one of thevaluevalues from the previouslistKeysrequest as theAccountKeyvalue.container: The name of the container inside the storage account. The following example uses the namefileuploads.etag: ETag to prevent conflict with multiple uploadssasTtl: ISO 8601 duration standard, The amount of time the device’s request to upload a file is valid before it expires.
{
  "account": "yourAccountName",
  "connectionString": "DefaultEndpointsProtocol=https;AccountName=yourAccountName;AccountKey=*****;BlobEndpoint=https://yourAccountName.blob.core.windows.net/",
  "container": "fileuploads",
  "sasTtl": "PT1H"
}
The response to this request looks like the following example:
{
  "account": "yourAccountName",
  "connectionString": "DefaultEndpointsProtocol=https;AccountName=yourAccountName;AccountKey=*****;BlobEndpoint=https://yourAccountName.blob.core.windows.net/",
  "container": "fileuploads",
  "sasTtl": "PT1H",
  "state": "pending",
  "etag": "\"7502ac89-0000-0300-0000-627eaf100000\""

}
Get the file upload storage account configuration
Use the following request to retrieve details of a file upload blob storage account configuration in your IoT Central application:
GET https://{your-app-subdomain}.azureiotcentral.com/api/fileUploads?api-version=2022-07-31
The response to this request looks like the following example:
{
  "account": "yourAccountName",
  "connectionString": "DefaultEndpointsProtocol=https;AccountName=yourAccountName;AccountKey=*****;BlobEndpoint=https://yourAccountName.blob.core.windows.net/",
  "container": "yourContainerName",
  "state": "succeeded",
  "etag": "\"7502ac89-0000-0300-0000-627eaf100000\""

}
Update the file upload storage account configuration
Use the following request to update a file upload blob storage account connection string in your IoT Central application:
PATCH https://{your-app-subdomain}.azureiotcentral.com/api/fileUploads?api-version=2022-07-31
{
  "connectionString": "DefaultEndpointsProtocol=https;AccountName=yourAccountName;AccountKey=*****;BlobEndpoint=https://yourAccountName.blob.core.windows.net/"
}
The response to this request looks like the following example:
{
  "account": "yourAccountName",
  "connectionString": "DefaultEndpointsProtocol=https;AccountName=yourAccountName;AccountKey=*****;BlobEndpoint=https://yourAccountName.blob.core.windows.net/",
  "container": "yourContainerName",
  "sasTtl": "PT1H",
  "state": "succeeded",
  "etag": "\"7502ac89-0000-0300-0000-627eaf100000\""
}
Remove the file upload storage account configuration
Use the following request to delete a storage account configuration:
DELETE https://{your-app-subdomain}.azureiotcentral.com/api/fileUploads?api-version=2022-07-31
Test file upload
After you configure file uploads in your IoT Central application, you can test it with the sample code. If you haven't already cloned the file upload sample repository, use the following commands to clone it to a suitable location on your local machine and install the dependent packages:
git clone https://github.com/azure-Samples/iot-central-file-upload-device
cd iotc-file-upload-device
npm i
npm build
Create the device template and import the model
To test the file upload, you run a sample device application. Create a device template for the sample device to use.
Open your application in IoT Central UI.
Navigate to the Device Templates tab in the left pane, select + New:
Choose IoT device as the template type.
On the Customize page of the wizard, enter a name such as File Upload Device Sample for the device template.
On the Review page, select Create.
Select Import a model and upload the FileUploadDeviceDcm.json model file from the folder
iotc-file-upload-device\setupin the repository you downloaded previously.Select Publish to publish the device template.
Add a device
To add a device to your Azure IoT Central application:
Choose Devices on the left pane.
Select the File Upload Device Sample device template that you created earlier.
Select + New and select Create.
Select the device that you created and Select Connect
Copy the values for ID scope, Device ID, and Primary key. You use these values in the device sample code.
Run the sample code
Open the git repository you downloaded in VS Code. Create an ".env" file at the root of your project and add the values you copied previously. The file should look like the following sample with the values you made a note of previously.
scopeId=<YOUR_SCOPE_ID>
deviceId=<YOUR_DEVICE_ID>
deviceKey=<YOUR_PRIMARY_KEY>
modelId=dtmi:IoTCentral:IotCentralFileUploadDevice;1
Open the git repository you downloaded in VS Code. Press F5 to run/debug the sample. In your terminal window you see that the device is registered and is connected to IoT Central:
Starting IoT Central device...
 > Machine: Windows_NT, 8 core, freemem=6674mb, totalmem=16157mb
Starting device registration...
DPS registration succeeded
Connecting the device...
IoT Central successfully connected device: 7z1xo26yd8
Sending telemetry: {
    "TELEMETRY_SYSTEM_HEARTBEAT": 1
}
Sending telemetry: {
    "TELEMETRY_SYSTEM_HEARTBEAT": 1
}
Sending telemetry: {
    "TELEMETRY_SYSTEM_HEARTBEAT": 1
}
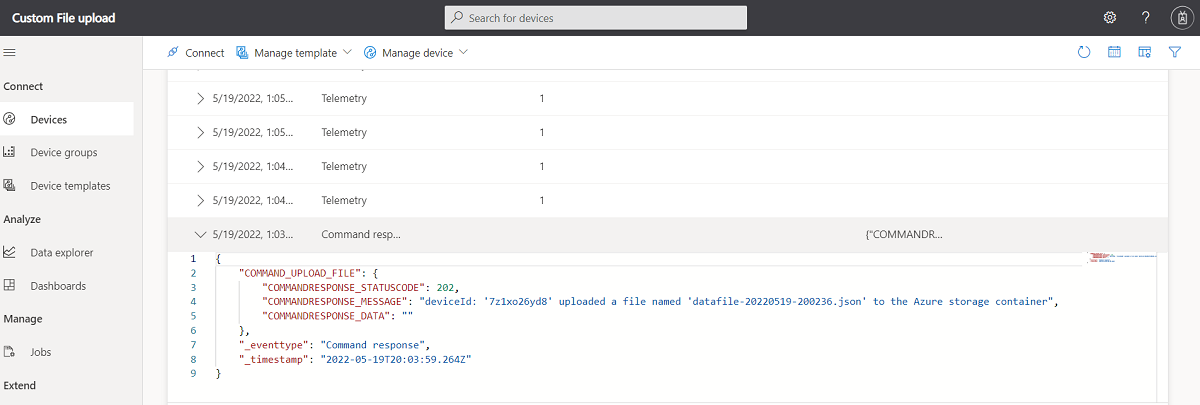
The sample project comes with a sample file named datafile.json. This file is uploaded when you use the Upload File command in your IoT Central application.
To test the upload, open your application and select the device you created. Select the Command tab and you see a button named Run. When you select that button the IoT Central app calls a direct method on your device to upload the file. You can see this direct method in the sample code in the /device.ts file. The method is named uploadFileCommand.
Select the Raw data tab to verify the file upload status.
You can also make a REST API call to verify the file upload status in the storage container.
Next steps
Now that you've learned how to configure file uploads with the REST API, a suggested next step is to How to create device templates from IoT Central GUI.
Feedback
Coming soon: Throughout 2024 we will be phasing out GitHub Issues as the feedback mechanism for content and replacing it with a new feedback system. For more information see: https://aka.ms/ContentUserFeedback.
Submit and view feedback for