Tutorial: Device Update for Azure IoT Hub using the Ubuntu (18.04 x64) simulator reference agent
This tutorial demonstrates an end-to-end image-based update using Device Update for IoT Hub. Device Update for Azure IoT Hub supports image-based, package-based, and script-based updates.
Image updates provide a higher level of confidence in the end state of the device. It's typically easier to replicate the results of an image update between a pre-production environment and a production environment because it doesn't pose the same challenges as managing packages and their dependencies. Because of their atomic nature, you can also adopt an A/B failover model easily.
In this tutorial, you'll learn how to:
- Assign an IoT device to a Device Update group using tags.
- Download and install an image.
- Import an update.
- Deploy an image update.
- Monitor the update deployment.
Prerequisites
Create a Device Update account and instance configured with an IoT hub.
Have an Ubuntu 18.04 device. This device can be either physical or a virtual machine.
Download the zip file named
Tutorial_Simulator.zipfrom Release Assets in the latest release, and unzip it.If your test device is different than your development machine, download the zip file onto both.
You can use
wgetto download the zip file. Replace<release_version>with the latest release, for example1.0.0.wget https://github.com/Azure/iot-hub-device-update/releases/download/<release_version>/Tutorial_Simulator.zip
Register a device and configure a module identity
Add a device to the device registry in your IoT hub. Every device that connects to IoT hub needs to be registered.
In this section, we'll also create a module identity. Modules are independent identities for components that exist on an IoT device, which allows for finer granularity when you have an IoT device running multiple processes. For this tutorial, you'll use this module identity for the Device Update agent that runs on the IoT device. For more information, see Understand and use module twins in IoT Hub.
- From the Azure portal, navigate to your IoT hub.
- On the left pane, select Devices. Then select Add Device.
- Under Device ID, enter a name for the device. Ensure that the Autogenerate keys checkbox is selected.
- Select Save.
- Now, you're returned to the Devices page and the device you created should be in the list. Select that device.
- Select Add Module Identity.
- Under Module Identity Name, enter a name for the module, for example, DUAgent.
- Select Save
Copy the module connection string
- In the device view, you should see your new module listed under the Module Identities heading. Select the module name to open its details.
- Select the Copy icon next to Connection string (primary key). Save this connection string to use when you configure the Device Update agent. This string is your module connection string.
Add a tag to your module twin
Still on the module identity details page, select Module Identity Twin
Add a new Device Update tag value at the same level as
modelIdandversionin the twin file, as shown:"tags": { "ADUGroup": "DU-simulator-tutorial" },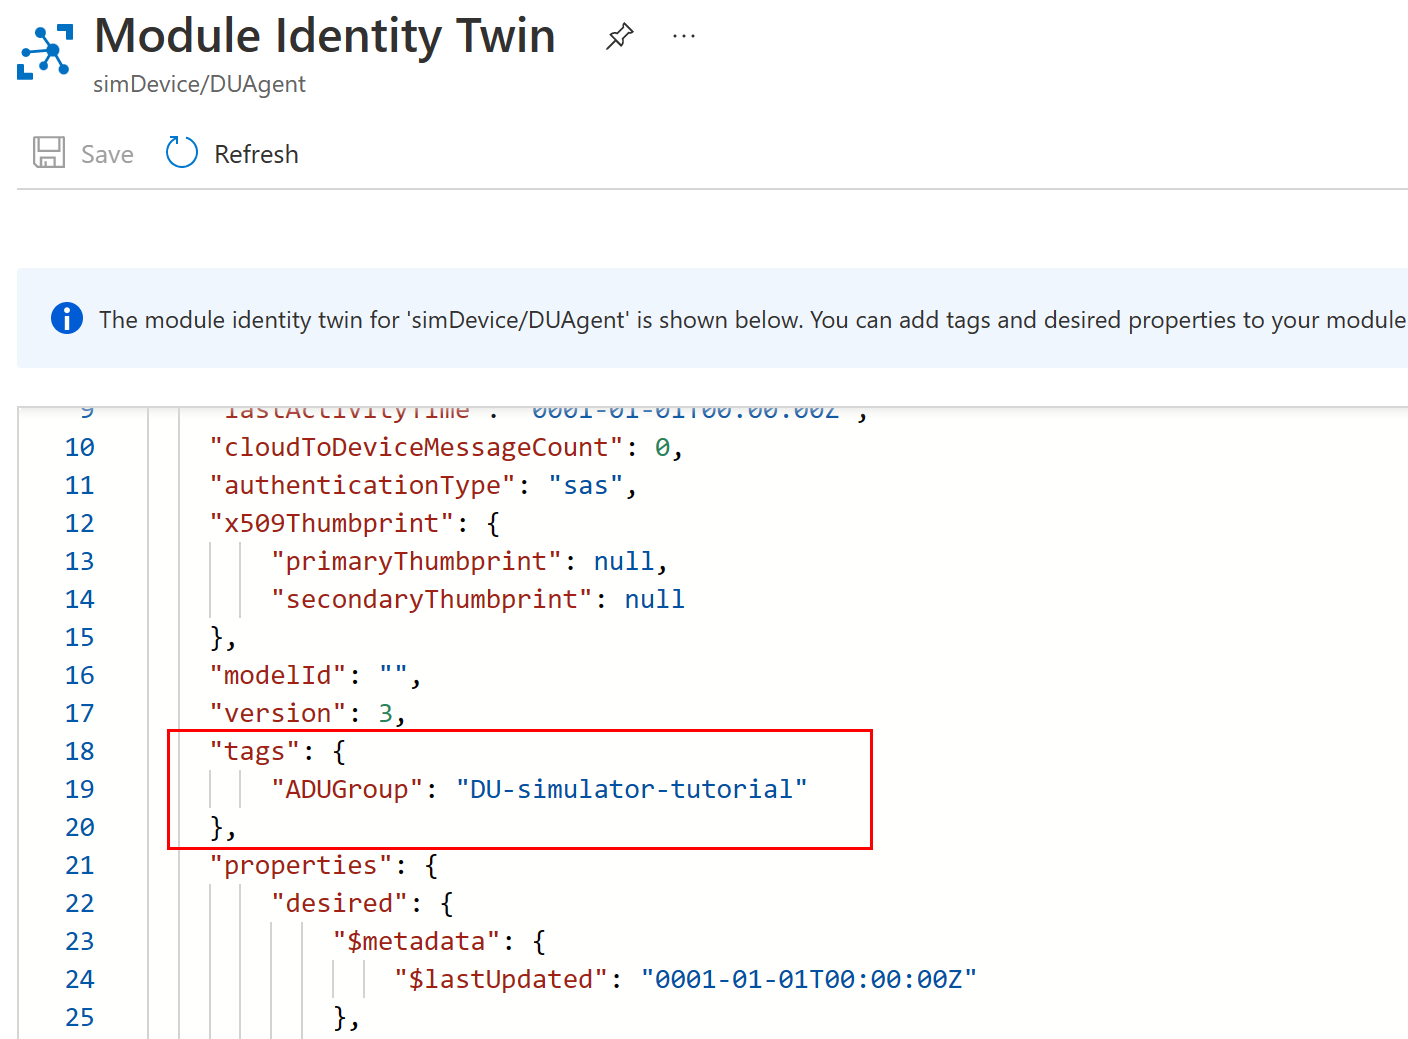
Every device that's managed by Device Update needs this reserved tag, which assigns the device to a Device Update group. It can be in the device twin or in a module twin, as shown here. Each device can only be assigned to one Device Update group.
Select Save. The portal reformats the module twin to incorporate the tag into the json structure.
Install and configure the Device Update agent
The Device Update agent runs on every device that's managed by Device Update. For this tutorial, we'll configure it to run as a simulator so that we can see how an update may be applied to a device without actually changing the device's configuration.
On your IoT device, add the Microsoft package repository and then add the Microsoft package signing key to your list of trusted keys.
wget https://packages.microsoft.com/config/ubuntu/18.04/multiarch/packages-microsoft-prod.deb -O packages-microsoft-prod.deb
sudo dpkg -i packages-microsoft-prod.deb
rm packages-microsoft-prod.deb
Install the Device Update agent .deb packages.
sudo apt-get update
sudo apt-get install deviceupdate-agent
Open the agent's configuration file.
sudo nano /etc/adu/du-config.jsonUpdate the following values in the configuration file:
- manufacturer:
"Contoso"- This value is used to classify the IoT device for targeting updates. - model:
"Video"- This value is used to classify the IoT device for targeting updates. - name:
"aduagent" - agents.connectionData: Provide the connection string that you copied from the module identity.
- agents.manufacturer:
"Contoso" - agents.model:
"Video"
For more information about the parameters in this step, see Device Update configuration file.
Note
You can also use the IoT Identity Service to provision the device. To do, that install the iot indentity service before installing the Device Update agent. Then, configure the Device Update agent with
"connectionType": "AIS"andconnectionDataas a blank string in the configuration file.- manufacturer:
Save and close the file.
CTRL+X,Y, andEnter.Set up the agent to run as a simulator. Run the following command on the IoT device so that the Device Update agent invokes the simulator handler to process a package update with SWUpdate (
microsoft/swupdate:1).sudo /usr/bin/AducIotAgent --extension-type updateContentHandler --extension-id 'microsoft/swupdate:1' --register-extension /var/lib/adu/extensions/sources/libmicrosoft_simulator_1.soUnzip
Tutorial_Simulator.zipfile that you downloaded in the prerequisites and copy thesample-du-simulator-data.jsonfile to thetmpfolder.cp sample-du-simulator-data.json /tmp/du-simulator-data.jsonIf /tmp doesn't exist, then run:
sudo mkdir/tmp
sudo chown root:root/tmp
sudo chmod 1777/tmp
Change permissions for the new file.
sudo chown adu:adu /tmp/du-simulator-data.json
sudo chmod 664 /tmp/du-simulator-data.json
Restart the Device Update agent to apply your changes.
sudo systemctl restart deviceupdate-agent
Import an update
In this section, you use the files TutorialImportManifest_Sim.importmanifest.json and adu-update-image-raspberrypi3.swu from the downloaded Tutorial_Simulator.zip in the prerequisites. The update file is reused from the Raspberry Pi tutorial. Because the update in this tutorial is simulated, the specific file content doesn't matter.
On your development machine, sign in to the Azure portal and go to your IoT hub that is configured with Device Update.
On the navigation pane, under Device Management, select Updates.
Select Import a new update.
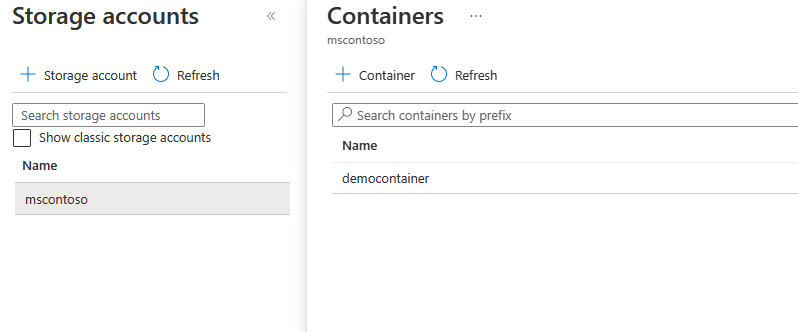
Select Select from storage container.
Select an existing storage account or create a new account by selecting + Storage account. Then, select an existing container or create a new container by selecting + Container. This container will be used to stage your update files for importing.
Note
We recommend that you use a new container each time you import an update to avoid accidentally importing files from previous updates. If you don't use a new container, be sure to delete any files from the existing container before you finish this step.
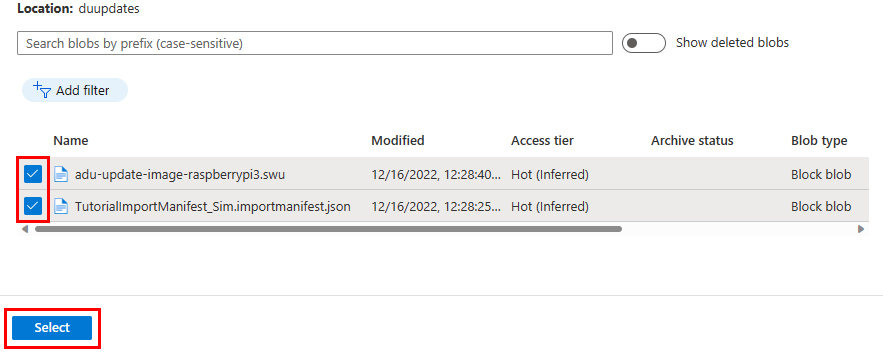
In your container, select Upload and go to the files you downloaded in the prerequisites. Select the TutorialImportManifest_Sim.importmanifest.json and the adu-update-image-raspberrypi3.swu files, then select Upload.
Select the checkbox by each file, then select the Select button to return to the Import update page.
On the Import update page, review the files to be imported. Then select Import update to start the import process.

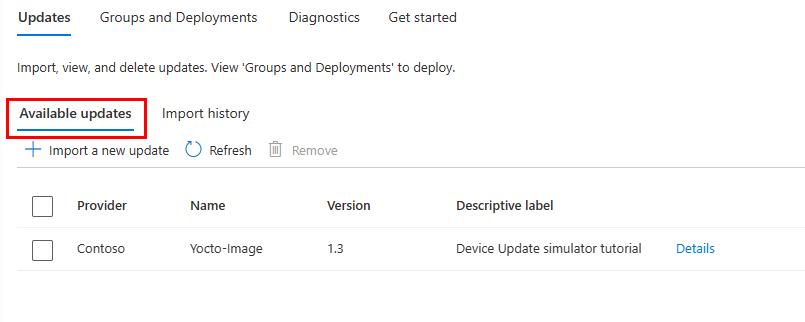
The import process begins, and the screen switches to the Import History section. The Status column shows the import as Running while the import is in progress, and Succeeded when the import is complete. Use the Refresh button to update the status.
When the Status column indicates the import has succeeded, select the Available updates header. You should see your imported update in the list now.

For more information about the import process, see Import an update to Device Update for IoT Hub.
View device groups
Device Update uses groups to organize devices. Device Update automatically sorts devices into groups based on their assigned tags and compatibility properties. Each device belongs to only one group, but groups can have multiple subgroups to sort different device classes.
Go to the Groups and Deployments tab at the top of the Updates page.
View the list of groups and the update compliance chart. The update compliance chart shows the count of devices in various states of compliance: On latest update, New updates available, and Updates in progress. Learn about update compliance.
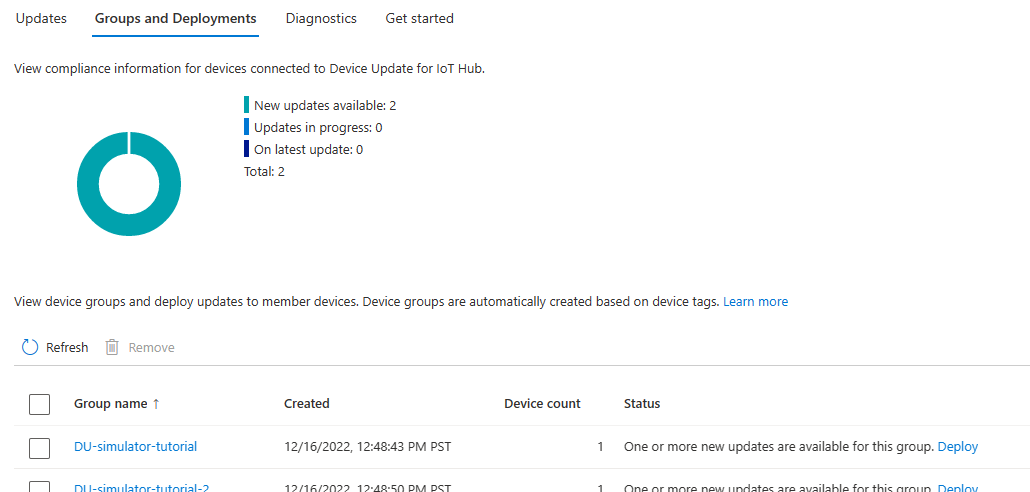
You should see a device group that contains the simulated device you set up in this tutorial along with any available updates for the devices in the new group. If there are devices that don't meet the device class requirements of the group, they'll show up in a corresponding invalid group.

For more information about tags and groups, see Manage device groups.
Deploy the update
On the Groups and Deployments tab, you should see a new update available for your device group. A link to the update should be under Status. You might need to refresh the page.
Select the group name to view its details.
On the group details page, you should see that there's one new update available. Select Deploy to start the deployment.
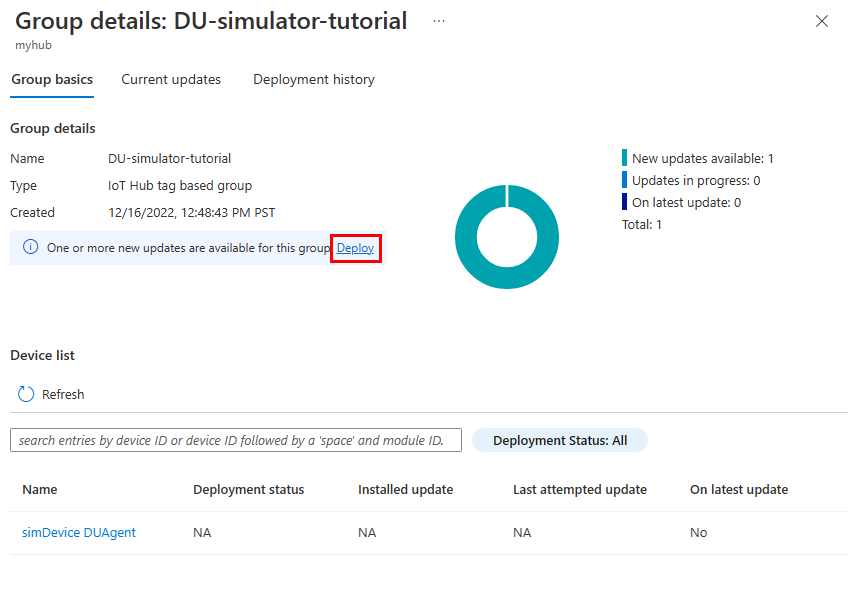
The update that we imported in the previous section is listed as the best available update for this group. Select Deploy.
Schedule your deployment to start immediately, then select Create.
On the group details page, navigate to the Current updates tab. Under Deployment details, Status turns to Active.
After your device is successfully updated, return to the Updates page. You should see that your compliance chart and deployment details are updated to reflect the same.

Monitor the update deployment
Return to the group details page and select the Deployment history tab.
Select View deployment details next to the deployment you created.
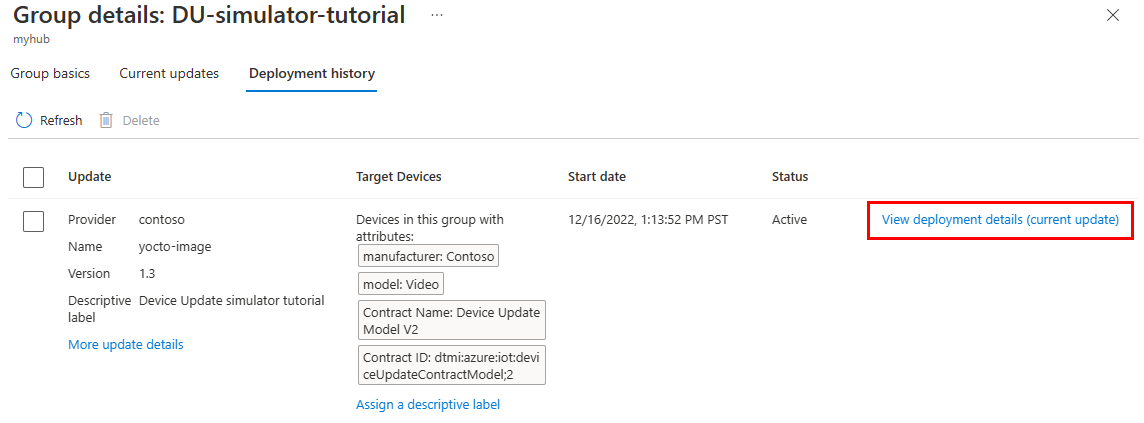
Select Refresh to view the latest status details.

You've now completed a successful end-to-end image update by using Device Update for IoT Hub using the Ubuntu (18.04 x64) simulator reference agent.
Clean up resources
If you're going to continue to the next tutorial, keep your Device Update and IoT Hub resources.
When no longer needed, you can delete these resources in the Azure portal.
Navigate to your resource group in the Azure portal.
Choose which resources to delete.
- If you want to delete all the resources in the group, select Delete resource group.
- If you only want to delete select resources, use the check boxes to select the resources then select Delete.
Next steps
In this tutorial, you learned how to import and deploy an image update. Next, learn how to update device packages.