Note
Access to this page requires authorization. You can try signing in or changing directories.
Access to this page requires authorization. You can try changing directories.
IoT Hub uses shared access signature (SAS) tokens to authenticate devices and services to avoid sending keys on the wire. You use SAS tokens to grant time-bounded access to devices and services to specific functionality in IoT Hub. To get authorization to connect to IoT Hub, devices and services must send SAS tokens signed with either a shared access or symmetric key. Symmetric keys are stored with a device identity in the identity registry.
This article introduces:
- The different permissions that you can grant to a client to access your IoT hub.
- The tokens IoT Hub uses to verify permissions.
- How to scope credentials to limit access to specific resources.
- Custom device authentication mechanisms that use existing device identity registries or authentication schemes.
Note
Some of the features mentioned in this article, like cloud-to-device messaging, device twins, and device management, are only available in the standard tier of IoT Hub. For more information about the basic and standard/free IoT Hub tiers, see Choose the right IoT Hub tier and size for your solution.
IoT Hub uses permissions to grant access to each IoT hub endpoint. Permissions limit access to an IoT hub based on functionality. You must have appropriate permissions to access any of the IoT Hub endpoints. For example, a device must include a token containing security credentials along with every message it sends to IoT Hub. However, the signing keys, like the device symmetric keys, are never sent over the wire.
Authentication and authorization
Authentication is the process of proving that you're who you say you are. Authentication verifies the identity of a user or device to IoT Hub. Authentication is sometimes shortened to AuthN. Authorization is the process of confirming permissions for an authenticated user or device on IoT Hub. Authorization specifies what resources and commands you're allowed to access, and what you can do with those resources and commands. Authorization is sometimes shortened to AuthZ.
This article describes authentication and authorization using Shared access signatures, which lets you group permissions and grant them to applications using access keys and signed security tokens. You can also use symmetric keys or shared access keys to authenticate a device with IoT Hub. SAS tokens provide authentication for each call made by the device to IoT Hub by associating the symmetric key to each call.
Access control and permissions
Use shared access policies for IoT hub-level access, and use the individual device credentials to scope access to that device only.
IoT hub-level shared access policies
Shared access policies can grant any combination of permissions. You can define policies in the Azure portal, programmatically by using the IoT Hub Resource REST APIs, or using the Azure CLI az iot hub policy command. A newly created IoT hub has the following default policies:
| Shared Access Policy | Permissions |
|---|---|
| iothubowner | All permissions |
| service | ServiceConnect permissions |
| device | DeviceConnect permissions |
| registryRead | RegistryRead permissions |
| registryReadWrite | RegistryRead and RegistryWrite permissions |
You can use the following permissions to control access to your IoT hub:
The ServiceConnect permission is used by back-end cloud services and grants the following access:
- Access to cloud service-facing communication and monitoring endpoints.
- Receive device-to-cloud messages, send cloud-to-device messages, and retrieve the corresponding delivery acknowledgments.
- Retrieve delivery acknowledgments for file uploads.
- Access twins to update tags and desired properties, retrieve reported properties, and run queries.
The DeviceConnect permission is used by devices and grants the following access:
- Access to device-facing endpoints.
- Send device-to-cloud messages and receive cloud-to-device messages.
- Perform file upload.
- Receive device twin desired property notifications and update device twin reported properties.
The RegistryRead permission is used by back-end cloud services and grants the following access:
- Read access to the identity registry. For more information, see Understand the identity registry in your IoT hub.
The RegistryReadWrite permission is used by back-end cloud services and grants the following access:
- Read and write access to the identity registry. For more information, see Understand the identity registry in your IoT hub.
Per-device security credentials
Every IoT hub has an identity registry that stores information about the devices and modules permitted to connect to it. Before a device or module can connect, there must be an entry for that device or module in the IoT hub's identity registry. A device or module authenticates with the IoT hub based on credentials stored in the identity registry.
When you register a device to use SAS token authentication, that device gets two symmetric keys. Symmetric keys grant the DeviceConnect permission for the associated device identity.
Use SAS tokens from services
Services can generate SAS tokens by using a shared access policy that defines the appropriate permissions as explained previously in the Access control and permissions section.
As an example, a service using the precreated shared access policy called registryRead would create a token with the following parameters:
- resource URI:
{IoT hub name}.azure-devices.net, - signing key: one of the keys of the
registryReadpolicy, - policy name:
registryRead, - any expiration time.
For example, the following code creates a SAS token in Node.js:
var endpoint = "myhub.azure-devices.net";
var policyName = 'registryRead';
var policyKey = '...';

var token = generateSasToken(endpoint, policyKey, policyName, 60);
The result, which grants access to read all device identities in the identity registry, would be:
SharedAccessSignature sr=myhub.azure-devices.net&sig=JdyscqTpXdEJs49elIUCcohw2DlFDR3zfH5KqGJo4r4%3D&se=1456973447&skn=registryRead
For more examples, see Generate SAS tokens.
For services, SAS tokens only grant permissions at the IoT Hub level. That is, a service authenticating with a token based on the service policy is able to perform all the operations granted by the ServiceConnect permission. These operations include receiving device-to-cloud messages, sending cloud-to-device messages, and so on. If you want to grant more granular access to your services, for example, limiting a service to only sending cloud-to-device messages, you can use Microsoft Entra ID. To learn more, see Control access to IoT Hub by using Microsoft Entra ID.
Use SAS tokens from devices
There are two ways to obtain DeviceConnect permissions with IoT Hub with SAS tokens: use a symmetric device key from the identity registry, or use a shared access key.
All functionality accessible from devices is exposed by design on endpoints with the prefix /devices/{deviceId}.
The device-facing endpoints are (irrespective of the protocol):
| Endpoint | Functionality |
|---|---|
{iot hub name}/devices/{deviceId}/messages/events |
Send device-to-cloud messages. |
{iot hub name}/devices/{deviceId}/messages/devicebound |
Receive cloud-to-device messages. |
Use a symmetric key in the identity registry
When using a device identity's symmetric key to generate a token, the policyName (skn) element of the token is omitted.
For example, a token created to access all device functionality should have the following parameters:
- resource URI:
{IoT hub name}.azure-devices.net/devices/{device id}, - signing key: any symmetric key for the
{device id}identity, - no policy name,
- any expiration time.
For example, the following code creates a SAS token in Node.js:
var endpoint ="myhub.azure-devices.net/devices/device1";
var deviceKey ="...";

var token = generateSasToken(endpoint, deviceKey, null, 60);
The result, which grants access to all functionality for device1, would be:
SharedAccessSignature sr=myhub.azure-devices.net%2fdevices%2fdevice1&sig=13y8ejUk2z7PLmvtwR5RqlGBOVwiq7rQR3WZ5xZX3N4%3D&se=1456971697
For more examples, see Generate SAS tokens.
Use a shared access policy to access on behalf of a device
When you create a token from a shared access policy, set the skn field to the name of the policy. This policy must grant the DeviceConnect permission.
The two main scenarios for using shared access policies to access device functionality are:
- cloud protocol gateways,
- token services used to implement custom authentication schemes.
Since the shared access policy can potentially grant access to connect as any device, it's important to use the correct resource URI when creating SAS tokens. This setting is especially important for token services, which have to scope the token to a specific device using the resource URI. This point is less relevant for protocol gateways as they're already mediating traffic for all devices.
As an example, a token service using the precreated shared access policy called device would create a token with the following parameters:
- resource URI:
{IoT hub name}.azure-devices.net/devices/{device id}, - signing key: one of the keys of the
devicepolicy, - policy name:
device, - any expiration time.
For example, the following code creates a SAS token in Node.js:
var endpoint ="myhub.azure-devices.net/devices/device1";
var policyName = 'device';
var policyKey = '...';

var token = generateSasToken(endpoint, policyKey, policyName, 60);
The result, which grants access to all functionality for device1, would be:
SharedAccessSignature sr=myhub.azure-devices.net%2fdevices%2fdevice1&sig=13y8ejUk2z7PLmvtwR5RqlGBOVwiq7rQR3WZ5xZX3N4%3D&se=1456971697&skn=device
A protocol gateway could use the same token for all devices by setting the resource URI to myhub.azure-devices.net/devices.
For more examples, see Generate SAS tokens.
Create a token service to integrate existing devices
You can use the IoT Hub identity registry to configure per-device or per-module security credentials and access control using tokens. If an IoT solution already has a custom identity registry and/or authentication scheme, consider creating a token service to integrate this infrastructure with IoT Hub. In this way, you can use other IoT features in your solution.
A token service is a custom cloud service. It uses an IoT Hub shared access policy with the DeviceConnect permission to create device-scoped or module-scoped tokens. These tokens enable a device or module to connect to your IoT hub.
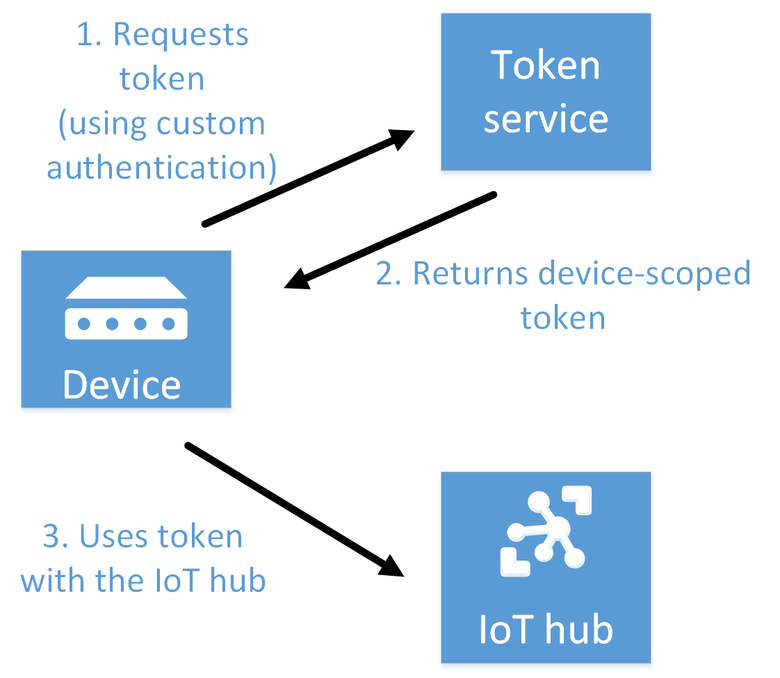
Here are the main steps of the token service pattern:
Create an IoT Hub shared access policy with the DeviceConnect permission for your IoT hub. You can create this policy in the Azure portal or programmatically. The token service uses this policy to sign the tokens it creates.
When a device or module needs to access your IoT hub, it requests a signed token from your token service. The device can authenticate with your custom identity registry/authentication scheme to determine the device/module identity that the token service uses to create the token.
The token service returns a token. The token is created by using
/devices/{deviceId}or/devices/{deviceId}/modules/{moduleId}asresourceURI, withdeviceIdas the device being authenticated andmoduleIdas the module being authenticated. The token service uses the shared access policy to construct the token.The device/module uses the token directly with the IoT hub.
Note
You can use the .NET class SharedAccessSignatureBuilder or the Java class IotHubServiceSasToken to create a token in your token service.
The token service can set the token expiration as desired. When the token expires, the IoT hub severs the device/module connection. Then, the device/module must request a new token from the token service. A short expiry time increases the load on both the device/module and the token service.
For a device/module to connect to your hub, you must still add it to the IoT Hub identity registry, even though it's using a token and not a key to connect. Therefore, you can continue to use per-device/per-module access control by enabling or disabling device/module identities in the identity registry. This approach mitigates the risks of using tokens with long expiry times.
Comparison with a custom gateway
The token service pattern is the recommended way to implement a custom identity registry/authentication scheme with IoT Hub. This pattern is recommended because IoT Hub continues to handle most of the solution traffic. However, if the custom authentication scheme is so intertwined with the protocol, you might require a custom gateway to process all the traffic. An example of such a scenario is using Transport Layer Security (TLS) and preshared keys (PSKs). For more information, see How an IoT Edge device can be used as a gateway.
Generate SAS tokens
Azure IoT SDKs automatically generate tokens, but some scenarios do require you to generate and use SAS tokens directly, including:
The direct use of the MQTT, AMQP, or HTTPS surfaces.
The implementation of the token service pattern, as explained in the Create a token service to integrate existing devices section.
A token signed with a shared access key grants access to all the functionality associated with the shared access policy permissions. A token signed with a device identity's symmetric key only grants the DeviceConnect permission for the associated device identity.
This section provides examples of generating SAS tokens in different code languages. You can also generate SAS tokens with the CLI extension command az iot hub generate-sas-token, or the Azure IoT Hub extension for Visual Studio Code.
SAS token structure
A SAS token has the following format:
SharedAccessSignature sr={URL-encoded-resourceURI}&sig={signature-string}&se={expiry}&skn={policyName}
Here are the expected values:
| Value | Description |
|---|---|
| {URL-encoded-resourceURI} | Lower case URL-encoding of the lower case resource URI |
| {resourceURI} | URI prefix (by segment) of the endpoints that can be accessed with this token, starting with host name of the IoT hub (no protocol). SAS tokens granted to backend services are scoped to the IoT hub level; for example, myHub.azure-devices.net. SAS tokens granted to devices must be scoped to an individual device; for example, myHub.azure-devices.net/devices/device1. |
| {signature-string} | An HMAC-SHA256 signature string of the form: {URL-encoded-resourceURI} + "\n" + {expiry}. Important: The key is decoded from base64 and used as key to perform the HMAC-SHA256 computation. |
| {expiry} | UTF8 strings for number of seconds since the epoch 00:00:00 UTC on 1 January 1970. |
| {policyName} | The name of the shared access policy to which this token refers. Absent if the token refers to device-registry credentials. |
The URI prefix is computed by segment and not by character. For example, /a/b is a prefix for /a/b/c but not for /a/bc.
The following code generates a SAS token using the resource URI, signing key, policy name, and expiration period. The next sections detail how to initialize the different inputs for the different token use cases.
var generateSasToken = function(resourceUri, signingKey, policyName, expiresInMins) {
    resourceUri = encodeURIComponent(resourceUri);

    // Set expiration in seconds
    var expires = (Date.now() / 1000) + expiresInMins * 60;
    expires = Math.ceil(expires);
    var toSign = resourceUri + '\n' + expires;

    // Use crypto
    var hmac = crypto.createHmac('sha256', Buffer.from(signingKey, 'base64'));
    hmac.update(toSign);
    var base64UriEncoded = encodeURIComponent(hmac.digest('base64'));

    // Construct authorization string
    var token = "SharedAccessSignature sr=" + resourceUri + "&sig="
    + base64UriEncoded + "&se=" + expires;
    if (policyName) token += "&skn="+policyName;
    return token;
};
Protocol specifics
Each supported protocol, such as MQTT, AMQP, and HTTPS, transports tokens in different ways.
When using MQTT, the CONNECT packet has the deviceId as the ClientId, {iothubhostname}/{deviceId} in the Username field, and a SAS token in the Password field. {iothubhostname} should be the full CName of the IoT hub (for example, myhub.azure-devices.net).
When using AMQP, IoT Hub supports SASL PLAIN and AMQP Claims-Based-Security.
If you use AMQP claims-based-security, the standard specifies how to transmit these tokens.
For SASL PLAIN, the username can be:
{policyName}@sas.root.{iothubName}if using IoT hub-level tokens.{deviceId}@sas.{iothubname}if using device-scoped tokens.
In both cases, the password field contains the token, as described in SAS token structure.
HTTPS implements authentication by including a valid token in the Authorization request header.
For example, Username (DeviceId is case-sensitive):
iothubname.azure-devices.net/DeviceId
Password (You can generate a SAS token with the CLI extension command az iot hub generate-sas-token, or the Azure IoT Hub extension for Visual Studio Code):
SharedAccessSignature sr=iothubname.azure-devices.net%2fdevices%2fDeviceId&sig=kPszxZZZZZZZZZZZZZZZZZAhLT%2bV7o%3d&se=1487709501
Note
The Azure IoT Hub SDKs automatically generate tokens when connecting to the service. In some cases, the Azure IoT SDKs don't support all the protocols or all the authentication methods.
Special considerations for SASL PLAIN
When using SASL PLAIN with AMQP, a client connecting to an IoT hub can use a single token for each TCP connection. When the token expires, the TCP connection disconnects from the service and triggers a reconnection. This behavior, while not problematic for a back-end app, is damaging for a device app for the following reasons:
Gateways usually connect on behalf of many devices. When using SASL PLAIN, they have to create a distinct TCP connection for each device connecting to an IoT hub. This scenario considerably increases the consumption of power and networking resources, and increases the latency of each device connection.
The increased use of resources to reconnect after each token expiration adversely affects resource-constrained devices.
Next steps
Now that you know how to control access to IoT Hub, you might be interested in the following IoT Hub developer guide articles: