Note
Access to this page requires authorization. You can try signing in or changing directories.
Access to this page requires authorization. You can try changing directories.
Note
This preview capability is subject to the Supplemental Terms of Use for Microsoft Azure Previews.
When your team builds AI-driven automations, you need a way to keep applications and their workflows, connections, and other items organized, secure, and separate so that unrelated work doesn't mix together. When you don't have clear boundaries, automation assets are harder to govern and scale as your team grows.
In Logic Apps Automation, an automation project solves this problem by providing an isolated container with its own compute, networking, security, and governance. Before you can start building your dynamic workloads in Logic Apps Automation, you need to create a project to store your applications and their contents. Create one project per team, business area, or scenario so teams can independently build and manage their automations.
Logic Apps Automation organizes your work at the following levels:
| Level | Contents |
|---|---|
| Project | The top-level container that groups applications. As the project creator and default owner, you control access and governance at this level. This quickstart focuses on creating and managing a project. |
| Application | A deployable package that stores workflows, connections, parameters, analytics, settings, and other items that your automation needs. |
| Workflow | The automation workload itself, which includes the starting event (trigger) and the steps (actions) to run. |
This quickstart shows how to create a project and add team members to your project so they can create applications and their workflows.
For more information, see:
Prerequisites
An Azure account and subscription that uses a Microsoft work or school account. Get a free Azure account.
Note
You need an Azure subscription to create projects. Make sure that your account can access the Logic Apps Automation portal. As a builder, you only need access to the portal to create dynamic workflows - no Azure subscription necessary.
For team members who need to work in your project, make sure they have a work or school account in the same Microsoft Entra tenant where your account exists.
For more information about Microsoft Entra tenants, see Tenant configurations.
Create your automation project
To create a container for your applications and control who has access, follow these steps:
Go to the Logic Apps Automation portal, and sign in with your Azure account.
On the home page, under Get started, select Create a project.
The Azure portal opens and shows the Automation Projects page so you can create your automation project.
On the Automation Projects toolbar, select + Create.
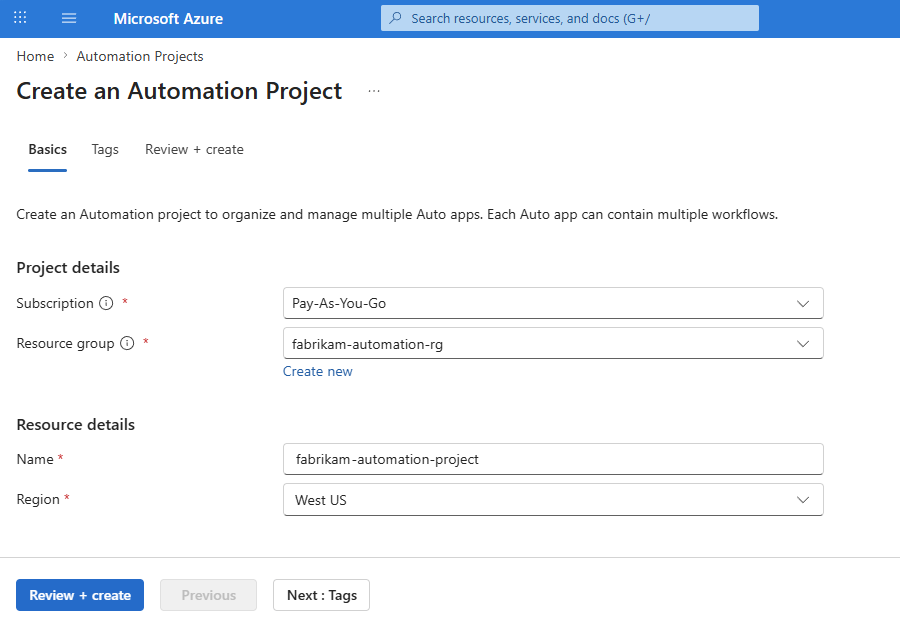
On the Create an Automation Project page, on the Basics tab, enter the following information:
Property Description Subscription Your Azure subscription. Resource group The Azure resource group for organizing your project resources. Enter a unique name across Azure regions that uses only alphanumeric characters, hyphens ( -), underscores (_), parentheses (()), or periods (.).Name Enter a unique project name across Azure regions that uses only alphanumeric characters, hyphens ( -), underscores (_), parentheses (()), or periods (.).Region The Azure region closest to your end users or the components that your workflows need to use. For example:
Select Review + create > Create.
The Azure portal sets up, creates, and deploys your automation project.
Note
This process might take several minutes to finish.
After this process completes, the Azure portal opens the automation project. If the project doesn't open, select Go to resource.
On the project toolbar, select Open in Automation Portal, which returns you to the Logic Apps Automation portal.
If you signed out, sign back in to the Logic Apps Automation portal.
From the Projects list, find and select your project.
The portal opens and shows your project's home page.

Before you can start building workflows, you need to create an application as a deployable package that contains these workflows. For more information, see Create dynamic automation applications.
Before others can work in your project, you need to add them as members.
Project ownership and privacy
By default, when you create a project, you automatically become the project owner and appear in the Project Owner project property. Each resource has only a single owner.
The project owner is a property, not a permission level. You can't clear or remove this property value.
As the project owner, you have the following permissions:
- Contributor role permissions at the project level
- Administrator-level permissions to delete the project and resources, such as application or sandboxes, including items you don't own. Not even members with the Contributor role can perform these tasks.
Add project members
Before others can create applications and workflows in your project, add them as project members by following these steps:
In the Logic Apps Automation portal, find and open your project.
On your project home page, on the sidebar, under Manage, select Settings.
In the Users section, select Add user.
On the Add role assignment pane, in the Select user box, enter the email address for the person you want to add.
The Select user list shows only people in the same Microsoft Entra tenant as you.
From the results, select the correctly matching person.
After the Role section appears, select the role the person needs, based on the principle of least privilege, and then select Add.
The following table describes the available roles at the project level, what they can do, and what they can't do:
Role Can Can't Reader (view only) - View only the project settings, members list, sandbox configurations, and shared resources.
- View workflow run history.- Create, edit, or delete anything.
- View applications.
- Trigger or cancel workflow runs.
- Manage permissions.Author - Create applications, sandbox configurations, and shared resources.
- View the project settings, members list, and sandbox configurations.- Edit the project settings and manage project members.
- View applications or their content without explicit app-level permissions.Contributor - View and edit project settings, manage the project, and manage project members.
- Create applications, but view only metadata for others' applications.
- Create and edit sandbox configurations.
- View workflows, connections, and parameters.
- Create, edit, and delete workflows.
- Create and edit connections.
- View workflow run history.
- Trigger and cancel workflow runs.
- Manage application permissions.- Delete the project (owner only).
- View application content without explicit application level permissions.Note
By default, applications are always private, which means that only their creators (owners) can view and access their applications. They're invisible to other project members until the creator-owner explicitly shares them.
Project contributors or owners can view application metadata for governance, but not the content. Applications often contain automation that connects to personal accounts. So, privacy by default keeps this data obscured unless explicitly shared.
Application owners or contributors can explicitly add members by granting application-level roles. To grant access to a specific application, open that application, go to Settings, User permissions, and add the member you want.