Create and run machine learning pipelines using components with the Azure Machine Learning CLI
APPLIES TO:  Azure CLI ml extension v2 (current)
In this article, you learn how to create and run machine learning pipelines by using Azure CLI and components. You can create pipelines without using components, but components offer the greatest amount of flexibility and reuse. Azure Machine Learning Pipelines can be defined in YAML and run from the CLI, authored in Python, or composed in Azure Machine Learning studio Designer with a drag-and-drop UI. This document focuses on the CLI.
Prerequisites
If you don't have an Azure subscription, create a free account before you begin. Try the free or paid version of Azure Machine Learning.
An Azure Machine Learning workspace. Create workspace resources.
Install and set up the Azure CLI extension for Machine Learning.
Clone the examples repository:
git clone https://github.com/Azure/azureml-examples --depth 1
cd azureml-examples/cli/jobs/pipelines-with-components/basics
Suggested prereading
Create your first pipeline with component
Let's create your first pipeline with components using an example. This section aims to give you an initial impression of what a pipeline and component look like in Azure Machine Learning with a concrete example.
From the cli/jobs/pipelines-with-components/basics directory of the azureml-examples repository, navigate to the 3b_pipeline_with_data subdirector. There are three types of files in this directory. Those are the files you need to create when building your own pipeline.
pipeline.yml: This YAML file defines the machine learning pipeline. This YAML file describes how to break a full machine learning task into a multistep workflow. For example, considering a simple machine learning task of using historical data to train a sales forecasting model, you might want to build a sequential workflow with data processing, model training, and model evaluation steps. Each step is a component that has well defined interface and can be developed, tested, and optimized independently. The pipeline YAML also defines how the child steps connect to other steps in the pipeline, for example, the model training step generates a model file and the model file will pass to a model evaluation step.
component.yml: This YAML file defines the component. It packages the following information:
- Metadata: name, display name, version, description, type etc. The metadata helps to describe and manage the component.
- Interface: inputs and outputs. For example, a model training component takes training data and number of epochs as input, and generate a trained model file as output. Once the interface is defined, different teams can develop and test the component independently.
- Command, code & environment: the command, code and environment to run the component. Command is the shell command to execute the component. Code usually refers to a source code directory. Environment could be an Azure Machine Learning environment(curated or customer created), docker image or conda environment.
component_src: This is the source code directory for a specific component. It contains the source code that is executed in the component. You can use your preferred language(Python, R...). The code must be executed by a shell command. The source code can take a few inputs from the shell command line to control how this step is going to be executed. For example, a training step might take training data, learning rate, number of epochs to control the training process. The argument of a shell command is used to pass inputs and outputs to the code.
Now let's create a pipeline using the 3b_pipeline_with_data example. We explain the detailed meaning of each file in following sections.
First list your available compute resources with the following command:
az ml compute list
If you don't have it, create a cluster called cpu-cluster by running:
Note
Skip this step to use serverless compute.
az ml compute create -n cpu-cluster --type amlcompute --min-instances 0 --max-instances 10
Now, create a pipeline job defined in the pipeline.yml file with the following command. The compute target is referenced in the pipeline.yml file as azureml:cpu-cluster. If your compute target uses a different name, remember to update it in the pipeline.yml file.
az ml job create --file pipeline.yml
You should receive a JSON dictionary with information about the pipeline job including:
| Key | Description |
|---|---|
name |
The GUID-based name of the job. |
experiment_name |
The name under which jobs will be organized in studio. |
services.Studio.endpoint |
A URL for monitoring and reviewing the pipeline job. |
status |
The status of the job. This will likely be Preparing at this point. |
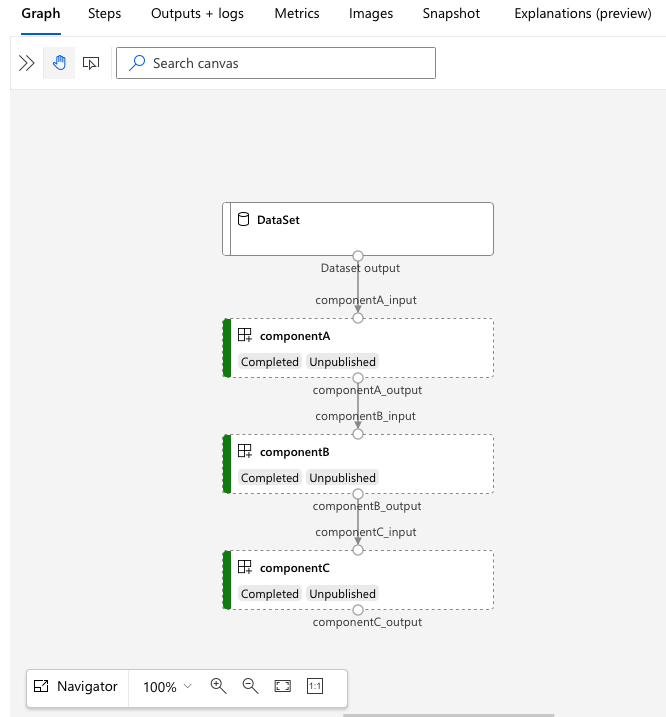
Open the services.Studio.endpoint URL to see a graph visualization of the pipeline.
Understand the pipeline definition YAML
Let's take a look at the pipeline definition in the 3b_pipeline_with_data/pipeline.yml file.
Note
To use serverless compute, replace default_compute: azureml:cpu-cluster with default_compute: azureml:serverless in this file.
$schema: https://azuremlschemas.azureedge.net/latest/pipelineJob.schema.json
type: pipeline

display_name: 3b_pipeline_with_data
description: Pipeline with 3 component jobs with data dependencies

settings:
  default_compute: azureml:cpu-cluster

outputs:
  final_pipeline_output:
    mode: rw_mount

jobs:
  component_a:
    type: command
    component: ./componentA.yml
    inputs:
      component_a_input:
        type: uri_folder
        path: ./data

    outputs:
      component_a_output:
        mode: rw_mount
  component_b:
    type: command
    component: ./componentB.yml
    inputs:
      component_b_input: ${{parent.jobs.component_a.outputs.component_a_output}}
    outputs:
      component_b_output:
        mode: rw_mount
  component_c:
    type: command
    component: ./componentC.yml
    inputs:
      component_c_input: ${{parent.jobs.component_b.outputs.component_b_output}}
    outputs:
      component_c_output: ${{parent.outputs.final_pipeline_output}}
      #  mode: upload
The table describes the most common used fields of pipeline YAML schema. To learn more, see the full pipeline YAML schema.
| key | description |
|---|---|
| type | Required. Job type must be pipeline for pipeline jobs. |
| display_name | Display name of the pipeline job in studio UI. Editable in studio UI. Doesn't have to be unique across all jobs in the workspace. |
| jobs | Required. Dictionary of the set of individual jobs to run as steps within the pipeline. These jobs are considered child jobs of the parent pipeline job. In this release, supported job types in pipeline are command and sweep |
| inputs | Dictionary of inputs to the pipeline job. The key is a name for the input within the context of the job and the value is the input value. These pipeline inputs can be referenced by the inputs of an individual step job in the pipeline using the ${{ parent.inputs.<input_name> }} expression. |
| outputs | Dictionary of output configurations of the pipeline job. The key is a name for the output within the context of the job and the value is the output configuration. These pipeline outputs can be referenced by the outputs of an individual step job in the pipeline using the ${{ parents.outputs.<output_name> }} expression. |
In the 3b_pipeline_with_data example, we've created a three steps pipeline.
- The three steps are defined under
jobs. All three step type is command job. Each step's definition is in correspondingcomponent.ymlfile. You can see the component YAML files under 3b_pipeline_with_data directory. We'll explain the componentA.yml in next section. - This pipeline has data dependency, which is common in most real world pipelines. Component_a takes data input from local folder under
./data(line 17-20) and passes its output to componentB (line 29). Component_a's output can be referenced as${{parent.jobs.component_a.outputs.component_a_output}}. - The
computedefines the default compute for this pipeline. If a component underjobsdefines a different compute for this component, the system respects component specific setting.

Read and write data in pipeline
One common scenario is to read and write data in your pipeline. In Azure Machine Learning, we use the same schema to read and write data for all type of jobs (pipeline job, command job, and sweep job). The following are pipeline job examples of using data for common scenarios.
- local data
- web file with public URL
- Azure Machine Learning datastore and path
- Azure Machine Learning data asset
Understand the component definition YAML
Now let's look at the componentA.yml as an example to understand component definition YAML.
$schema: https://azuremlschemas.azureedge.net/latest/commandComponent.schema.json
type: command

name: component_a
display_name: componentA
version: 1

inputs:
  component_a_input:
    type: uri_folder

outputs:
  component_a_output:
    type: uri_folder

code: ./componentA_src

environment:
  image: python

command: >-
  python hello.py --componentA_input ${{inputs.component_a_input}} --componentA_output ${{outputs.component_a_output}}
The most common used schema of the component YAML is described in table. To learn more, see the full component YAML schema.
| key | description |
|---|---|
| name | Required. Name of the component. Must be unique across the Azure Machine Learning workspace. Must start with lowercase letter. Allow lowercase letters, numbers and underscore(_). Maximum length is 255 characters. |
| display_name | Display name of the component in the studio UI. Can be nonunique within the workspace. |
| command | Required the command to execute |
| code | Local path to the source code directory to be uploaded and used for the component. |
| environment | Required. The environment that is used to execute the component. |
| inputs | Dictionary of component inputs. The key is a name for the input within the context of the component and the value is the component input definition. Inputs can be referenced in the command using the ${{ inputs.<input_name> }} expression. |
| outputs | Dictionary of component outputs. The key is a name for the output within the context of the component and the value is the component output definition. Outputs can be referenced in the command using the ${{ outputs.<output_name> }} expression. |
| is_deterministic | Whether to reuse the previous job's result if the component inputs didn't change. Default value is true, also known as reuse by default. The common scenario when set as false is to force reload data from a cloud storage or URL. |
For the example in 3b_pipeline_with_data/componentA.yml, componentA has one data input and one data output, which can be connected to other steps in the parent pipeline. All the files under code section in component YAML will be uploaded to Azure Machine Learning when submitting the pipeline job. In this example, files under ./componentA_src will be uploaded (line 16 in componentA.yml). You can see the uploaded source code in Studio UI: double select the ComponentA step and navigate to Snapshot tab, as shown in the following screenshot. We can see it's a hello-world script just doing some simple printing, and write current datetime to the componentA_output path. The component takes input and output through command line argument, and it's handled in the hello.py using argparse.

Input and output
Input and output define the interface of a component. Input and output could be either of a literal value(of type string,number,integer, or boolean) or an object containing input schema.
Object input (of type uri_file, uri_folder,mltable,mlflow_model,custom_model) can connect to other steps in the parent pipeline job and hence pass data/model to other steps. In pipeline graph, the object type input renders as a connection dot.
Literal value inputs (string,number,integer,boolean) are the parameters you can pass to the component at run time. You can add default value of literal inputs under default field. For number and integer type, you can also add minimum and maximum value of the accepted value using min and max fields. If the input value exceeds the min and max, pipeline fails at validation. Validation happens before you submit a pipeline job to save your time. Validation works for CLI, Python SDK and designer UI. The following screenshot shows a validation example in designer UI. Similarly, you can define allowed values in enum field.

If you want to add an input to a component, remember to edit three places:
inputsfield in component YAMLcommandfield in component YAML.- Component source code to handle the command line input. It's marked in green box in the previous screenshot.
To learn more about inputs and outputs, see Manage inputs and outputs of component and pipeline.
Environment
Environment defines the environment to execute the component. It could be an Azure Machine Learning environment(curated or custom registered), docker image or conda environment. See the following examples.
- Azure Machine Learning registered environment asset. It's referenced in component following
azureml:<environment-name>:<environment-version>syntax. - public docker image
- conda file Conda file needs to be used together with a base image.
Register component for reuse and sharing
While some components are specific to a particular pipeline, the real benefit of components comes from reuse and sharing. Register a component in your Machine Learning workspace to make it available for reuse. Registered components support automatic versioning so you can update the component but assure that pipelines that require an older version will continue to work.
In the azureml-examples repository, navigate to the cli/jobs/pipelines-with-components/basics/1b_e2e_registered_components directory.
To register a component, use the az ml component create command:
az ml component create --file train.yml
az ml component create --file score.yml
az ml component create --file eval.yml
After these commands run to completion, you can see the components in Studio, under Asset -> Components:

Select a component. You see detailed information for each version of the component.
Under Details tab, you see basic information of the component like name, created by, version etc. You see editable fields for Tags and Description. The tags can be used for adding rapidly searched keywords. The description field supports Markdown formatting and should be used to describe your component's functionality and basic use.
Under Jobs tab, you see the history of all jobs that use this component.
Use registered components in a pipeline job YAML file
Let's use 1b_e2e_registered_components to demo how to use registered component in pipeline YAML. Navigate to 1b_e2e_registered_components directory, open the pipeline.yml file. The keys and values in the inputs and outputs fields are similar to those already discussed. The only significant difference is the value of the component field in the jobs.<JOB_NAME>.component entries. The component value is of the form azureml:<COMPONENT_NAME>:<COMPONENT_VERSION>. The train-job definition, for instance, specifies the latest version of the registered component my_train should be used:
type: command
component: azureml:my_train@latest
inputs:
  training_data:
    type: uri_folder
    path: ./data
  max_epocs: ${{parent.inputs.pipeline_job_training_max_epocs}}
  learning_rate: ${{parent.inputs.pipeline_job_training_learning_rate}}
  learning_rate_schedule: ${{parent.inputs.pipeline_job_learning_rate_schedule}}
outputs:
  model_output: ${{parent.outputs.pipeline_job_trained_model}}
services:
  my_vscode:
Manage components
You can check component details and manage the component using CLI (v2). Use az ml component -h to get detailed instructions on component command. The following table lists all available commands. See more examples in Azure CLI reference.
| commands | description |
|---|---|
az ml component create |
Create a component |
az ml component list |
List components in a workspace |
az ml component show |
Show details of a component |
az ml component update |
Update a component. Only a few fields(description, display_name) support update |
az ml component archive |
Archive a component container |
az ml component restore |
Restore an archived component |
Next steps
- Try out CLI v2 component example
Feedback
Coming soon: Throughout 2024 we will be phasing out GitHub Issues as the feedback mechanism for content and replacing it with a new feedback system. For more information see: https://aka.ms/ContentUserFeedback.
Submit and view feedback for