Tutorial: Diagnose a virtual machine network routing problem using the Azure portal
In this tutorial, you use Azure Network Watcher next hop tool to troubleshoot and diagnose a VM routing problem that's preventing it from correctly communicating with other resources. Next hop shows you that a custom route caused the routing problem.
In this tutorial, you learn how to:
- Create a virtual network
- Create two virtual machines
- Test communication to different IPs using the next hop capability of Azure Network Watcher
- View the effective routes
- Create a custom route
- Diagnose a routing problem
If you prefer, you can diagnose a virtual machine network routing problem using the Azure CLI or Azure PowerShell versions of the tutorial.
If you don't have an Azure subscription, create a free account before you begin.
Prerequisites
- An Azure account with an active subscription.
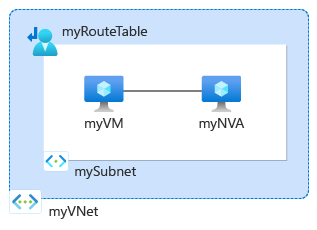
Create a virtual network
In this section, you create a virtual network.
Sign in to the Azure portal.
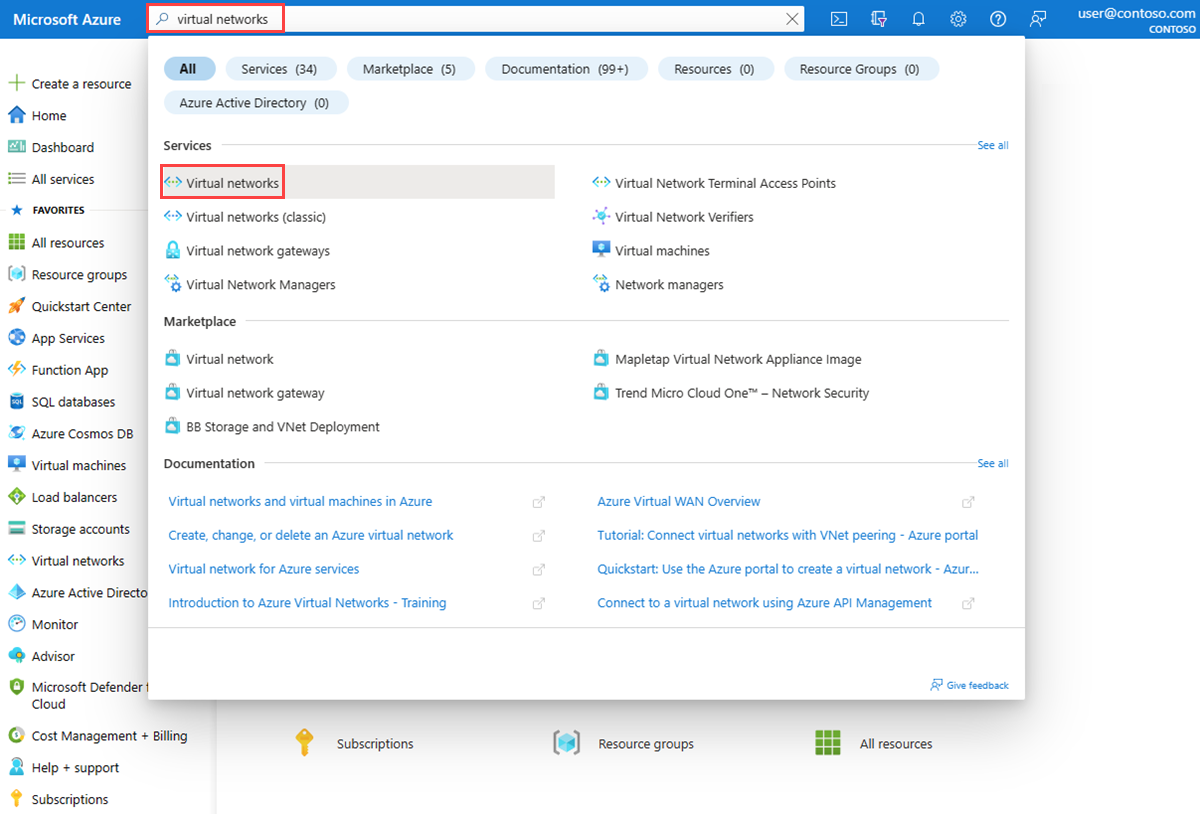
In the search box at the top of the portal, enter virtual networks. Select Virtual networks from the search results.
Select + Create. In Create virtual network, enter or select the following values in the Basics tab:
Setting Value Project Details Subscription Select your Azure subscription. Resource Group Select Create new.
Enter myResourceGroup in Name.
Select OK.Instance details Virtual network name Enter myVNet. Region Select East US. Select the IP Addresses tab, or select Next button at the bottom of the page twice.
Enter the following values in the IP Addresses tab:
Setting Value IPv4 address space 10.0.0.0/16 Subnet name mySubnet Subnet IP address range 10.0.0.0 - 10.0.0.255 (size: /24) Select the Review + create tab or select the Review + create button at the bottom of the page.
Review the settings, and then select Create.
Create virtual machines
In this section, you create two virtual machines: myVM and myNVA. You use myVM virtual machine to test the communication from. myNVA virtual machine is used as a network virtual appliance in the scenario.
Create first virtual machine
In the search box at the top of the portal, enter virtual machines. Select Virtual machines in the search results.
Select + Create and then select Azure virtual machine.
In Create a virtual machine, enter or select the following values in the Basics tab:
Setting Value Project Details Subscription Select your Azure subscription. Resource Group Select myResourceGroup. Instance details Virtual machine name Enter myVM. Region Select (US) East US. Availability Options Select No infrastructure redundancy required. Security type Select Standard. Image Select Windows Server 2022 Datacenter: Azure Edition - x64 Gen2. Size Choose a size or leave the default setting. Administrator account Username Enter a username. Password Enter a password. Confirm password Reenter password. Select the Networking tab, or select Next: Disks, then Next: Networking.
In the Networking tab, enter or select the following values:
Setting Value Network interface Virtual network Select myVNet. Subnet Select mySubnet. Public IP Select (new) myVM-ip. NIC network security group Select Basic. Public inbound ports Select Allow selected ports. Select inbound ports Select RDP (3389). Caution
Leaving the RDP port open to the internet is only recommended for testing. For production environments, it's recommended to restrict access to the RDP port to a specific IP address or range of IP addresses. You can also block internet access to the RDP port and use Azure Bastion to securely connect to your virtual machine from the Azure portal.
Select Review + create.
Review the settings, and then select Create.
Once the deployment is complete, select Go to resource to go to the Overview page of myVM.
Select Connect, then select select under Native RDP.
Select Download RDP file and open the downloaded file.
Select Connect and then enter the username and password that you created in the previous steps. Accept the certificate if prompted.
Once logged in, open a web browser and go to
www.bing.comto verify it's reachable.
Create second virtual machine
Follow the previous steps (1-6) and use myNVA for the virtual machine name to create the second virtual machine.
Test network communication using Network Watcher next hop
Use the next hop capability of Network Watcher to determine which route Azure is using to route traffic from myVM, which has one network interface with one IP configuration
In the search box at the top of the portal, enter network watcher. Select Network Watcher in the search results.
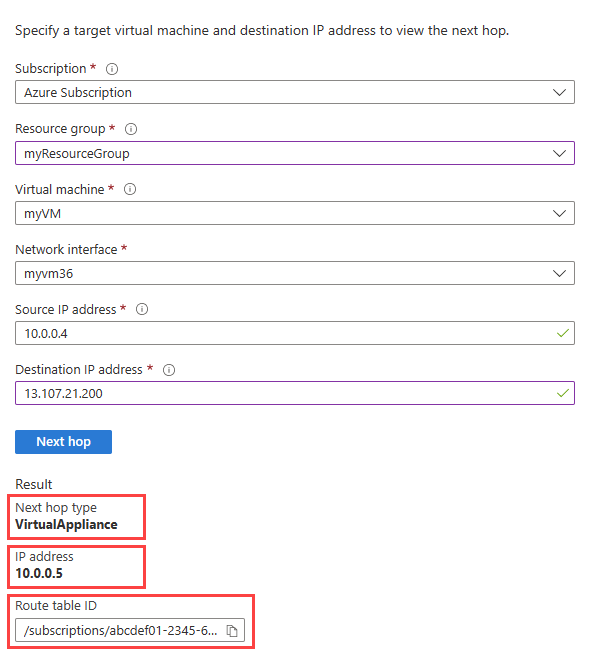
Under Network diagnostic tools, select Next hop. Enter or select the following values:
Setting Value Subscription Select your Azure subscription. Resource group Select myResourceGroup. Virtual machine Select myVM. Network interface Leave the default. Source IP address Enter 10.0.0.4 or the IP of your VM if it's different. Destination IP address Enter 13.107.21.200 to test the communication to www.bing.com.Select Next hop button to start the test. The test result shows information about the next hop like the next hop type, its IP address, and the route table ID used to route traffic. The result of testing 13.107.21.200 shows that the next hop type is Internet and the route table ID is System Route which means traffic destined to
www.bing.comfrom myVM is routed to the internet using Azure default system route.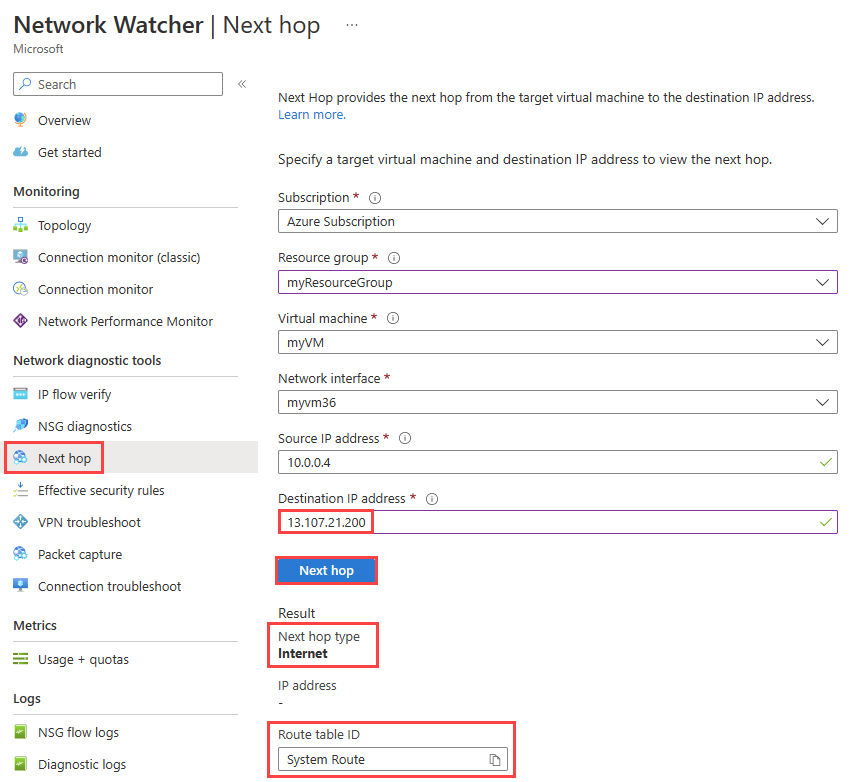
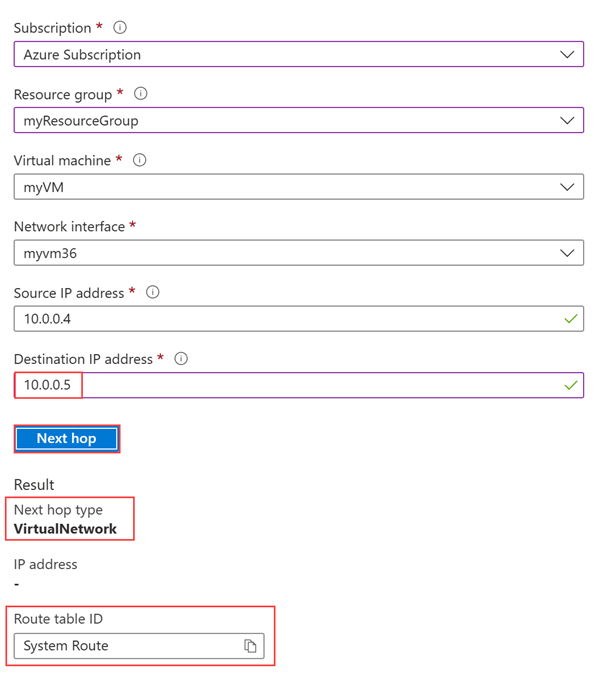
Change the Destination IP address to 10.0.0.5 which is the IP address of myNVA virtual machine, and then select Next hop button. The result shows that the next hop type is VirtualNetwork and the route table ID is System Route which means traffic destined to 10.0.0.5 from myVM is routed within myVNet virtual network using Azure default system route.
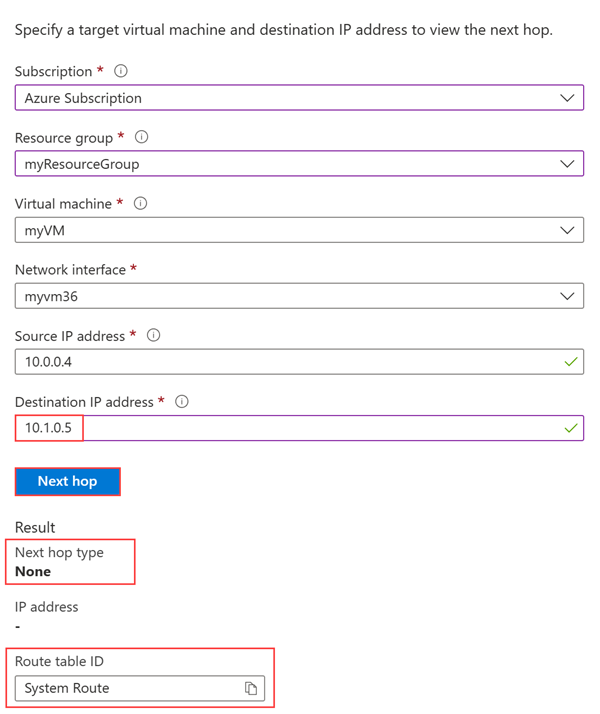
Next, change the Destination IP address to 10.1.0.5 which is a private IP address that isn't in the address space of myVNet virtual network, and then select Next hop button. The result shows that the next hop type is None which means traffic destined to 10.1.0.5 from myVM is dropped.
View details of a route
To further analyze routing, review the effective routes for myVM network interface.
In the search box at the top of the portal, enter virtual machines. Select Virtual machines in the search results.
Under Settings, select Networking, then select the network interface.
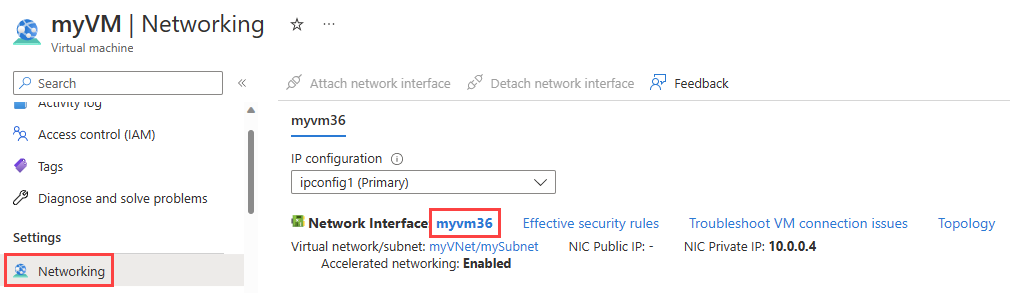
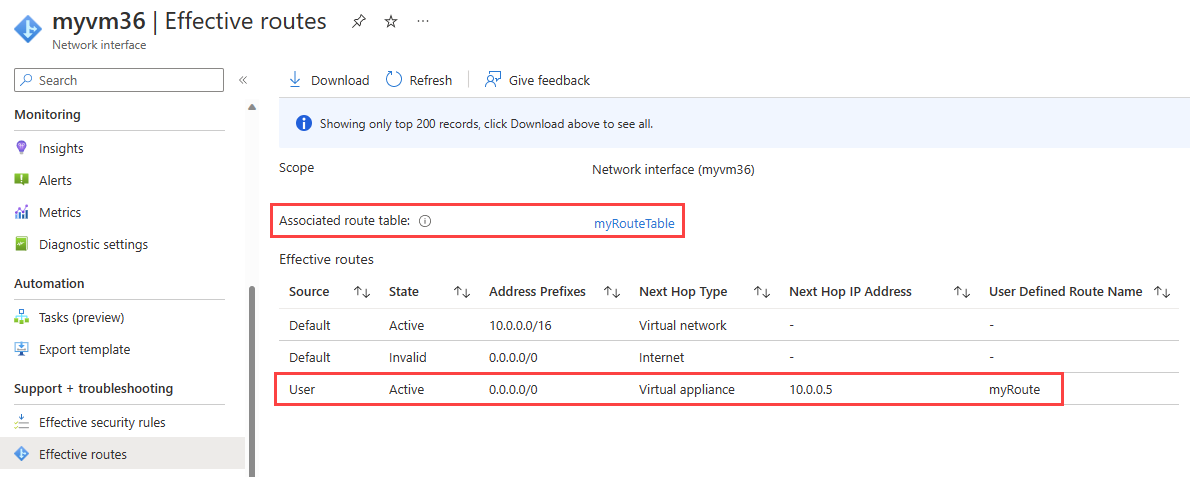
Under Help, select Effective routes to see the all routes associated with the network interface of myVM.
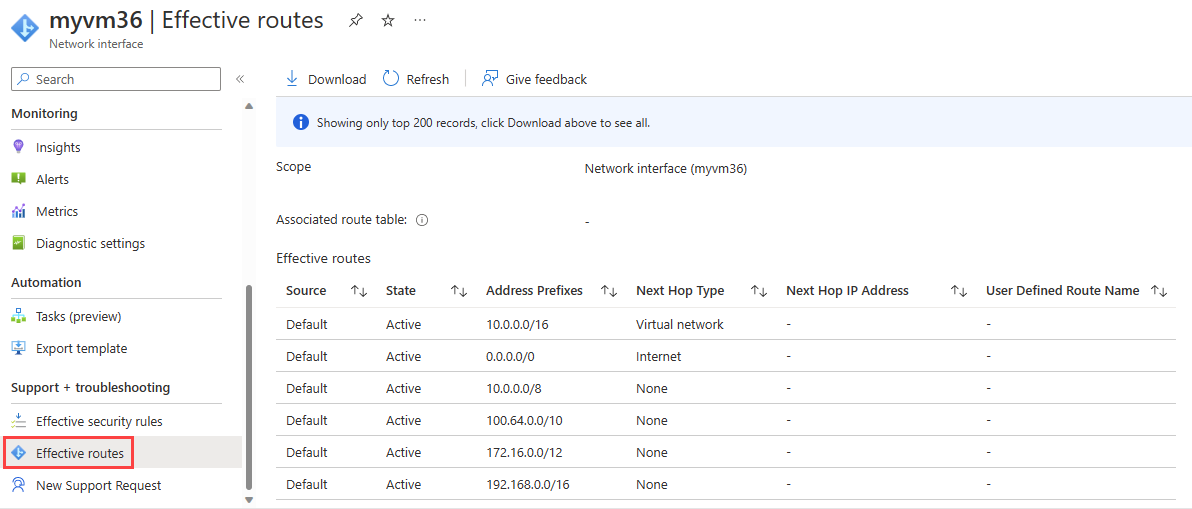
In the previous section, when you ran the test using 13.107.21.200, the route with 0.0.0.0/0 address prefix was used to route traffic to the address since no other route has the address. By default, all addresses not specified within the address prefix of another route are routed to the internet.
When you ran the test using 10.0.0.5, the route with 10.0.0.0/16 address prefix was used to route traffic to it.
However, when you ran the test using 10.1.0.5, the result was None for the next hop type because this IP address is in the 10.0.0.0/8 address space. Azure default route for 10.0.0.0/8 address prefix has next hope type as None. If you add an address prefix that contains 10.1.0.5 to the virtual network address space, then the next hop type for 10.1.0.5 will change from None to VirtualNetwork.

Test a routing problem due to custom routes
Next, you create a static custom route to override Azure default system routes and cause a routing problem to myVM virtual machine that prevents it from directly communicating with www.bing.com. Then, you'll use Network Watcher next hop to troubleshoot and diagnose the problem.
Create a custom route
In this section, you create a static custom route (user-defined route) in a route table that forces all traffic destined outside the virtual network to a specific IP address. Forcing traffic to a virtual network appliance is a common scenario.
In the search box at the top of the portal, enter route tables. Select Route tables in the search results.
Select + Create to create a new route table. In the Create Route table page, enter or select the following values:
Setting Value Project Details Subscription Select your Azure subscription. Resource group Select myResourceGroup. Instance Details Region Select East US. Name Enter myRouteTable. Propagate gateway routes Leave the default. Select Review + create.
Review the settings, and then select Create.
Once the deployment is complete, select Go to resource to go to the Overview page of myRouteTable.
Under Settings, select Routes, and then select + Add to add a custom route.
In the Add route page, enter or select the following values:
Setting Value Route name Enter myRoute. Address prefix destination Select IP Addresses. Destination IP addresses/CIDR ranges Enter 0.0.0.0/0. Next hop type Select Virtual appliance. next hop address Enter 10.0.0.5. Select Add.
Associate the route table with the subnet
In this section, you associate the route table that you created in the previous section with mySubnet subnet.
Under Settings, select Subnets, and then select + Associate to associate myRouteTable with mySubnet subnet.
In the Associate subnet page, select the following values:
Setting Value Virtual network Select myVNet (myResourcegroup). Subnet Select MySubnet. Select OK.
Go to www.bing.com
In myVM, open the web browser and go to www.bing.com to verify if it's still reachable. The custom route that you created and associated with subnet of myVM forces the traffic to go to myNVA. The traffic is dropped as myNVA isn't set up to forward the traffic for the purposes of this tutorial to demonstrate a routing problem.
Test network communication using next hop
Repeat the steps you used in Test network communication using Network Watcher next hop section using 13.107.21.200 to test the communication to www.bing.com.
View effective routes
Repeat the steps you used in View details of a route to check the effective routes after using the custom route that caused an issue in reaching www.bing.com.
The custom route with prefix 0.0.0.0/0 overrode Azure default route and caused all traffic destined outside myVNet virtual machine to go to 10.0.0.5.
Note
In this tutorial, traffic to www.bing.com was dropped because myNVA was not set up to forward traffic. To learn how to set up a virtual machine to forward traffic, see Turn on IP forwarding.
Clean up resources
When no longer needed, delete myResourceGroup resource group and all of the resources it contains:
In the search box at the top of the portal, enter myResourceGroup. Select myResourceGroup from the search results.
Select Delete resource group.
In Delete a resource group, enter myResourceGroup, and then select Delete.
Select Delete to confirm the deletion of the resource group and all its resources.
Next step
To learn how to monitor communication between two virtual machines, advance to the next tutorial:
Feedback
Coming soon: Throughout 2024 we will be phasing out GitHub Issues as the feedback mechanism for content and replacing it with a new feedback system. For more information see: https://aka.ms/ContentUserFeedback.
Submit and view feedback for