Provision read access to Azure Arc-enabled SQL Server 2022 using Microsoft Purview Data owner policies (preview)
Important
This feature is currently in preview. The Supplemental Terms of Use for Microsoft Azure Previews include additional legal terms that apply to Azure features that are in beta, in preview, or otherwise not yet released into general availability.
Data owner policies are a type of Microsoft Purview access policies. They allow you to manage access to user data in sources that have been registered for Data Policy Enforcement in Microsoft Purview. These policies can be authored directly in the Microsoft Purview governance portal, and after publishing, they get enforced by the data source.
This guide covers how a data owner can delegate authoring policies in Microsoft Purview to enable access to Azure Arc-enabled SQL Server. The following actions are currently enabled: Read. This action is only supported for policies at server level. Modify is not supported at this point.
Prerequisites
An Azure account with an active subscription. Create an account for free.
A new or existing Microsoft Purview account. Follow this quickstart guide to create one.
- Get SQL Server on-premises version 2022 and install it. Versions 2022 or more recent are supported on both Windows and Linux. You can try the free Developer edition.
- Configure your permissions and then register a list of resource providers in the subscription you'll use to onboard the SQL Server instance to Azure Arc.
- Complete prerequisites and onboard the SQL Server instance with Azure Arc. A simple configuration for Windows SQL Server is here. An alternate configuration for Linux SQL Server is here.
- Enable Microsoft Entra authentication in SQL Server. For a simpler setup, complete the prerequisites and process outlined in this article.
- Remember to grant application permissions and grant admin consent
- You need to configure a Microsoft Entra admin for the SQL Server instance, but it isn't necessary to set up other Microsoft Entra logins or users. You'll grant access to those users by using Microsoft Purview policies.
Region support
Data policy enforcement is available in all Microsoft Purview regions except:
- West US2
- East Asia
- US Gov Virginia
- China North 3
Security considerations for Azure Arc-enabled SQL Server
- The server admin can turn off the Microsoft Purview policy enforcement.
- Azure Arc admin and server admin permissions provide the ability to change the Azure Resource Manager path of the server. Because mappings in Microsoft Purview use Resource Manager paths, it can lead to wrong policy enforcements.
- A SQL Server admin (database admin) can gain the power of a server admin and can tamper with the cached policies from Microsoft Purview.
- The recommended configuration is to create a separate app registration for each SQL server instance. This configuration prevents the second SQL Server instance from reading the policies meant for the first SQL Server instance, in case a rogue admin in the second SQL Server instance tampers with the Resource Manager path.
Verify the prerequisites
Sign in to the Azure portal through this link
Navigate to SQL servers on the left pane. You'll see a list of SQL Server instances on Azure Arc.
Select the SQL Server instance that you want to configure.
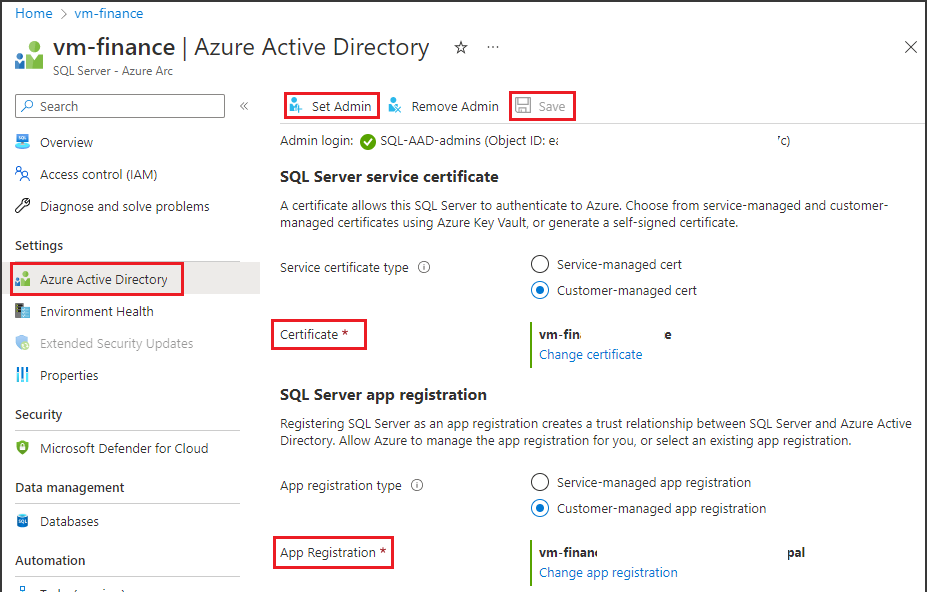
Go to Microsoft Entra ID on the left pane.
Ensure that Microsoft Entra authentication is configured with an admin login. If not, refer to the access policy prerequisites section in this guide.
Ensure that a certificate has been provided to for SQL Server to authenticate to Azure. If not, refer to the access policy prerequisites section in this guide.
Ensure that an app registration has been entered to create a trust relationship between SQL Server and Microsoft Entra ID. If not, refer to the access policy prerequisites section in this guide.
If you made any changes, select the Save button to save the configuration and wait until the operation completes successfully. This could take a few minutes. The message "Saved successfully" will be displayed at the top of the page in green background. You might need to scroll up to see it.
Microsoft Purview configuration
Register the data source in Microsoft Purview
Before a policy can be created in Microsoft Purview for a data resource, you must register that data resource in Microsoft Purview Studio. You will find the instructions related to registering the data resource later in this guide.
Note
Microsoft Purview policies rely on the data resource ARM path. If a data resource is moved to a new resource group or subscription it will need to be de-registered and then registered again in Microsoft Purview.
Configure permissions to enable Data policy enforcement on the data source
Once a resource is registered, but before a policy can be created in Microsoft Purview for that resource, you must configure permissions. A set of permissions are needed to enable the Data policy enforcement. This applies to data sources, resource groups, or subscriptions. To enable Data policy enforcement, you must have both specific Identity and Access Management (IAM) privileges on the resource as well as specific Microsoft Purview privileges:
You must have either one of the following IAM role combinations on the resource's Azure Resource Manager path or any parent of it (that is, using IAM permission inheritance):
- IAM Owner
- Both IAM Contributor and IAM User Access Administrator
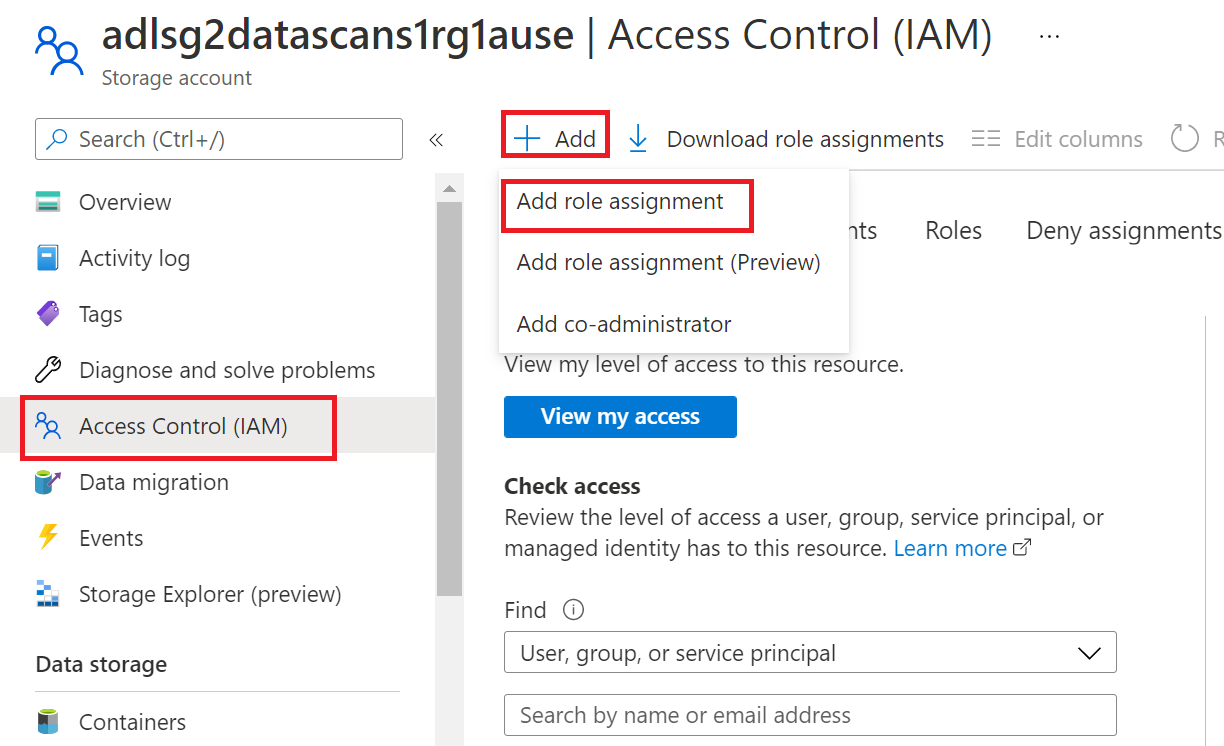
To configure Azure role-based access control (RBAC) permissions, follow this guide. The following screenshot shows how to access the Access Control section in the Azure portal for the data resource to add a role assignment.
Note
The IAM Owner role for a data resource can be inherited from a parent resource group, a subscription, or a subscription management group. Check which Microsoft Entra users, groups, and service principals hold or are inheriting the IAM Owner role for the resource.
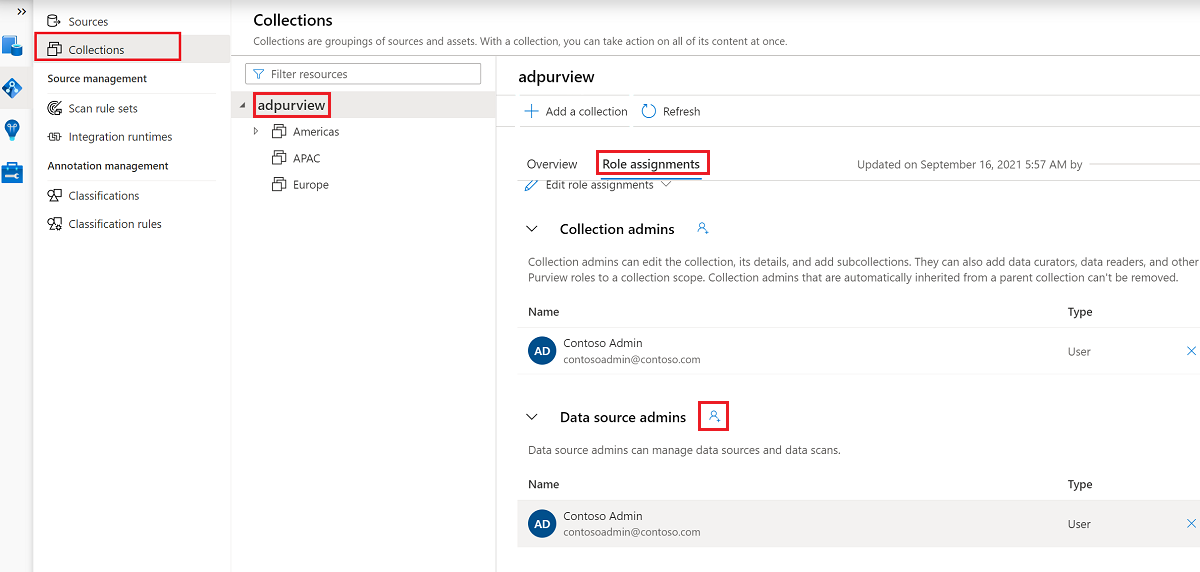
You also need to have the Microsoft Purview Data source admin role for the collection or a parent collection (if inheritance is enabled). For more information, see the guide on managing Microsoft Purview role assignments.
The following screenshot shows how to assign the Data source admin role at the root collection level.


Configure Microsoft Purview permissions to create, update, or delete access policies
To create, update or delete policies, you need to get the Policy author role in Microsoft Purview at root collection level:
- The Policy author role can create, update, and delete DevOps and Data Owner policies.
- The Policy author role can delete self-service access policies.
For more information about managing Microsoft Purview role assignments, see Create and manage collections in the Microsoft Purview Data Map.
Note
Policy author role must be configured at the root collection level.
In addition, to easily search Microsoft Entra users or groups when creating or updating the subject of a policy, you can greatly benefit from getting the Directory Readers permission in Microsoft Entra ID. This is a common permission for users in an Azure tenant. Without the Directory Reader permission, the Policy Author will have to type the complete username or email for all the principals included in the subject of a data policy.
Configure Microsoft Purview permissions for publishing Data Owner policies
Data Owner policies allow for checks and balances if you assign the Microsoft Purview Policy author and Data source admin roles to different people in the organization. Before a Data owner policy takes effect, a second person (Data source admin) must review it and explicitly approve it by publishing it. This does not apply to DevOps or Self-service access policies as publishing is automatic for them when those policies are created or updated.
To publish a Data owner policy you need to get the Data source admin role in Microsoft Purview at root collection level.
For more information about managing Microsoft Purview role assignments, see Create and manage collections in the Microsoft Purview Data Map.
Note
To publish Data owner policies, the Data source admin role must be configured at the root collection level.
Delegate access provisioning responsibility to roles in Microsoft Purview
After a resource has been enabled for Data policy enforcement, any Microsoft Purview user with the Policy author role at the root collection level can provision access to that data source from Microsoft Purview.
Note
Any Microsoft Purview root Collection admin can assign new users to root Policy author roles. Any Collection admin can assign new users to a Data source admin role under the collection. Minimize and carefully vet the users who hold Microsoft Purview Collection admin, Data source admin, or Policy author roles.
If a Microsoft Purview account with published policies is deleted, such policies will stop being enforced within an amount of time that depends on the specific data source. This change can have implications on both security and data access availability. The Contributor and Owner roles in IAM can delete Microsoft Purview accounts. You can check these permissions by going to the Access control (IAM) section for your Microsoft Purview account and selecting Role Assignments. You can also use a lock to prevent the Microsoft Purview account from being deleted through Resource Manager locks.
Register data sources in Microsoft Purview
Register each data source with Microsoft Purview to later define access policies.
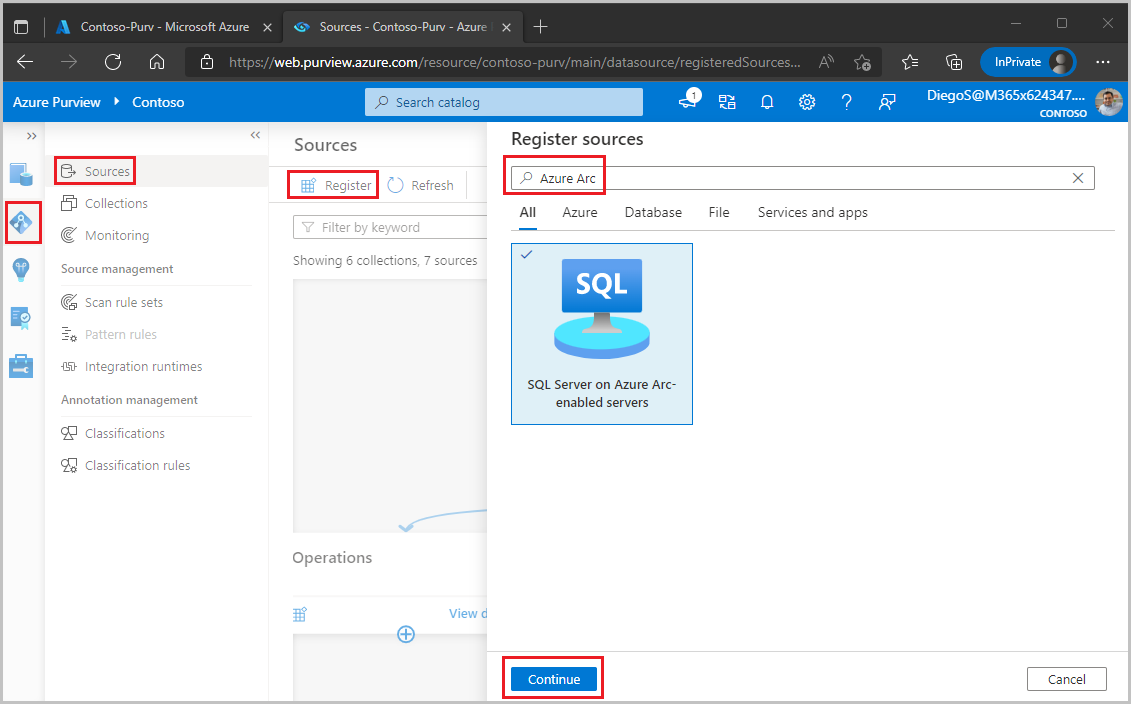
Sign in to Microsoft Purview Studio.
Navigate to the Data map feature on the left pane, select Sources, then select Register. Type "Azure Arc" in the search box and select SQL Server on Azure Arc. Then select Continue.
Enter a Name for this registration. It is best practice to make the name of the registration the same as the server name in the next step.
Select an Azure subscription, Server name and Server endpoint.
Select a collection to put this registration in.
Enable Data Policy Enforcement. Data Policy Enforcement needs certain permissions and can affect the security of your data, as it delegates to certain Microsoft Purview roles to manage access to the data sources. Go through the secure practices related to Data Policy Enforcement in this guide: How to enable Data Policy Enforcement
Select Register or Apply at the bottom.
Once your data source has the Data policy enforcement toggle Enabled, it will look like this picture.

Enable policies in Azure Arc-enabled SQL Server
This section describes the steps to configure SQL Server on Azure Arc to use Microsoft Purview. Execute these steps after you enable the Data policy enforcement option for this data source in the Microsoft Purview account.
Sign in to the Azure portal through this link
Navigate to SQL servers on the left pane. You'll see a list of SQL Server instances on Azure Arc.
Select the SQL Server instance that you want to configure.
Go to Microsoft Entra ID on the left pane.
Scroll down to Microsoft Purview access policies.
Select the button to Check for Microsoft Purview Governance. Wait while the request is processed. While that happens, this message will be displayed at the top of the page. You might need to scroll up to see it.

At the bottom of the page, confirm that the Microsoft Purview Governance Status shows
Governed. Note that it may take up to 30 minutes for the correct status to be reflected. Continue doing a browser refresh until that happens.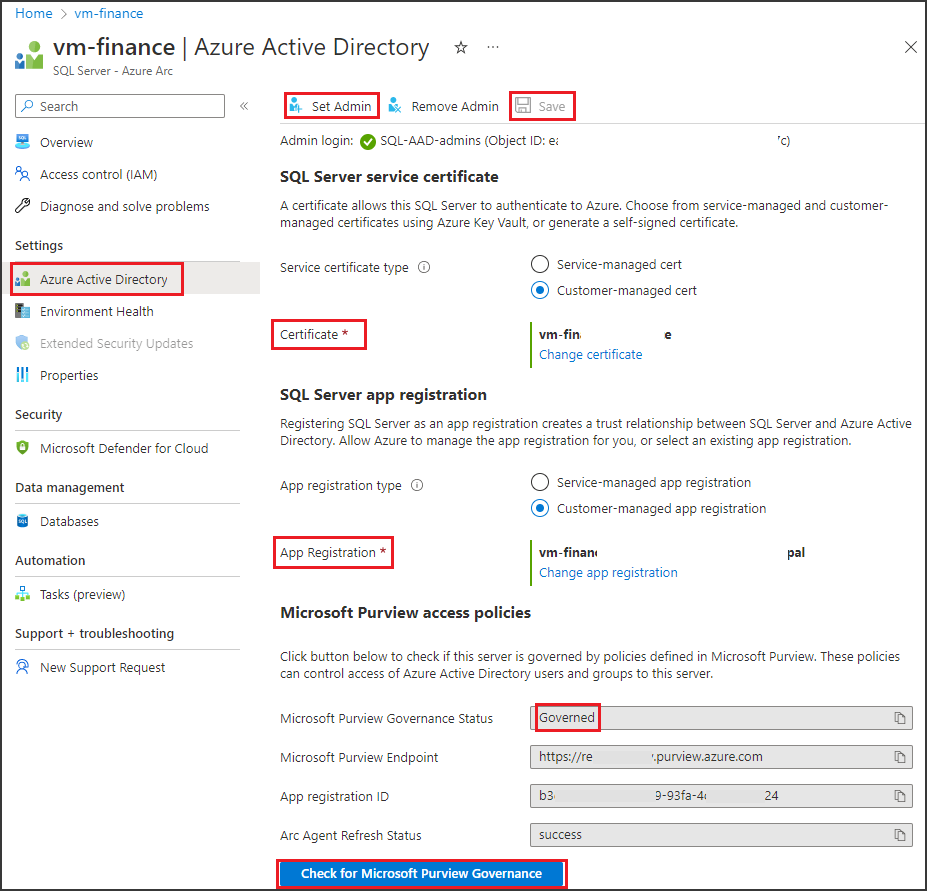
Confirm that the Microsoft Purview Endpoint points to the Microsoft Purview account where you registered this data source and enabled the data policy enforcement
Create and publish a Data owner policy
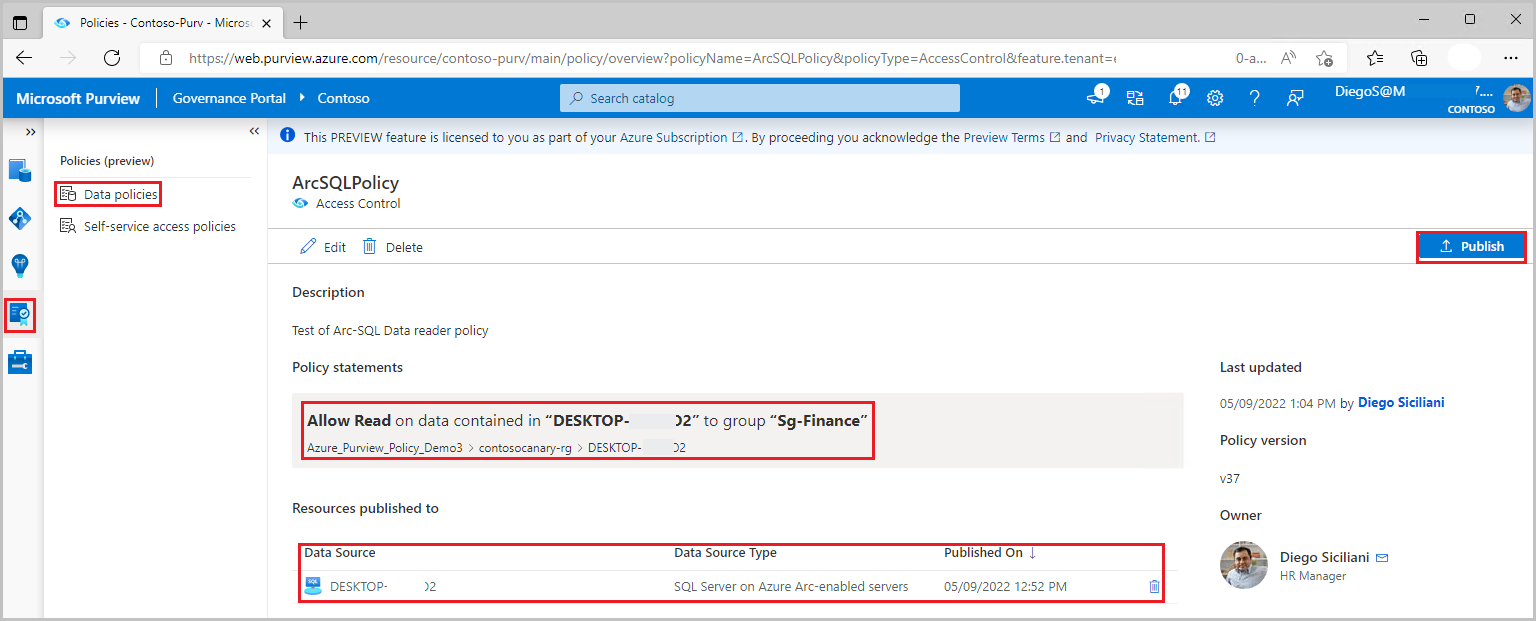
Execute the steps in the Create a new policy and Publish a policy sections of the data-owner policy authoring tutorial. The result will be a data owner policy similar to the example:
Example: Read policy. This policy assigns the Microsoft Entra principal 'sg-Finance' to the SQL Data reader action, in the scope of SQL server DESKTOP-xxx. This policy has also been published to that server. Note that policies related to this action are not supported below server level.
Note
- Given that scan is not currently available for this data source, data reader policies can only be created at server level. Use the Data sources box instead of the Asset box when authoring the data resources part of the policy.
- There is a know issue with SQL Server Management Studio that prevents right-clicking on a table and choosing option “Select Top 1000 rows”.
Important
- Publish is a background operation. It can take up to 5 minutes for the changes to be reflected in this data source.
- Changing a policy does not require a new publish operation. The changes will be picked up with the next pull.
Unpublish a data owner policy
Follow this link for the steps to unpublish a data owner policy in Microsoft Purview.
Update or delete a data owner policy
Follow this link for the steps to update or delete a data owner policy in Microsoft Purview.
Test the policy
After the policy is published and has been communicated to the data source, any of the Microsoft Entra users in the Subject should be able to connect and execute a query that targets the assets to which the policy granted access. To test, use SSMS or any SQL client and try to query. For example, attempt access to a SQL table you have provided read access to.
If you require additional troubleshooting, see the Next steps section in this guide.
Role definition detail
This section contains a reference of how relevant Microsoft Purview data policy roles map to specific actions in SQL data sources.
| Microsoft Purview policy role definition | Data source specific actions |
|---|---|
| Read | Microsoft.Sql/sqlservers/Connect |
| Microsoft.Sql/sqlservers/databases/Connect | |
| Microsoft.Sql/Sqlservers/Databases/Schemas/Tables/Rows | |
| Microsoft.Sql/Sqlservers/Databases/Schemas/Views/Rows | |
Next steps
Check blog, demo and related how-to guides
- Doc: Concepts for Microsoft Purview data owner policies
- Doc: Microsoft Purview data owner policies on all data sources in a subscription or a resource group
- Doc: Microsoft Purview data owner policies on an Azure SQL Database
- Doc: Troubleshoot Microsoft Purview policies for SQL data sources
- Blog: Grant users access to data assets in your enterprise via API
Feedback
Coming soon: Throughout 2024 we will be phasing out GitHub Issues as the feedback mechanism for content and replacing it with a new feedback system. For more information see: https://aka.ms/ContentUserFeedback.
Submit and view feedback for