Index data from SharePoint document libraries
Important
SharePoint Online indexer support is in public preview. It's offered "as-is", under Supplemental Terms of Use and supported on best effort only. Preview features aren't recommended for production workloads and aren't guaranteed to become generally available.
Be sure to visit the known limitations section before you start.
To use this preview, fill out this form. You won't be receiving any approval notification right after since any access request is automatically accepted after submission. After access is enabled, use a preview REST API (2023-10-01-Preview or later) to index your content.
This article explains how to configure a search indexer to index documents stored in SharePoint document libraries for full text search in Azure AI Search. Configuration steps are first, followed by behaviors and scenarios
Functionality
An indexer in Azure AI Search is a crawler that extracts searchable data and metadata from a data source. The SharePoint Online indexer connects to your SharePoint site and indexes documents from one or more document libraries. The indexer provides the following functionality:
- Index files and metadata from one or more document libraries.
- Index incrementally, picking up just the new and changed files and metadata.
- Deletion detection is built in. Deletion in a document library is picked up on the next indexer run, and the document is removed from the index.
- Text and normalized images are extracted by default from the documents that are indexed. Optionally, you can add a skillset for deeper AI enrichment, like OCR or text translation.
Prerequisites
SharePoint in Microsoft 365 cloud service
Files in a document library
Supported document formats
The SharePoint Online indexer can extract text from the following document formats:
- CSV (see Indexing CSV blobs)
- EML
- EPUB
- GZ
- HTML
- JSON (see Indexing JSON blobs)
- KML (XML for geographic representations)
- Microsoft Office formats: DOCX/DOC/DOCM, XLSX/XLS/XLSM, PPTX/PPT/PPTM, MSG (Outlook emails), XML (both 2003 and 2006 WORD XML)
- Open Document formats: ODT, ODS, ODP
- Plain text files (see also Indexing plain text)
- RTF
- XML
- ZIP
Limitations and considerations
Here are the limitations of this feature:
Indexing SharePoint Lists isn't supported.
Indexing SharePoint .ASPX site content isn't supported.
OneNote notebook files aren't supported.
Private endpoint isn't supported.
Renaming a SharePoint folder doesn't trigger incremental indexing. A renamed folder is treated as new content.
SharePoint supports a granular authorization model that determines per-user access at the document level. The indexer doesn't pull these permissions into the index, and Azure AI Search doesn't support document-level authorization. When a document is indexed from SharePoint into a search service, the content is available to anyone who has read access to the index. If you require document-level permissions, you should consider security filters to trim results and automate copying the permissions at a file level to a field in the index.
Indexing user-encrypted files, Information Rights Management (IRM) protected files, ZIP files with passwords or similar encrypted content isn't supported. For encrypted content to be processed, the user with proper permissions to the specific file must remove the encryption so the item can be indexed accordingly when the indexer runs the next scheduled iteration.
Here are the considerations when using this feature:
- If you need a SharePoint content indexing solution in a production environment, consider creating a custom connector with SharePoint Webhooks, calling Microsoft Graph API to export the data to an Azure Blob container, and then use the Azure blob indexer for incremental indexing.
- If your SharePoint configuration allows Microsoft 365 processes to update SharePoint file system metadata, be aware that these updates can trigger the SharePoint Online indexer, causing the indexer to ingest documents multiple times. Because the SharePoint Online indexer is a third-party connector to Azure, the indexer can't read the configuration or vary its behavior. It responds to changes in new and changed content, regardless of how those updates are made. For this reason, make sure that you test your setup and understand the document processing count prior to using the indexer and any AI enrichment.
Configure the SharePoint Online indexer
To set up the SharePoint Online indexer, use both the Azure portal and a preview REST API.
This section provides the steps. You can also watch the following video.
Step 1 (Optional): Enable system assigned managed identity
Enable a system-assigned managed identity to automatically detect the tenant the search service is provisioned in.
Perform this step if the SharePoint site is in the same tenant as the search service. Skip this step if the SharePoint site is in a different tenant. The identity isn't used for indexing, just tenant detection. You can also skip this step if you want to put the tenant ID in the connection string.
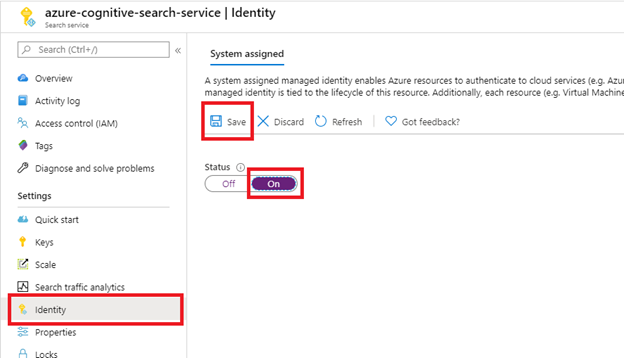
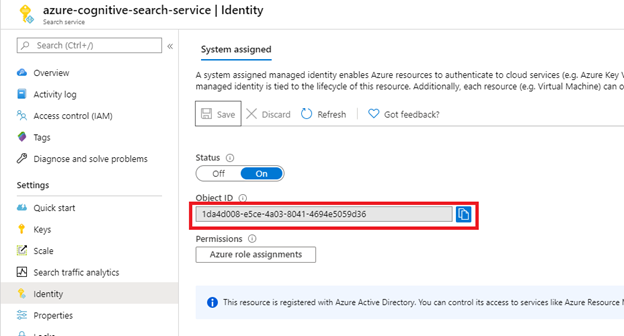
After selecting Save, you get an Object ID that has been assigned to your search service.
Step 2: Decide which permissions the indexer requires
The SharePoint Online indexer supports both delegated and application permissions. Choose which permissions you want to use based on your scenario.
We recommend app-based permissions. See limitations for known issues related to delegated permissions.
Application permissions (recommended), where the indexer runs under the identity of the SharePoint tenant with access to all sites and files. The indexer requires a client secret. The indexer will also require tenant admin approval before it can index any content.
Delegated permissions, where the indexer runs under the identity of the user or app sending the request. Data access is limited to the sites and files to which the caller has access. To support delegated permissions, the indexer requires a device code prompt to sign in on behalf of the user. User-delegated permissions enforces token expiration every 75 minutes, per the most recent security libraries used to implement this authentication type. This is not a behavior that can be adjusted. An expired token requires manual indexing using Run Indexer (preview). For this reason, you might want app-based permissions instead.
If your Microsoft Entra organization has conditional access enabled and your administrator isn't able to grant any device access for delegated permissions, you should consider app-based permissions instead. For more information, see Microsoft Entra Conditional Access policies.
Step 3: Create a Microsoft Entra application registration
The SharePoint Online indexer uses this Microsoft Entra application for authentication.
Sign in to the Azure portal.
Search for or navigate to Microsoft Entra ID, then select App registrations.
Select + New registration:
- Provide a name for your app.
- Select Single tenant.
- Skip the URI designation step. No redirect URI required.
- Select Register.
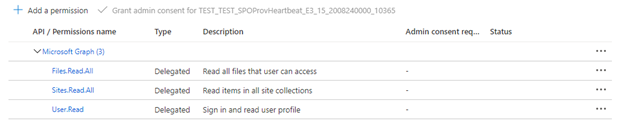
On the left, select API permissions, then Add a permission, then Microsoft Graph.
If the indexer is using application API permissions, then select Application permissions and add the following:
- Application - Files.Read.All
- Application - Sites.Read.All

Using application permissions means that the indexer accesses the SharePoint site in a service context. So when you run the indexer it will have access to all content in the SharePoint tenant, which requires tenant admin approval. A client secret is also required for authentication. Setting up the client secret is described later in this article.
If the indexer is using delegated API permissions, select Delegated permissions and add the following:
- Delegated - Files.Read.All
- Delegated - Sites.Read.All
- Delegated - User.Read
Delegated permissions allow the search client to connect to SharePoint under the security identity of the current user.
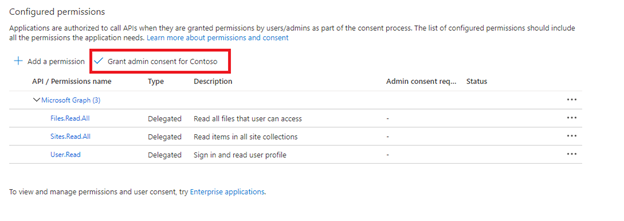
Give admin consent.
Tenant admin consent is required when using application API permissions. Some tenants are locked down in such a way that tenant admin consent is required for delegated API permissions as well. If either of these conditions apply, you’ll need to have a tenant admin grant consent for this Microsoft Entra application before creating the indexer.
Select the Authentication tab.
Set Allow public client flows to Yes then select Save.
Select + Add a platform, then Mobile and desktop applications, then check
https://login.microsoftonline.com/common/oauth2/nativeclient, then Configure.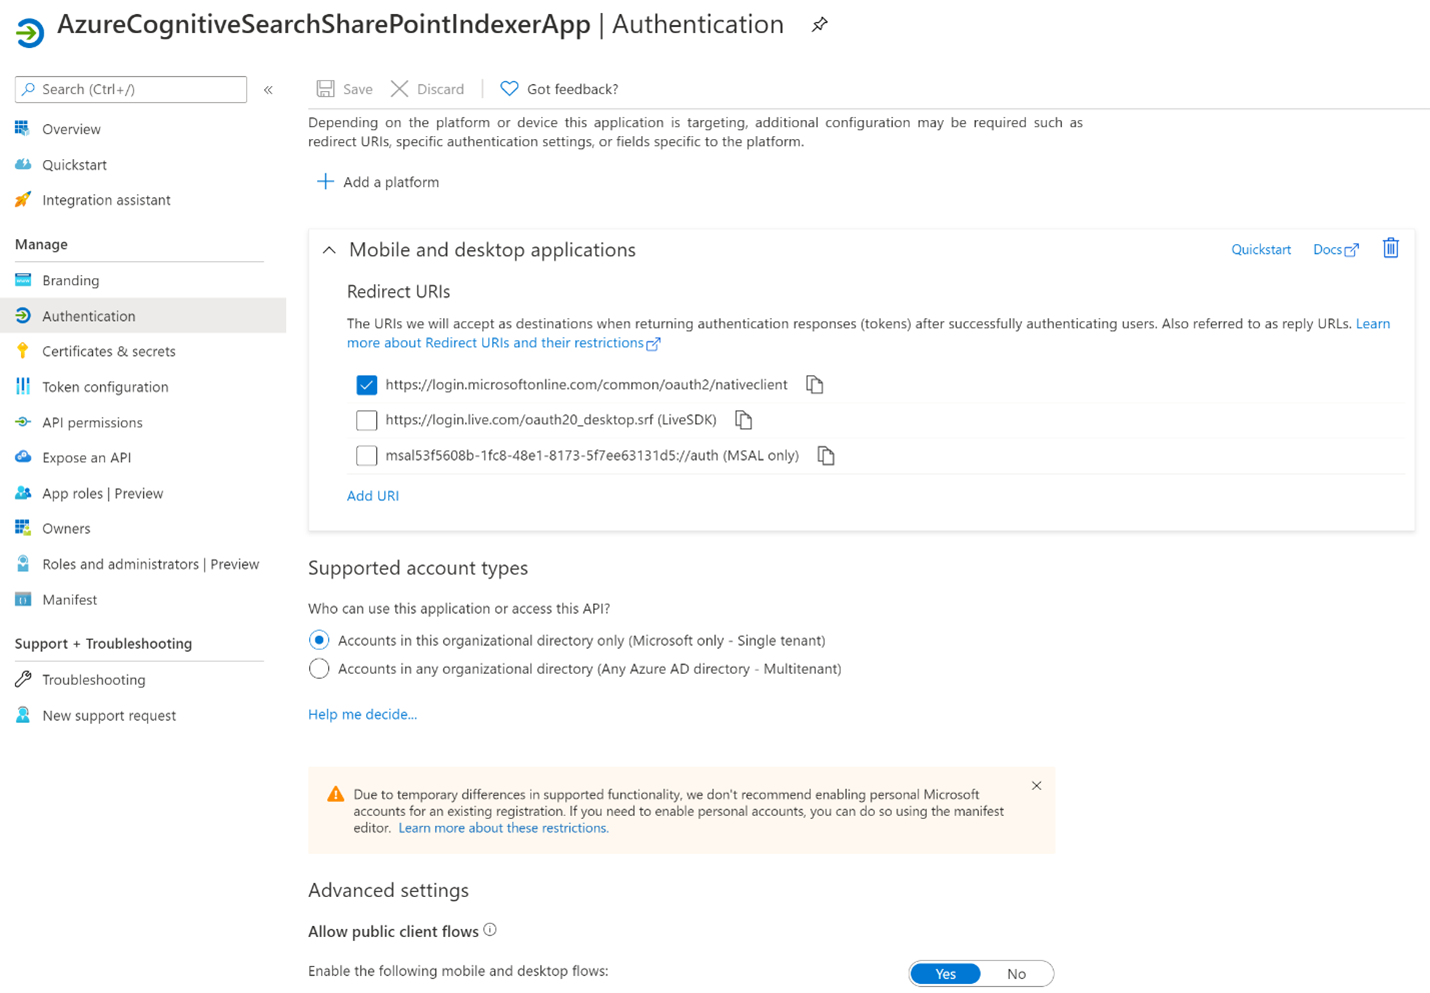
(Application API Permissions only) To authenticate to the Microsoft Entra application using application permissions, the indexer requires a client secret.
Select Certificates & Secrets from the menu on the left, then Client secrets, then New client secret.

In the menu that pops up, enter a description for the new client secret. Adjust the expiration date if necessary. If the secret expires, it needs to be recreated and the indexer needs to be updated with the new secret.
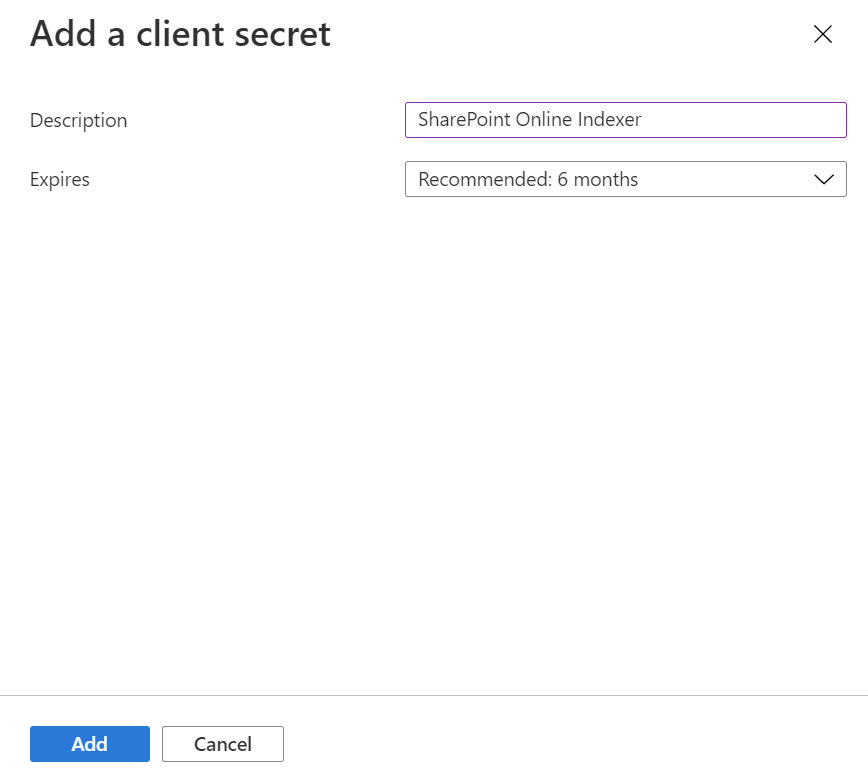
The new client secret appears in the secret list. Once you navigate away from the page, the secret is no longer be visible, so copy it using the copy button and save it in a secure location.

Step 4: Create data source
Important
Starting in this section, use the preview REST API for the remaining steps. We recommend the latest preview API, 2023-10-01-preview. If you’re not familiar with the Azure AI Search REST API, we suggest taking a look at this Quickstart.
A data source specifies which data to index, credentials, and policies to efficiently identify changes in the data (new, modified, or deleted rows). A data source can be used by multiple indexers in the same search service.
For SharePoint indexing, the data source must have the following required properties:
- name is the unique name of the data source within your search service.
- type must be "sharepoint". This value is case-sensitive.
- credentials provide the SharePoint endpoint and the Microsoft Entra application (client) ID. An example SharePoint endpoint is
https://microsoft.sharepoint.com/teams/MySharePointSite. You can get the endpoint by navigating to the home page of your SharePoint site and copying the URL from the browser. - container specifies which document library to index. Properties control which documents are indexed.
To create a data source, call Create Data Source (preview).
POST https://[service name].search.windows.net/datasources?api-version=2023-10-01-Preview
Content-Type: application/json
api-key: [admin key]

{
    "name" : "sharepoint-datasource",
    "type" : "sharepoint",
    "credentials" : { "connectionString" : "[connection-string]" },
    "container" : { "name" : "defaultSiteLibrary", "query" : null }
}
Connection string format
The format of the connection string changes based on whether the indexer is using delegated API permissions or application API permissions
Delegated API permissions connection string format
SharePointOnlineEndpoint=[SharePoint site url];ApplicationId=[Azure AD App ID];TenantId=[SharePoint site tenant id]Application API permissions connection string format
SharePointOnlineEndpoint=[SharePoint site url];ApplicationId=[Azure AD App ID];ApplicationSecret=[Azure AD App client secret];TenantId=[SharePoint site tenant id]
Note
If the SharePoint site is in the same tenant as the search service and system-assigned managed identity is enabled, TenantId doesn't have to be included in the connection string. If the SharePoint site is in a different tenant from the search service, TenantId must be included.
Step 5: Create an index
The index specifies the fields in a document, attributes, and other constructs that shape the search experience.
To create an index, call Create Index (preview):
POST https://[service name].search.windows.net/indexes?api-version=2023-10-01-Preview
Content-Type: application/json
api-key: [admin key]

{
    "name" : "sharepoint-index",
    "fields": [
        { "name": "id", "type": "Edm.String", "key": true, "searchable": false },
        { "name": "metadata_spo_item_name", "type": "Edm.String", "key": false, "searchable": true, "filterable": false, "sortable": false, "facetable": false },
        { "name": "metadata_spo_item_path", "type": "Edm.String", "key": false, "searchable": false, "filterable": false, "sortable": false, "facetable": false },
        { "name": "metadata_spo_item_content_type", "type": "Edm.String", "key": false, "searchable": false, "filterable": true, "sortable": false, "facetable": true },
        { "name": "metadata_spo_item_last_modified", "type": "Edm.DateTimeOffset", "key": false, "searchable": false, "filterable": false, "sortable": true, "facetable": false },
        { "name": "metadata_spo_item_size", "type": "Edm.Int64", "key": false, "searchable": false, "filterable": false, "sortable": false, "facetable": false },
        { "name": "content", "type": "Edm.String", "searchable": true, "filterable": false, "sortable": false, "facetable": false }
    ]
}
Important
Only metadata_spo_site_library_item_id may be used as the key field in an index populated by the SharePoint Online indexer. If a key field doesn't exist in the data source, metadata_spo_site_library_item_id is automatically mapped to the key field.
Step 6: Create an indexer
An indexer connects a data source with a target search index and provides a schedule to automate the data refresh. Once the index and data source are created, you can create the indexer.
During this step, you’re asked to sign in with organization credentials that have access to the SharePoint site. If possible, we recommend creating a new organizational user account and giving that new user the exact permissions that you want the indexer to have.
There are a few steps to creating the indexer:
Send a Create Indexer (preview) request:
POST https://[service name].search.windows.net/indexers?api-version=2023-10-01-Preview
Content-Type: application/json
api-key: [admin key]

{
    "name" : "sharepoint-indexer",
    "dataSourceName" : "sharepoint-datasource",
    "targetIndexName" : "sharepoint-index",
    "parameters": {
    "batchSize": null,
    "maxFailedItems": null,
    "maxFailedItemsPerBatch": null,
    "base64EncodeKeys": null,
    "configuration": {
        "indexedFileNameExtensions" : ".pdf, .docx",
        "excludedFileNameExtensions" : ".png, .jpg",
        "dataToExtract": "contentAndMetadata"
      }
    },
    "schedule" : { },
    "fieldMappings" : [
        {
          "sourceFieldName" : "metadata_spo_site_library_item_id",
          "targetFieldName" : "id",
          "mappingFunction" : {
            "name" : "base64Encode"
          }
         }
    ]
}
When you create the indexer for the first time, the Create Indexer (preview) request waits until you complete the next step. You must call Get Indexer Status to get the link and enter your new device code.
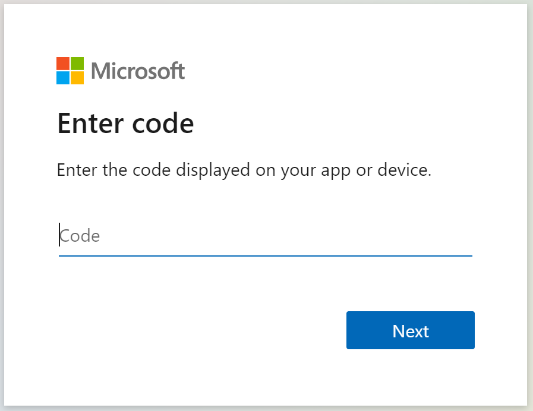
GET https://[service name].search.windows.net/indexers/sharepoint-indexer/status?api-version=2023-10-01-Preview
Content-Type: application/json
api-key: [admin key]
If you don’t run the Get Indexer Status within 10 minutes, the code expires and you’ll need to recreate the data source.
Copy the device login code from the Get Indexer Status response. The device login can be found in the "errorMessage".
{
    "lastResult": {
        "status": "transientFailure",
        "errorMessage": "To sign in, use a web browser to open the page https://microsoft.com/devicelogin and enter the code <CODE> to authenticate."
    }
}
Provide the code that was included in the error message.
The SharePoint Online indexer will access the SharePoint content as the signed-in user. The user that logs in during this step will be that signed-in user. So, if you sign in with a user account that doesn’t have access to a document in the Document Library that you want to index, the indexer won’t have access to that document.
If possible, we recommend creating a new user account and giving that new user the exact permissions that you want the indexer to have.
Approve the permissions that are being requested.
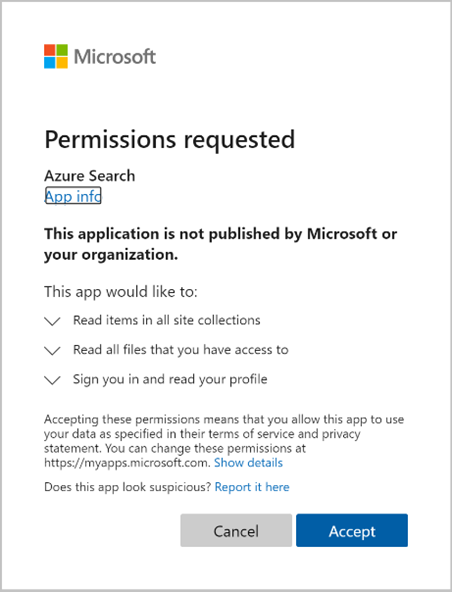
The Create Indexer (preview) initial request completes if all the permissions provided above are correct and within the 10 minute timeframe.
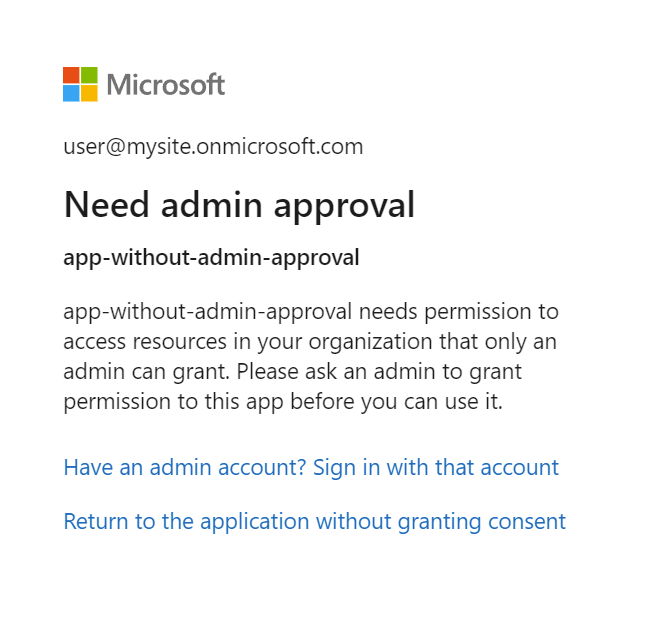
Note
If the Microsoft Entra application requires admin approval and was not approved before logging in, you may see the following screen. Admin approval is required to continue.
Step 7: Check the indexer status
After the indexer has been created, you can call Get Indexer Status:
GET https://[service name].search.windows.net/indexers/sharepoint-indexer/status?api-version=2023-10-01-Preview
Content-Type: application/json
api-key: [admin key]
Updating the data source
If there are no updates to the data source object, the indexer runs on a schedule without any user interaction.
However, if you modify the data source object while the device code is expired, you must sign in again in order for the indexer to run. For example, if you change the data source query, sign in again using the https://microsoft.com/devicelogin and get the new device code.
Here are the steps for updating a data source, assuming an expired device code:
Call Run Indexer (preview) to manually start indexer execution.
POST https://[service name].search.windows.net/indexers/sharepoint-indexer/run?api-version=2023-10-01-Preview
Content-Type: application/json
api-key: [admin key]
Check the indexer status.
GET https://[service name].search.windows.net/indexers/sharepoint-indexer/status?api-version=2023-10-01-Preview
Content-Type: application/json
api-key: [admin key]
If you get an error asking you to visit
https://microsoft.com/devicelogin, open the page and copy the new code.Paste the code into the dialog box.
Manually run the indexer again and check the indexer status. This time, the indexer run should successfully start.
Indexing document metadata
If you're indexing document metadata ("dataToExtract": "contentAndMetadata"), the following metadata will be available to index.
| Identifier | Type | Description |
|---|---|---|
| metadata_spo_site_library_item_id | Edm.String | The combination key of site ID, library ID, and item ID, which uniquely identifies an item in a document library for a site. |
| metadata_spo_site_id | Edm.String | The ID of the SharePoint site. |
| metadata_spo_library_id | Edm.String | The ID of document library. |
| metadata_spo_item_id | Edm.String | The ID of the (document) item in the library. |
| metadata_spo_item_last_modified | Edm.DateTimeOffset | The last modified date/time (UTC) of the item. |
| metadata_spo_item_name | Edm.String | The name of the item. |
| metadata_spo_item_size | Edm.Int64 | The size (in bytes) of the item. |
| metadata_spo_item_content_type | Edm.String | The content type of the item. |
| metadata_spo_item_extension | Edm.String | The extension of the item. |
| metadata_spo_item_weburi | Edm.String | The URI of the item. |
| metadata_spo_item_path | Edm.String | The combination of the parent path and item name. |
The SharePoint Online indexer also supports metadata specific to each document type. More information can be found in Content metadata properties used in Azure AI Search.
Note
To index custom metadata, "additionalColumns" must be specified in the query parameter of the data source.
Include or exclude by file type
You can control which files are indexed by setting inclusion and exclusion criteria in the "parameters" section of the indexer definition.
Include specific file extensions by setting "indexedFileNameExtensions" to a comma-separated list of file extensions (with a leading dot). Exclude specific file extensions by setting "excludedFileNameExtensions" to the extensions that should be skipped. If the same extension is in both lists, it's excluded from indexing.
PUT /indexers/[indexer name]?api-version=2020-06-30
{
    "parameters" : {
        "configuration" : {
            "indexedFileNameExtensions" : ".pdf, .docx",
            "excludedFileNameExtensions" : ".png, .jpeg"
        }
    }
}
Controlling which documents are indexed
A single SharePoint Online indexer can index content from one or more document libraries. Use the "container" parameter on the data source definition to indicate which sites and document libraries to index from.
The data source "container" section has two properties for this task: "name" and "query".
Name
The "name" property is required and must be one of three values:
| Value | Description |
|---|---|
| defaultSiteLibrary | Index all content from the site's default document library. |
| allSiteLibraries | Index all content from all document libraries in a site. Document libraries from a subsite are out of scope/ If you need content from subsites, choose "useQuery" and specify "includeLibrariesInSite". |
| useQuery | Only index the content defined in the "query". |
Query
The "query" parameter of the data source is made up of keyword/value pairs. The below are the keywords that can be used. The values are either site URLs or document library URLs.
Note
To get the value for a particular keyword, we recommend navigating to the document library that you’re trying to include/exclude and copying the URI from the browser. This is the easiest way to get the value to use with a keyword in the query.
| Keyword | Value description and examples |
|---|---|
| null | If null or empty, index either the default document library or all document libraries depending on the container name. Example: "container" : { "name" : "defaultSiteLibrary", "query" : null } |
| includeLibrariesInSite | Index content from all libraries under the specified site in the connection string. The scope includes any subsites of your site. The value should be the URI of the site or subsite. Example: "container" : { "name" : "useQuery", "query" : "includeLibrariesInSite=https://mycompany.sharepoint.com/mysite" } |
| includeLibrary | Index all content from this library. The value is the fully qualified path to the library, which can be copied from your browser: Example 1 (fully qualified path): "container" : { "name" : "useQuery", "query" : "includeLibrary=https://mycompany.sharepoint.com/mysite/MyDocumentLibrary" } Example 2 (URI copied from your browser): "container" : { "name" : "useQuery", "query" : "includeLibrary=https://mycompany.sharepoint.com/teams/mysite/MyDocumentLibrary/Forms/AllItems.aspx" } |
| excludeLibrary | Don't index content from this library. The value is the fully qualified path to the library, which can be copied from your browser: Example 1 (fully qualified path): "container" : { "name" : "useQuery", "query" : "includeLibrariesInSite=https://mysite.sharepoint.com/subsite1; excludeLibrary=https://mysite.sharepoint.com/subsite1/MyDocumentLibrary" } Example 2 (URI copied from your browser): "container" : { "name" : "useQuery", "query" : "includeLibrariesInSite=https://mycompany.sharepoint.com/teams/mysite; excludeLibrary=https://mycompany.sharepoint.com/teams/mysite/MyDocumentLibrary/Forms/AllItems.aspx" } |
| additionalColumns | Index columns from the document library. The value is a comma-separated list of column names you want to index. Use a double backslash to escape semicolons and commas in column names: Example 1 (additionalColumns=MyCustomColumn,MyCustomColumn2): "container" : { "name" : "useQuery", "query" : "includeLibrary=https://mycompany.sharepoint.com/mysite/MyDocumentLibrary;additionalColumns=MyCustomColumn,MyCustomColumn2" } Example 2 (escape characters using double backslash): "container" : { "name" : "useQuery", "query" : "includeLibrary=https://mycompany.sharepoint.com/teams/mysite/MyDocumentLibrary/Forms/AllItems.aspx;additionalColumns=MyCustomColumnWith\\,,MyCustomColumnWith\\;" } |
Handling errors
By default, the SharePoint Online indexer stops as soon as it encounters a document with an unsupported content type (for example, an image). You can use the excludedFileNameExtensions parameter to skip certain content types. However, you might need to index documents without knowing all the possible content types in advance. To continue indexing when an unsupported content type is encountered, set the failOnUnsupportedContentType configuration parameter to false:
PUT https://[service name].search.windows.net/indexers/[indexer name]?api-version=2023-10-01-Preview
Content-Type: application/json
api-key: [admin key]

{
    ... other parts of indexer definition
    "parameters" : { "configuration" : { "failOnUnsupportedContentType" : false } }
}
For some documents, Azure AI Search is unable to determine the content type, or unable to process a document of otherwise supported content type. To ignore this failure mode, set the failOnUnprocessableDocument configuration parameter to false:
"parameters" : { "configuration" : { "failOnUnprocessableDocument" : false } }
Azure AI Search limits the size of documents that are indexed. These limits are documented in Service Limits in Azure AI Search. Oversized documents are treated as errors by default. However, you can still index storage metadata of oversized documents if you set indexStorageMetadataOnlyForOversizedDocuments configuration parameter to true:
"parameters" : { "configuration" : { "indexStorageMetadataOnlyForOversizedDocuments" : true } }
You can also continue indexing if errors happen at any point of processing, either while parsing documents or while adding documents to an index. To ignore a specific number of errors, set the maxFailedItems and maxFailedItemsPerBatch configuration parameters to the desired values. For example:
{
    ... other parts of indexer definition
    "parameters" : { "maxFailedItems" : 10, "maxFailedItemsPerBatch" : 10 }
}
If a file on the SharePoint site has encryption enabled, an error message similar to the following may be encountered:
Code: resourceModified Message: The resource has changed since the caller last read it; usually an eTag mismatch Inner error: Code: irmEncryptFailedToFindProtector
The error message will also include the SharePoint site ID, drive ID, and drive item ID in the following pattern: <sharepoint site id> :: <drive id> :: <drive item id>. This information can be used to identify which item is failing on the SharePoint end. The user can then remove the encryption from the item to resolve the issue.
See also
Feedback
Coming soon: Throughout 2024 we will be phasing out GitHub Issues as the feedback mechanism for content and replacing it with a new feedback system. For more information see: https://aka.ms/ContentUserFeedback.
Submit and view feedback for