Note
Access to this page requires authorization. You can try signing in or changing directories.
Access to this page requires authorization. You can try changing directories.
Note
Azure AI Search is available through the Azure portal, REST APIs, and Azure SDKs. It also underpins Foundry IQ, the managed knowledge layer that transforms enterprise content into reusable, permission-aware knowledge bases for agents in the Microsoft Foundry portal.
This tutorial builds a website that searches through a catalog of books and then deploys the website to an Azure Static Web App.
What does the sample do?
This sample website provides access to a catalog of 10,000 books. You can search the catalog by entering text in the search bar. While you enter text, the website uses the search index's suggestion feature to autocomplete the text. When the query finishes, the website displays the list of books with a portion of the details. You can select a book to see all the details, stored in the search index, of the book.
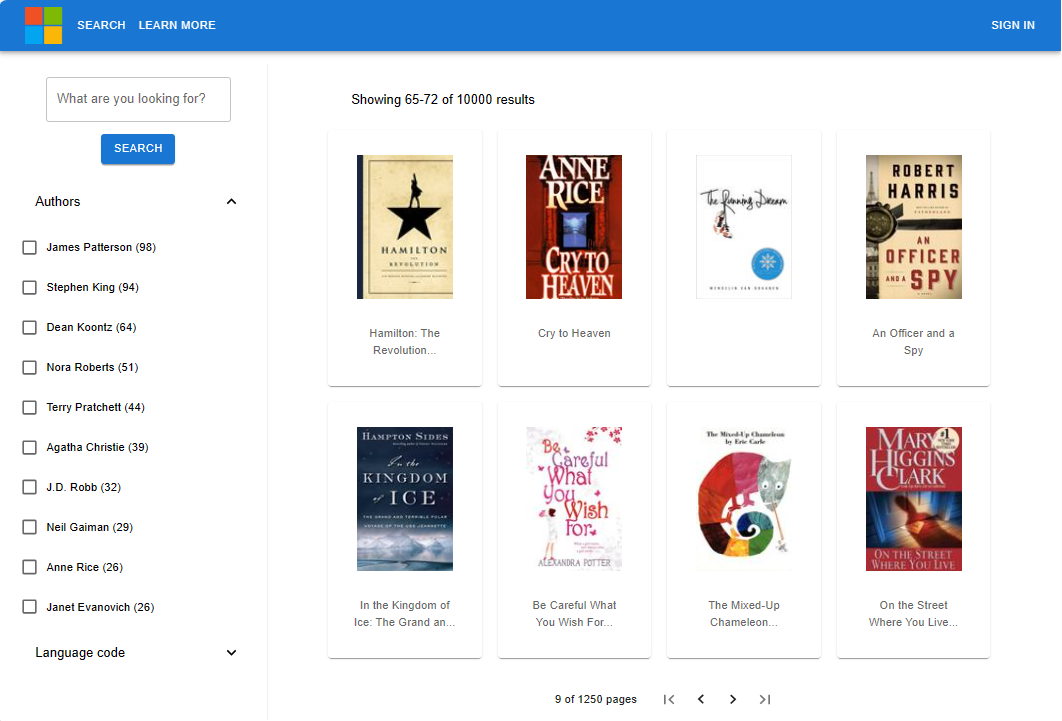
The search experience includes:
- Search – provides search functionality for the application.
- Suggest – provides suggestions as the user is typing in the search bar.
- Facets and filters - provides a faceted navigation structure that filters by author or language.
- Paginated results - provides paging controls for scrolling through results.
- Document Lookup – looks up a document by ID to retrieve all of its contents for the details page.
How is the sample organized?
The sample code includes the following components:
| App | Purpose | GitHub Repository Location |
|---|---|---|
| client | React app (presentation layer) to display books, with search. It calls the Azure Function app. | /azure-search-static-web-app/client |
| api | Azure .NET Function app (business layer) - calls the Azure AI Search API using .NET SDK | /azure-search-static-web-app/api |
| bulk insert | .NET project to create the index and add documents to it. | /azure-search-static-web-app/bulk-insert |
Set up your development environment
Create services and install the following software for your local development environment.
- Azure AI Search, any region or tier
- .NET 9 or latest version
- Git
- Visual Studio Code
- C# Dev Tools extension for Visual Studio Code
- Azure Static Web App extension for Visual Studio Code
This tutorial doesn't run the Azure Function API locally. If you want to run it locally, install azure-functions-core-tools.
Fork and clone the search sample with git
To deploy the Static Web App, you need to fork the sample repository. The web apps use your GitHub fork location to decide the build actions and deployment content. Code execution in the Static Web App happens remotely, with Azure Static Web Apps reading the code from your forked sample.
On GitHub, fork the azure-search-static-web-app repository.
Complete the fork process in your web browser with your GitHub account. This tutorial uses your fork as part of the deployment to an Azure Static Web App.
At a Bash terminal, download your forked sample application to your local computer.
Replace
YOUR-GITHUB-ALIASwith your GitHub alias.git clone https://github.com/YOUR-GITHUB-ALIAS/azure-search-static-web-app.gitAt the same Bash terminal, go into your forked repository for this website search example:
cd azure-search-static-web-appUse the Visual Studio Code command,
code .to open your forked repository. You accomplish the remaining tasks from Visual Studio Code, unless specified.code .