Keep track of data during hunting with Microsoft Sentinel
Hunting bookmarks in Microsoft Sentinel helps you preserve the queries and query results that you deem relevant. You can also record your contextual observations and reference your findings by adding notes and tags. Bookmarked data is visible to you and your teammates for easy collaboration. For more information, see Bookmarks.
Important
Microsoft Sentinel is now generally available within the Microsoft unified security operations platform in the Microsoft Defender portal. For more information, see Microsoft Sentinel in the Microsoft Defender portal.
Add a bookmark
Create a bookmark to preserve the queries, results, your observations, and findings.
For Microsoft Sentinel in the Azure portal, under Threat management select Hunting.
For Microsoft Sentinel in the Defender portal, select Microsoft Sentinel > Threat management > Hunting.From the Hunting tab, select a hunt.
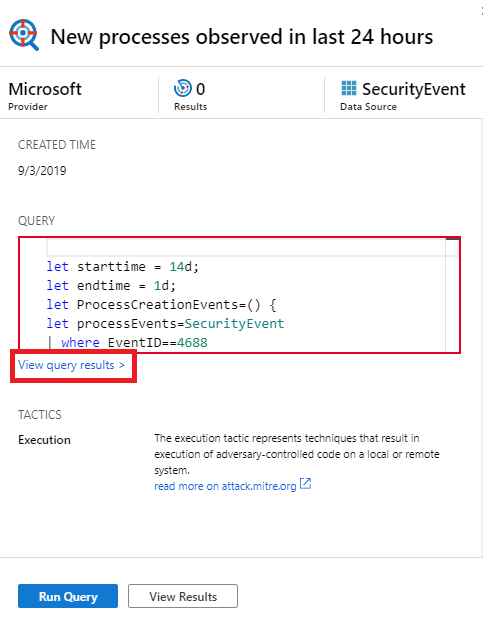
Select one of the hunting queries.
In the hunting query details, select Run Query.
Select View query results. For example:
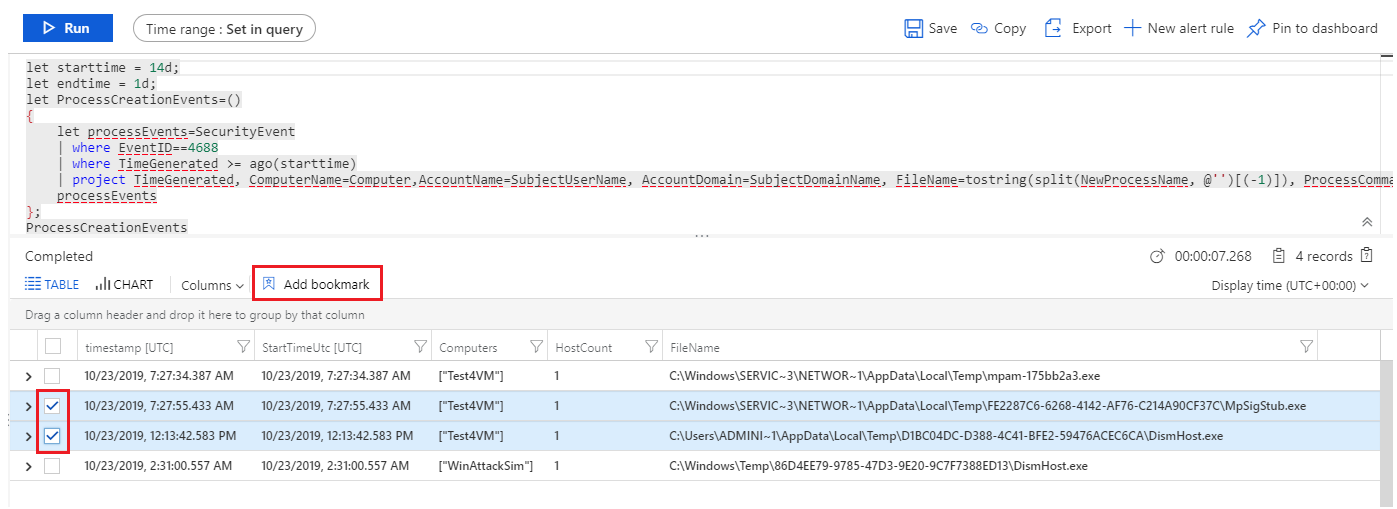
This action opens the query results in the Logs pane.
From the log query results list, use the checkboxes to select one or more rows that contain the information you find interesting.
Select Add bookmark:
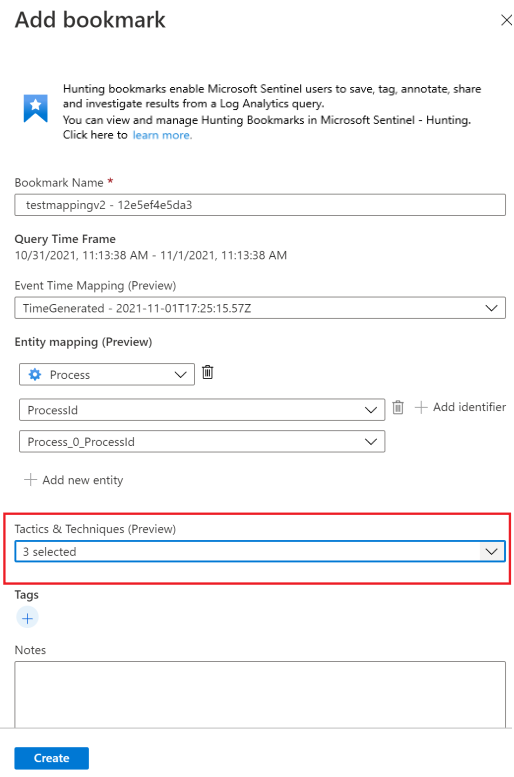
On the right, in the Add bookmark pane, optionally, update the bookmark name, add tags, and notes to help you identify what was interesting about the item.
Bookmarks can be optionally mapped to MITRE ATT&CK techniques or sub-techniques. MITRE ATT&CK mappings are inherited from mapped values in hunting queries, but you can also create them manually. Select the MITRE ATT&CK tactic associated with the desired technique from the drop-down menu in the Tactics & Techniques section of the Add bookmark pane. The menu expands to show all the MITRE ATT&CK techniques, and you can select multiple techniques and sub-techniques in this menu.
Now an expanded set of entities can be extracted from bookmarked query results for further investigation. In the Entity mapping section, use the drop-downs to select entity types and identifiers. Then map the column in the query results containing the corresponding identifier. For example:
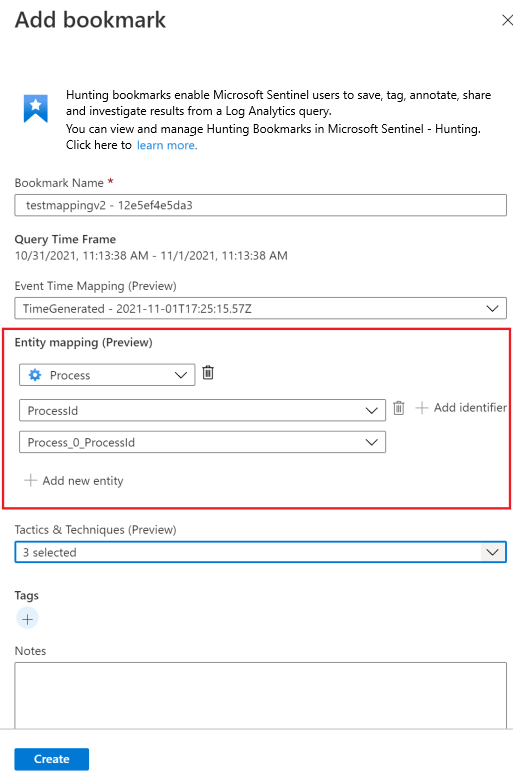
To view the bookmark in the investigation graph, you must map at least one entity. Entity mappings to account, host, IP, and URL entity types you created are supported, preserving backwards compatibility.
Select Save to commit your changes and add the bookmark. All bookmarked data is shared with other analysts, and is a first step toward a collaborative investigation experience.

The log query results support bookmarks whenever this pane is opened from Microsoft Sentinel. For example, you select General > Logs from the navigation bar, select event links in the investigations graph, or select an alert ID from the full details of an incident. You can't create bookmarks when the Logs pane is opened from other locations, such as directly from Azure Monitor.
View and update bookmarks
Find and update a bookmark from the bookmark tab.
For Microsoft Sentinel in the Azure portal, under Threat management select Hunting.
For Microsoft Sentinel in the Defender portal, select Microsoft Sentinel > Threat management > Hunting.Select the Bookmarks tab to view the list of bookmarks.
Search or filter to find a specific bookmark or bookmarks.
Select individual bookmarks to view the bookmark details in the right-hand pane.
Make your changes as needed. Your changes are automatically saved.
Exploring bookmarks in the investigation graph
Visualize your bookmarked data by launching the investigation experience in which you can view, investigate, and visually communicate your findings by using an interactive entity-graph diagram and timeline.
From the Bookmarks tab, select the bookmark or bookmarks you want to investigate.
In the bookmark details, ensure that at least one entity is mapped.
Select Investigate to view the bookmark in the investigation graph.
For instructions to use the investigation graph, see Use the investigation graph to deep dive.
Add bookmarks to a new or existing incident
Add bookmarks to an incident from the bookmarks tab on the Hunting page.
From the Bookmarks tab, select the bookmark or bookmarks you want to add to an incident.
Select Incident actions from the command bar:

Select either Create new incident or Add to existing incident, as appropriate. Then:
- For a new incident: Optionally update the details for the incident, and then select Create.
- For adding a bookmark to an existing incident: Select one incident, and then select Add.
To view the bookmark within the incident,
- Go to Microsoft Sentinel > Threat management > Incidents.
- Select the incident with your bookmark and View full details.
- On the incident page, in the left pane, select the Bookmarks.
View bookmarked data in logs
View bookmarked queries, results, or their history.
From the Hunting > Bookmarks tab, select the bookmark.
From the details pane, select the following links:
View source query to view the source query in the Logs pane.
View bookmark logs to see all bookmark metadata, which includes who made the update, the updated values, and the time the update occurred.
From the command bar on the Hunting > Bookmarks tab, select Bookmark Logs to view the raw bookmark data for all bookmarks.

This view shows all your bookmarks with associated metadata. You can use Kusto Query Language (KQL) queries to filter down to the latest version of the specific bookmark you're looking for.
There can be a significant delay (measured in minutes) between the time you create a bookmark and when it's displayed in the Bookmarks tab.
Delete a bookmark
Deleting the bookmark removes the bookmark from the list in the Bookmark tab. The HuntingBookmark table for your Log Analytics workspace continues to contain previous bookmark entries, but the latest entry changes the SoftDelete value to true, making it easy to filter out old bookmarks. Deleting a bookmark doesn't remove any entities from the investigation experience that are associated with other bookmarks or alerts.
To delete a bookmark, complete the following steps.
From the Hunting > Bookmarks tab, select the bookmark or bookmarks you want to delete.
Right-click, and select the option to delete the bookmarks selected.
Related content
In this article, you learned how to run a hunting investigation using bookmarks in Microsoft Sentinel. To learn more about Microsoft Sentinel, see the following articles: