Manage application lifecycle on a managed cluster using Azure Resource Manager
You have multiple options for deploying Azure Service Fabric applications on your Service Fabric managed cluster. We recommend using Azure Resource Manager. If you use Resource Manager, you can describe applications and services in JSON, and then deploy them in the same Resource Manager template as your cluster. Unlike using PowerShell or Azure CLI to deploy and manage applications, if you use Resource Manager, you don't have to wait for the cluster to be ready; application registration, provisioning, and deployment can all happen in one step. Using Resource Manager is the best way to manage the application life cycle in your cluster. For more information, see Best practices: Infrastructure as code.
Managing your applications as resources in Resource Manager can help you gain improvements in these areas:
- Audit trail: Resource Manager audits every operation and keeps a detailed activity log. An activity log can help you trace any changes made to the applications and to your cluster.
- Role-based access control: You can manage access to clusters and to applications deployed on the cluster by using the same Resource Manager template.
- Management efficiency: Using Resource Manager gives you a single location (the Azure portal) for managing your cluster and critical application deployments.
In this document, you will learn how to:
- Deploy service fabric application resources by using Resource Manager.
- Upgrade service fabric application resources by using Resource Manager.
- Delete service fabric application resources.
Note
This document is part four of a four-part tutorial series, beginning with deploying a Service Fabric managed cluster. As such, it's expected that you deployed your cluster before this step. However, if you intend to deploy your cluster and application together, in the same ARM or Bicep template, know that versions must have a dependency on nodeType. Otherwise, the deployment fails.
Deploy Service Fabric application resources
The high-level steps you take to deploy an application and its services by using the Resource Manager application resource model are:
- Package the application code.
- Upload the package.
- Reference the location of the package in a Resource Manager template as an application resource.
For more information, view Package an application.
Then, you create a Resource Manager template, update the parameters file with application details, and deploy the template on the Service Fabric managed cluster. Explore samples.
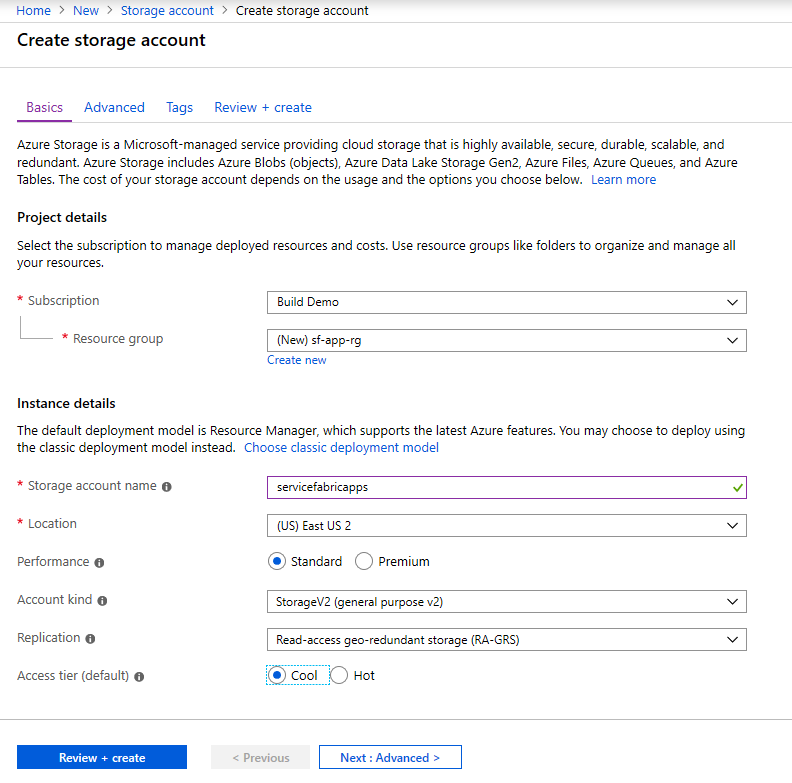
Create a storage account
To deploy an application from a Resource Manager template, you must have a storage account. The storage account is used to stage the application image.
You can reuse an existing storage account or you can create a new storage account for staging your applications. If you use an existing storage account, you can skip this step.
Caution
Anonymous public access to blob data in your storage account presents a security risk. When you create a storage account, we recommend that you disable anonymous public access to blob data at the account level, by setting the AllowBlobPublicAccess property to false. For more information, see Remediate anonymous public read access to blob data (Azure Resource Manager deployments).
Configure your storage account
After the storage account is created, you create a blob container where the applications can be staged. In the Azure portal, go to the Azure Storage account where you want to store your applications. Select Blobs > Add Container.
You can grant access to the container in one of the following ways:
- You can assign an Azure RBAC role that grants permissions to the container to a security principal, so that that security principal can access data in the container via Microsoft Entra authorization. For more information, see Authorize access to blobs using Microsoft Entra ID.
- You can delegate access to the container with a shared access signature to grant a client access to blobs in the container for a limited period of time and with specific permissions. For more information, see Grant limited access to Azure Storage resources using shared access signatures (SAS).
- You can use the account access keys to authorize access to blob data. This approach is the least secure and so is not recommended.
Stage the application in your storage account
Before you can deploy an application, you must stage the application in blob storage. In this tutorial, we create the application package manually. Keep in mind that this step can be automated. For more information, see Package an application.
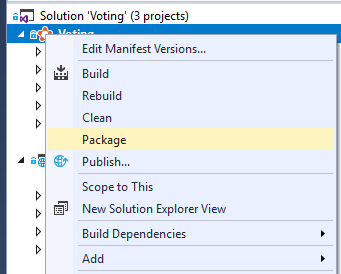
In this tutorial, we use the Voting sample application.
In Visual Studio, right-click the Voting project, and then select Package.
Go to the .\service-fabric-dotnet-quickstart\Voting\pkg\Debug directory. Zip the contents into a file called Voting.zip. The ApplicationManifest.xml file should be at the root in the zip file.

Rename the file to change the extension from .zip to .sfpkg.
In the Azure portal, in the apps container for your storage account, select Upload, and then upload Voting.sfpkg.
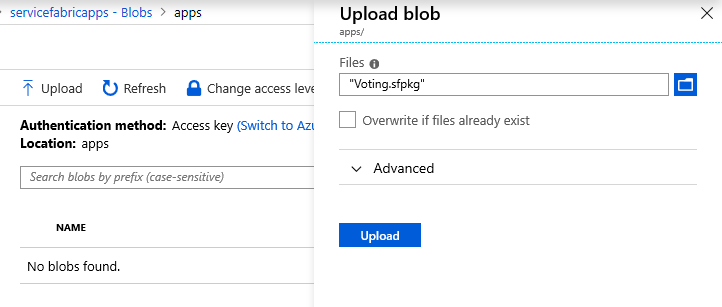
Now, the application is now staged and you can create the Resource Manager template to deploy the application.
Create the Resource Manager template
The sample application contains Azure Resource Manager templates you can use to deploy the application. The template file names are UserApp.json and UserApp.Parameters.json.
Note
The UserApp.Parameters.json file must be updated with the name of your cluster.
| Parameter | Description | Example | Comments |
|---|---|---|---|
| clusterName | The name of the cluster you're deploying to | sf-cluster123 | |
| application | The name of the application | Voting | |
| version | The resource ID, application type, and version of the app. | /providers/Microsoft.ServiceFabric/managedClusters/sf-cluster-123/applicationTypes/VotingType/versions/1.0.0 | Must match ApplicationManifest.xml |
| serviceName | The name of the service | VotingWeb | Must be in the format ServiceType |
| serviceTypeName | The type name of the service | VotingWebType | Must match ServiceManifest.xml |
| appPackageUrl | The blob storage URL of the application | https://servicefabricapps.blob.core.windows.net/apps/Voting.sfpkg | The URL of the application package in blob storage (the procedure to set the URL is described later in the article) |
{
    "apiVersion": "2021-05-01",
    "type": "Microsoft.ServiceFabric/managedclusters/applications",
    "name": "[concat(parameters('clusterName'), '/', parameters('applicationName'))]",
    "location": "[variables('clusterLocation')]",
},
{
    "apiVersion": "2021-05-01",
    "type": "Microsoft.ServiceFabric/managedclusters/applicationTypes",
    "name": "[concat(parameters('clusterName'), '/', parameters('applicationTypeName'))]",
    "location": "[variables('clusterLocation')]",
},
{
    "apiVersion": "2021-05-01",
    "type": "Microsoft.ServiceFabric/managedclusters/applicationTypes/versions",
    "name": "[concat(parameters('clusterName'), '/', parameters('applicationTypeName'), '/', parameters('applicationTypeVersion'))]",
    "location": "[variables('clusterLocation')]",
},
{
    "apiVersion": "2021-05-01",
    "type": "Microsoft.ServiceFabric/managedclusters/applications/services",
    "name": "[concat(parameters('clusterName'), '/', parameters('applicationName'), '/', parameters('serviceName'))]",
    "location": "[variables('clusterLocation')]"
}
Deploy the Service Fabric application
Run the New-AzResourceGroupDeployment cmdlet to deploy the application to the resource group that contains your cluster:
New-AzResourceGroupDeployment -ResourceGroupName "sf-cluster-rg" -TemplateParameterFile ".\UserApp.Parameters.json" -TemplateFile ".\UserApp.json" -Verbose
Upgrade the Service Fabric application by using Resource Manager
Important
Any service being deployed via Azure Resource Manager (ARM) template must be removed from the DefaultServices section of the corresponding ApplicationManifest.xml file.
You might upgrade an application that's already deployed to a Service Fabric cluster for one of these reasons:
A new service is added to the application. A service definition must be added to service-manifest.xml and application-manifest.xml files when a service is added to the application. To reflect a new version of an application, you also must change the application type version from 1.0.0 to 1.0.1 in UserApp.Parameters.json:
"applicationTypeVersion": {
    "value": "1.0.1"
},
"serviceName2": {
    "value": "VotingData"
},
"serviceTypeName2": {
    "value": "VotingDataType"
}
A new version of an existing service is added to the application. Examples include application code changes and updates to app type version and name. For this upgrade, update UserApp.Parameters.json like this:
 "applicationTypeVersion": {
    "value": "1.0.1"
}
Delete Service Fabric application resources
Note
Applications should not be deleted via Azure Resource Manager (ARM) template as there is no declarative way to cleanup individual resources
To delete a service fabric application that was deployed by using the application resource model in Resource Manager:
Use the Get-AzResource cmdlet to get the resource ID for the application:
Get-AzResource -Name <String> | f1Use the Remove-AzServiceFabricApplication cmdlet to delete the application resources:
Remove-AzServiceFabricApplication -ResourceId <String> [-Force]
Migration from classic to managed clusters
If you are migrating application(s) from classic to managed clusters you will need to make sure to validate types are correctly specified or you will encounter errors.
The following items are called out specifically due to frequency of usage, but not meant to be an exclusive list of differences.
- upgradeReplicaSetCheckTimeout is now an integer for managed, but a string on classic SFRP.
See managed clusters applications resource types for full list of properties and types
Next steps
Learn more about managed cluster application deployment:
Feedback
Coming soon: Throughout 2024 we will be phasing out GitHub Issues as the feedback mechanism for content and replacing it with a new feedback system. For more information see: https://aka.ms/ContentUserFeedback.
Submit and view feedback for