Configure a point-to-site (P2S) VPN on Windows for use with Azure Files
You can use a point-to-site (P2S) VPN connection to mount your Azure file shares over SMB from outside of Azure, without opening up port 445. A point-to-site VPN connection is a VPN connection between Azure and an individual client. To use a P2S VPN connection with Azure Files, you must configure a VPN connection for each client that wants to connect. If you have many clients that need to connect to your Azure file shares from your on-premises network, you can use a site-to-site (S2S) VPN connection instead of a point-to-site connection for each client. To learn more, see Configure a site-to-site VPN for use with Azure Files.
We strongly recommend that you read Networking considerations for direct Azure file share access before continuing with this how-to article for a complete discussion of the networking options available for Azure Files.
The article details the steps to configure a point-to-site VPN on Windows (Windows client and Windows Server) to mount Azure file shares directly on-premises. If you're looking to route Azure File Sync traffic over a VPN, see configuring Azure File Sync proxy and firewall settings.
Applies to
| File share type | SMB | NFS |
|---|---|---|
| Standard file shares (GPv2), LRS/ZRS | ||
| Standard file shares (GPv2), GRS/GZRS | ||
| Premium file shares (FileStorage), LRS/ZRS |
Prerequisites
The most recent version of the Azure PowerShell module. See Install the Azure PowerShell module.
An Azure file share you would like to mount on-premises. Azure file shares are deployed within storage accounts, which are management constructs that represent a shared pool of storage in which you can deploy multiple file shares, as well as other storage resources. Learn more about how to deploy Azure file shares and storage accounts in Create an Azure file share.
A virtual network with a private endpoint for the storage account that contains the Azure file share you want to mount on-premises. To learn how to create a private endpoint, see Configuring Azure Files network endpoints.
You must create a gateway subnet on the virtual network. To create a gateway subnet, sign into the Azure portal, navigate to the virtual network, select Settings > Subnets, and then select + Gateway subnet. When you create the gateway subnet, you specify the number of IP addresses that the subnet contains. The number of IP addresses needed depends on the VPN gateway configuration that you want to create. It's best to specify /27 or larger (/26, /25 etc.) to allow enough IP addresses for future changes, such as adding an ExpressRoute gateway.
Collect environment information
Before setting up the point-to-site VPN, you need to collect some information about your environment.
In order to set up a point-to-site VPN using the Azure portal, you'll need to know your resource group name, virtual network name, gateway subnet name, and storage account name.
Create root certificate for VPN authentication
In order for VPN connections from your on-premises Windows machines to be authenticated to access your virtual network, you must create two certificates:
- A root certificate, which will be provided to the virtual machine gateway
- A client certificate, which will be signed with the root certificate
You can either use a root certificate that was generated with an enterprise solution, or you can generate a self-signed certificate. If you're using an enterprise solution, acquire the .cer file for the root certificate from your IT organization.
If you aren't using an enterprise certificate solution, create a self-signed root certificate using this PowerShell script. You'll create the client certificate after deploying the virtual network gateway. If possible, leave your PowerShell session open so you don't need to redefine variables when you create the client certificate later in this article.
Important
Run this PowerShell script as administrator from an on-premises machine running Windows 10/Windows Server 2016 or later. Don't run the script from a Cloud Shell or VM in Azure.
$rootcertname                = 'CN=P2SRootCert'
$certLocation                = 'Cert:\CurrentUser\My'
$vpnTemp                     = 'C:\vpn-temp'
$exportedencodedrootcertpath = "$vpnTemp\P2SRootCertencoded.cer"
$exportedrootcertpath        = "$vpnTemp\P2SRootCert.cer"

if (-Not (Test-Path -Path $vpnTemp -PathType Container)) {
    New-Item -ItemType Directory -Force -Path $vpnTemp | Out-Null
}

if ($PSVersionTable.PSVersion.Major -ge 6) {
    Import-Module -Name PKI -UseWindowsPowerShell
}

$selfSignedCertParams = @{
    Type              = 'Custom'
    KeySpec           = 'Signature'
    Subject           = $rootcertname
    KeyExportPolicy   = 'Exportable'
    HashAlgorithm     = 'sha256'
    KeyLength         = '2048'
    CertStoreLocation = $certLocation
    KeyUsageProperty  = 'Sign'
    KeyUsage          = 'CertSign'
}
$rootcert = New-SelfSignedCertificate @selfSignedCertParams

Export-Certificate -Cert $rootcert -FilePath $exportedencodedrootcertpath -NoClobber | Out-Null

certutil -encode $exportedencodedrootcertpath $exportedrootcertpath | Out-Null

$rawRootCertificate = Get-Content -Path $exportedrootcertpath

$rootCertificate = ''

foreach ($line in $rawRootCertificate) {
    if ($line -notlike '*Certificate*') {
        $rootCertificate += $line
    }
}
Deploy virtual network gateway
The Azure virtual network gateway is the service that your on-premises Windows machines will connect to. If you haven't already, you must create a gateway subnet on the virtual network before deploying the virtual network gateway.
Deploying a virtual network gateway requires two basic components:
- A public IP address that will identify the gateway to your clients wherever they are in the world
- The root certificate you created in the previous step, which will be used to authenticate your clients
You can use the Azure portal or Azure PowerShell to deploy the virtual network gateway. Deployment can take up to 45 minutes to complete.
To deploy a virtual network gateway using the Azure portal, follow these instructions.
Sign in to the Azure portal.
In Search resources, services, and docs, type virtual network gateways. Locate Virtual network gateways in the Marketplace search results and select it.
Select + Create to create a new virtual network gateway.
On the Basics tab, fill in the values for Project details and Instance details.
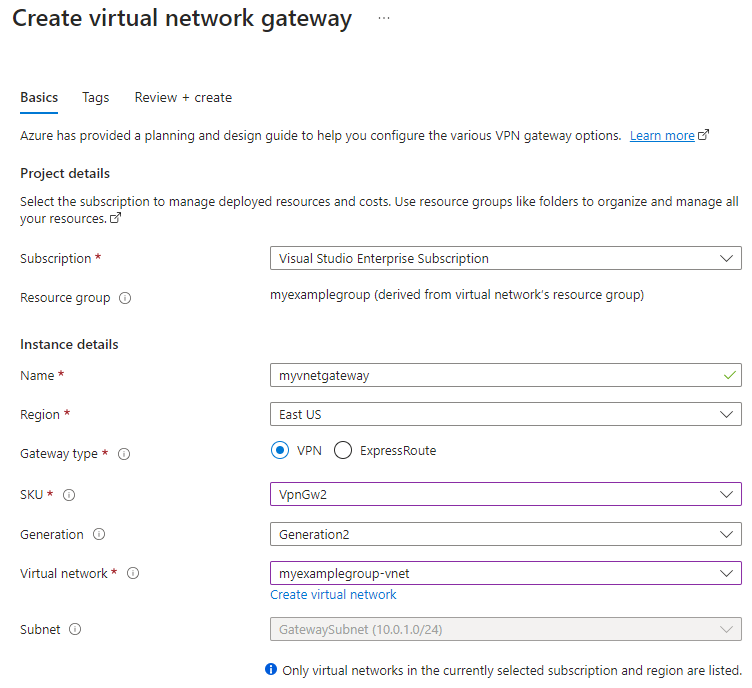
- Subscription: Select the subscription you want to use from the dropdown.
- Resource Group: This setting is autofilled when you select your virtual network on this page.
- Name: Name your gateway. Naming your gateway not the same as naming a gateway subnet. It's the name of the gateway object you're creating.
- Region: Select the region in which you want to create this resource. The region for the gateway must be the same as the virtual network.
- Gateway type: Select VPN. VPN gateways use the virtual network gateway type VPN.
- SKU: Select the gateway SKU that supports the features you want to use from the dropdown. See Gateway SKUs. Don't use the Basic SKU because it doesn't support IKEv2 authentication.
- Generation: Select the generation you want to use. We recommend using a Generation2 SKU. For more information, see Gateway SKUs.
- Virtual network: From the dropdown, select the virtual network to which you want to add this gateway. If you can't see the virtual network for which you want to create a gateway, make sure you selected the correct subscription and region.
- Subnet: This field should be grayed out and list the name of the gateway subnet you created, along with its IP address range. If you instead see a Gateway subnet address range field with a text box, then you haven't yet configured a gateway subnet (see Prerequisites.)
Specify the values for the Public IP address that gets associated to the virtual network gateway. The public IP address is assigned to this object when the virtual network gateway is created. The only time the primary public IP address changes is when the gateway is deleted and re-created. It doesn't change across resizing, resetting, or other internal maintenance/upgrades.
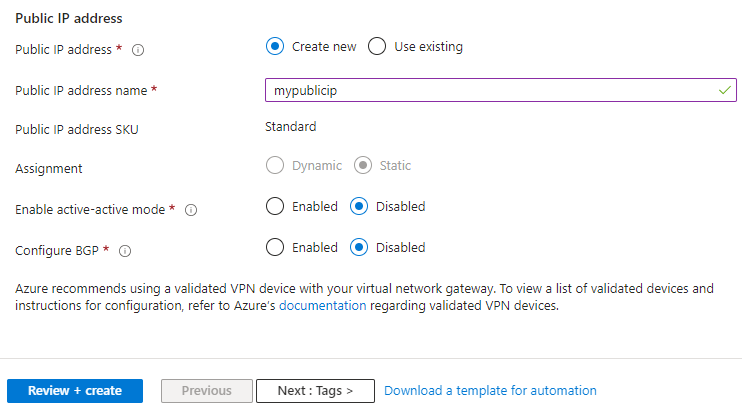
- Public IP address: Leave Create new selected.
- Public IP address name: In the text box, type a name for your public IP address instance.
- Public IP address SKU: Setting is autoselected.
- Assignment: The assignment is typically autoselected and can be either Dynamic or Static.
- Enable active-active mode: Select Disabled. Only enable this setting if you're creating an active-active gateway configuration.
- Configure BGP: Select Disabled, unless your configuration specifically requires this setting. If you do require this setting, the default ASN is 65515, although this value can be changed.
Select Review + create to run validation. Once validation passes, select Create to deploy the virtual network gateway. Deployment can take up to 45 minutes to complete.
When deployment is complete, select Go to resource.
In the service menu, under Settings, select Point-to-site configuration and then select Configure now. You should see the Point-to-site configuration page.
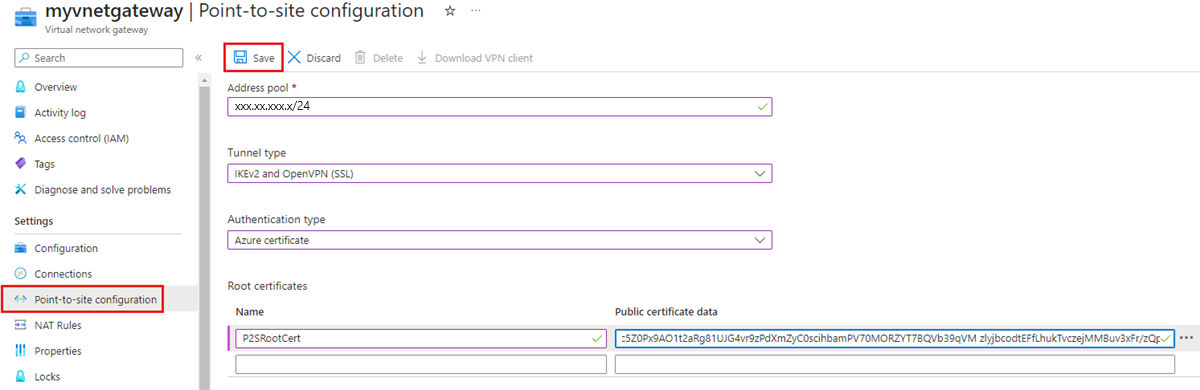
- Address pool: Add the private IP address range that you want to use. VPN clients dynamically receive an IP address from the range that you specify. The minimum subnet mask is 29 bit for active/passive and 28 bit for active/active configuration.
- Tunnel type: Specify the tunnel type you want to use. Computers connecting via the native Windows VPN client will try IKEv2 first. If that doesn't connect, they fall back to SSTP (if you select both IKEv2 and SSTP from the dropdown). If you select the OpenVPN tunnel type, you can connect using an OpenVPN Client or the Azure VPN Client.
- Authentication type: Specify the authentication type you want to use (in this case, choose Azure certificate).
- Root certificate name: The file name of the root certificate (.cer file).
- Public certificate data: Open the root certificate with NotePad and copy/paste the public certificate data in this text field. If you used the PowerShell script in this article to generate a self-signed root certificate, it will be located in
C:\vpn-temp. Be sure to only paste the text that's in between -----BEGIN CERTIFICATE----- and -----END CERTIFICATE-----. Don't include any additional spaces or characters.
Note
If you don't see tunnel type or authentication type, your gateway is using the Basic SKU. The Basic SKU doesn't support IKEv2 authentication. If you want to use IKEv2, you need to delete and recreate the gateway using a different gateway SKU.
Select Save at the top of the page to save all of the configuration settings and upload the root certificate public key information to Azure.


Create client certificate
Each client computer that you connect to a virtual network with a point-to-site connection must have a client certificate installed. You generate the client certificate from the root certificate and install it on each client computer. If you don't install a valid client certificate, authentication will fail when the client tries to connect. You can either create a client certificate from a root certificate that was generated with an enterprise solution, or you can create a client certificate from a self-signed root certificate.
Create client certificate using an enterprise solution
If you're using an enterprise certificate solution, generate a client certificate with the common name value format name@yourdomain.com. Use this format instead of the domain name\username format. Make sure the client certificate is based on a user certificate template that has Client Authentication listed as the first item in the user list. Check the certificate by double-clicking it and viewing Enhanced Key Usage in the Details tab.
Create client certificate from a self-signed root certificate
If you're not using an enterprise certificate solution, you can use PowerShell to create a client certificate with the URI of the virtual network gateway. This certificate will be signed with the root certificate you created earlier. When you generate a client certificate from a self-signed root certificate, it's automatically installed on the computer that you used to generate it.
If you want to install a client certificate on another client computer, export the certificate as a .pfx file, along with the entire certificate chain. Doing so will create a .pfx file that contains the root certificate information required for the client to authenticate. To export the self-signed root certificate as a .pfx, select the root certificate and use the same steps as described in Export the client certificate.
Identify the self-signed root certificate
If you're using the same PowerShell session that you used to create your self-signed root certificate, you can skip ahead to Generate a client certificate.
If not, use the following steps to identify the self-signed root certificate that's installed on your computer.
Get a list of the certificates that are installed on your computer.
Get-ChildItem -Path 'Cert:\CurrentUser\My'Locate the subject name from the returned list, then copy the thumbprint that's located next to it to a text file. In the following example, there are two certificates. The CN name is the name of the self-signed root certificate from which you want to generate a child certificate. In this case, it's called P2SRootCert.
Thumbprint                                Subject
----------                                -------
AED812AD883826FF76B4D1D5A77B3C08EFA79F3F  CN=P2SChildCert4
7181AA8C1B4D34EEDB2F3D3BEC5839F3FE52D655  CN=P2SRootCert
Declare a variable for the root certificate using the thumbprint from the previous step. Replace THUMBPRINT with the thumbprint of the root certificate from which you want to generate a client certificate.
$rootcert = Get-ChildItem -Path 'Cert:\CurrentUser\My\<THUMBPRINT>'For example, using the thumbprint for P2SRootCert in the previous step, the command looks like this:
$rootcert = Get-ChildItem -Path 'Cert:\CurrentUser\My\7181AA8C1B4D34EEDB2F3D3BEC5839F3FE52D655'
Generate a client certificate
Use the New-AzVpnClientConfiguration PowerShell cmdlet to generate a client certificate. If you're not using the same PowerShell session that you used to create your self-signed root certificate, you'll need to identify the self-signed root certificate as described in the previous section. Before running the script, replace <resource-group-name> with your resource group name and <vpn-gateway-name> with the name of the virtual network gateway you just deployed.
Important
Run this PowerShell script as administrator from the on-premises Windows machine that you want to connect to the Azure file share. The computer must be running Windows 10/Windows Server 2016 or later. Don't run the script from a Cloud Shell in Azure. Make sure you sign in to your Azure account before running the script (Connect-AzAccount).
$clientcertpassword = '<enter-your-password>'
$resourceGroupName  = '<resource-group-name>'
$vpnName            = '<vpn-gateway-name>'
$vpnTemp            = 'C:\vpn-temp'
$certLocation       = 'Cert:\CurrentUser\My'

$vpnClientConfigParams = @{
    ResourceGroupName    = $resourceGroupName
    Name                 = $vpnName
    AuthenticationMethod = 'EAPTLS'
}
$vpnClientConfiguration = New-AzVpnClientConfiguration @vpnClientConfigParams

$webRequestParams = @{
    Uri = $vpnClientConfiguration.VpnProfileSASUrl
    OutFile = "$vpnTemp\vpnclientconfiguration.zip"
}
Invoke-WebRequest @webRequestParams

$expandArchiveParams = @{
    Path            = "$vpnTemp\vpnclientconfiguration.zip"
    DestinationPath = "$vpnTemp\vpnclientconfiguration"
}
Expand-Archive @expandArchiveParams

$vpnGeneric = "$vpnTemp\vpnclientconfiguration\Generic"
$vpnProfile = ([xml](Get-Content -Path "$vpnGeneric\VpnSettings.xml")).VpnProfile

$exportedclientcertpath = "$vpnTemp\P2SClientCert.pfx"
$clientcertname         = "CN=$($vpnProfile.VpnServer)"

$selfSignedCertParams = @{
    Type              = 'Custom'
    DnsName           = $vpnProfile.VpnServer
    KeySpec           = 'Signature'
    Subject           = $clientcertname
    KeyExportPolicy   = 'Exportable'
    HashAlgorithm     = 'sha256'
    KeyLength         = 2048
    CertStoreLocation = $certLocation
    Signer            = $rootcert
    TextExtension     = @('2.5.29.37={text}1.3.6.1.5.5.7.3.2')
}
$clientcert = New-SelfSignedCertificate @selfSignedCertParams

$mypwd = ConvertTo-SecureString -String $clientcertpassword -Force -AsPlainText

Export-PfxCertificate -FilePath $exportedclientcertpath -Password $mypwd -Cert $clientcert |
    Out-Null
Configure the VPN client
The Azure virtual network gateway will create a downloadable package with configuration files required to initialize the VPN connection on your on-premises Windows machine. The configuration package contains settings that are specific to the VPN gateway that you created. If you make changes to the gateway, such as changing a tunnel type, certificate, or authentication type, you'll need to generate another VPN client profile configuration package and install it on each client. Otherwise, your VPN clients may not be able to connect.
You'll configure the VPN connection using the Always On VPN feature introduced in Windows 10/Windows Server 2016. This package also contains executables that will configure the legacy Windows VPN client, if desired. This guide uses Always On VPN rather than the legacy Windows VPN client because the Always On VPN client allows you to connect/disconnect from the Azure VPN without having administrator permissions to the machine.
Install the client certificate
To install the client certificate required for authentication against the virtual network gateway, follow these steps on the client computer.
- Once the client certificate is exported, locate and copy the .pfx file to the client computer.
- On the client computer, double-click the .pfx file to install. Leave the Store Location as Current User, and then select Next.
- On the File to import page, don't make any changes. Select Next.
- On the Private key protection page, input the password for the certificate, or verify that the security principal is correct, then select Next.
- On the Certificate Store page, leave the default location, and then select Next.
- Select Finish. On the Security Warning for the certificate installation, select Yes. You can comfortably select 'Yes' for this security warning because you generated the certificate.
- The certificate is now successfully imported.
Install the VPN client
This section helps you configure the native VPN client that's part of your Windows operating system to connect to your virtual network (IKEv2 and SSTP). This configuration doesn't require additional client software.
View configuration files
On the client computer, navigate to C:\vpn-temp and open the vpnclientconfiguration folder to view the following subfolders:
- WindowsAmd64 and WindowsX86, which contain the Windows 64-bit and 32-bit installer packages, respectively. The WindowsAmd64 installer package is for all supported 64-bit Windows clients, not just Amd.
- Generic, which contains general information used to create your own VPN client configuration. The Generic folder is provided if IKEv2 or SSTP+IKEv2 was configured on the gateway. If only SSTP is configured, then the Generic folder isn't present.
Configure VPN client profile
You can use the same VPN client configuration package on each Windows client computer, as long as the version matches the architecture for the client.
Note
You must have Administrator rights on the Windows client computer from which you want to connect in order to run the installer package.
Select the VPN client configuration files that correspond to the architecture of the Windows computer. For a 64-bit processor architecture, choose the
VpnClientSetupAmd64installer package. For a 32-bit processor architecture, choose theVpnClientSetupX86installer package.Double-click the package to install it. If you see a SmartScreen popup, select More info, then Run anyway.
Connect to your VPN. Go to VPN Settings and locate the VPN connection that you created. It's the same name as your virtual network. Select Connect. A pop-up message might appear. Select Continue to use elevated privileges.
On the Connection status page, select Connect to start the connection. If you see a Select Certificate screen, verify that the client certificate showing is the one that you want to use to connect. If it isn't, use the drop-down arrow to select the correct certificate, and then select OK.
Mount Azure file share
Now that you've set up your point-to-site VPN, you can use it to mount the Azure file share to an on-premises machine.
To mount the file share using your storage account key, open a Windows command prompt and run the following command. Replace <YourStorageAccountName>, <FileShareName>, and <YourStorageAccountKey> with your own values. If Z: is already in use, replace it with an available drive letter. You can find your storage account key in the Azure portal by navigating to the storage account and selecting Security + networking > Access keys.
net use Z: \\<YourStorageAccountName>.file.core.windows.net\<FileShareName> /user:localhost\<YourStorageAccountName> <YourStorageAccountKey>
Rotate VPN Root Certificate
If a root certificate needs to be rotated due to expiration or new requirements, you can add a new root certificate to the existing virtual network gateway without redeploying the virtual network gateway. After adding the root certificate using the following script, you'll need to re-create the VPN client certificate.
Replace <resource-group-name>, <desired-vpn-name-here>, and <new-root-cert-name> with your own values, then run the script.
#Creating the new Root Certificate
$ResourceGroupName           = '<resource-group-name>'
$vpnName                     = '<desired-vpn-name-here>'
$NewRootCertName             = '<new-root-cert-name>'
$rootcertname                = "CN=$NewRootCertName"
$certLocation                = 'Cert:\CurrentUser\My'
$date                        = Get-Date -Format 'MM_yyyy'
$vpnTemp                     = "C:\vpn-temp_$date"
$exportedencodedrootcertpath = "$vpnTemp\P2SRootCertencoded.cer"
$exportedrootcertpath        = "$vpnTemp\P2SRootCert.cer"

if (-Not (Test-Path -Path $vpnTemp -PathType Container)) {
    New-Item -ItemType Directory -Force -Path $vpnTemp | Out-Null
}

$selfSignedCertParams = @{
    Type              = 'Custom'
    KeySpec           = 'Signature'
    Subject           = $rootcertname
    KeyExportPolicy   = 'Exportable'
    HashAlgorithm     = 'sha256'
    KeyLength         = 2048
    CertStoreLocation = $certLocation
    KeyUsageProperty  = 'Sign'
    KeyUsage          = 'CertSign'
}
$rootcert = New-SelfSignedCertificate @selfSignedCertParams

$exportCertParams = @{
    Cert      = $rootcert
    FilePath  = $exportedencodedrootcertpath
    NoClobber = $true
}
Export-Certificate @exportCertParams | Out-Null

certutil -encode $exportedencodedrootcertpath $exportedrootcertpath | Out-Null

$rawRootCertificate = Get-Content -Path $exportedrootcertpath

$rootCertificate = ''

foreach($line in $rawRootCertificate) {
    if ($line -notlike '*Certificate*') {
        $rootCertificate += $line
    }
}

#Fetching gateway details and adding the newly created Root Certificate.
$gateway = Get-AzVirtualNetworkGateway -Name $vpnName -ResourceGroupName $ResourceGroupName

$vpnClientRootCertParams = @{
    PublicCertData               = $rootCertificate
    ResourceGroupName            = $ResourceGroupName
    VirtualNetworkGatewayName    = $gateway
    VpnClientRootCertificateName = $NewRootCertName
}
Add-AzVpnClientRootCertificate @vpnClientRootCertParams