Use Azure Files with multiple Active Directory forests
Many organizations want to use identity-based authentication for SMB Azure file shares in environments that have multiple on-premises Active Directory Domain Services (AD DS) forests. This is a common IT scenario, especially following mergers and acquisitions, where the acquired company's AD forests are isolated from the parent company's AD forests. This article explains how forest trust relationships work and provides step-by-step instructions for multi-forest setup and validation.
Important
If you want to set share-level permissions for specific Microsoft Entra users or groups using Azure role-based access control (RBAC), then you must first sync the on-premises AD accounts to Microsoft Entra ID using Microsoft Entra Connect. Otherwise, you can use a default share-level permission.
Applies to
| File share type | SMB | NFS |
|---|---|---|
| Standard file shares (GPv2), LRS/ZRS | ||
| Standard file shares (GPv2), GRS/GZRS | ||
| Premium file shares (FileStorage), LRS/ZRS |
Prerequisites
- Two AD DS domain controllers with different forests and on different virtual networks (VNETs)
- Sufficient AD permissions to perform administrative tasks (for example, Domain Admin)
- If using Azure RBAC, both forests must be reachable by a single Microsoft Entra Connect Sync server
How forest trust relationships work
Azure Files on-premises AD DS authentication is only supported against the AD forest of the domain service that the storage account is registered to. You can only access Azure file shares with the AD DS credentials from a single forest by default. If you need to access your Azure file share from a different forest, then you must configure a forest trust.
A forest trust is a transitive trust between two AD forests that allows users in any of the domains in one forest to be authenticated in any of the domains in the other forest.
Multi-forest setup
To configure a multi-forest setup, we'll perform the following steps:
- Collect domain information and VNET connections between domains
- Establish and configure a forest trust
- Set up identity-based authentication and hybrid user accounts
Collect domain information
For this exercise, we have two on-premises AD DS domain controllers with two different forests and in different VNETs.
| Forest | Domain | VNET |
|---|---|---|
| Forest 1 | onpremad1.com | DomainServicesVNet WUS |
| Forest 2 | onpremad2.com | vnet2/workloads |
Establish and configure trust
In order to enable clients from Forest 1 to access Azure Files domain resources in Forest 2, we must establish a trust between the two forests. Follow these steps to establish the trust.
Log on to a machine that's domain-joined to Forest 2 and open the Active Directory Domains and Trusts console.
Right-click on the local domain onpremad2.com, and then select the Trusts tab.
Select New Trusts to launch the New Trust Wizard.
Specify the domain name you want to build trust with (in this example, onpremad1.com), and then select Next.
For Trust Type, select Forest trust, and then select Next.
Note
Only forest trusts are supported for Azure Files. Other trust types, such as external trusts, are not supported.
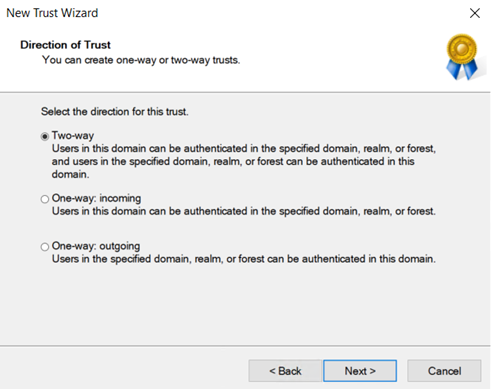
For Direction of Trust, select Two-way, and then select Next.
For Sides of Trust, select This domain only, and then select Next.
Users in the specified forest can be authenticated to use all of the resources in the local forest (forest-wide authentication) or only those resources that you select (selective authentication). For Outgoing Trust Authentication Level, select Forest-wide authentication, which is the preferred option when both forests belong to the same organization. Select Next.
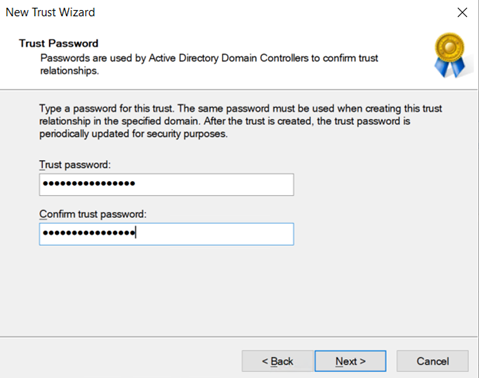
Enter a password for the trust, then select Next. The same password must be used when creating this trust relationship in the specified domain.
You should see a message that the trust relationship was successfully created. To configure the trust, select Next.
Confirm the outgoing trust, and select Next.
Enter the username and password of a user that has admin privileges from the other domain.
Once authentication passes, the trust is established, and you should be able to see the specified domain onpremad1.com listed in the Trusts tab.
Set up identity-based authentication and hybrid user accounts
Once the trust is established, follow these steps to create a storage account and SMB file share for each domain, enable AD DS authentication on the storage accounts, and create hybrid user accounts synced to Microsoft Entra ID.
Log in to the Azure portal and create two storage accounts such as onprem1sa and onprem2sa. For optimal performance, we recommend that you deploy the storage accounts in the same region as the clients from which you plan to access the shares.
Note
Creating a second storage account isn't necessary. These instructions are meant to show an example of how to access storage accounts that belong to different forests. If you only have one storage account, you can ignore the second storage account setup instructions.
Create an SMB Azure file share on each storage account.
Sync your on-premises AD to Microsoft Entra ID using Microsoft Entra Connect Sync application.
Domain-join an Azure VM in Forest 1 to your on-premises AD DS. For information about how to domain-join, refer to Join a Computer to a Domain.
Enable AD DS authentication on the storage account associated with Forest 1, for example onprem1sa. This will create a computer account in your on-premises AD called onprem1sa to represent the Azure storage account and join the storage account to the onpremad1.com domain. You can verify that the AD identity representing the storage account was created by looking in Active Directory Users and Computers for onpremad1.com. In this example, you'd see a computer account called onprem1sa.
Create a user account by navigating to Active Directory > onpremad1.com. Right-click on Users, select Create, enter a user name (for example, onprem1user), and check the Password never expires box (optional).
Optional: If you want to use Azure RBAC to assign share-level permissions, you must sync the user to Microsoft Entra ID using Microsoft Entra Connect. Normally Microsoft Entra Connect Sync updates every 30 minutes. However, you can force it to sync immediately by opening an elevated PowerShell session and running
Start-ADSyncSyncCycle -PolicyType Delta. You might need to install the ADSync module first by runningImport-Module ADSync. To verify that the user has been synced to Microsoft Entra ID, sign in to the Azure portal with the Azure subscription associated with your multi-forest tenant and select Microsoft Entra ID. Select Manage > Users and search for the user you added (for example, onprem1user). On-premises sync enabled should say Yes.Set share-level permissions using either Azure RBAC roles or a default share-level permission.
- If the user is synced to Microsoft Entra ID, you can grant a share-level permission (Azure RBAC role) to the user onprem1user on storage account onprem1sa so the user can mount the file share. To do this, navigate to the file share you created in onprem1sa and follow the instructions in Assign share-level permissions for specific Microsoft Entra users or groups.
- Otherwise, you can use a default share-level permission that applies to all authenticated identities.
Repeat steps 4-8 for Forest2 domain onpremad2.com (storage account onprem2sa/user onprem2user). If you have more than two forests, repeat the steps for each forest.
Configure directory and file-level permissions (optional)
In a multi-forest environment, use the icacls command-line utility to configure directory and file-level permissions for users in both forests. See Configure Windows ACLs with icacls.
If icacls fails with an Access is denied error, follow these steps to configure directory and file-level permissions by mounting the share with the storage account key.
Delete the existing share mount:
net use * /delete /yRe-mount the share using the storage account key:
net use <driveletter> \\storageaccount.file.core.windows.net\sharename /user:AZURE\<storageaccountname> <storageaccountkey>Set icacls permissions for user in Forest2 on storage account joined to Forest1 from client in Forest1.
Note
We don't recommend using File Explorer to configure ACLs in a multi-forest environment. Although users which belong to the forest that's domain-joined to the storage account can have file/directory-level permissions set via File Explorer, it won't work for users that don't belong to the same forest that's domain-joined to the storage account.
Configure domain suffixes
As explained above, the way Azure Files registers in AD DS is almost the same as a regular file server, where it creates an identity (by default a computer account, could also be a service logon account) that represents the storage account in AD DS for authentication. The only difference is that the registered service principal name (SPN) of the storage account ends with file.core.windows.net, which doesn't match with the domain suffix. Because of the different domain suffix, you'll need to configure a suffix routing policy to enable multi-forest authentication.
Because the suffix file.core.windows.net is the suffix for all Azure Files resources rather than a suffix for a specific AD domain, the client's domain controller doesn't know which domain to forward the request to, and will therefore fail all requests where the resource isn't found in its own domain.
For example, when users in a domain in Forest 1 want to reach a file share with the storage account registered against a domain in Forest 2, this won't automatically work because the service principal of the storage account doesn't have a suffix matching the suffix of any domain in Forest 1.
You can configure domain suffixes using one of the following methods:
- Modify storage account suffix and add a CNAME record (recommended - will work with two or more forests)
- Add custom name suffix and routing rule (won't work with more than two forests)
Modify storage account name suffix and add CNAME record
You can solve the domain routing issue by modifying the suffix of the storage account name associated with the Azure file share, and then adding a CNAME record to route the new suffix to the endpoint of the storage account. With this configuration, domain-joined clients can access storage accounts joined to any forest. This works for environments that have two or more forests.
In our example, we have the domains onpremad1.com and onpremad2.com, and we have onprem1sa and onprem2sa as storage accounts associated with SMB Azure file shares in the respective domains. These domains are in different forests that trust each other to access resources in each other's forests. We want to allow access to both storage accounts from clients who belong to each forest. To do this, we need to modify the SPN suffixes of the storage account:
onprem1sa.onpremad1.com -> onprem1sa.file.core.windows.net
onprem2sa.onpremad2.com -> onprem2sa.file.core.windows.net
This will allow clients to mount the share with net use \\onprem1sa.onpremad1.com because clients in either onpremad1 or onpremad2 will know to search onpremad1.com to find the proper resource for that storage account.
To use this method, complete the following steps:
Make sure you've established trust between the two forests and set up identity-based authentication and hybrid user accounts as described in the previous sections.
Modify the SPN of the storage account using the setspn tool. You can find
<DomainDnsRoot>by running the following Active Directory PowerShell command:(Get-AdDomain).DnsRootsetspn -s cifs/<storage-account-name>.<DomainDnsRoot> <storage-account-name>Add a CNAME entry using Active Directory DNS Manager and follow the steps below for each storage account in the domain that the storage account is joined to. If you're using a private endpoint, add the CNAME entry to map to the private endpoint name.
Open Active Directory DNS Manager.
Go to your domain (for example, onpremad1.com).
Go to "Forward Lookup Zones".
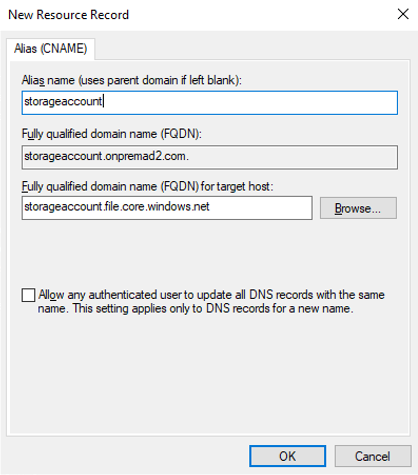
Select the node named after your domain (for example, onpremad1.com) and right-click New Alias (CNAME).
For the alias name, enter your storage account name.
For the fully qualified domain name (FQDN), enter
<storage-account-name>.<domain-name>, such as mystorageaccount.onpremad1.com.For the target host FQDN, enter
<storage-account-name>.file.core.windows.netSelect OK.
Now, from domain-joined clients, you should be able to use storage accounts joined to any forest.
Note
Ensure hostname part of the FQDN matches the storage account name as described above. Otherwise you'll get an access denied error: "The filename, directory name, or volume label syntax is incorrect." A network trace will show STATUS_OBJECT_NAME_INVALID (0xc0000033) message during the SMB session setup.
Add custom name suffix and routing rule
If you've already modified the storage account name suffix and added a CNAME record as described in the previous section, you can skip this step. If you'd rather not make DNS changes or modify the storage account name suffix, you can configure a suffix routing rule from Forest 1 to Forest 2 for a custom suffix of file.core.windows.net.
Note
Configuring name suffix routing doesn't affect the ability to access resources in the local domain. It's only required to allow the client to forward the request to the domain matching the suffix when the resource isn't found in its own domain.
First, add a new custom suffix on Forest 2. Make sure you have the appropriate administrative permissions to change the configuration and that you've established trust between the two forests. Then follow these steps:
- Log on to a machine or VM that's joined to a domain in Forest 2.
- Open the Active Directory Domains and Trusts console.
- Right-click on Active Directory Domains and Trusts.
- Select Properties, and then select Add.
- Add "file.core.windows.net" as the UPN Suffix.
- Select Apply, then OK to close the wizard.
Next, add the suffix routing rule on Forest 1, so that it redirects to Forest 2.
- Log on to a machine or VM that's joined to a domain in Forest 1.
- Open the Active Directory Domains and Trusts console.
- Right-click on the domain that you want to access the file share, then select the Trusts tab and select Forest 2 domain from outgoing trusts.
- Select Properties and then Name Suffix Routing.
- Check if the "*.file.core.windows.net" suffix shows up. If not, select Refresh.
- Select "*.file.core.windows.net", then select Enable and Apply.
Validate that the trust is working
Now we'll validate that the trust is working by running the klist command to display the contents of the Kerberos credentials cache and key table.
- Log on to a machine or VM that's joined to a domain in Forest 1 and open a Windows command prompt.
- To display the credentials cache for the domain-joined storage account in Forest 2, run one of the following commands:
- If you used the Modify storage account name suffix and add CNAME record method, run:
klist get cifs/onprem2sa.onpremad2.com - If you used the Add custom name suffix and routing rule method, run:
klist get cifs/onprem2sa.file.core.windows.net
- If you used the Modify storage account name suffix and add CNAME record method, run:
- You should see output similar to the following. The klist output will differ slightly based on which method you used to configure domain suffixes.
Client: onprem1user @ ONPREMAD1.COM
Server: cifs/onprem2sa.file.core.windows.net @ ONPREMAD2.COM
KerbTicket Encryption Type: AES-256-CTS-HMAC-SHA1-96
Ticket Flags 0x40a10000 -> forwardable renewable pre_authent name_canonicalize
Start Time: 11/22/2022 18:45:02 (local)
End Time: 11/23/2022 4:45:02 (local)
Renew Time: 11/29/2022 18:45:02 (local)
Session Key Type: AES-256-CTS-HMAC-SHA1-96
Cache Flags: 0x200 -> DISABLE-TGT-DELEGATION
Kdc Called: onprem2.onpremad2.com
- Log on to a machine or VM that's joined to a domain in Forest 2 and open a Windows command prompt.
- To display the credentials cache for the domain-joined storage account in Forest 1, run one of the following commands:
- If you used the Modify storage account name suffix and add CNAME record method, run:
klist get cifs/onprem1sa.onpremad1.com - If you used the Add custom name suffix and routing rule method, run:
klist get cifs/onprem1sa.file.core.windows.net
- If you used the Modify storage account name suffix and add CNAME record method, run:
- You should see output similar to the following. The klist output will differ slightly based on which method you used to configure domain suffixes.
Client: onprem2user @ ONPREMAD2.COM
Server: krbtgt/ONPREMAD2.COM @ ONPREMAD2.COM
KerbTicket Encryption Type: AES-256-CTS-HMAC-SHA1-96
Ticket Flags 0x40e10000 -> forwardable renewable pre_authent name_canonicalize
Start Time: 11/22/2022 18:46:35 (local)
End Time: 11/23/2022 4:46:35 (local)
Renew Time: 11/29/2022 18:46:35 (local)
Session Key Type: AES-256-CTS-HMAC-SHA1-96
Cache Flags: 0x1 -> PRIMARY
Kdc Called: onprem2

Client: onprem2user @ ONPREMAD2.COM
Server: cifs/onprem1sa.file.core.windows.net @ ONPREMAD1.COM
KerbTicket Encryption Type: AES-256-CTS-HMAC-SHA1-96
Ticket Flags 0x40a10000 -> forwardable renewable pre_authent name_canonicalize
Start Time: 11/22/2022 18:46:35 (local)
End Time: 11/23/2022 4:46:35 (local)
Renew Time: 11/29/2022 18:46:35 (local)
Session Key Type: AES-256-CTS-HMAC-SHA1-96
Cache Flags: 0x200 -> DISABLE-TGT-DELEGATION
Kdc Called: onpremad1.onpremad1.com
If you see the above output, you're done. If you don't, follow these steps to provide alternative UPN suffixes to make multi-forest authentication work.
Important
This method will only work in environments with two forests. If you have more than two forests, use one of the other methods to configure domain suffixes.
First, add a new custom suffix on Forest 1.
- Log on to a machine or VM that's joined to a domain in Forest 1.
- Open the Active Directory Domains and Trusts console.
- Right-click on Active Directory Domains and Trusts.
- Select Properties, and then select Add.
- Add an alternative UPN suffix such as "onprem1sa.file.core.windows.net".
- Select Apply, then OK to close the wizard.
Next, add the suffix routing rule on Forest 2.
- Log on to a machine or VM that's joined to a domain in Forest 2.
- Open the Active Directory Domains and Trusts console.
- Right-click on the domain that you want to access the file share, then select the Trusts tab and select the outgoing trust of Forest 2 where the suffix routing name was added.
- Select Properties and then Name Suffix Routing.
- Check if the "onprem1sa.file.core.windows.net" suffix shows up. If not, select Refresh.
- Select "onprem1sa.file.core.windows.net", then select Enable and Apply.
Next steps
For more information, see these resources:
Feedback
Coming soon: Throughout 2024 we will be phasing out GitHub Issues as the feedback mechanism for content and replacing it with a new feedback system. For more information see: https://aka.ms/ContentUserFeedback.
Submit and view feedback for