Azure Disk Encryption sample scripts for Linux VMs
Caution
This article references CentOS, a Linux distribution that is nearing End Of Life (EOL) status. Please consider your use and plan accordingly. For more information, see the CentOS End Of Life guidance.
Applies to: ✔️ Linux VMs ✔️ Flexible scale sets
This article provides sample scripts for preparing pre-encrypted VHDs and other tasks.
Note
All scripts refer to the latest, non-AAD version of ADE, except where noted.
Sample PowerShell scripts for Azure Disk Encryption
List all encrypted VMs in your subscription
You can find all ADE-encrypted VMs and the extension version, in all resource groups present in a subscription, using this PowerShell script.
Alternatively, these cmdlets will show all ADE-encrypted VMs (but not the extension version):
$osVolEncrypted = {(Get-AzVMDiskEncryptionStatus -ResourceGroupName $_.ResourceGroupName -VMName $_.Name).OsVolumeEncrypted}
$dataVolEncrypted= {(Get-AzVMDiskEncryptionStatus -ResourceGroupName $_.ResourceGroupName -VMName $_.Name).DataVolumesEncrypted}
Get-AzVm | Format-Table @{Label="MachineName"; Expression={$_.Name}}, @{Label="OsVolumeEncrypted"; Expression=$osVolEncrypted}, @{Label="DataVolumesEncrypted"; Expression=$dataVolEncrypted}
List all encrypted VMSS instances in your subscription
You can find all ADE-encrypted VMSS instances and the extension version, in all resource groups present in a subscription, using this PowerShell script.
List all disk encryption secrets used for encrypting VMs in a key vault
Get-AzKeyVaultSecret -VaultName $KeyVaultName | where {$_.Tags.ContainsKey('DiskEncryptionKeyFileName')} | format-table @{Label="MachineName"; Expression={$_.Tags['MachineName']}}, @{Label="VolumeLetter"; Expression={$_.Tags['VolumeLetter']}}, @{Label="EncryptionKeyURL"; Expression={$_.Id}}
Using the Azure Disk Encryption prerequisites PowerShell script
If you're already familiar with the prerequisites for Azure Disk Encryption, you can use the Azure Disk Encryption prerequisites PowerShell script. For an example of using this PowerShell script, see the Encrypt a VM Quickstart. You can remove the comments from a section of the script, starting at line 211, to encrypt all disks for existing VMs in an existing resource group.
The following table shows which parameters can be used in the PowerShell script:
| Parameter | Description | Mandatory? |
|---|---|---|
| $resourceGroupName | Name of the resource group to which the KeyVault belongs to. A new resource group with this name will be created if one doesn't exist. | True |
| $keyVaultName | Name of the KeyVault in which encryption keys are to be placed. A new vault with this name will be created if one doesn't exist. | True |
| $location | Location of the KeyVault. Make sure the KeyVault and VMs to be encrypted are in the same location. Get a location list with Get-AzLocation. |
True |
| $subscriptionId | Identifier of the Azure subscription to be used. You can get your Subscription ID with Get-AzSubscription. |
True |
| $aadAppName | Name of the Microsoft Entra application that will be used to write secrets to KeyVault. A new application with this name will be created if one doesn't exist. If this app already exists, pass aadClientSecret parameter to the script. | False |
| $aadClientSecret | Client secret of the Microsoft Entra application that was created earlier. | False |
| $keyEncryptionKeyName | Name of optional key encryption key in KeyVault. A new key with this name will be created if one doesn't exist. | False |
Encrypt or decrypt VMs without a Microsoft Entra app
- Enable disk encryption on an existing or running Linux VM
- Disable encryption on a running Linux VM
- Disabling encryption is only allowed on Data volumes for Linux VMs.
Encrypt or decrypt VMs with a Microsoft Entra app (previous release)
- Enable disk encryption on an existing or running Linux VM
- Disable encryption on a running Linux VM
- Disabling encryption is only allowed on Data volumes for Linux VMs.
- Create a new encrypted managed disk from a pre-encrypted VHD/storage blob
- Creates a new encrypted managed disk provided a pre-encrypted VHD and its corresponding encryption settings
Encrypting an OS drive on a running Linux VM
Prerequisites for OS disk encryption
- The VM must be using a distribution compatible with OS disk encryption as listed in the Azure Disk Encryption supported operating systems
- The VM must be created from the Marketplace image in Azure Resource Manager.
- Azure VM with at least 4 GB of RAM (recommended size is 7 GB). See Memory requirements for further information.
- (For RHEL and CentOS) Disable SELinux. To disable SELinux, see "4.4.2. Disabling SELinux" in the SELinux User's and Administrator's Guide on the VM.
- After you disable SELinux, reboot the VM at least once.
Steps
Create a VM by using one of the distributions specified previously.
Configure the VM according to your needs. If you're going to encrypt all the (OS + data) drives, the data drives need to be specified and mountable from /etc/fstab.
Note
Use UUID=... to specify data drives in /etc/fstab instead of specifying the block device name (for example, /dev/sdb1). During encryption, the order of drives changes on the VM. If your VM relies on a specific order of block devices, it will fail to mount them after encryption.
Sign out of the SSH sessions.
To encrypt the OS, specify volumeType as All or OS when you enable encryption.
Note
All user-space processes that are not running as
systemdservices should be killed with aSIGKILL. Reboot the VM. When you enable OS disk encryption on a running VM, plan on VM downtime.Periodically monitor the progress of encryption by using the instructions in the next section.
After Get-AzVmDiskEncryptionStatus shows "VMRestartPending", restart your VM either by signing in to it or by using the portal, PowerShell, or CLI.
C:\> Get-AzVmDiskEncryptionStatus  -ResourceGroupName $ResourceGroupName -VMName $VMName
-ExtensionName $ExtensionName
OsVolumeEncrypted : VMRestartPending DataVolumesEncrypted : NotMounted OsVolumeEncryptionSettings : Microsoft.Azure.Management.Compute.Models.DiskEncryptionSettings ProgressMessage : OS disk successfully encrypted, reboot the VMBefore you reboot, we recommend that you save boot diagnostics of the VM.
Monitoring OS encryption progress
You can monitor OS encryption progress in three ways:
Use the
Get-AzVmDiskEncryptionStatuscmdlet and inspect the ProgressMessage field:Get-AzVMDiskEncryptionStatus -ResourceGroupName $_.ResourceGroupName -VMName $_.NameOsVolumeEncrypted : EncryptionInProgress DataVolumesEncrypted : NotMounted OsVolumeEncryptionSettings : Microsoft.Azure.Management.Compute.Models.DiskEncryptionSettings ProgressMessage : OS disk encryption startedAfter the VM reaches "OS disk encryption started", it takes about 40 to 50 minutes on a Premium-storage backed VM.
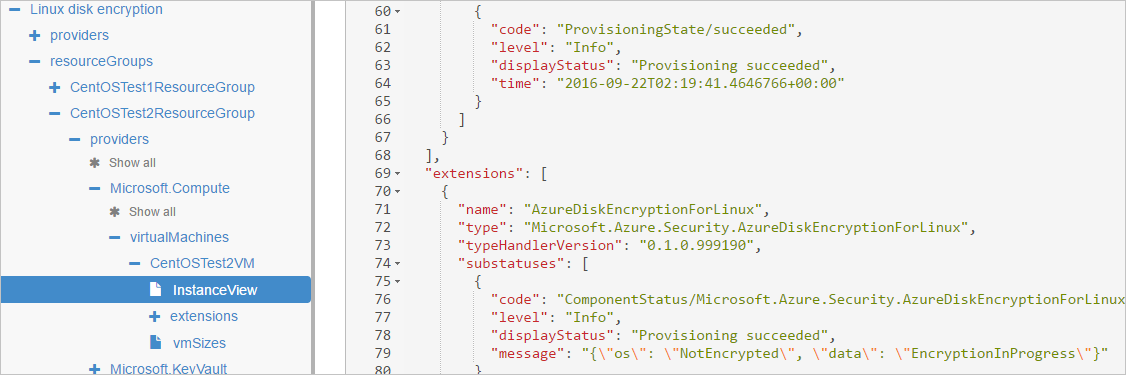
Because of issue #388 in WALinuxAgent,
OsVolumeEncryptedandDataVolumesEncryptedshow up asUnknownin some distributions. With WALinuxAgent version 2.1.5 and later, this issue is fixed automatically. If you seeUnknownin the output, you can verify disk-encryption status by using the Azure Resource Explorer.Go to Azure Resource Explorer, and then expand this hierarchy in the selection panel on left:
|-- subscriptions
   |-- [Your subscription]
        |-- resourceGroups
             |-- [Your resource group]
                  |-- providers
                       |-- Microsoft.Compute
                            |-- virtualMachines
                                 |-- [Your virtual machine]
                                      |-- InstanceView
In the InstanceView, scroll down to see the encryption status of your drives.
Look at boot diagnostics. Messages from the ADE extension should be prefixed with
[AzureDiskEncryption].Sign in to the VM via SSH, and get the extension log from:
/var/log/azure/Microsoft.Azure.Security.AzureDiskEncryptionForLinux
We recommend that you don't sign-in to the VM while OS encryption is in progress. Copy the logs only when the other two methods have failed.
Prepare a pre-encrypted Linux VHD
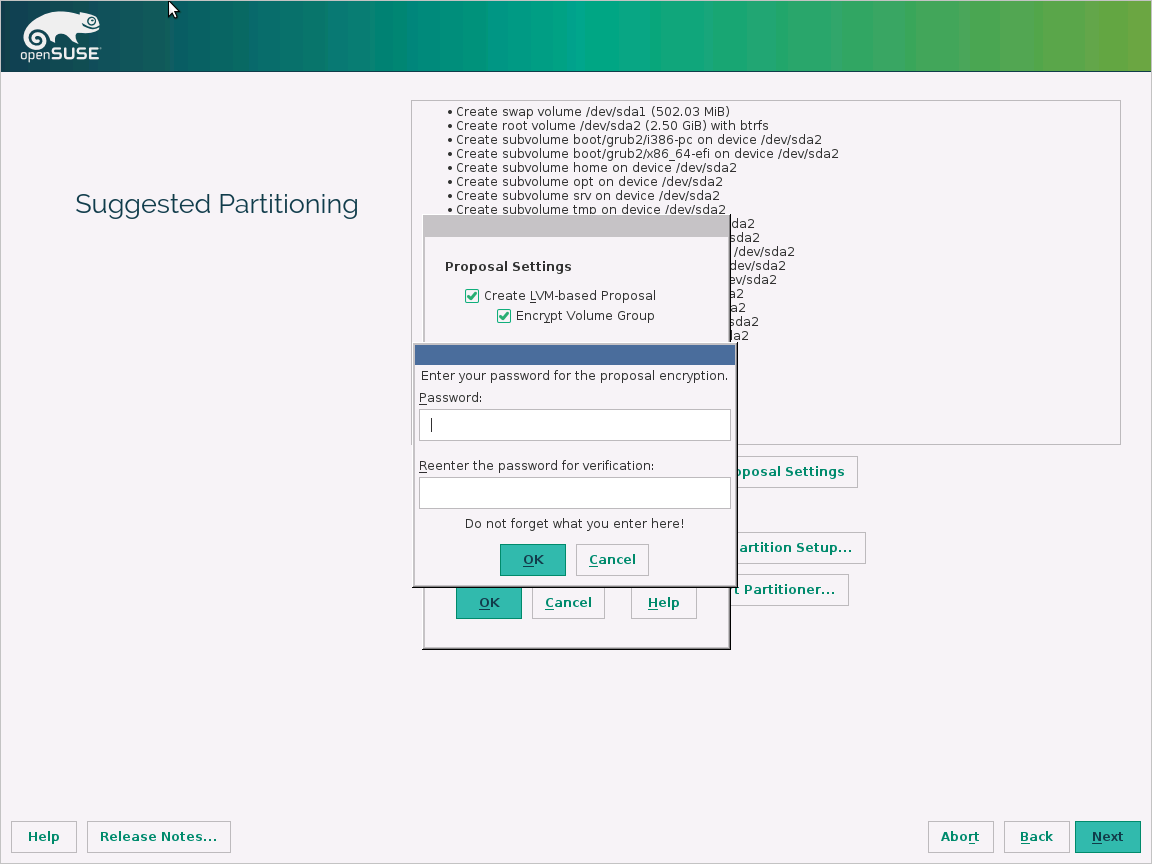
The preparation for pre-encrypted VHDs can vary depending on the distribution. Examples on preparing Ubuntu, openSUSE, and CentOS 7 are available.
Configure encryption during the distribution installation by doing the following steps:
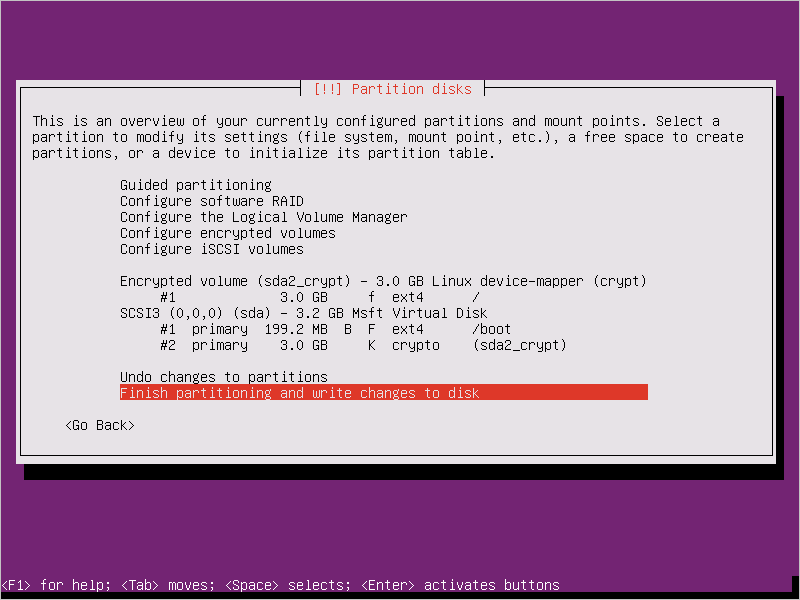
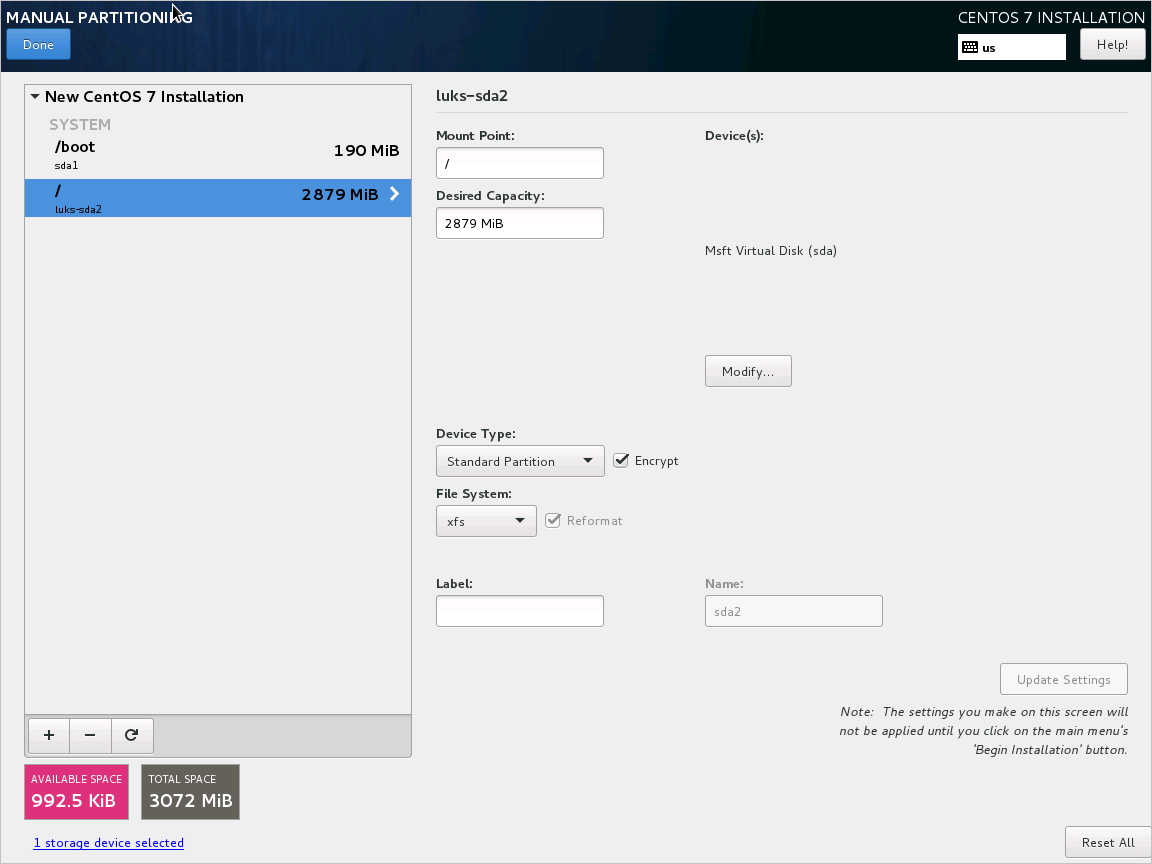
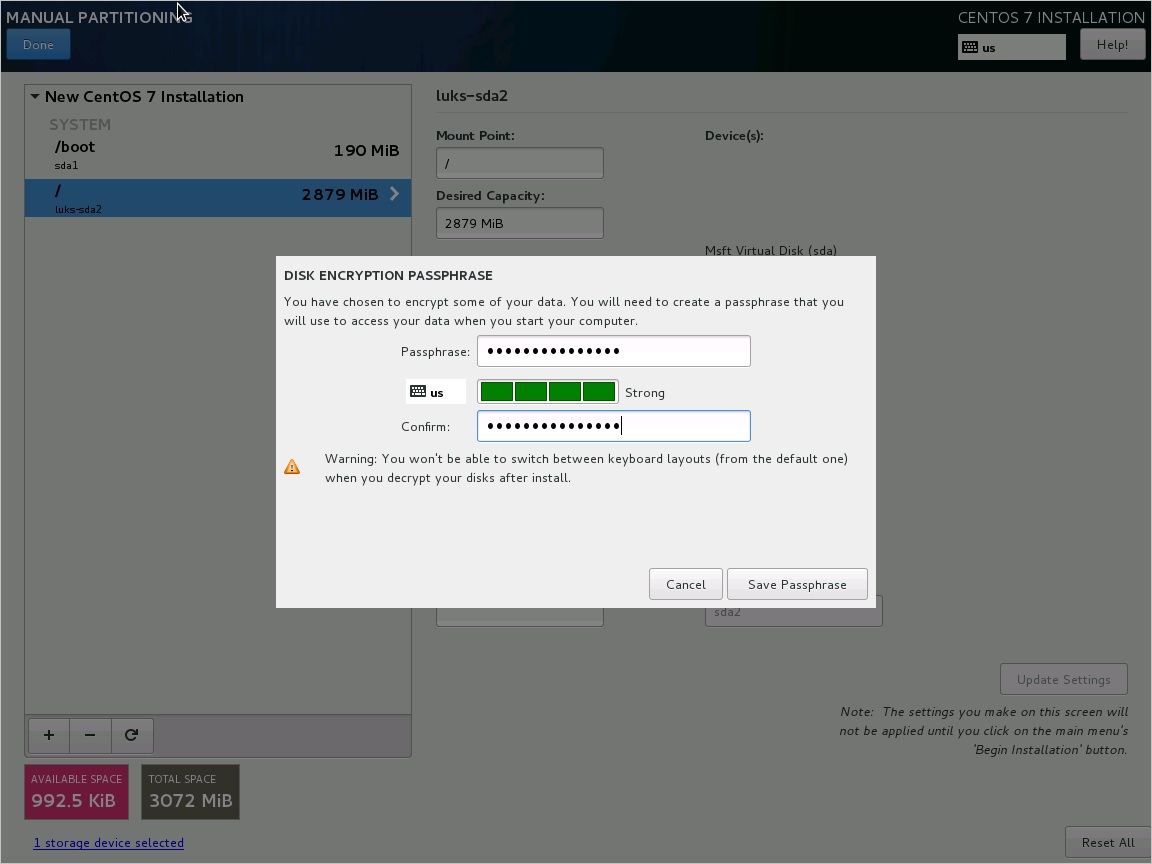
Select Configure encrypted volumes when you partition the disks.
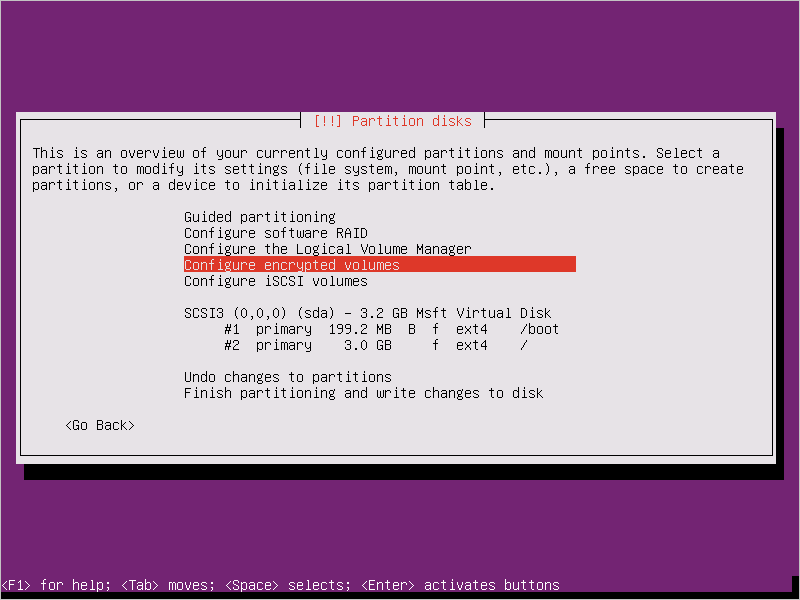
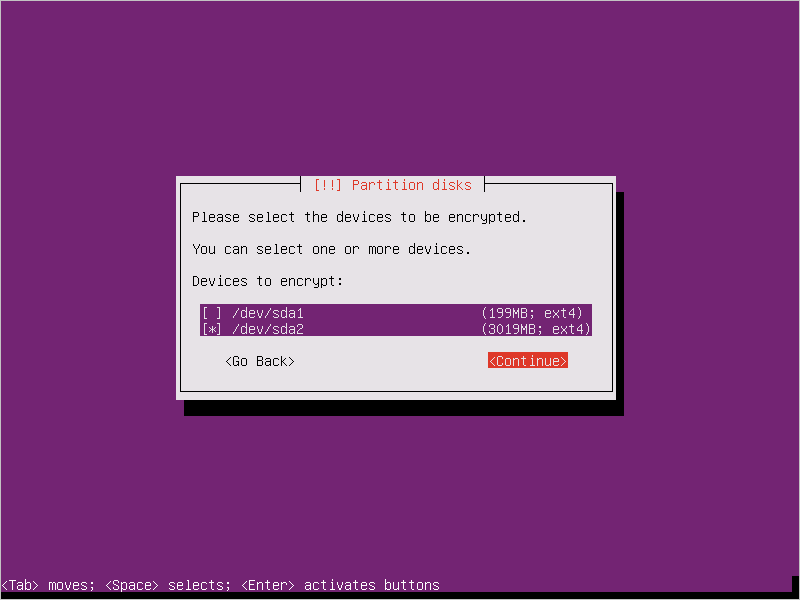
Create a separate boot drive, which must not be encrypted. Encrypt your root drive.
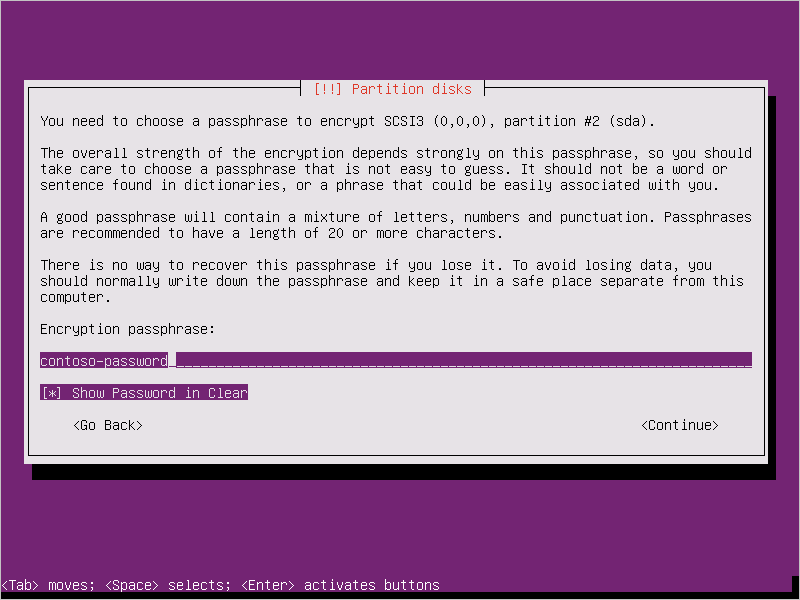
Provide a passphrase. This is the passphrase that you uploaded to the key vault.
Finish partitioning.
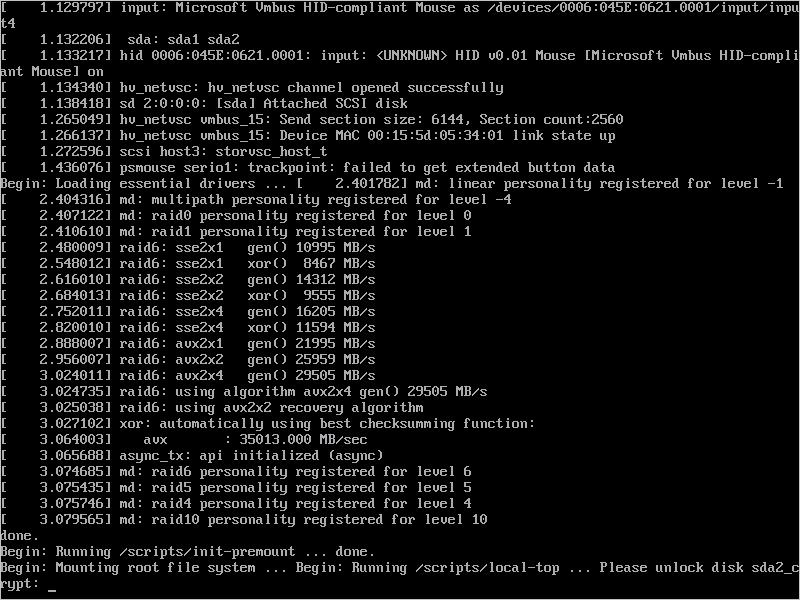
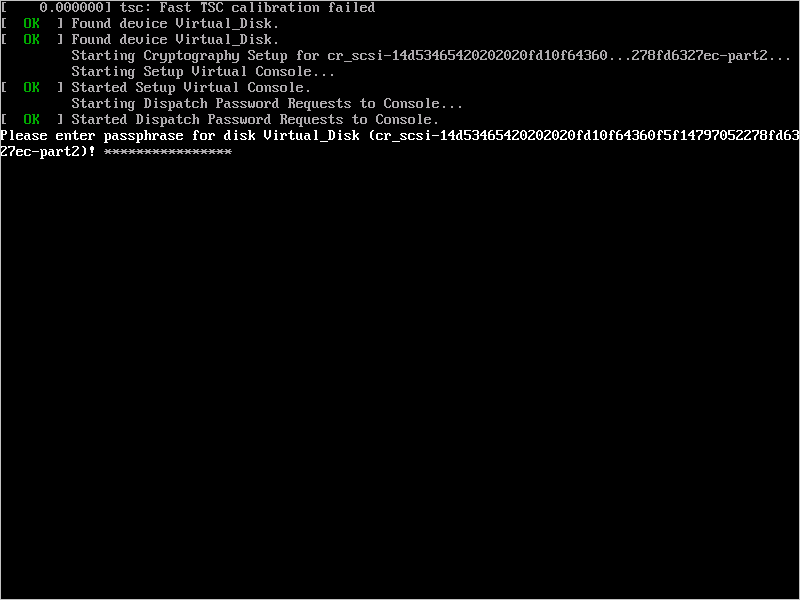
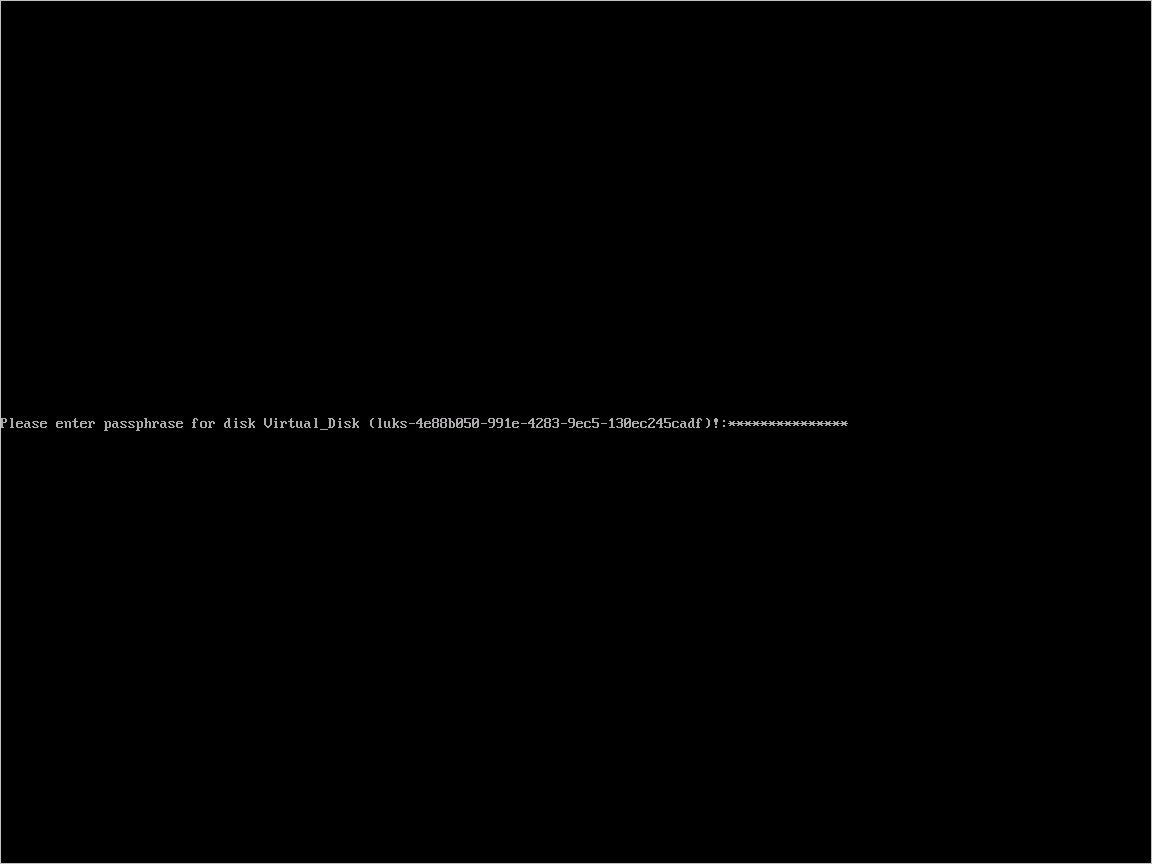
When you boot the VM and are asked for a passphrase, use the passphrase you provided in step 3.
Prepare the VM for uploading into Azure using these instructions. Don't run the last step (deprovisioning the VM) yet.
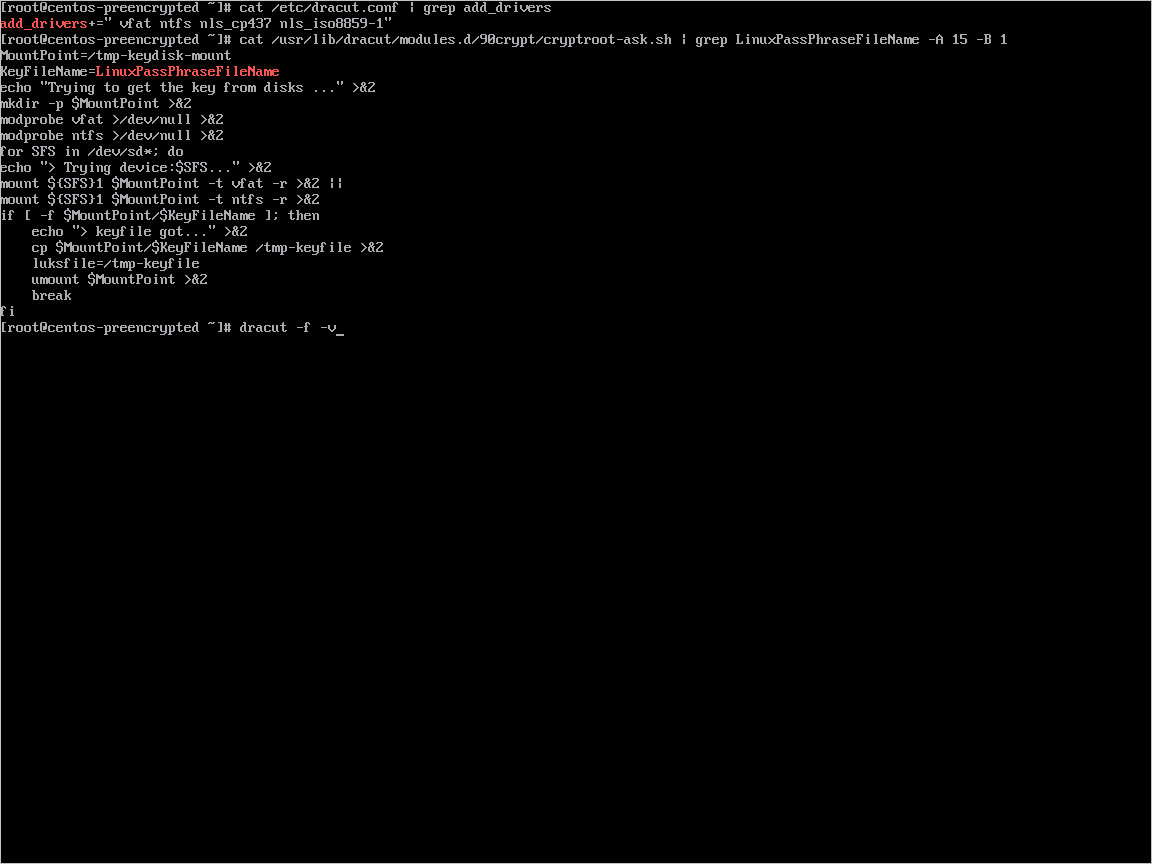
Configure encryption to work with Azure by doing the following steps:
Create a file under
/usr/local/sbin/azure_crypt_key.sh, with the content in the following script. Pay attention to the KeyFileName, because it's the passphrase file name used by Azure.#!/bin/sh MountPoint=/tmp-keydisk-mount KeyFileName=LinuxPassPhraseFileName echo "Trying to get the key from disks ..." >&2 mkdir -p $MountPoint modprobe vfat >/dev/null 2>&1 modprobe ntfs >/dev/null 2>&1 sleep 2 OPENED=0 cd /sys/block for DEV in sd*; do echo "> Trying device: $DEV ..." >&2 mount -t vfat -r /dev/${DEV}1 $MountPoint >/dev/null|| mount -t ntfs -r /dev/${DEV}1 $MountPoint >/dev/null if [ -f $MountPoint/$KeyFileName ]; then cat $MountPoint/$KeyFileName umount $MountPoint 2>/dev/null OPENED=1 break fi umount $MountPoint 2>/dev/null done if [ $OPENED -eq 0 ]; then echo "FAILED to find suitable passphrase file ..." >&2 echo -n "Try to enter your password: " >&2 read -s -r A </dev/console echo -n "$A" else echo "Success loading keyfile!" >&2 fiChange the crypt config in /etc/crypttab. It should look like this:
xxx_crypt uuid=xxxxxxxxxxxxxxxxxxxxx none luks,discard,keyscript=/usr/local/sbin/azure_crypt_key.shAdd executable permissions to the script:
sudo chmod +x /usr/local/sbin/azure_crypt_key.shEdit
/etc/initramfs-tools/modulesby appending lines:vfat ntfs nls_cp437 nls_utf8 nls_iso8859-1Run
update-initramfs -u -k allto update the initramfs to make thekeyscripttake effect.Now you can deprovision the VM.

Continue to the next step and upload your VHD into Azure.

Upload encrypted VHD to an Azure storage account
After DM-Crypt encryption is enabled, the local encrypted VHD needs to be uploaded to your storage account.
Add-AzVhd [-Destination] <Uri> [-LocalFilePath] <FileInfo> [[-NumberOfUploaderThreads] <Int32> ] [[-BaseImageUriToPatch] <Uri> ] [[-OverWrite]] [ <CommonParameters>]
Upload the secret for the pre-encrypted VM to your key vault
When encrypting using a Microsoft Entra app (previous release), the disk-encryption secret that you obtained previously must be uploaded as a secret in your key vault. The key vault needs to have disk encryption and permissions enabled for your Microsoft Entra client.
 $AadClientId = "My-AAD-Client-Id"
 $AadClientSecret = "My-AAD-Client-Secret"

 $key vault = New-AzKeyVault -VaultName $KeyVaultName -ResourceGroupName $ResourceGroupName -Location $Location

 Set-AzKeyVaultAccessPolicy -VaultName $KeyVaultName -ResourceGroupName $ResourceGroupName -ServicePrincipalName $AadClientId -PermissionsToKeys all -PermissionsToSecrets all
 Set-AzKeyVaultAccessPolicy -VaultName $KeyVaultName -ResourceGroupName $ResourceGroupName -EnabledForDiskEncryption
Disk encryption secret not encrypted with a KEK
To set up the secret in your key vault, use Set-AzKeyVaultSecret. The passphrase is encoded as a base64 string and then uploaded to the key vault. In addition, make sure that the following tags are set when you create the secret in the key vault.
 # This is the passphrase that was provided for encryption during the distribution installation
 $passphrase = "contoso-password"

 $tags = @{"DiskEncryptionKeyEncryptionAlgorithm" = "RSA-OAEP"; "DiskEncryptionKeyFileName" = "LinuxPassPhraseFileName"}
 $secretName = [guid]::NewGuid().ToString()
 $secretValue = [Convert]::ToBase64String([System.Text.Encoding]::ASCII.GetBytes($passphrase))
 $secureSecretValue = ConvertTo-SecureString $secretValue -AsPlainText -Force

 $secret = Set-AzKeyVaultSecret -VaultName $KeyVaultName -Name $secretName -SecretValue $secureSecretValue -tags $tags
 $secretUrl = $secret.Id
Use the $secretUrl in the next step for attaching the OS disk without using KEK.
Disk encryption secret encrypted with a KEK
Before you upload the secret to the key vault, you can optionally encrypt it by using a key encryption key. Use the wrap API to first encrypt the secret using the key encryption key. The output of this wrap operation is a base64 URL encoded string, which you can then upload as a secret by using the Set-AzKeyVaultSecret cmdlet.
    # This is the passphrase that was provided for encryption during the distribution installation
    $passphrase = "contoso-password"

    Add-AzKeyVaultKey -VaultName $KeyVaultName -Name "keyencryptionkey" -Destination Software
    $KeyEncryptionKey = Get-AzKeyVaultKey -VaultName $KeyVault.OriginalVault.Name -Name "keyencryptionkey"

    $apiversion = "2015-06-01"

    ##############################
    # Get Auth URI
    ##############################

    $uri = $KeyVault.VaultUri + "/keys"
    $headers = @{}

    $response = try { Invoke-RestMethod -Method GET -Uri $uri -Headers $headers } catch { $_.Exception.Response }

    $authHeader = $response.Headers["www-authenticate"]
    $authUri = [regex]::match($authHeader, 'authorization="(.*?)"').Groups[1].Value

    Write-Host "Got Auth URI successfully"

    ##############################
    # Get Auth Token
    ##############################

    $uri = $authUri + "/oauth2/token"
    $body = "grant_type=client_credentials"
    $body += "&client_id=" + $AadClientId
    $body += "&client_secret=" + [Uri]::EscapeDataString($AadClientSecret)
    $body += "&resource=" + [Uri]::EscapeDataString("https://vault.azure.net")
    $headers = @{}

    $response = Invoke-RestMethod -Method POST -Uri $uri -Headers $headers -Body $body

    $access_token = $response.access_token

    Write-Host "Got Auth Token successfully"

    ##############################
    # Get KEK info
    ##############################

    $uri = $KeyEncryptionKey.Id + "?api-version=" + $apiversion
    $headers = @{"Authorization" = "Bearer " + $access_token}

    $response = Invoke-RestMethod -Method GET -Uri $uri -Headers $headers

    $keyid = $response.key.kid

    Write-Host "Got KEK info successfully"

    ##############################
    # Encrypt passphrase using KEK
    ##############################

    $passphraseB64 = [Convert]::ToBase64String([System.Text.Encoding]::ASCII.GetBytes($Passphrase))
    $uri = $keyid + "/encrypt?api-version=" + $apiversion
    $headers = @{"Authorization" = "Bearer " + $access_token; "Content-Type" = "application/json"}
    $bodyObj = @{"alg" = "RSA-OAEP"; "value" = $passphraseB64}
    $body = $bodyObj | ConvertTo-Json

    $response = Invoke-RestMethod -Method POST -Uri $uri -Headers $headers -Body $body

    $wrappedSecret = $response.value

    Write-Host "Encrypted passphrase successfully"

    ##############################
    # Store secret
    ##############################

    $secretName = [guid]::NewGuid().ToString()
    $uri = $KeyVault.VaultUri + "/secrets/" + $secretName + "?api-version=" + $apiversion
    $secretAttributes = @{"enabled" = $true}
    $secretTags = @{"DiskEncryptionKeyEncryptionAlgorithm" = "RSA-OAEP"; "DiskEncryptionKeyFileName" = "LinuxPassPhraseFileName"}
    $headers = @{"Authorization" = "Bearer " + $access_token; "Content-Type" = "application/json"}
    $bodyObj = @{"value" = $wrappedSecret; "attributes" = $secretAttributes; "tags" = $secretTags}
    $body = $bodyObj | ConvertTo-Json

    $response = Invoke-RestMethod -Method PUT -Uri $uri -Headers $headers -Body $body

    Write-Host "Stored secret successfully"

    $secretUrl = $response.id
Use $KeyEncryptionKey and $secretUrl in the next step for attaching the OS disk using KEK.
Specify a secret URL when you attach an OS disk
Without using a KEK
While you're attaching the OS disk, you need to pass $secretUrl. The URL was generated in the "Disk-encryption secret not encrypted with a KEK" section.
    Set-AzVMOSDisk `
            -VM $VirtualMachine `
            -Name $OSDiskName `
            -SourceImageUri $VhdUri `
            -VhdUri $OSDiskUri `
            -Linux `
            -CreateOption FromImage `
            -DiskEncryptionKeyVaultId $KeyVault.ResourceId `
            -DiskEncryptionKeyUrl $SecretUrl
Using a KEK
When you attach the OS disk, pass $KeyEncryptionKey and $secretUrl. The URL was generated in the "Disk encryption secret encrypted with a KEK" section.
    Set-AzVMOSDisk `
            -VM $VirtualMachine `
            -Name $OSDiskName `
            -SourceImageUri $CopiedTemplateBlobUri `
            -VhdUri $OSDiskUri `
            -Linux `
            -CreateOption FromImage `
            -DiskEncryptionKeyVaultId $KeyVault.ResourceId `
            -DiskEncryptionKeyUrl $SecretUrl `
            -KeyEncryptionKeyVaultId $KeyVault.ResourceId `
            -KeyEncryptionKeyURL $KeyEncryptionKey.Id
Feedback
Coming soon: Throughout 2024 we will be phasing out GitHub Issues as the feedback mechanism for content and replacing it with a new feedback system. For more information see: https://aka.ms/ContentUserFeedback.
Submit and view feedback for