Note
Access to this page requires authorization. You can try signing in or changing directories.
Access to this page requires authorization. You can try changing directories.
Applies to: ✔️ Linux VMs ✔️ Flexible scale sets
In this article, you learn how to use an Azure DevOps task to inject build artifacts into a virtual machine (VM) image, so that you can install and configure your application and operating system.
Important
Azure DevOps task for VM Image Builder is currently in PREVIEW. See the Supplemental Terms of Use for Microsoft Azure Previews for legal terms that apply to Azure features that are in beta, preview, or otherwise not yet released into general availability.
DevOps task versions
At this time, there are two Azure VM Image Builder DevOps tasks:
Stable VM Image Builder task: The latest stable build that's been tested, and reports no General Data Protection Regulation (GDPR) issues.
Unstable VM Image Builder task: We offer a so-called unstable task so that you can test the latest updates and features before we release the task code as stable. After about a week, if there are no customer-reported or telemetry issues, we promote the task code to stable.
Prerequisites
Note
The VM Image Builder task doesn't currently support Windows Restart or running elevated commands as Administrator. That is, the task isn't suitable for Azure Virtual Desktop scenarios or Windows customizations that require those features. To use DevOps with VM Image Builder, nest the template within an Azure Resource Manager task, and use Azure CLI or PowerShell tasks.
Before you begin, you must:
Have an Azure DevOps Services (formerly Visual Studio Team Services, or VSTS) account, and a Build Pipeline created.
Register and enable the VM Image Builder feature requirements in the subscription that's used by the pipelines:
Create a standard Azure storage account in the source image resource group. You can use other resource groups or storage accounts. The storage account is used transfer the build artifacts from the DevOps task to the image.
# Azure PowerShell
$timeInt=$(get-date -UFormat "%s")
$storageAccName="aibstorage"+$timeInt
$location=westus
# Create a storage account and blob in the resource group
New-AzStorageAccount -ResourceGroupName $strResourceGroup -Name $storageAccName -Location $location -SkuName Standard_LRS
# The Azure CLI location=westus scriptStorageAcc=aibstordot$(date +'%s') # Create a storage account and blob in the resource group az storage account create -n $scriptStorageAcc -g $strResourceGroup -l $location --sku Standard_LRS
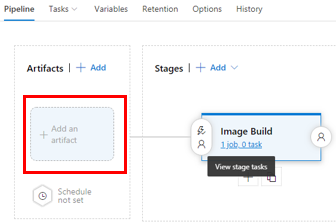
Add a task to the release pipeline
Select Release Pipeline > Edit.
On the User Agent, select the plus sign (+) to add and search for Image Builder.
Select Add.
In the following sections, set the task properties.
Azure subscription
In the dropdown list, select the subscription that you want VM Image Builder to run. Use the subscription where your source images are stored and the images are to be distributed. You need to grant the VM Image Builder contributor access to the subscription or resource group.
Resource group
Use the resource group where the temporary image template artifact will be stored. When you create a template artifact, another temporary VM Image Builder resource group, IT_<DestinationResourceGroup>_<TemplateName>_guid, is created. The temporary resource group stores the image metadata, such as scripts. At the end of the task, the image template artifact and temporary VM Image Builder resource group is deleted.
Location
The location is the region where VM Image Builder will run. Only a set number of regions are supported. The source images must be present in this location. For example, if you're using Azure Compute Gallery (formerly Shared Image Gallery), a replica must exist in that region.
Managed identity (required)
VM Image Builder requires a managed identity, which it uses to read source custom images, connect to Azure Storage, and create custom images. For more information, see Learn about VM Image Builder.
Virtual network support
You can configure the created VM to be in a specific virtual network. When you configure the task, provide the resource ID of a pre-existing subnet in the VNet Configuration (Optional) input field. Omit the resource ID if no specific virtual network needs to be used. For more information, see Azure VM Image Builder service networking options.
Source
The source images must be of the supported VM Image Builder operating systems. You can choose existing custom images in the same region that VM Image Builder is running from:
Managed Image: Pass in the resource ID. For example:
/subscriptions/<subscriptionID>/resourceGroups/<rgName>/providers/Microsoft.Compute/images/<imageName>Compute Gallery: Pass in the resource ID of the image version. For example:
/subscriptions/$subscriptionID/resourceGroups/$sigResourceGroup/providers/Microsoft.Compute/galleries/$sigName/images/$imageDefName/versions/<versionNumber>If you need to get the latest Compute Gallery version, use an Azure PowerShell or Azure CLI task to get it and set a DevOps variable. Use the variable in the VM Image Builder DevOps task. For more information, see the examples in Get the latest image version resource ID.
(Marketplace) Base image: Use the dropdown list of popular images, which always uses the latest version of the supported operating systems.
If the base image isn't in the list, you can specify the exact image by using
Publisher:Offer:Sku.(Optional) Base image version: You can supply the version of the image that you want to use. The default version is
latest.
Customize
The following sections discuss various ways to customize tasks.
Provisioner
Initially, two customizers are supported, Shell and PowerShell. Only inline is supported. If you want to download scripts, you can pass inline commands to do so.
For your operating system, select PowerShell or Shell.
The Windows Update task
For Windows only, the task runs Windows Update at the end of the customizations. It also handles the required reboots.
The task runs the following Windows Update configuration:
    "type": "WindowsUpdate",
    "searchCriteria": "IsInstalled=0",
    "filters": [
        "exclude:$_.Title -like '*Preview*'",
        "include:$true"
The task installs important and recommended Windows Updates that aren't preview versions.
Handling reboots
The DevOps task doesn't currently support rebooting Windows builds. If you try to reboot with PowerShell code, the build fails. However, you can use code to reboot Linux builds.
Build path
The task is designed to be able to inject DevOps Build release artifacts into the image. To make this work, you need to set up a build pipeline. In the release pipeline setup, add the repo of the build artifacts.
Select the Build Path button to choose the build folder that you want to be placed on the image. The VM Image Builder task copies all the files and directories within it. When the image is being created, VM Image Builder deploys the files and directories into different paths, depending on the operating system.
Important
When you're adding a repo artifact, you might find that the directory name is prefixed with an underscore character (_). The underscore can cause issues with the inline commands. Be sure to use the appropriate quotation marks in the commands.
The following example explains how this works:
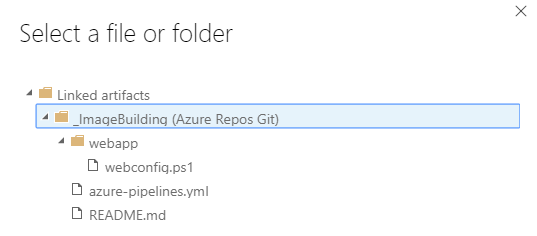
For Windows: Files exist in the C: drive. A directory named buildArtifacts is created, which includes the webapp directory.
For Linux: Files exist in the
/tmpdirectory. Thewebappdirectory is created, which includes all the files and directories. Because this is a temporary directory, you must move the files out of it. Otherwise, they'll be deleted.
Inline customization script
For Windows: You can enter PowerShell inline commands, separated by commas. If you want to run a script in your build directory, you can use:
& 'c:\buildArtifacts\webapp\webconfig.ps1'You can reference multiple scripts or add more commands. For example:
& 'c:\buildArtifacts\webapp\webconfig.ps1'
& 'c:\buildArtifacts\webapp\installAgent.ps1'
For Linux: The build artifacts are put into the /tmp directory. However, on many Linux operating systems, on a reboot, the /tmp directory contents are deleted. If you want the artifacts to exist in the image, you must create another directory and copy them over. For example:
sudo mkdir /lib/buildArtifacts
sudo cp -r "/tmp/_ImageBuilding/webapp" /lib/buildArtifacts/.
If you're OK with using the /tmp directory, you can run the script by using the following code:
# Grant execute permissions to run scripts
sudo chmod +x "/tmp/_ImageBuilding/webapp/coreConfig.sh"
echo "running script"
sudo . "/tmp/AppsAndImageBuilderLinux/_WebApp/coreConfig.sh"
What happens to the build artifacts after the image build?
Note
VM Image Builder doesn't automatically remove the build artifacts. We strongly suggest that you always use code to remove the build artifacts.
For Windows: VM Image Builder deploys files to the C:\buildArtifacts directory. Because the directory is persisted, you must remove it by running a script. For example:
# Clean up buildArtifacts directory
Remove-Item -Path "C:\buildArtifacts\*" -Force -Recurse

# Delete the buildArtifacts directory
Remove-Item -Path "C:\buildArtifacts" -Force
For Linux: The build artifacts are put into the /tmp directory. However, on many Linux operating systems, the /tmp directory contents are deleted on reboot. We suggest that you use code to remove the contents and not rely on the operating system to remove the contents. For example:
sudo rm -R "/tmp/AppsAndImageBuilderLinux"
Total length of image build
Total length can't be changed in the DevOps pipeline task yet. It uses the default of 240 minutes. If you want to increase the buildTimeoutInMinutes, you can use an Azure CLI task in the release pipeline. Configure the task to copy a template and submit it. For an example solution, see Use environment variables and parameters with VM Image Builder, or use Azure PowerShell.
Storage account
Select the storage account you created in the prerequisites. If you don't see it in the list, VM Image Builder doesn't have permissions to it.
When the build starts, VM Image Builder creates a container called imagebuilder-vststask, where the build artifacts from the repo are stored.
Note
You need to manually delete the storage account or container after each build.
Distribute
The following three distribute types are supported.
Managed image
Resource ID:
/subscriptions/<subscriptionID>/resourceGroups/<rgName>/providers/Microsoft.Compute/images/<imageName>Locations
Azure Compute Gallery
The Compute Gallery must already exist.
Resource ID:
/subscriptions/<subscriptionID>/resourceGroups/<rgName>/providers/Microsoft.Compute/galleries/<galleryName>/images/<imageDefName>Regions: A list of regions, comma separated. For example,
westus,eastus,centralus.
Virtual hard disk
You can't pass any values to this. VM Image Builder emits the virtual hard disk VHD to the temporary VM Image Builder resource group, IT_<DestinationResourceGroup>_<TemplateName>, in the vhds container. When you start the release build, VM Image Builder emits logs. When VM Image Builder has finished, it emits the VHD URL.
Optional settings
You can override the VM size setting from its default size of Standard_D1_v2. You might want to do so to reduce total customization time. Or you might want to create images that depend on certain VM sizes, such as GPU (graphics processing unit), HPC (high-performance computing), and so on.
How the task works
When you create the release, the task creates a container in the storage account, named imagebuilder-vststask. It zips (compresses) and uploads your build artifacts and creates a shared access signature token for the zip file.
The task uses the properties that are passed to the task to create the VM Image Builder template artifact. The task does the following:
Downloads the build artifact zip file and any other associated scripts. The files are saved in a storage account in the temporary VM Image Builder resource group
IT_<DestinationResourceGroup>_<TemplateName>.Creates a template that's prefixed with t_ and a 10-digit monotonic integer. The template is saved to the resource group that you selected, and it exists for the duration of the build in the resource group.
Example output:
start reading task parameters...
found build at:  /home/vsts/work/r1/a/_ImageBuilding/webapp
end reading parameters
getting storage account details for aibstordot1556933914
created archive /home/vsts/work/_temp/temp_web_package_21475337782320203.zip
Source for image:  { type: 'SharedImageVersion',
  imageVersionId: '/subscriptions/<subscriptionID>/resourceGroups/<rgName>/providers/Microsoft.Compute/galleries/<galleryName>/images/<imageDefName>/versions/<imgVersionNumber>' }
template name:  t_1556938436xxx
starting put template...
When the image build starts, the run status is reported in the release logs:
starting run template...
When the image build finishes, the output is similar to following text:
2019-05-06T12:49:52.0558229Z starting run template...
2019-05-06T13:36:33.8863094Z run template:  Succeeded
2019-05-06T13:36:33.8867768Z getting runOutput for  SharedImage_distribute
2019-05-06T13:36:34.6652541Z ==============================================================================
2019-05-06T13:36:34.6652925Z ## task output variables ##
2019-05-06T13:36:34.6658728Z $(imageUri) =  /subscriptions/<subscriptionID>/resourceGroups/aibwinsig/providers/Microsoft.Compute/galleries/my22stSIG/images/winWAppimages/versions/0.23760.13763
2019-05-06T13:36:34.6659989Z ==============================================================================
2019-05-06T13:36:34.6663500Z deleting template t_1557146959485...
2019-05-06T13:36:34.6673713Z deleting storage blob imagebuilder-vststask\webapp/18-1/webapp_1557146958741.zip
2019-05-06T13:36:34.9786039Z blob imagebuilder-vststask\webapp/18-1/webapp_1557146958741.zip is deleted
2019-05-06T13:38:37.4884068Z delete template:  Succeeded
The image template and IT_<DestinationResourceGroup>_<TemplateName> are deleted.
You can take the $(imageUri) Azure DevOps Services (formerly Visual Studio Team Services, or VSTS) variable and use it in the next task or just use the value and build a VM.
Output DevOps variables
Here is the publisher, offer, SKU, and version of the source marketplace image:
$(pirPublisher)$(pirOffer)$(pirSku)$(pirVersion)
Here's the image URI, which is the resource ID of the distributed image:
$(imageUri)
FAQ
Can I use an existing image template that I've already created, outside of DevOps?
Not at this time.
Can I specify the image template name?
No. A unique template name is used and then deleted.
The VM Image Builder task failed. How can I troubleshoot the issue?
If there's a build failure, the DevOps task doesn't delete the staging resource group. You can access the staging resource group that contains the build customization log.
You'll see an error in the DevOps log for the VM Image Builder task, and the message will contain the customization.log location. For example:
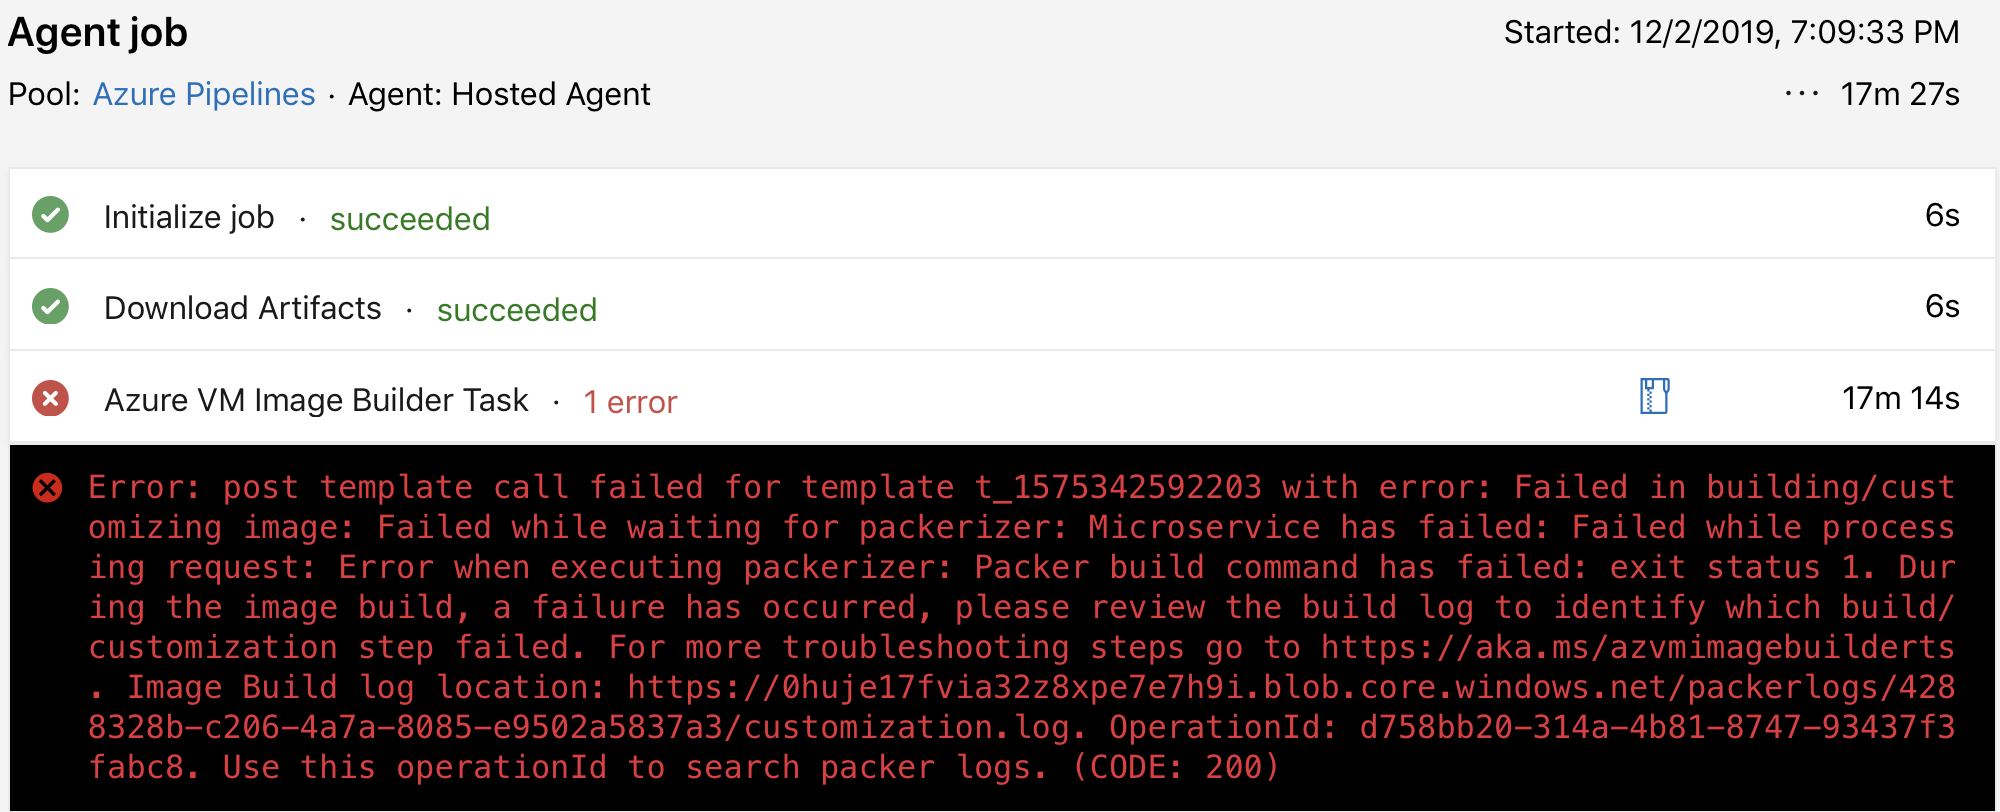
For more information, see Troubleshoot the VM Image Builder service.
After you've investigated the failure, you can delete the staging resource group. First, delete the VM Image Builder template resource artifact. The artifact is prefixed with t_, and you can find it in the DevOps task build log:
...
Source for image:  { type: 'SharedImageVersion',
  imageVersionId: '/subscriptions/<subscriptionID>/resourceGroups/<rgName>/providers/Microsoft.Compute/galleries/<galleryName>/images/<imageDefName>/versions/<imgVersionNumber>' }
...
template name:  t_1556938436xxx
...
The VM Image Builder template resource artifact is in the resource group that was specified initially in the task. When you're done troubleshooting, delete the artifact. If you're deleting it by using the Azure portal, within the resource group, select Show Hidden Types to view the artifact.
Next steps
For more information, see VM Image Builder overview.