Configure a VNet-to-VNet VPN connection - Azure portal
This article helps you connect your virtual networks using the VNet-to-VNet connection type in the Azure portal. When you use the portal to connect virtual networks using VNet-to-VNet, the virtual networks can be in different regions, but must be in the same subscription. If your virtual networks are in different subscriptions, use the PowerShell instructions instead. This article doesn't apply to virtual network peering. For virtual network peering, see the Virtual Network peering article.

About VNet-to-VNet connections
Configuring a VNet-to-VNet connection is a simple way to connect virtual networks. When you connect a virtual network to another virtual network with a VNet-to-VNet connection type, it's similar to creating a site-to-site IPsec connection to an on-premises location. Both connection types use a VPN gateway to provide a secure tunnel with IPsec/IKE and function the same way when communicating. However, they differ in the way the local network gateway is configured.
When you create a VNet-to-VNet connection, the local network gateway address space is automatically created and populated. However, the local network gateway isn't visible in this configuration. That means that you can't configure it manually.
If you update the address space for one VNet, the other VNet automatically routes to the updated address space.
It's typically faster and easier to create a VNet-to-VNet connection than a site-to-site connection.
If you know you want to specify more address spaces for the local network gateway, or plan to add more connections later and need to adjust the local network gateway, create the configuration using the site-to-site connection steps instead.
The VNet-to-VNet connection doesn't include point-to-site client pool address space. If you need transitive routing for point-to-site clients, then create a site-to-site connection between the virtual network gateways, or use virtual network peering.
Why create a VNet-to-VNet connection?
You might want to connect virtual networks by using a VNet-to-VNet connection for the following reasons:
Cross region geo-redundancy and geo-presence
- You can set up your own geo-replication or synchronization with secure connectivity without going over internet-facing endpoints.
- With Azure Traffic Manager and Azure Load Balancer, you can set up highly available workload with geo-redundancy across multiple Azure regions. For example, you can set up SQL Server Always On availability groups across multiple Azure regions.
Regional multi-tier applications with isolation or administrative boundaries
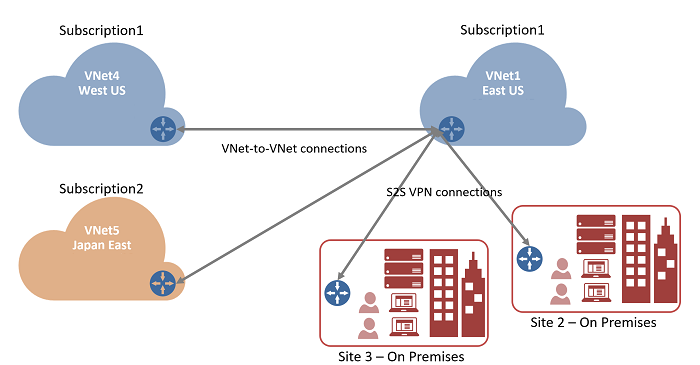
Within the same region, you can set up multi-tier applications with multiple virtual networks that are connected together because of isolation or administrative requirements. VNet-to-VNet communication can be combined with multi-site configurations. These configurations let you establish network topologies that combine cross-premises connectivity with inter-virtual network connectivity, as shown in the following diagram:
Create and configure VNet1
If you already have a VNet, verify that the settings are compatible with your VPN gateway design. Pay particular attention to any subnets that might overlap with other networks. Your connection won't work properly if you have overlapping subnets.
In this section, create VNet1 using the following values. If you're using your own values, make sure the address spaces don't overlap with any of the virtual networks to which you want to connect.
- Virtual network settings
- Name: VNet1
- Address space: 10.1.0.0/16
- Subscription: Select the subscription you want to use.
- Resource group: TestRG1
- Location: East US
- Subnet
- Name: FrontEnd
- Address range: 10.1.0.0/24
Sign in to the Azure portal.
In Search resources, service, and docs (G+/) at the top of the portal page, enter virtual network. Select Virtual network from the Marketplace search results to open the Virtual network page.
On the Virtual network page, select Create to open the Create virtual network page.
On the Basics tab, configure the virtual network settings for Project details and Instance details. You see a green check mark when the values you enter are validated. You can adjust the values shown in the example according to the settings that you require.
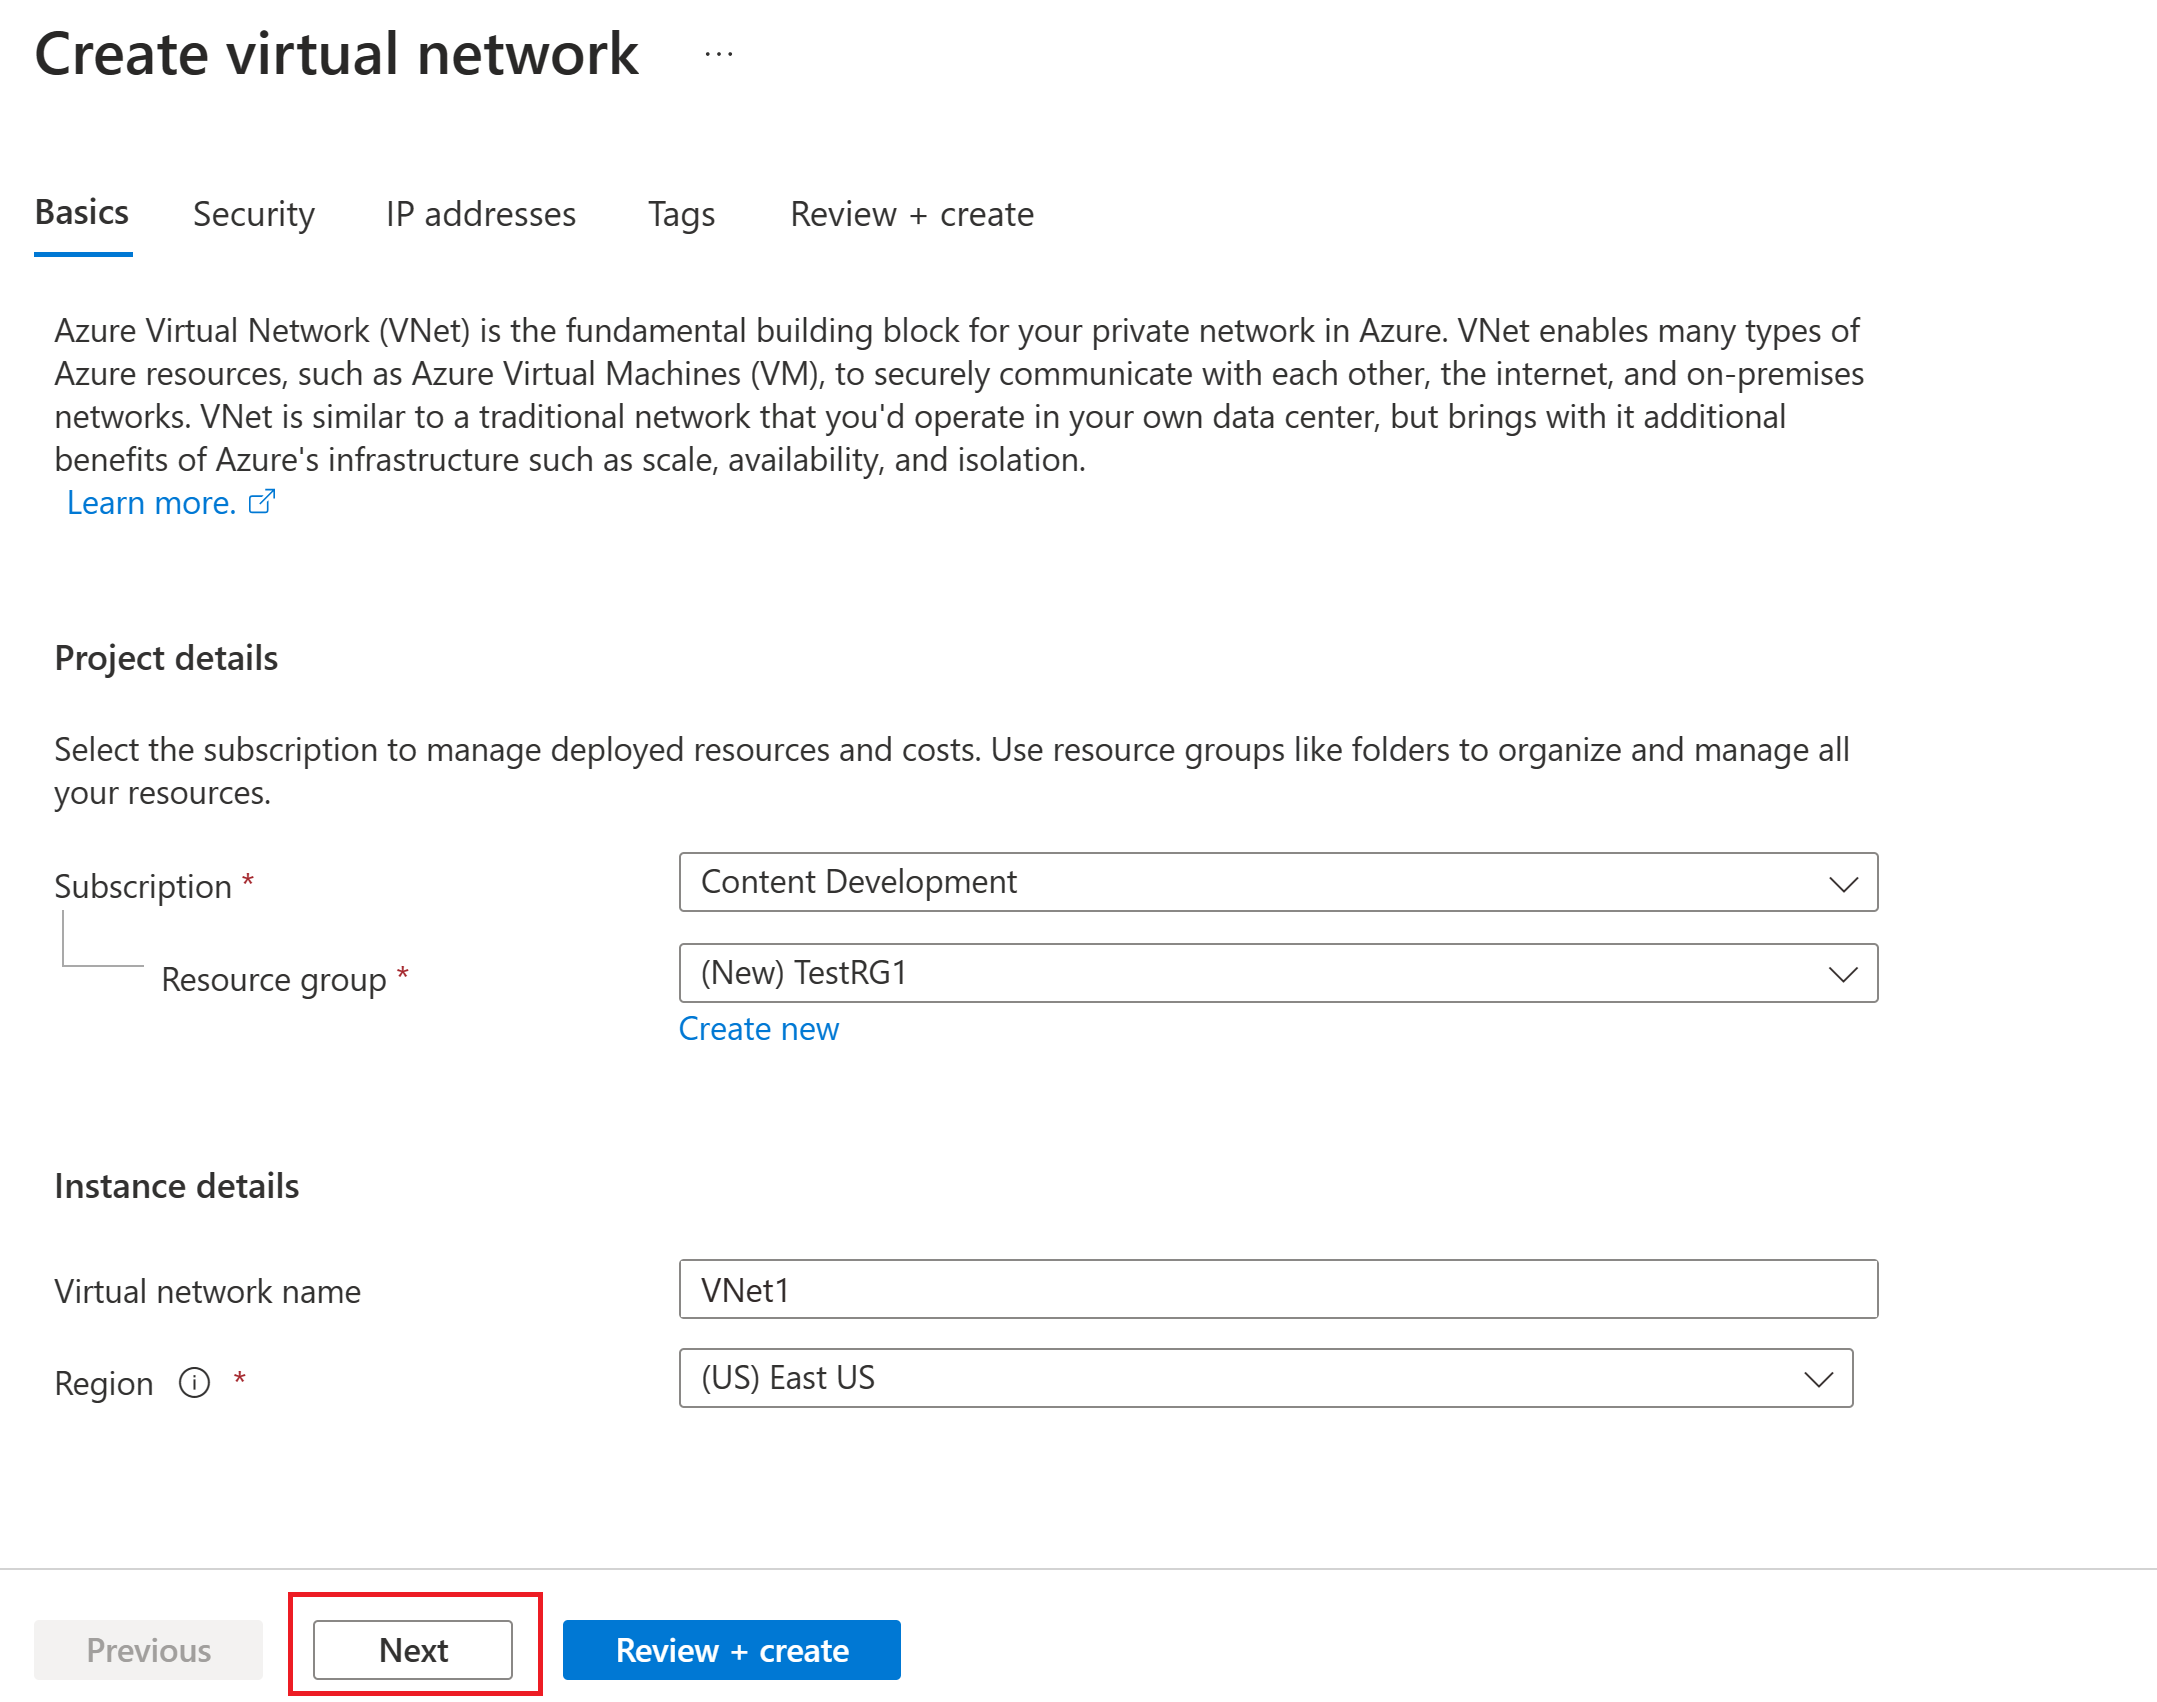
- Subscription: Verify that the subscription listed is the correct one. You can change subscriptions by using the dropdown box.
- Resource group: Select an existing resource group or select Create new to create a new one. For more information about resource groups, see Azure Resource Manager overview.
- Name: Enter the name for your virtual network.
- Region: Select the location for your virtual network. The location determines where the resources that you deploy to this virtual network will reside.
Select Next or Security to go to the Security tab. For this exercise, leave the default values for all the services on this page.
Select IP Addresses to go to the IP Addresses tab. On the IP Addresses tab, configure the settings.
IPv4 address space: By default, an address space is automatically created. You can select the address space and adjust it to reflect your own values. You can also add a different address space and remove the default that was automatically created. For example, you can specify the starting address as 10.1.0.0 and specify the address space size as /16. Then select Add to add that address space.
+ Add subnet: If you use the default address space, a default subnet is created automatically. If you change the address space, add a new subnet within that address space. Select + Add subnet to open the Add subnet window. Configure the following settings, and then select Add at the bottom of the page to add the values.
- Subnet name: You can use the default, or specify the name. Example: FrontEnd.
- Subnet address range: The address range for this subnet. Examples are 10.1.0.0 and /24.
Review the IP addresses page and remove any address spaces or subnets that you don't need.
Select Review + create to validate the virtual network settings.
After the settings are validated, select Create to create the virtual network.

Create the gateway subnet
The virtual network gateway requires a specific subnet named GatewaySubnet. The gateway subnet is part of the IP address range for your virtual network and contains the IP addresses that the virtual network gateway resources and services use.
When you create the gateway subnet, you specify the number of IP addresses that the subnet contains. The number of IP addresses needed depends on the VPN gateway configuration that you want to create. Some configurations require more IP addresses than others. It's best to specify /27 or larger (/26, /25, etc.) for your gateway subnet.
- On the page for your virtual network, on the left pane, select Subnets to open the Subnets page.
- At the top of the page, select + Gateway subnet to open the Add subnet pane.
- The name is automatically entered as GatewaySubnet. Adjust the IP address range value, if necessary. An example is 10.1.255.0/27.
- Don't adjust the other values on the page. Select Save at the bottom of the page to save the subnet.
Important
Network security groups (NSGs) on the gateway subnet are not supported. Associating a network security group to this subnet might cause your virtual network gateway (VPN and ExpressRoute gateways) to stop functioning as expected. For more information about network security groups, see What is a network security group?
Create the VNet1 VPN gateway
In this step, you create the virtual network gateway for your virtual network. Creating a gateway can often take 45 minutes or more, depending on the selected gateway SKU. For gateway SKU pricing, see Pricing.
Create a virtual network gateway (VPN gateway) by using the following values:
- Name: VNet1GW
- Gateway type: VPN
- SKU: VpnGw2AZ
- Generation: Generation 2
- Virtual network: VNet1
- Gateway subnet address range: 10.1.255.0/27
- Public IP address: Create new
- Public IP address name: VNet1GWpip1
- Public IP address SKU: Standard
- Assignment: Static
- Second Public IP address name: VNet1GWpip2
- Enable active-active mode: Enabled
In Search resources, services, and docs (G+/), enter virtual network gateway. Locate Virtual network gateway in the Marketplace search results and select it to open the Create virtual network gateway page.
On the Basics tab, fill in the values for Project details and Instance details.

Subscription: Select the subscription you want to use from the dropdown list.
Resource group: This value is autofilled when you select your virtual network on this page.
Name: This is the name of the gateway object you're creating. This is different than the gateway subnet to which gateway resources will be deployed.
Region: Select the region in which you want to create this resource. The region for the gateway must be the same as the virtual network.
Gateway type: Select VPN. VPN gateways use the virtual network gateway type VPN.
SKU: From the dropdown list, select a gateway SKU that supports the features you want to use.
- We recommend that you select a SKU that ends in AZ when possible. AZ SKUs support availability zones.
- The Basic SKU isn't available in the portal. To configure a Basic SKU gateway, you must use PowerShell or CLI.
Generation: Select Generation2 from the dropdown.
Virtual network: From the dropdown list, select the virtual network to which you want to add this gateway. If you can't see the virtual network you want to use, make sure you selected the correct subscription and region in the previous settings.
Gateway subnet address range or Subnet: The gateway subnet is required to create a VPN gateway.
Currently, this field can show different settings options, depending on the virtual network address space and whether you already created a subnet named GatewaySubnet for your virtual network.
If you don't have a gateway subnet and you don't see the option to create one on this page, go back to your virtual network and create the gateway subnet. Then, return to this page and configure the VPN gateway.

Specify the values for Public IP address. These settings specify the public IP address objects that will be associated to the VPN gateway. A public IP address is assigned to each public IP address object when the VPN gateway is created. The only time the assigned public IP address changes is when the gateway is deleted and re-created. IP addresses don't change across resizing, resetting, or other internal maintenance/upgrades of your VPN gateway.
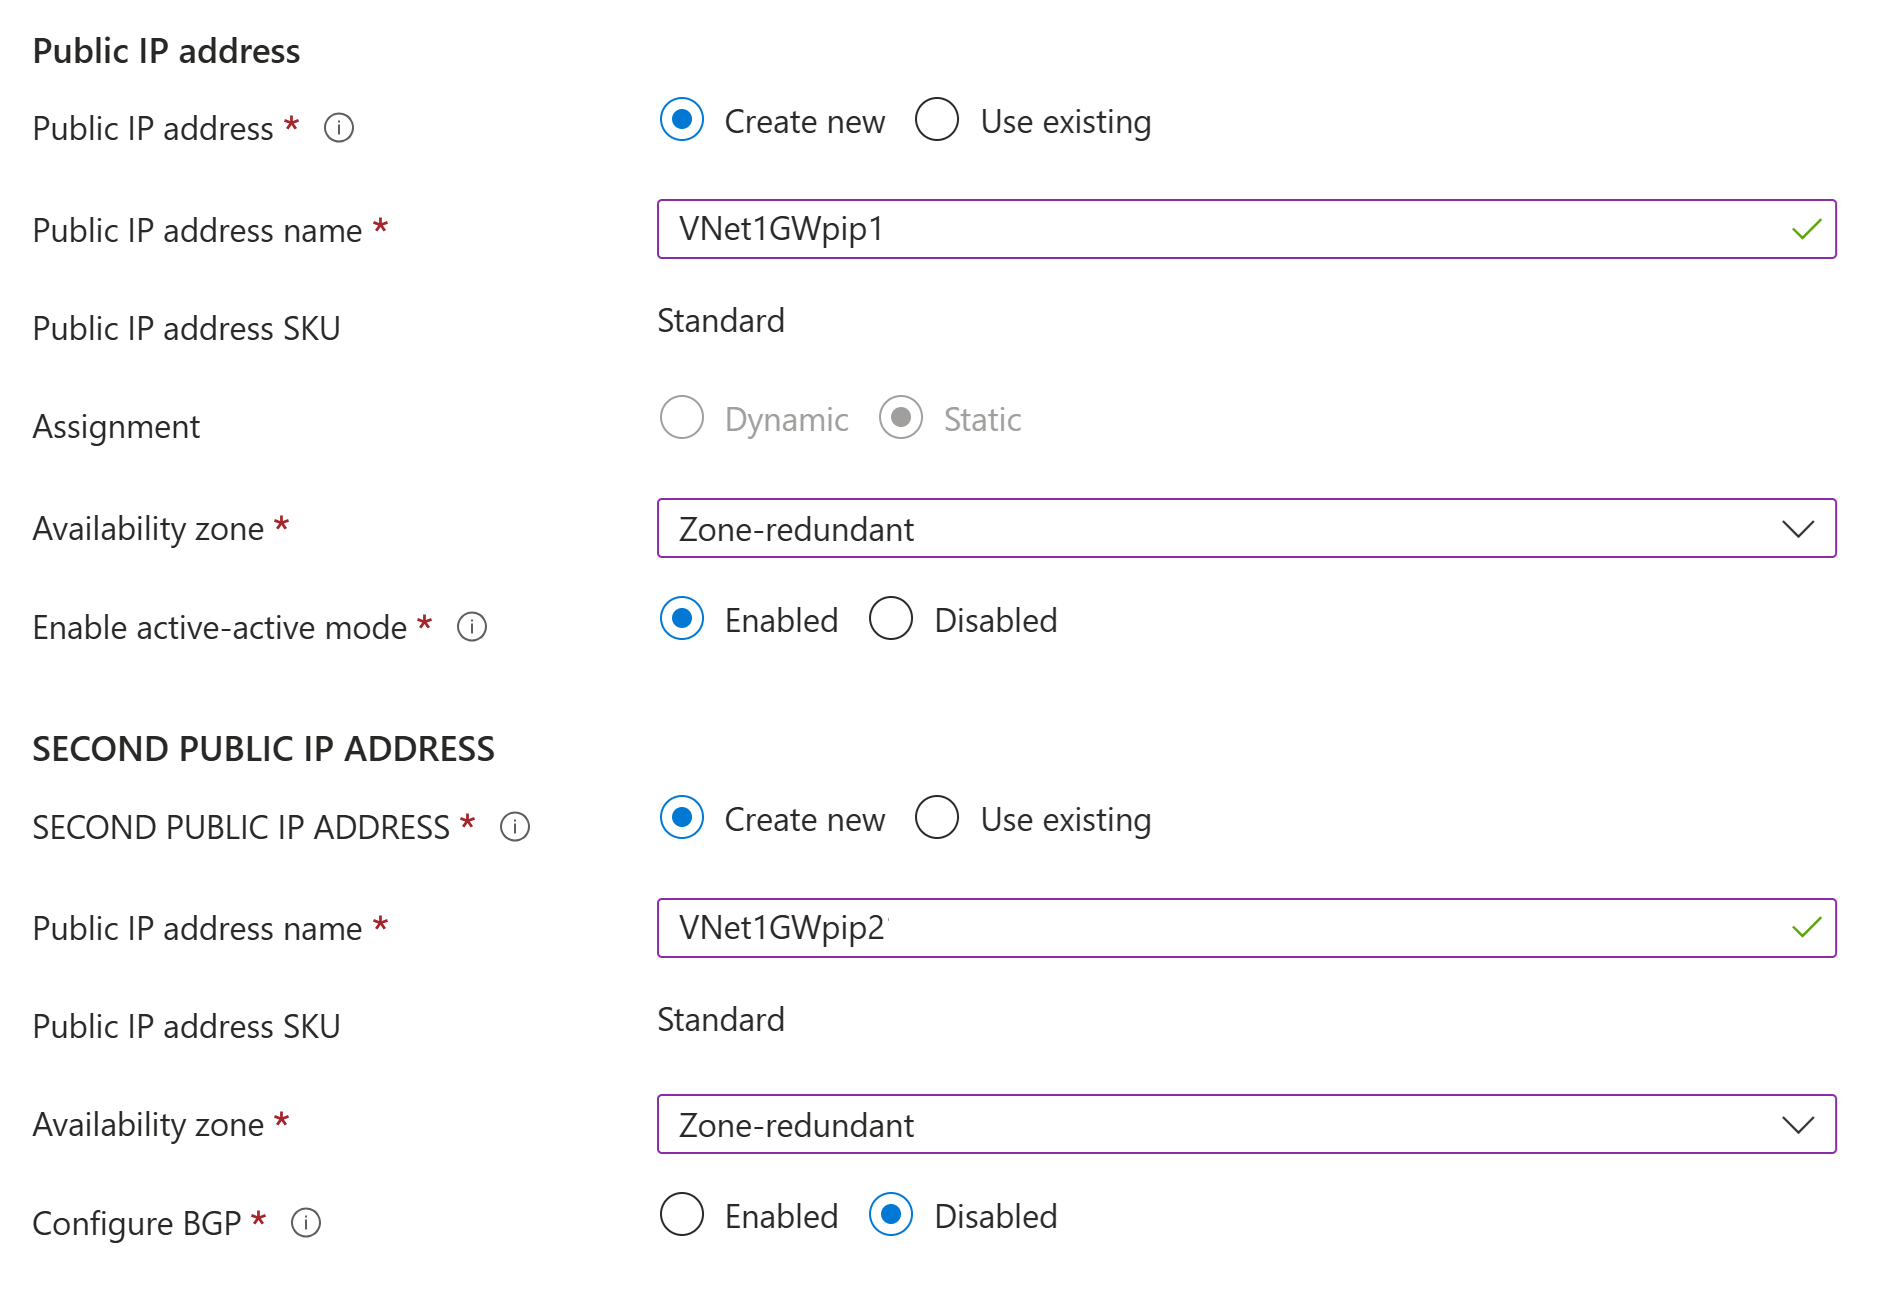
Public IP address type: If this option appears, select Standard.
Public IP address: Leave Create new selected.
Public IP address name: In the text box, enter a name for your public IP address instance.
Public IP address SKU: Setting is autoselected to Standard SKU.
Assignment: The assignment is typically autoselected and should be Static.
Availability zone: This setting is available for AZ gateway SKUs in regions that support availability zones. Select Zone-redundant, unless you know you want to specify a zone.
Enable active-active mode: We recommend that you select Enabled to take advantage of the benefits of an active-active mode gateway. If you plan to use this gateway for a site-to-site connection, take into consideration the following:
- Verify the active-active design that you want to use. Connections with your on-premises VPN device must be configured specifically to take advantage of active-active mode.
- Some VPN devices don't support active-active mode. If you're not sure, check with your VPN device vendor. If you're using a VPN device that doesn't support active-active mode, you can select Disabled for this setting.
Second public IP address: Select Create new. This is available only if you selected Enabled for the Enable active-active mode setting.
Public IP address name: In the text box, enter a name for your public IP address instance.
Public IP address SKU: Setting is autoselected to Standard SKU.
Availability zone: Select Zone-redundant, unless you know you want to specify a zone.
Configure BGP: Select Disabled unless your configuration specifically requires this setting. If you do require this setting, the default ASN is 65515, although this value can be changed.
Enable Key Vault Access: Select Disabled unless your configuration specifically requires this setting.
Select Review + create to run validation.
After validation passes, select Create to deploy the VPN gateway.

A gateway can take 45 minutes or more to fully create and deploy. You can see the deployment status on the Overview page for your gateway. After the gateway is created, you can view the IP address that has been assigned to it by looking at the virtual network in the portal. The gateway appears as a connected device.
Important
Network security groups (NSGs) on the gateway subnet are not supported. Associating a network security group to this subnet might cause your virtual network gateway (VPN and ExpressRoute gateways) to stop functioning as expected. For more information about network security groups, see What is a network security group?
Create and configure VNet4
After you've configured VNet1, create VNet4 and the VNet4 gateway by repeating the previous steps and replacing the values with VNet4 values. You don't need to wait until the virtual network gateway for VNet1 has finished creating before you configure VNet4. If you're using your own values, make sure the address spaces don't overlap with any of the virtual networks to which you want to connect.
You can use the following examples values to configure VNet4 and the VNet4 gateway.
- Virtual network settings
- Name: VNet4
- Address space: 10.41.0.0/16
- Subscription: Select the subscription you want to use.
- Resource group: TestRG4
- Location: West US 2
- Subnet
- Name: FrontEnd
- Address range: 10.41.0.0/24
Add the gateway subnet:
- Name: GatewaySubnet
- Gateway subnet address range: 10.41.255.0/27
Configure the VNet4 VPN gateway
You can use the following examples values to configure the VNet4 VPN gateway.
- Virtual network gateway settings
- Name: VNet4GW
- Resource group: West US 2
- Generation: Generation 2
- Gateway type: Select VPN.
- VPN type: Select Route-based.
- SKU: VpnGw2AZ
- Generation: Generation2
- Virtual network: VNet4
- Public IP address name: VNet4GWpip1
- Public IP address SKU: Standard
- Assignment: Static
- Second Public IP address name: VNet4GWpip2
- Enable active-active mode: Enabled
Configure your connections
When the VPN gateways for both VNet1 and VNet4 have completed, you can create your virtual network gateway connections.
Virtual networks in the same subscription can be connected using the portal, even if they are in different resource groups. However, if your virtual networks are in different subscriptions, you must use PowerShell to make the connections.
You can create either a bidirectional, or a single direction connection. For this exercise, we'll specify a bidirectional connection. The bidirectional connection value creates two separate connections so that traffic can flow in both directions.
In the portal, go to VNet1GW.
On the virtual network gateway page, in the left pane, select Connections to open the Connections page. Then select + Add to open the Create connection page.
On the Create connection page, fill in the connection values.
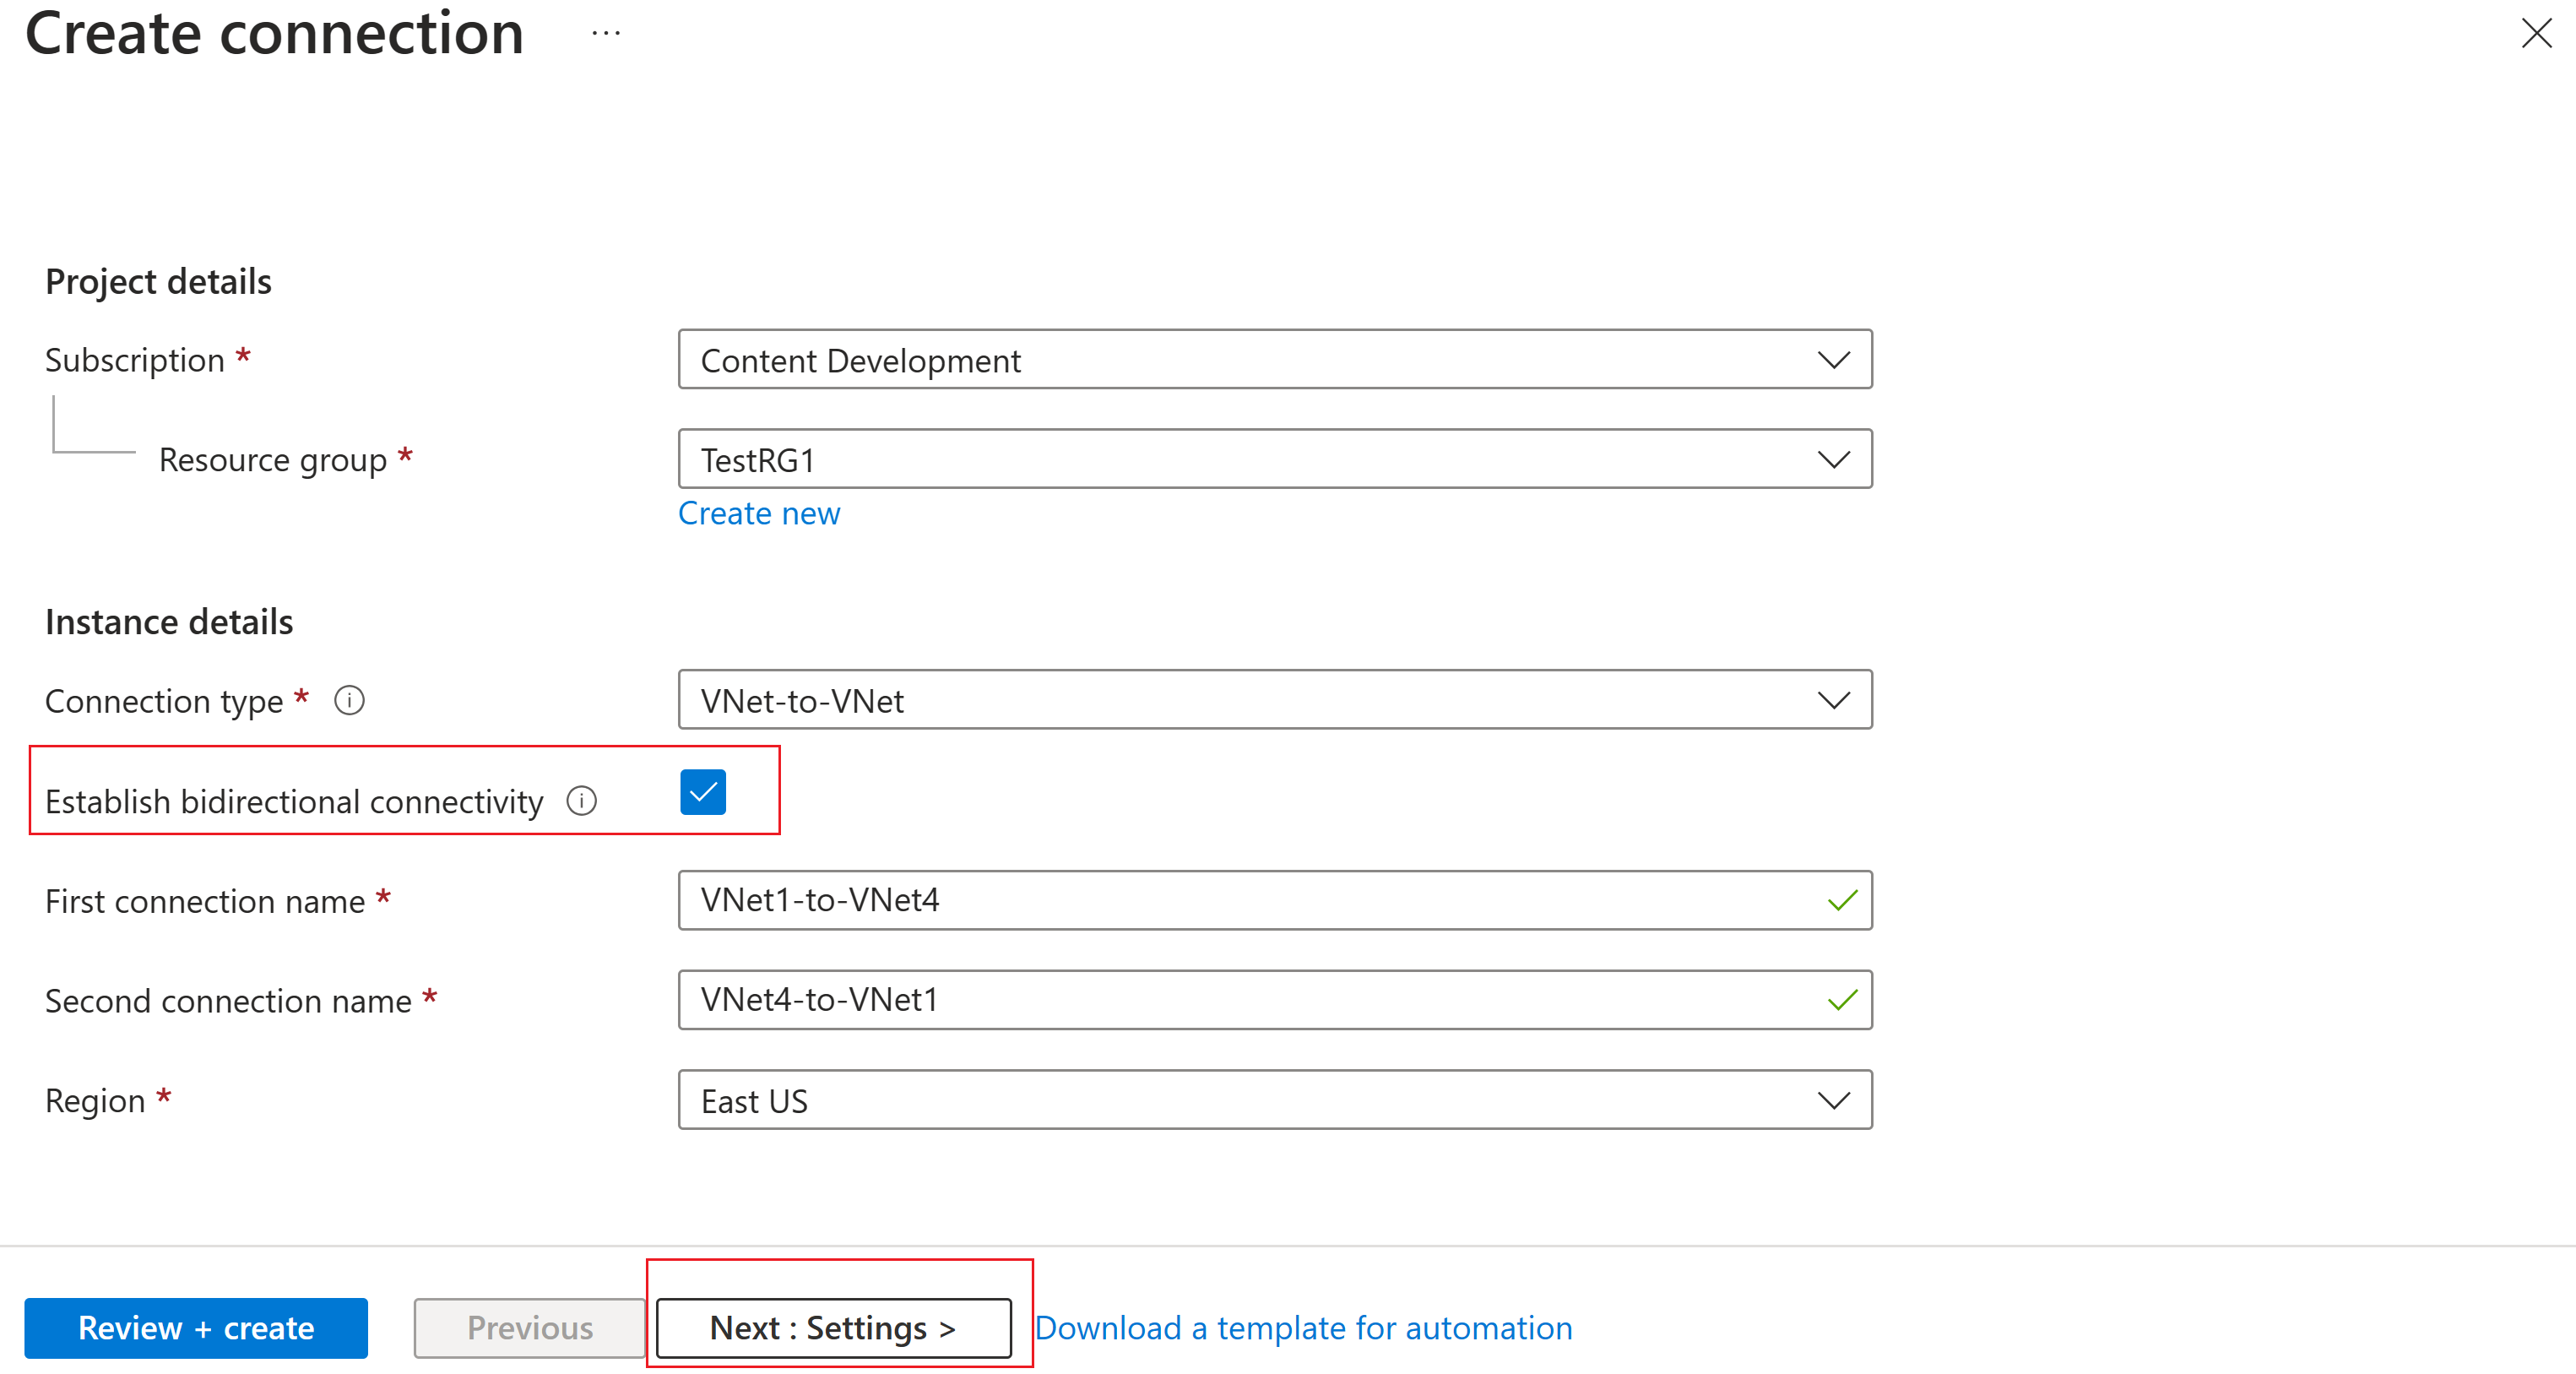
- Connection type: Select VNet-to-VNet from the drop-down.
- Establish bidirectional connectivity: Select this value if you want to establish traffic flow in both directions. If you don't select this setting and you later want to add a connection in the opposite direction, you'll need to create a new connection originating from the other virtual network gateway.
- First connection name: VNet1-to-VNet4
- Second connection name: VNet4-to-VNet1
- Region: East US (the region for VNet1GW)
Click Next : Settings > at the bottom of the page to advance to the Settings page.
On the Settings page, specify the following values:
- First virtual network gateway: Select VNet1GW from the dropdown.
- Second virtual network gateway: Select VNet4GW from the dropdown.
- Shared key (PSK): In this field, enter a shared key for your connection. You can generate or create this key yourself. In a site-to-site connection, the key you use is the same for your on-premises device and your virtual network gateway connection. The concept is similar here, except that rather than connecting to a VPN device, you're connecting to another virtual network gateway. The important thing when specifying a shared key is that it's exactly the same for both sides of the connection.
- IKE Protocol: IKEv2
For this exercise, you can leave the rest of the settings as their default values.
Select Review + create, then Create to validate and create your connections.

Verify your connections
Locate the virtual network gateway in the Azure portal. For example, VNet1GW.
On the Virtual network gateway page, select Connections to view the Connections page for the virtual network gateway. After the connection is established, you'll see the Status values change to Connected.
Under the Name column, select one of the connections to view more information. When data begins flowing, you'll see values for Data in and Data out.
Add more connections
You can create another VNet-to-VNet connection, or create an IPsec site-to-site connection to an on-premises location.
Before you create more connections, verify that the address space for your virtual network doesn't overlap with any of the address spaces you want to connect to.
When you configure a new connection, be sure to adjust the Connection type to match the type of connection you want to create. If you're adding a site-to-site connection, you must create a local network gateway before you can create the connection.
When you configure a connection that uses a shared key, make sure that the shared key is exactly the same for both sides of the connection.
To create more connections, follow these steps:
- In the Azure portal, go to the VPN gateway from which you want to create the connection.
- In the left pane, select Connections. View the existing connections.
- Create the new connection.
VNet-to-VNet FAQ
See the VPN Gateway FAQ for VNet-to-VNet frequently asked questions.
Next steps
For information about how you can limit network traffic to resources in a virtual network, see Network Security.
For information about how Azure routes traffic between Azure, on-premises, and Internet resources, see Virtual network traffic routing.